CodeMirrorとは
Web上で動作するコードエディタを作成できるライブラリです。
自由に拡張機能を設定することで、独自のエディタを作成することができます。
先日、長らくベータ開発中だった、CodeMirrorのバージョン6が正式リリースされました。
CodeMirror 6はゼロから実装し直したということもあり、APIが変わっているところも多く、新しい概念も追加されています。
エディタのStateとその更新
CodeMirror 6のSystem Guideとして、アーキテクチャの概要などが説明されています。
その中でもっとも基本的な、Stateの更新部分についてまとめます。
view更新までの流れ
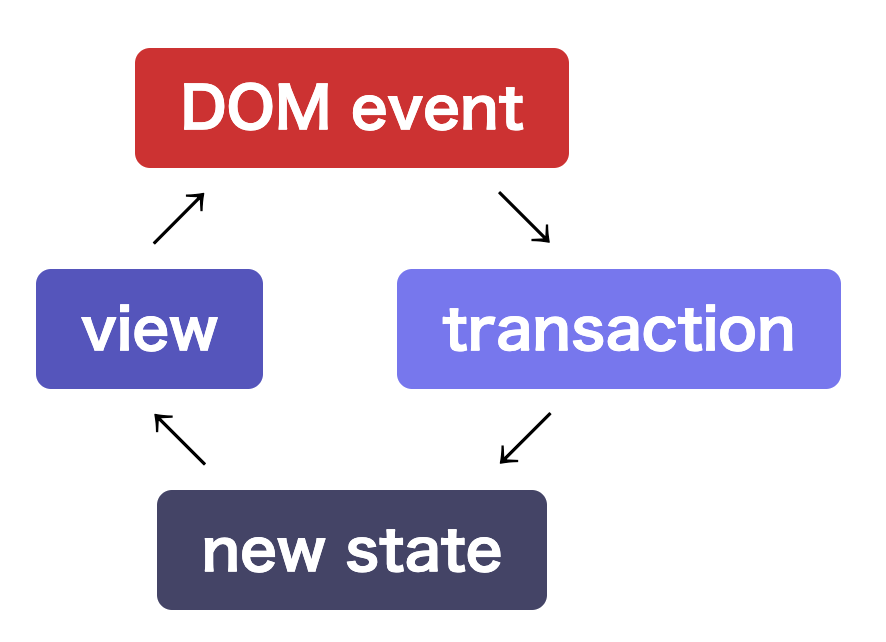
System Guideに以下の図が掲載されています。
エディタの状態をstateとして管理しているのですが、その更新にはtransactionというものを使っています。
入力や、DOMイベントの発生を検知し、transactionを発生させ、新しいstateを作成します。
そのstateをもとに、viewに内容が反映されます。
コードをもとに解説
以下のようにカスタムフックとしてCodeMirrorの初期設定をします。
それぞれ詳しく説明していきます。
import { useEffect, useRef } from 'react'
import { EditorState } from '@codemirror/state'
import { indentWithTab } from '@codemirror/commands'
import { highlightActiveLineGutter, lineNumbers } from '@codemirror/gutter'
import { EditorView, keymap } from '@codemirror/view'

type OnChangeCallback = (text: string) => void

export const useEditor = (
  defaultValue: string,
  onChangeCallback: OnChangeCallback
) => {
  const editorParentRef = useRef<HTMLDivElement>(null)
  const updateCallback = EditorView.updateListener.of(
    update => update.docChanged && onChangeCallback(update.state.doc.toString())
  )

  useEffect(() => {
    if (editorParentRef.current === null) return

    const editorStateConfig = {
      doc: defaultValue,
      extensions: [
        lineNumbers(),
        highlightActiveLineGutter(),
        keymap.of([indentWithTab]),
        updateCallback,
      ],
    }
    const editorView = new EditorView({
      state: EditorState.create(editorStateConfig),
      parent: editorParentRef.current,
    })

    return () => {
      editorView.destroy()
    }
  }, [defaultValue, updateCallback])

  return editorParentRef
}
EditorState
EditorStateConfigとして、エディター作成時にドキュメントの値や、Extensionを定義します。
keymapもextensionとして登録しますし、自分で作成した独自のExtensionも追加可能です。
動的にExtensionを追加することもできますが、基本的には初期化のタイミングでExtensionの設定を行います。
    const editorStateConfig = {
      doc: defaultValue,
      extensions: [
        lineNumbers(),
        highlightActiveLineGutter(),
        keymap.of([indentWithTab]),
        updateCallback,
+        myOriginalExtension
      ],
    }
これをもとにEditorStateを作り、EditorViewを作成します。
以降stateは、editorView.stateで参照することができます。
    const editorView = new EditorView({
      state: EditorState.create(editorStateConfig),
      parent: editorParentRef.current,
    })
Extension
先程、transactionによってstateを更新すると説明しましたが、このtransactionの作成、dispatchをする役割を担っているのがExtensionです。
Extensionでtransactionの定義をすることで、stateの更新を行い、viewへの反映を行います。
おまけ updateListener
上記の例ではEditorView.updateListenerも定義しています。
これは、viewが更新されるたびに呼ばれるコールバックを定義できるもので、React.setStateなどを渡すことで、component側でもドキュメントの値を取得できるようにしています。
最後に
初期化のタイミングでEditorView, EditorStateなどの概念が出てくるので、最初は複雑に感じるかもしれないのですが、このようにstateを更新するための設定を行っているということが分かってもらえたと思います。
あとはExtensionを使えば自由にカスタマイズできるので、好きなエディタを作ってみてください。
独自のExtensionを作成する時には、またいくつか重要な概念があるので、別記事として投稿しようと思います。
