こんにちは。Yahoo! JAPAN 新卒のkyaritaです。
この記事はYahoo! JAPAN 18 新卒 2 Advent Calendar 2018 21日目の記事です。
昨日の記事は@PinkPhayateさんの自分を追い込むためのLINE botを作ったでした。
はじめに
最近Vue.jsの勉強を始めたので、これでTwitterでグルメ情報を投稿しているmuni_gurumeさんの投稿を駅名で検索して、リストで表示できるようにしてみます。
ソースコードはhttps://github.com/kyarita/meshi_search にあります。
今回は僕自身のVue.js入門を兼ねているので、基本的な内容のみでvuexによる状態管理やnuxt.jsでSSRなどの話はありません。悪しからず。
Vue.jsとは
公式ドキュメント
概要は貼り付けたリンクから確認して頂くのが一番わかりやすいですが、単一ファイルコンポーネントで簡潔に記述できるフロントエンドフレームワークです。
公式ドキュメントが日本語にも対応しているので英語が苦手な僕にはありがたいです。
Vuetify.jsとは
公式ドキュメント
Vue.js向けのコンポーネントフレームワークです。
初めから用意されているテンプレートを利用すればある程度骨組みができた状態から開発が可能です。
他にもコンポーネントが用意されていて、タグを指定するだけでもある程度それらしいUIパーツができるようになっています。
今回は少し頑張って提供されているコンポーネントを利用して開発してみます。
実装
環境
今回は以下の環境で開発を行いました。
node v10.14.2
vue-cli 3.2.1
vuetify 1.3.0
express 4.16.0
主な手順
npm install -g @vue/cliでvue-cliをインストールし、
vue create myapp、vue add vuetifyを実行してアプリの原型とvuetifyを使えるようにします。
expressはTwitterのAPIを叩くために利用します。
componentsディレクトリにTop.vueを作り、
vue createで生成されたApp.vueに子コンポーネントとしてTop.vueを生やします。
ツイート内容のコンポーネントも分割して、Top.vueの子コンポーネントとします。
<script>
/* eslint-disable */
  import TweetCard from './TweetCard'

  export default {
    name: 'Top',
    components: { //ここに追加しておく
      TweetCard
    },
    props:[],
    data() {
      return {
        tweets:[]
      };
    },
    methods: {
      search: function() {
      }
    }
  }
</script>
また、親コンポーネントから子コンポーネントに取得したツイート内容を配列に入れ渡しておきます、
<div
  class="card-debug"
  is="TweetCard" //子コンポーネント名を指定する
  v-for="tweet in tweets" //ツイートの配列を渡す
  v-bind:key="tweet.id"
  :tweet="tweets[tweet.id]" //子コンポーネントのpropsにtweet変数を登録する
></div>
親から渡された変数は以下のようにpropsの配列に文字列として記述して利用します。
<script>
export default {
  name: 'TweetCard',
  props: ['tweet'],
  data(){
    return {};
  }
}
</script>
Tweet内容を表示するコンポーネントはvuetifyのv-cardタグを利用します。
v-cardはヘルパーコンポーネントとしてv-card-title``v-card-text, v-card-media, v-card-actionsを利用できます。
<v-card
  height='250px'
  width='350px'>
  <v-layout>
    <v-flex>

      <v-flex d-flex xl2 class="content">
        <v-card-title class="text-content">
          <a href="https://auctions.yahoo.co.jp/">
            <h4>{{tweet.station}}</h4>
          </a>
        </v-card-title>
        <v-card-text>
          <a href="https://shopping.yahoo.co.jp/">
            <div>{{tweet.text}}</div>
          </a>
        </v-card-text>
      </v-flex>

      <v-layout wrap class="picture">
        <v-flex v-for="n in 4" :key="n" xs6>
          <a :href=tweet.picture[n-1]>
            <v-img
              :src=tweet.picture[n-1]
              max-height="80px"
            ></v-img>
          </a>
        </v-flex>
      </v-layout>

     </v-flex>
  </v-layout>
</v-card>
expressでサーバを記述します。express-generatorを利用すると必要ないものも入ってしまい邪魔なので手書きする方が良さそうな気がします。(今回はexpress-generatorで生成してしまいました)
'dist'の部分はビルドして作られるディレクトリ名に書き換えます。
var createError = require('http-errors');
var express = require('express');
var path = require('path');
var cookieParser = require('cookie-parser');
var logger = require('morgan');

var app = express();

// view engine setup
app.set('view engine', 'ejs');

app.use(logger('dev'));
app.use(express.json());
app.use(express.urlencoded({ extended: false }));
app.use(cookieParser());

app.use(express.static(path.join(__dirname, 'dist')));//ここの部分を書き換える

// catch 404 and forward to error handler
app.use(function(req, res, next) {
  next(createError(404));
});

// error handler
app.use(function(err, req, res, next) {
  // set locals, only providing error in development
  res.locals.message = err.message;
  res.locals.error = req.app.get('env') === 'development' ? err : {};

  // render the error page
  res.status(err.status || 500);
  res.render('error');
});

module.exports = app;
そしてnpm run buildでビルドし、npm startでサーバを起動すればlocalhost:3000にアクセスして画面がみられます。
ツイートを取得する部分は/search/検索ワードをエンドポイントにして以下のように記述しました。
const twitClient = new Twitter({
 //ここにトークンをいれる
});
app.get('/search/:word', function(req, res, next) {
  res.header("Access-Control-Allow-Origin", "*");
  twitClient.get('statuses/user_timeline', {screen_name : "muni_gurume", count : 1000}, (error, data, response) => {
    tweets = [];
    if (error || !data) {
      console.log(error);
      tweets.push({'error': error});
      res.json(tweets);
      res.end();
      return ;
    }
    data.forEach( content => {
      //駅名を切り出して配列にいれる
      const station = content.text.slice(content.text.indexOf(':'), content.text.indexOf('駅'));
      if (station === word) {
        tweets.push({station: station, text: content.text, urls: content.entities.urls});
      }
    });
    res.json(tweets);
    res.end();
    return ;
  });
});
成果
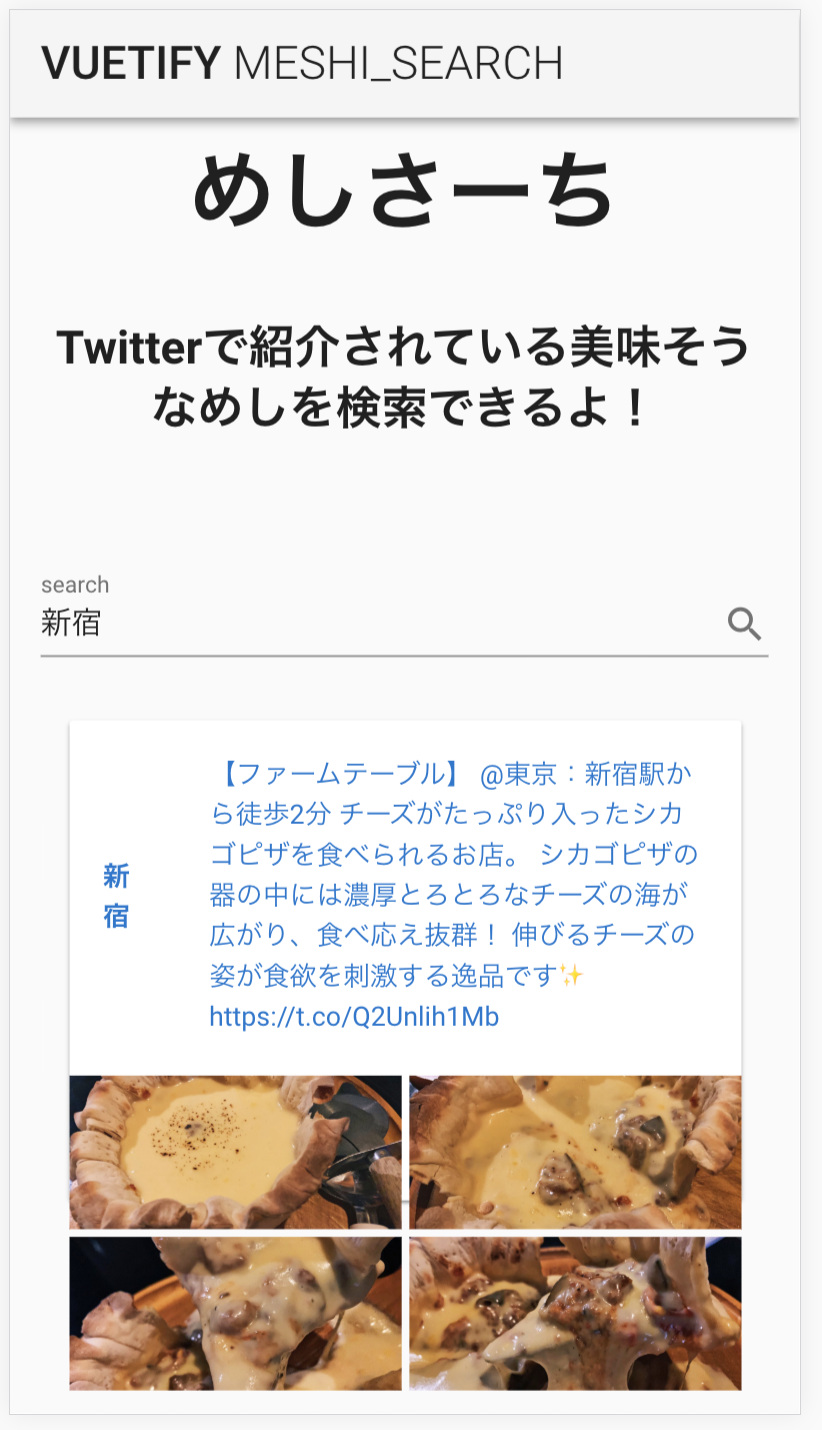
詳細なコードはGitHubにあるので大まかにしか記事には書いていませんが、最終的にはこんな感じでツイートを取得して表示することができました。
ただ、いまいち上手くデータが取得できず、ヒットするツイートが少しだけになってしまいました。

まとめ
vue.jsとvuetifyで割と簡単にそれらしいものが作ることができました。
vue.jsは個人的にreactよりも初めの段階はとっつきやすく、jsに不慣れな方でもやりやすい印象を受けました。
vuetifyはサンプルがcodepenで動かすことができるので、ここでUIパーツを作ってからコピーしていけばドキュメントを流し読みした状態でもなんとなく記述することができて良いですね。
余談
実はTwitterのキーワード検索から駅名 from:muni_gurumeで全く同じことができます。
作り始めてから気がつきました。😩😩😩😩😩