この記事は Rust Advent Calendar 2023 1日目の記事です。
はじめに
Rustは、その安全性と効率性から近年注目されているプログラミング言語です。学習コストの高さが指摘されていますが、チュートリアルをこなすと意外と簡単に API が作れるので実プロダクトへの適用を検討されている方も多くなっているのではないかと思います。
そんな気持ちで使ってみると意外と困るのが非機能要件の面で、まだまだ実務で活用するための情報は世の中に少ないのかなと感じています。
こういった部分を少しでも解消できたらと今年10月には分散トレーシングの実装に焦点を当てて
のような発表をしたのですが、このスライドのコードは2023年11月30日現在の最新のクレートでは動かなくなっています。
(たった2か月前に書いたスライドなのに!!!)
そこで、この記事ではRustを使用してAPIを簡単に作成する方法と実運用における分散トレーシングの実装に焦点を当てて、現時点で最新の情報で紹介していきます。本記事はAWSサービスにある程度慣れた開発者を対象にしており、特にAWS X-Rayを用いたトレーシングに興味のある方に有用です。
本編
本記事では、以下のステップを通じてRustでのAPI開発と分散トレーシングの設定を詳しく説明します。
- 成果物の構成: 最終的に作成するシステムのアーキテクチャを紹介します。
- 環境構築: 必要なツールとその設定方法を説明します。
- ベースとなるAPIの作成: Rustを使った基本的なAPIの構築方法を解説します。
- AWSへのデプロイ: 作成したAPIをAWSにデプロイする手順を説明します。
- 分散トレーシングの実現: AWS X-Rayを使用した分散トレーシングの実装方法を詳述します。
導入
成果物の構成
本記事で最終的に作成するシステムの構成は以下の図の通りです。
ロードバランサーがリクエストを受けて、その後ろには ECS on Fargate で API サーバーが稼働します。このサーバーにはサイドカーで AWS Distro for OpenTelemetry(ADOT と略されます)というアプリケーションが動作しており、この ADOT が AWS X-Ray へトレース情報を送信します。

環境構築
本記事では ECS on Fargate で動作させるためのコンテナベースのアプリケーションを作成します。また、AWS へのデプロイには AWS Copilot CLI というツールを使用します。
本記事執筆時の使用したツールのバージョンは以下の通りです。
$ rustc --version
rustc 1.74.0 (79e9716c9 2023-11-13)

$ docker --version
Docker version 24.0.6, build ed223bc

$ copilot --version
copilot version: v1.32.0
それぞれのツールのインストール方法は以下のリンクをご参照ください。
- Rust: https://www.rust-lang.org/tools/install
- Docker: https://docs.docker.com/engine/install/
- AWS Copilot CLI: https://aws.github.io/copilot-cli/docs/getting-started/install/
ベースとなる API の作成
Rust プロジェクトの作成
まずは Rust のプロジェクトを作成します。
$ cargo new otel-example
     Created binary (application) `otel-example` package
ここで失敗することはないと思いますが、正しく作れていれば以下のような構成になっているはずです。
$ cd otel-example
$ tree .
.
├── Cargo.toml
└── src
    └── main.rs

1 directory, 2 files
API の実装
本記事では Actix Web というフレームワークを使って API を実装します。まずは必要なクレートを追加します。
$ cargo add actix-web
    Updating crates.io index
      Adding actix-web v4.4.0 to dependencies.
             Features:
             + __compress
             + actix-macros
             + actix-web-codegen
             + compress-brotli
             + compress-gzip
             + compress-zstd
             + cookie
             + cookies
             + http2
             + macros
             - actix-tls
             - experimental-io-uring
             - openssl
             - rustls
             - rustls-0_20
             - rustls-0_21
             - secure-cookies
    Updating crates.io index
次に、main.rs に以下のように記述します。ポート番号8080で待ち受けて、リクエストすると Hello, World! と返す API です。
use actix_web::{get, App, HttpServer, Responder};

#[get("/")]
async fn index() -> impl Responder {
    "Hello, World!"
}

#[actix_web::main]
async fn main() -> std::io::Result<()> {
    HttpServer::new(|| App::new().service(index))
        .bind(("0.0.0.0", 8080))?
        .run()
        .await
}
ここまで正しく出来ていれば、 cargo run コマンドを実行すると API サーバーが動き出します。
$ curl localhost:8080
Hello, World!
Dockerfile の作成
次は Dockerfile を作成するのですが、今は docker init という便利なコマンドがあるのでこちらを利用します。途中でいくつか質問されますが、
-
What application platform does your project use?: Rust -
What version of Rust do you want to use?: 1.74.0 -
What port does your server listen on?: 8080
と回答して下さい。
$ docker init

Welcome to the Docker Init CLI!

This utility will walk you through creating the following files with sensible defaults for your project:
  - .dockerignore
  - Dockerfile
  - compose.yaml

Let's get started!

? What application platform does your project use? Rust
? What version of Rust do you want to use? 1.74.0
? What port does your server listen on? 8080

CREATED: .dockerignore
CREATED: Dockerfile
CREATED: compose.yaml

✔ Your Docker files are ready!

Take a moment to review them and tailor them to your application.

When you're ready, start your application by running: docker compose up --build

Your application will be available at http://localhost:8080
このコマンドによって、良い感じの Dockerfile と compose.yaml が生成されていると思います。ここまで正しく出来ていれば
$ docker compose up --build
でコンテナのビルドと実行が行え、先ほどと同様に curl でリクエストすることが出来るはずです。
$ curl localhost:8080
Hello, World!
AWS へのデプロイ
前準備の最終段階で、このアプリケーションを AWS にデプロイします。
環境構築・デプロイには AWS Copilot CLI の copilot init コマンドを使います。こちらも途中、いくつか質問されます。以下のように回答してください。
-
What would you like to name your application?: otel-example -
Which workload type best represents your architecture?: Load Balanced Web Service -
What do you want to name this service?: api -
Which Dockerfile would you like to use for api?: ./Dockfile
途中で聞かれる質問:
-
Would you like to deploy an environment?: y -
What is your environment's name?: dev
以下のような感じで環境構築とデプロイが進行します。
$ copilot init
Welcome to the Copilot CLI! We're going to walk you through some questions
to help you get set up with a containerized application on AWS. An application is a collection of
containerized services that operate together.

Application name: otel-example
Workload type: Load Balanced Web Service
Service name: api
Dockerfile: ./Dockerfile
Ok great, we'll set up a Load Balanced Web Service named api in application otel-example.

- Creating the infrastructure for stack otel-example-infrastructure-roles                       [create complete]  [51.1s]
  - A StackSet admin role assumed by CloudFormation to manage regional stacks                   [create complete]  [21.0s]
  - An IAM role assumed by the admin role to create ECR repositories, KMS keys, and S3 buckets  [create complete]  [22.8s]
✔ The directory copilot will hold service manifests for application otel-example.

✔ Wrote the manifest for service api at copilot/api/manifest.yml
Your manifest contains configurations like your container size and port.

- Update regional resources with stack set "otel-example-infrastructure"  [succeeded]  [0.0s]
All right, you're all set for local development.
Deploy: Yes
Only found one option, defaulting to: Create a new environment
Environment name: dev
Environment dev does not yet exist in application otel-example; initializing it.
✔ Wrote the manifest for environment dev at copilot/environments/dev/manifest.yml
- Update regional resources with stack set "otel-example-infrastructure"  [succeeded]  [0.0s]
- Update regional resources with stack set "otel-example-infrastructure"  [succeeded]           [156.4s]
  - Update resources in region "ap-northeast-1"                           [create complete]     [155.3s]
    - KMS key to encrypt pipeline artifacts between stages                [create complete]     [121.5s]
    - ECR container image repository for "api"                            [create complete]     [0.0s]
    - S3 Bucket to store local artifacts                                  [create in progress]  [4.2s]
✔ Proposing infrastructure changes for the otel-example-dev environment.
- Creating the infrastructure for the otel-example-dev environment.  [create complete]  [50.5s]
  - An IAM Role for AWS CloudFormation to manage resources           [create complete]  [20.2s]
  - An IAM Role to describe resources in your environment            [create complete]  [21.6s]
✔ Provisioned bootstrap resources for environment dev in region ap-northeast-1 under application otel-example.
✔ Provisioned bootstrap resources for environment dev.
✔ Proposing infrastructure changes for the otel-example-dev environment.
- Creating the infrastructure for the otel-example-dev environment.                    [update complete]  [73.8s]
  - An ECS cluster to group your services                                              [create complete]  [3.9s]
  - A security group to allow your containers to talk to each other                    [create complete]  [0.0s]
  - An Internet Gateway to connect to the public internet                              [create complete]  [15.6s]
  - A resource policy to allow AWS services to create log streams for your workloads.  [create complete]  [0.0s]
  - Private subnet 1 for resources with no internet access                             [create complete]  [4.7s]
  - Private subnet 2 for resources with no internet access                             [create complete]  [4.7s]
  - A custom route table that directs network traffic for the public subnets           [create complete]  [10.6s]
  - Public subnet 1 for resources that can access the internet                         [create complete]  [6.8s]
  - Public subnet 2 for resources that can access the internet                         [create complete]  [4.7s]
  - A private DNS namespace for discovering services within the environment            [create complete]  [43.6s]
  - A Virtual Private Cloud to control networking of your AWS resources                [create complete]  [12.4s]
✔ Successfully deployed environment devLogin Succeeded
[+] Building 4.1s (14/14) FINISHED                                                                                                 docker:default
 => [internal] load build definition from Dockerfile                                                                                         0.0s
 => => transferring dockerfile: 2.60kB                                                                                                       0.0s
 => [internal] load .dockerignore                                                                                                            0.0s
 => => transferring context: 655B                                                                                                            0.0s
 => resolve image config for docker.io/docker/dockerfile:1                                                                                   2.2s
 => CACHED docker-image://docker.io/docker/dockerfile:1@sha256:ac85f380a63b13dfcefa89046420e1781752bab202122f8f50032edf31be0021              0.0s
 => [internal] load metadata for docker.io/library/debian:bullseye-slim                                                                      1.5s
 => [internal] load metadata for docker.io/library/rust:1.74.0-slim-bullseye                                                                 1.7s
 => [build 1/3] FROM docker.io/library/rust:1.74.0-slim-bullseye@sha256:4ddb21b979def540e0c7d686ec92fd271e44200f1273551b0b248032e573377a     0.0s
 => [internal] load build context                                                                                                            0.0s
 => => transferring context: 117B                                                                                                            0.0s
 => [final 1/3] FROM docker.io/library/debian:bullseye-slim@sha256:5aab272aa24713622bfac9dba239bc7488d9979b0d82d19a9dffccd99292154d          0.0s
 => CACHED [final 2/3] RUN adduser     --disabled-password     --gecos ""     --home "/nonexistent"     --shell "/sbin/nologin"     --no-cr  0.0s
 => CACHED [build 2/3] WORKDIR /app                                                                                                          0.0s
 => CACHED [build 3/3] RUN --mount=type=bind,source=src,target=src     --mount=type=bind,source=Cargo.toml,target=Cargo.toml     --mount=ty  0.0s
 => CACHED [final 3/3] COPY --from=build /bin/server /bin/                                                                                   0.0s
 => exporting to image                                                                                                                       0.0s
 => => exporting layers                                                                                                                      0.0s
 => => writing image sha256:02207867c293dd57c4a312ff89fd0c504fe468f00193eae88a30e99310113400                                                 0.0s
 => => naming to xxxxxxxx.dkr.ecr.ap-northeast-1.amazonaws.com/otel-example/api:latest                                                   0.0s

What's Next?
  View a summary of image vulnerabilities and recommendations → docker scout quickview
The push refers to repository [xxxxxxx.dkr.ecr.ap-northeast-1.amazonaws.com/otel-example/api]
f80cacd6484c: Pushed
9bb1c9725dbe: Pushed
1b6fd3ad4ce6: Pushed
latest: digest: sha256:ea427626348a09a6ff3aaa6f94f9ab831ed46b1d0df091f9a013731349116131 size: 948
✔ Proposing infrastructure changes for stack otel-example-dev-api
- Creating the infrastructure for stack otel-example-dev-api                      [create complete]     [359.4s]
  - Service discovery for your services to communicate within the VPC             [create complete]     [0.0s]
  - Update your environment's shared resources                                    [update complete]     [178.6s]
    - A security group for your load balancer allowing HTTP traffic               [create complete]     [4.6s]
    - An Application Load Balancer to distribute public traffic to your services  [create complete]     [150.8s]
    - A load balancer listener to route HTTP traffic                              [create in progress]  [154.8s]
  - An IAM role to update your environment stack                                  [create complete]     [17.0s]
  - An IAM Role for the Fargate agent to make AWS API calls on your behalf        [create complete]     [17.0s]
  - An HTTP listener rule for path `/` that forwards HTTP traffic to your tasks   [create complete]     [1.7s]
  - A custom resource assigning priority for HTTP listener rules                  [create complete]     [0.0s]
  - A CloudWatch log group to hold your service logs                              [create complete]     [0.0s]
  - An IAM Role to describe load balancer rules for assigning a priority          [create complete]     [17.0s]
  - An ECS service to run and maintain your tasks in the environment cluster      [create complete]     [122.7s]
    Deployments
               Revision  Rollout      Desired  Running  Failed  Pending
      PRIMARY  1         [completed]  1        1        0       0
  - A target group to connect the load balancer to your service on port 8080      [create complete]     [17.0s]
  - An ECS task definition to group your containers and run them on ECS           [create complete]     [1.6s]
  - An IAM role to control permissions for the containers in your tasks           [create complete]     [17.0s]
✔ Deployed service api.
Recommended follow-up action:
  - Your service is accessible at http://xxxxxxxx.ap-northeast-1.elb.amazonaws.com over the internet.
- Be a part of the Copilot ✨community✨!
  Ask or answer a question, submit a feature request...
  Visit 👉 https://aws.github.io/copilot-cli/community/get-involved/ to see how!
正しくデプロイできていれば、最後に生成される URL にリクエストするとローカルで動かしていた時と同様のレスポンスが得られるはずです。
$ curl http://xxxxxxxx.ap-northeast-1.elb.amazonaws.com
Hello, World!
分散トレーシングの実現
ここからが本題で、AWS X-Ray にトレーシング情報を送信するまでの実装をします。
必要なクレートの追加
まずは必要なクレートを追加します。大きく分けると tracing と opentelemetry の2つのクレートを使用します。
$ cargo add opentelemetry
$ cargo add opentelemetry-otlp
$ cargo add opentelemetry_sdk --features rt-tokio
$ cargo add tracing
$ cargo add tracing-actix-web
$ cargo add tracing-opentelemetry
$ cargo add tracing-subscriber
正しく追加されていれば、Cargo.toml は以下のようになっていると思います。
[package]
name = "otel-example"
version = "0.1.0"
edition = "2021"

# See more keys and their definitions at https://doc.rust-lang.org/cargo/reference/manifest.html

[dependencies]
actix-web = "4.4.0"
opentelemetry = "0.21.0"
opentelemetry-otlp = "0.14.0"
opentelemetry_sdk = { version = "0.21.1", features = ["rt-tokio"] }
tracing = "0.1.40"
tracing-actix-web = "0.7.9"
tracing-opentelemetry = "0.22.0"
tracing-subscriber = "0.3.18"
tracing の設定を行う関数を実装
ここからソースコードを編集していきますが、順を追って少しずつ進めます。まずは、tracing の初期化を行う関数を実装します。
ポイントは以下の2点です。
- OpenTelemetry の情報は ADOT が待ち受ける
http://localhost:4317に送信する - AWS X-Ray は ID のフォーマットが OpenTelemetry と違うので、ID Generator に
opentelemetry_sdk::trace::XrayIdGeneratorを指定する
use opentelemetry_otlp::WithExportConfig;
use tracing_subscriber::layer::SubscriberExt;
use tracing_subscriber::Registry;

fn init_tracing() {
    // Tracer の作成
    let tracer = opentelemetry_otlp::new_pipeline()
        .tracing()
        .with_exporter(
            opentelemetry_otlp::new_exporter()
                .tonic()
                .with_endpoint("http://localhost:4317"),
        )
        .with_trace_config(
            opentelemetry_sdk::trace::config()
                .with_sampler(opentelemetry_sdk::trace::Sampler::AlwaysOn)
                .with_id_generator(opentelemetry_sdk::trace::XrayIdGenerator::default())
                .with_resource(opentelemetry_sdk::Resource::new(vec![
                    opentelemetry::KeyValue::new("service.name", "sample-app"),
                ])),
        )
        .install_batch(opentelemetry_sdk::runtime::Tokio)
        .expect("Not running in tokio runtime");

    // OpenTelemetry の tracing 層の Layer を作成
    let telemetry = tracing_opentelemetry::layer().with_tracer(tracer);

    // subscriber の登録
    let subscriber = Registry::default().with(telemetry);
    tracing::subscriber::set_global_default(subscriber).unwrap();
}
main.rs の修正
次に、上記初期化処理を実行するよう main 関数を修正します。
tracing_actix_web という ActixWeb のミドルウェアを使うことで、リクエストに対するトレーシングは簡単に実現することが出来ます。
#[actix_web::main]
async fn main() -> std::io::Result<()> {
    init_tracing();

    HttpServer::new(|| {
        App::new()
            .wrap(tracing_actix_web::TracingLogger::default())
            .service(index)
    })
    .bind(("0.0.0.0", 8080))?
    .run()
    .await
}
manifest.yaml の修正
最後に、 ADOT を使用するために AWS Copilot の設定を変更します。
name: api
type: Load Balanced Web Service

# Distribute traffic to your service.
http:
  # Requests to this path will be forwarded to your service.
  # To match all requests you can use the "/" path.
  path: '/'
  # You can specify a custom health check path. The default is "/".
  # healthcheck: '/'

# Configuration for your containers and service.
image:
  # Docker build arguments. For additional overrides: https://aws.github.io/copilot-cli/docs/manifest/lb-web-service/#image-build
  build: Dockerfile
  # Port exposed through your container to route traffic to it.
  port: 8080

cpu: 256       # Number of CPU units for the task.
memory: 512    # Amount of memory in MiB used by the task.
count: 1       # Number of tasks that should be running in your service.
exec: true     # Enable running commands in your container.
network:
  connect: true # Enable Service Connect for intra-environment traffic between services.
observability:  # この設定を追加すると ADOT がサイドカーで動く
  tracing: awsxray
デプロイと動作確認
修正が完了したのでデプロイします。環境は出来ているので、デプロイは copilot deploy コマンドで行います。
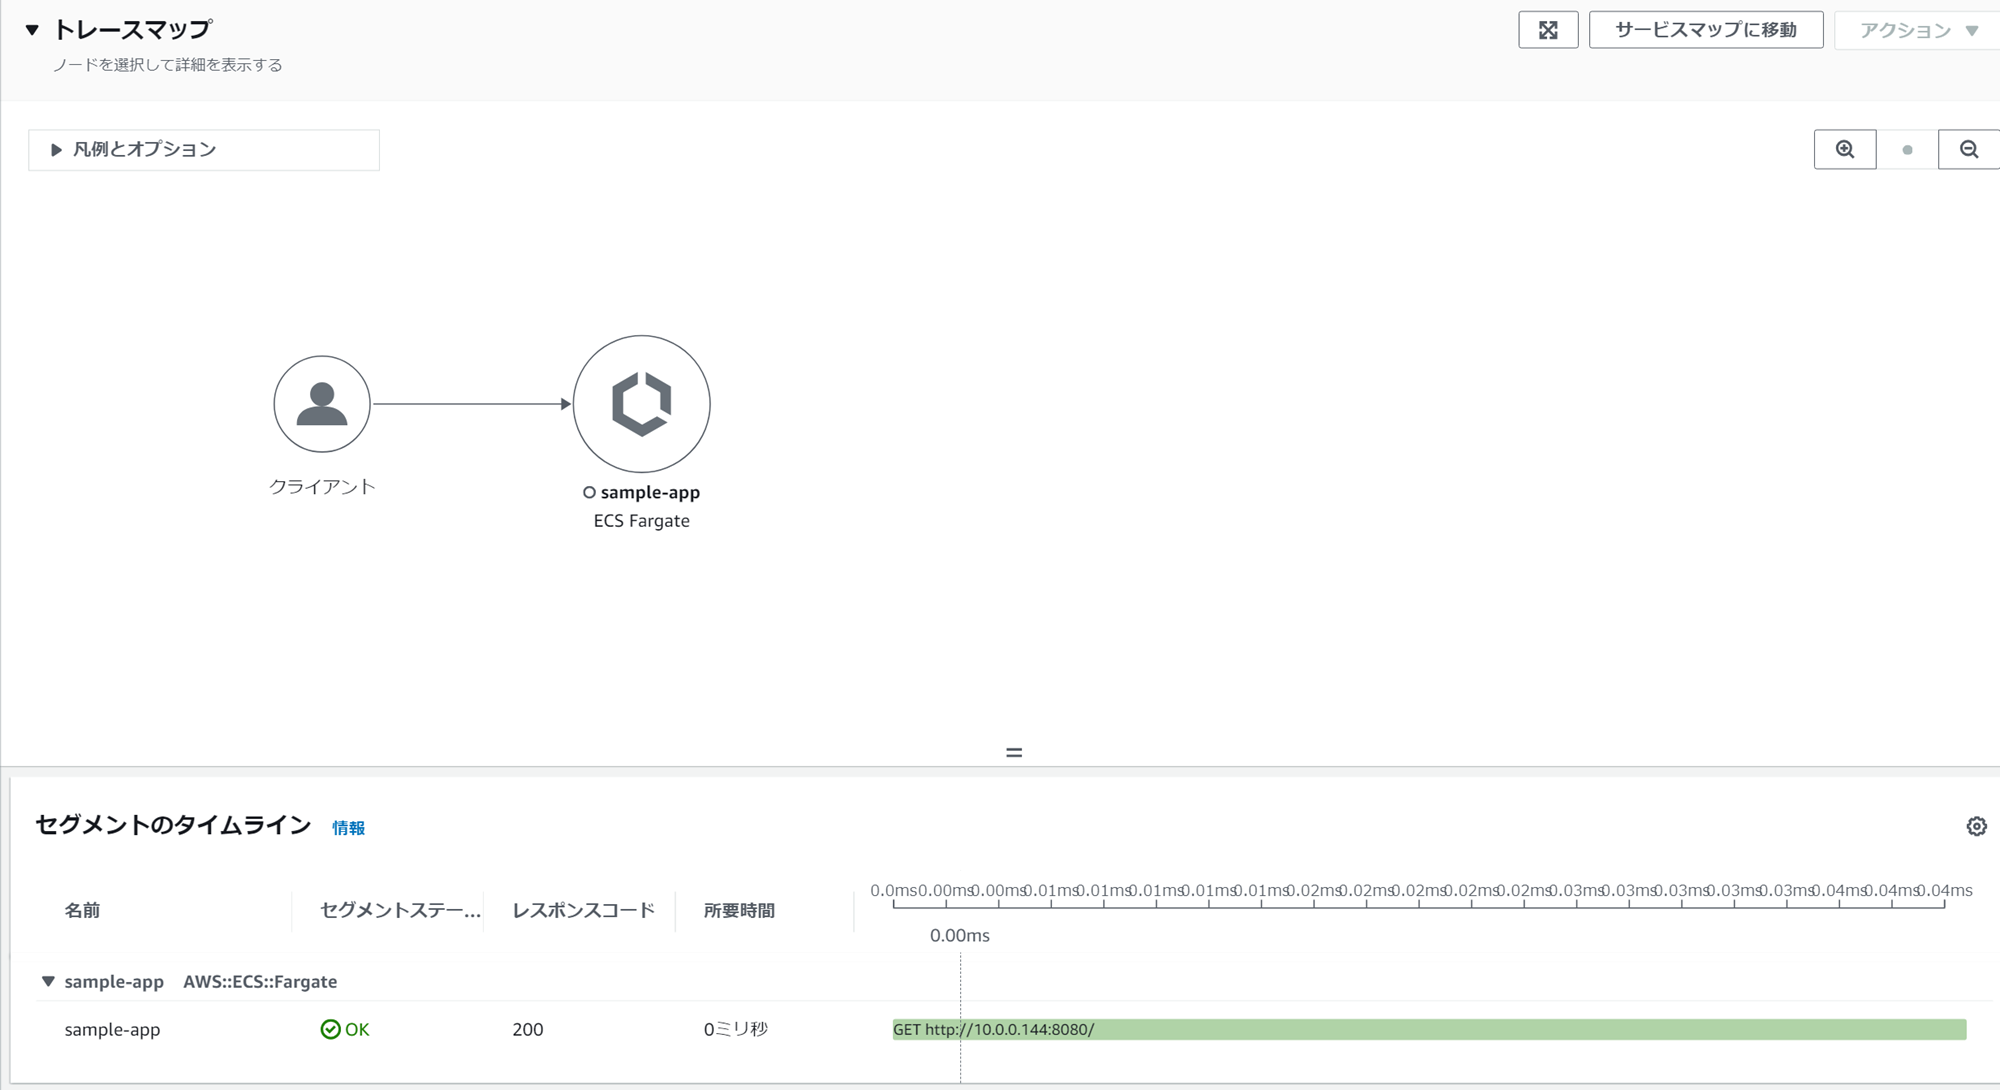
ここまでの修正が正しく行えていれば、リクエストに対して以下のように X-Ray のトレース情報が見れるようになっていると思います。
クリーンアップ
最後に、このまま放置してしまうと AWS の料金がかかってしまいます。以下のコマンドでリソースを削除します。
$ copilot app delete
おわりに
この記事ではRustを使用したAPI開発の基本とAWS X-Rayによる分散トレーシングの実装方法を紹介しました。本当に基礎的な部分だけの紹介にはなりますが、プロダクトでRustを活用する際のお役に立てると幸いです。
この先、実際に開発を進めていくと
- リクエストヘッダーに
X-Amzn-Trace-Idが含まれている場合の処理方法 - 内部処理でのサブセグメントの作り方
- 外部 API 実行時などにトレースする方法
などが気になってくると思います。
こういった点が知りたい場合には X-Rayのドキュメント や tracing、tracing-opentelemetryのドキュメントなどが参考になると思います。
X(旧 Twitter)での質問も大歓迎なので、気になることがあればぜひ気軽にお声がけいただけたらと思います。