2017年7月時点でのAndroidアプリにおいてTwitte Kitを使う方法。
2017年1月18日にGoogleがFablicを買収すると報じられていました。
その影響かはわかりませんが、Android StudioのFablicプラグインにTwitterが見当たらなかったので、
Fabricを使わずTwitter KitでAndroidアプリをTwitterと連携させる方法を調べたので記事にしました。
本記事ではログイン画面からアプリ連携を行い、
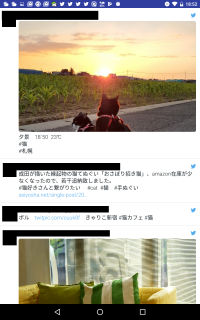
猫で検索をかけた結果をタイムライン表示するところまでを行います。
開発環境
OS: Windows 10 Pro
IDE:Android Studio 2.3.3
言語:Java
動作確認環境
Nexus7(2013)
Android 6.0.1
大まかな流れ
1.Twitterにアプリケーション登録 2.dependencyの追加 3.ログインボタンの追加 4.タイムライン表示1.Twitterにアプリケーション登録
Twitterにアプリを登録して、Consumer KeyとConsmer Secretを取得。キーの登録はTwitter Application Managerで行います。
Twitter Application Manager
2.dependencyの追加
ここからはAndroid Studioでの操作になります。 APIを呼び出すためにGradle Scriptsのbuild.gradle(Modle:app)のdependenciesに下記を追加します。 compile 'com.twitter.sdk.android:twitter:3.0.0' compile 'com.twitter.sdk.android:twitter-core:3.0.0' compile 'com.twitter.sdk.android:tweet-ui:3.0.0' compile 'com.twitter.sdk.android:tweet-composer:3.0.0' compile 'com.twitter.sdk.android:twitter-mopub:3.0.0'dependencies {
compile fileTree(dir: 'libs', include: ['*.jar'])
androidTestCompile('com.android.support.test.espresso:espresso-core:2.2.2', {
exclude group: 'com.android.support', module: 'support-annotations'
})
compile 'com.android.support:appcompat-v7:25.3.1'
compile 'com.android.support.constraint:constraint-layout:1.0.2'
//ここに追加
compile 'com.twitter.sdk.android:twitter:3.0.0'
compile 'com.twitter.sdk.android:twitter-core:3.0.0'
compile 'com.twitter.sdk.android:tweet-ui:3.0.0'
compile 'com.twitter.sdk.android:tweet-composer:3.0.0'
compile 'com.twitter.sdk.android:twitter-mopub:3.0.0'
testCompile 'junit:junit:4.12'
}
追記(2017/8/6)
上記のように細かく4つのdependencyを追加しなくても、
下記を追加するだけでタイムラインを表示できるとご指摘をいただきました。
@kimukouさん、ありがとうございます。
compile('com.twitter.sdk.android:twitter:3.0.0@aar') {
    transitive = true;
}
3.ログインボタンの追加
Twitter Kitで準備されているログインボタンをActivityのレイアウトファイルに配置します。<?xml version="1.0" encoding="utf-8"?>
<android.support.constraint.ConstraintLayout xmlns:android="http://schemas.android.com/apk/res/android"
xmlns:app="http://schemas.android.com/apk/res-auto"
xmlns:tools="http://schemas.android.com/tools"
android:layout_width="match_parent"
android:layout_height="match_parent"
tools:context="jp.lab.kyam.twetterappbytwitterkit.MainActivity">
<com.twitter.sdk.android.core.identity.TwitterLoginButton
android:id="@+id/login_button"
android:layout_width="wrap_content"
android:layout_height="wrap_content"/>
</android.support.constraint.ConstraintLayout>
Java側のonCreateの中でレイアウトファイルで追加したログインボタンのコールバック追加します。
流れ1で取得したConsumer KeyとConsumer SecretはTwitterAuthConfigの中に直接書き込むなり、
リソースから参照するなりして、ここで指定します。
    private TwitterLoginButton mLoginButton;

    @Override
    protected void onCreate(Bundle savedInstanceState) {
        super.onCreate(savedInstanceState);
        setContentView(R.layout.activity_main);

        String consumerKey = getResources().getString(R.string.consumer_key);
        String consumerSecretKey = getResources().getString(R.string.consumer_secret);
        TwitterConfig config = new TwitterConfig.Builder(this)
                .logger(new DefaultLogger(Log.DEBUG))
                .twitterAuthConfig(new TwitterAuthConfig(consumerKey, consumerSecretKey))
                .debug(true)
                .build();
        Twitter.initialize(config);

        mLoginButton = (TwitterLoginButton)findViewById(R.id.login_button);
        mLoginButton.setEnabled(true);
        mLoginButton.setCallback(new Callback<TwitterSession>() {
            @Override
            public void success(Result<TwitterSession> result) {
                showTimeLine();
            }

            @Override
            public void failure(TwitterException exception) {

            }
        });
    }
注意!
このボタンはそのままではグレーアウトしているので
自分でJavaのコード中でsetEnable(true)するなどして、Enableにする必要があります。
レイアウトファイルの中でenable=trueにしてもグレーアウトしたままでした。
4.タイムライン表示
タイムライン表示に必要なAdapterもTwtter Kitで提供されています。<?xml version="1.0" encoding="utf-8"?>
<android.support.constraint.ConstraintLayout xmlns:android="http://schemas.android.com/apk/res/android"
xmlns:app="http://schemas.android.com/apk/res-auto"
xmlns:tools="http://schemas.android.com/tools"
android:layout_width="match_parent"
android:layout_height="match_parent"
tools:context="jp.lab.kyam.twetterappbytwitterkit.TimeLineActivity">
<TextView
android:id="@+id/android:empty"
android:layout_width="match_parent"
android:layout_height="match_parent"
android:gravity="center_horizontal|center_vertical"
android:text="No Tweets"/>
<ListView
android:id="@+id/android:list"
android:layout_width="match_parent"
android:layout_height="0dp"
android:layout_weight="1"
android:divider="#e1e8ed"
android:dividerHeight="1dp"
android:drawSelectorOnTop="false"/>
</android.support.constraint.ConstraintLayout>
TweetTimelineListAdapterを利用します。
package jp.lab.kyam.twetterappbytwitterkit;

import android.app.ListActivity;
import android.support.v7.app.AppCompatActivity;
import android.os.Bundle;

import com.twitter.sdk.android.tweetui.SearchTimeline;
import com.twitter.sdk.android.tweetui.TweetTimelineListAdapter;
import com.twitter.sdk.android.tweetui.UserTimeline;

public class TimeLineActivity extends ListActivity {

    @Override
    protected void onCreate(Bundle savedInstanceState) {
        super.onCreate(savedInstanceState);
        setContentView(R.layout.activity_time_line);

        final SearchTimeline searchTimeline = new SearchTimeline.Builder()
                .query("#猫")
                .build();
        final TweetTimelineListAdapter adapter = new TweetTimelineListAdapter.Builder(this)
                .setTimeline(searchTimeline)
                .build();
        setListAdapter(adapter);
    }
}
これで猫で検索をかけた結果をタイムライン表示できます。
本記事の全ソースコードはGitHubにアップロードしてありますので、ご自由にお使いください。
https://github.com/kyam3235/TwitterAppByTwitterKit
