2025年5月現在の忘備録です。
kadowakiさんの記事を参考にしています。
目次
WSL2のインストール
まずはWSL2をインストールします。
コマンドプロンプトもしくはPowerShellを管理者で起動します。
wsl --install
ディストリビューションを指定しない場合はUbuntuがインストールされます。
PCを再起動し、Ubuntuが起動したらユーザー名とパスワードを設定します。
下記コマンドをたたき、WSL2が有効なことを確認しましょう。
C:\Users\xxx>wsl -l -v
  NAME              STATE           VERSION
* Ubuntu            Running         2
ではWSL2を起動しましょう。
以下のようになれば正常です。
C:\Users\xxx>wsl
To run a command as administrator (user "root"), use "sudo <command>".
See "man sudo_root" for details.

xxx@LAPTOP-xxx:/mnt/c/Users/xxx$
Wardenのインストール
ドキュメントを参考にしながらインストールをしていきます。
- Homebrewのインストール
下記コマンドを叩いて、Homebrewをインストールします。
$ /bin/bash -c "$(curl -fsSL https://raw.githubusercontent.com/Homebrew/install/master/install.sh)"
パスワードを求められるので、先ほど設定したパスワードを入力します。
Enterを求められたら叩いて次へ進みます。
以下のようにInstallation successful!が出たらインストール完了です。

私の場合、インストール完了の直前にbrewコマンドを設定してくださいと出ています。
NextStepsに設定方法が出ているので、実行します。

そのままコピペで実行します。
バージョンが出れば設定完了です。
$ echo >> /home/xxx/.bashrc
    echo 'eval "$(/home/linuxbrew/.linuxbrew/bin/brew shellenv)"' >> /home/xxx/.bashrc
    eval "$(/home/linuxbrew/.linuxbrew/bin/brew shellenv)"
$ brew -v
Homebrew 4.5.0
2. wardenのインストール
次に以下コマンドでwardenをインストールしていきます。
$ brew install wardenenv/warden/warden
次のエラーが出たのでエラー内容に従って進んでいきます。
Warning: The post-install step did not complete successfully
You can try again using:
  brew postinstall gcc

Error: The following formula cannot be installed from bottle and must be
built from source.
  warden
Install Clang or run `brew install gcc`.
$ brew postinstall gcc
==> Postinstalling gcc
Warning: The post-install step did not complete successfully
You can try again using:
  brew postinstall gcc
ということでgccが正常にセットアップされないので以下を試してみました。
$ sudo apt update
$ sudo apt install build-essential
再度wardenインストールを実行
$ brew install wardenenv/warden/warden
無事にインストールできたので以下コマンドでwardenを起動させます。
$ warden svc up
Dockerで確認するとコンテナとイメージが作られていますね!


3. 起動の確認・DNSの設定
ではコンテナ内にブラウザからアクセスできるか以下から確認してみます。
- https://traefik.warden.test/
- https://portainer.warden.test/
- https://dnsmasq.warden.test/
- https://mailhog.warden.test/
確認できなかった場合、OSのDNS設定が必要かと思います。
まずコントロールパネルから、
ネットワークとインターネット>ネットワークの状態とタスクの表示
を開きます。

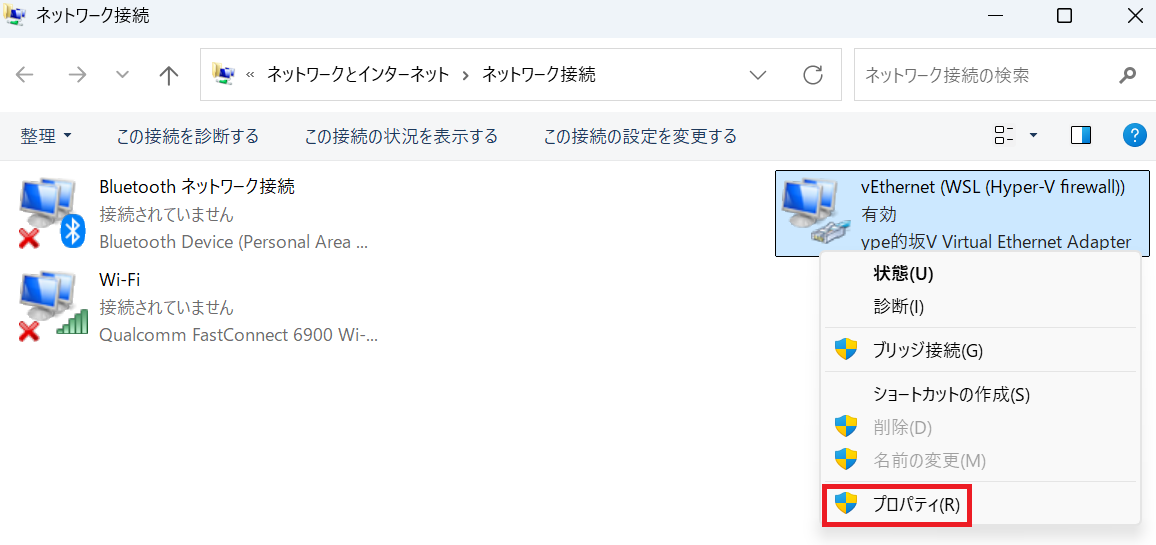
次にアダプター設定の変更を開きます。

設定を変更したい接続を右クリックでプロパティを開きます。
IPv4を選択してプロパティを開きます。

以下のように設定します。

これで再度接続し、確認できれば成功です!
magento2のインストール
- プロジェクトのディレクトリを作成する
 mkdir -p ~/Sites/exampleproject
 cd ~/Sites/exampleproject
exampleprojectは任意のプロジェクト名にしてください。
2. .envの生成
$ warden env-init exampleproject magento2
A warden env file was created at /home/xxx/Sites/exampleproject/.env
You may now use 'warden env up' to start your environment.
このようになれば成功です。
exampleprojectは任意のプロジェクト名です。
3. SSL証明書の作成
$ warden sign-certificate exampleproject.test
==> Generating private key exampleproject.test.key.pem
==> Generating signing req exampleproject.test.crt.pem
==> Generating certificate exampleproject.test.crt.pem
Certificate request self-signature ok
subject=C = US, O = Warden.dev, CN = exampleproject.test
==> Updating traefik
[+] Running 1/1
 ✔ Container traefik  Running
[+] Restarting 1/1
 ✔ Container traefik  Started
4. Dockerコンテナを起動する
$ warden env up
~省略~
[+] Running 8/8
 ✔ Container exampleproject-php-debug-1   Started
 ✔ Container exampleproject-nginx-1       Started
 ✔ Container exampleproject-php-fpm-1     Started
 ✔ Container exampleproject-redis-1       Started
 ✔ Container exampleproject-db-1          Started
 ✔ Container exampleproject-opensearch-1  Started
 ✔ Container exampleproject-rabbitmq-1    Started
 ✔ Container exampleproject-varnish-1     Started
5. php-fpmコンテナに入る
$ warden shell
www-data@exampleproject-php-fpm:/var/www/html$
6. Magento Marketplace 認証の登録
$ composer global config http-basic.repo.magento.com <username> <password>
Changed current directory to /home/www-data/.composer
こちらは以前認証していればスキップ可能です!
認証キーの取得に関してはこちらを参照してください。
公開キーをユーザー名として使用し、秘密キーをパスワードとして使用します。
7. Composerでmgantoをダウンロードする
$ export META_PACKAGE=magento/project-community-edition
$ export META_VERSION=2.4.x

$ composer create-project --repository-url=https://repo.magento.com/ \
  "${META_PACKAGE}" /tmp/exampleproject "${META_VERSION}"

$ rsync -a /tmp/exampleproject/ /var/www/html/
$ rm -rf /tmp/exampleproject/

Failed to audit installed packages.
ここでComposerを使って新しいプロジェクトを作成します。
composer.jsonが生成されたり、vendor/に依存パッケージがダウンロードされます。
私の場合、最後にFailed to audit installed packages.と出たのですが、インストールには問題なさそうなので無視して進めます。
8. magento2をインストールする
bin/magento setup:install \
  --base-url=https://app.exampleproject.test \
  --backend-frontname=admin \
  --amqp-host=rabbitmq \
  --amqp-port=5672 \
  --amqp-user=guest \
  --amqp-password=guest \
  --db-host=db \
  --db-name=magento \
  --db-user=magento \
  --db-password=magento \
  --search-engine=opensearch \
  --opensearch-host=opensearch \
  --opensearch-port=9200 \
  --opensearch-index-prefix=magento2 \
  --opensearch-enable-auth=0 \
  --opensearch-timeout=15 \
  --http-cache-hosts=varnish:80 \
  --session-save=redis \
  --session-save-redis-host=redis \
  --session-save-redis-port=6379 \
  --session-save-redis-db=2 \
  --session-save-redis-max-concurrency=20 \
  --cache-backend=redis \
  --cache-backend-redis-server=redis \
  --cache-backend-redis-db=0 \
  --cache-backend-redis-port=6379 \
  --page-cache=redis \
  --page-cache-redis-server=redis \
  --page-cache-redis-db=1 \
  --page-cache-redis-port=6379 \
  --admin-firstname=admin \
  --admin-lastname=admin \
  --admin-email=admin@example.com \
  --admin-user=admin \
  --admin-password=admin123 \
  --language=ja_JP \
  --currency=JPY \
  --timezone=Asia/Tokyo \
  --use-rewrites=1
用途に合わせてカスタマイズしてインストールしてください。
あとはその他の設定をしていきます。
 bin/magento config:set --lock-env web/secure/offloader_header X-Forwarded-Proto

 bin/magento config:set --lock-env web/secure/use_in_frontend 1
 bin/magento config:set --lock-env web/secure/use_in_adminhtml 1

 bin/magento config:set --lock-env system/full_page_cache/caching_application 2
 bin/magento config:set --lock-env system/full_page_cache/ttl 604800

 bin/magento config:set --lock-env catalog/search/enable_eav_indexer 1

 bin/magento config:set --lock-env dev/static/sign 0

 bin/magento deploy:mode:set -s developer
 bin/magento cache:disable block_html full_page

 bin/magento indexer:reindex
 bin/magento cache:flush
9. 2FAの設定
$ TFA_SECRET=$(python3 -c "import base64; print(base64.b32encode(bytearray('$(pwgen -A1 128)', 'ascii')).decode('utf-8'))" | sed 's/=*$//')
$ OTPAUTH_URL=$(printf "otpauth://totp/app.practice-01.test%%3Aadmin%%40example.com?issuer=app.practice-01.test&secret=%s" "${TFA_SECRET}")
$ bin/magento config:set --lock-env twofactorauth/general/force_providers google
Value was saved in app/etc/env.php and locked.
TFA_SECRET= ~~~:2FA用の秘密鍵の生成をします。
OTPAUTH_URL= ~~~:Google Authenticator用のOTP URLを生成します。
bin/magento config:set --lock-env ~~~ :Googleプロバイダを有効にします。
注意
ドキュメントによると、magento2.4.8ではバグがあるため、
app/etc/env.php を修正するように記載があります。
【systemのtwofactorauthを修正】
'twofactorauth' => [
    'general' => [
        'force_providers' => 'google'
    ]
]
【追加】
'twofactorauth' => [
  'general' => [
    'force_providers' => 'google'
  ]
]
次にadminユーザーに2FAを紐付けます。
以下コマンドが成功しなかった場合、上記の修正が反映されてない可能性もあるので、キャッシュクリアなど試してみてください。
$ bin/magento security:tfa:google:set-secret admin "${TFA_SECRET}"
Google OTP secret has been set
2FAの設定は以上です。
あとは以下で設定の確認とQRコードの発行をして完了です!
$ printf "%s\n\n" "${OTPAUTH_URL}"
$ printf "2FA Authenticator Codes:\n%s\n" "$(oathtool -s 30 -w 10 --totp --base32 "${TFA_SECRET}")"

$ segno "${OTPAUTH_URL}" -s 4 -o "pub/media/${ADMIN_USER}-totp-qr.png"
$ printf "%s\n\n" "https://${TRAEFIK_SUBDOMAIN}.${TRAEFIK_DOMAIN}/media/${ADMIN_USER}-totp-qr.png?t=$(date +%s)"
最後に以下にアクセスし、表示されれば成功です!
- https://app.[プロジェクト名].test/
- https://app.[プロジェクト名].test/admin/
- https://rabbitmq.[プロジェクト名].test/
- https://elasticsearch.[プロジェクト名].test/
windowsの場合、こちらを記載していないとアクセスできないので注意してください。
127.0.0.1 app.[プロジェクト名].test app.[プロジェクト名].test/admin/ rabbitmq.[プロジェクト名].test/ elasticsearch.[プロジェクト名].test/