前書き
Front用のPythonモジュールとSpringBootで作ったAPIを連携するといったことをしてみたので、流れのメモ書きを残します。
Pythonモジュールは Pyramid と呼ばれるWEBフレームワークを用いています。
全体のざっくりした流れ
-
ブラウザからHTTPリクエストを送る
↓
-
Pythonで受け取って、リクエストを作成
↓
-
APIにリクエストを送り、レスポンスを受け取る
↓
レスポンスを加工して、テンプレートファイルをブラウザに表示する
詳細
Python / SpringBootAPI を起動
ブラウザからのリクエストを受け取る為に、Pythonモジュールを起動し、
Pythonからリクエストを受け取るために、APIを起動しておきます。
(env) username@host:~/dirname/PythonProject1$ pserve development.ini
Starting server in PID 6660.
Serving on http://0.0.0.0:50001
ブラウザからHTTPリクエスト送信
下記のURLをブラウザに入力。
http://0.0.0.0:50001/hotel/
context/view.config
ここでルーティングを管理。
/hotel にアクセスがきた場合にHotelListContext の view_hotel_list の処理を開始する。
def set_detail_setting(config):

    RootContext.set_child(
        name='hotel',
        factory=HotelListContext,
    )

    config.add_view(
        context=HotelListContext,
        view=context_as_view,
        attr='view_hotel_list',
        renderer='hotel/common/hotel/listHotel.jinja2',
        request_method='GET',
        name=''
    )
context/list/list.py
Executorに処理を渡し、結果をvalidateやデータ加工して結果の受け渡しを行う。
class HotelListContext(HotelListBaseContext):

    def view_hotel_list(self):
        logger.info('Start search hotel result.')

        list_executor = Executor(self.list_service)
        list_form = self.validated_form(HotelSchema)
        response = list_executor.execute_search_products(list_form.data)
        logger.info(response)
        return {
            'data': {
                'hotels': response['body']['items'],
                'pagination': response['body']['pagination']
            }
        }
context/list/executor/__init__.py
リクエスト用のJSONを作成した後に、APIへリクエストを投げる。
レスポンスを /context/list/list.py に戻す。
class HotelSearchListExecutor(object):

    def __init__(self, service):
        self.service = service

    def execute_search_products(self, condition):
        detail_condition = {
            'header': executor_create_header_request(condition),
            'body': {
                'query': condition.get('query')
                'searchBy': condition.get('searchBy'),
                'pageNum': condition.get('pageNum'),
                'sortBy': condition.get('pageNum'),
                'sortOrder': condition.get('sortOrder')
            }
        }
        return self.service.search_hotel(detail_condition)
listHotel_jinja2
/context/list/list.py から渡されたJSONをjinja2で表示
※受け取ったことを確認する為の簡単なものを使います。
<!DOCTYPE html>
<html lang=
"en">
<head>
    <title>Test page</title>
</head>
<body>
<table border=1>
    <tr>
        <td>id</td>
        <td>name</td>
        <td>cityCode</td>
    </tr>
    {% for item in data.hotels %}
        <tr>
            <td>{{ item.id }}</td>
            <td>{{ item.name }}</td>
            <td>{{ item.cityCode }}</td>
        </tr>
    {% endfor %}
</table>
</body>
</html>
流れの中で使われるメソッドや定義
development.ini
ここでAPIにリクエストを投げるときのURLを定義
URL = http://localhost:8080/hotel/
executor_helper.py
context/list/executor/__init__.py -> executor_create_header_request(condition)
上記処理で利用する、リクエストのヘッダのテンプレートです。
def executor_create_header_request(condition):

    return {
        'languageCode': 'en',
        'countryCode': 'US',
        'currencyCode': 'USD'
    }
schema/hotel/__init__.py
/context/list/list.py ⇒ self.validated_form(HotelSchema)
ここでvalidate処理を行う。
class HotelSchema(Schema):
    allow_extra_fields = True
    filter_extra_fields = True
    query = validators.UnicodeString(not_empty=False, if_missing='')
    sortBy = validators.UnicodeString(not_empty=False, if_missing='name')
    pageNum = validators.UnicodeString(not_empty=False, if_missing='1')
    sortOrder = validators.UnicodeString(not_empty=False, if_missing='ASC')
ブラウザでの結果
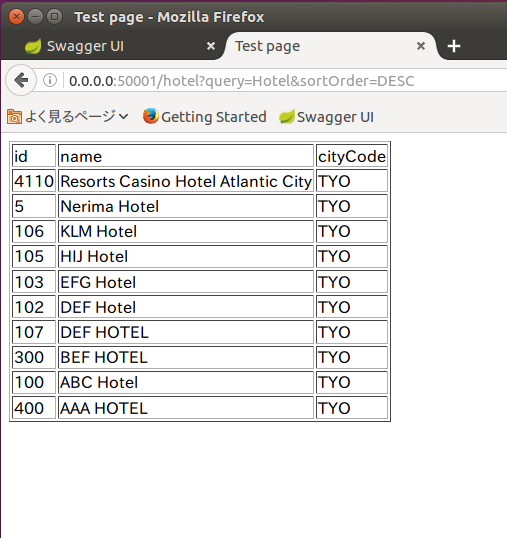
DBのデータがAPIを通してブラウザ画面に表示されています。
これでPythonモジュールとAPIの連携ができたことが確認できました。