使用する製品
前提
下記の手順を実施してブラウザからCData API Serverにアクセス出来る事。
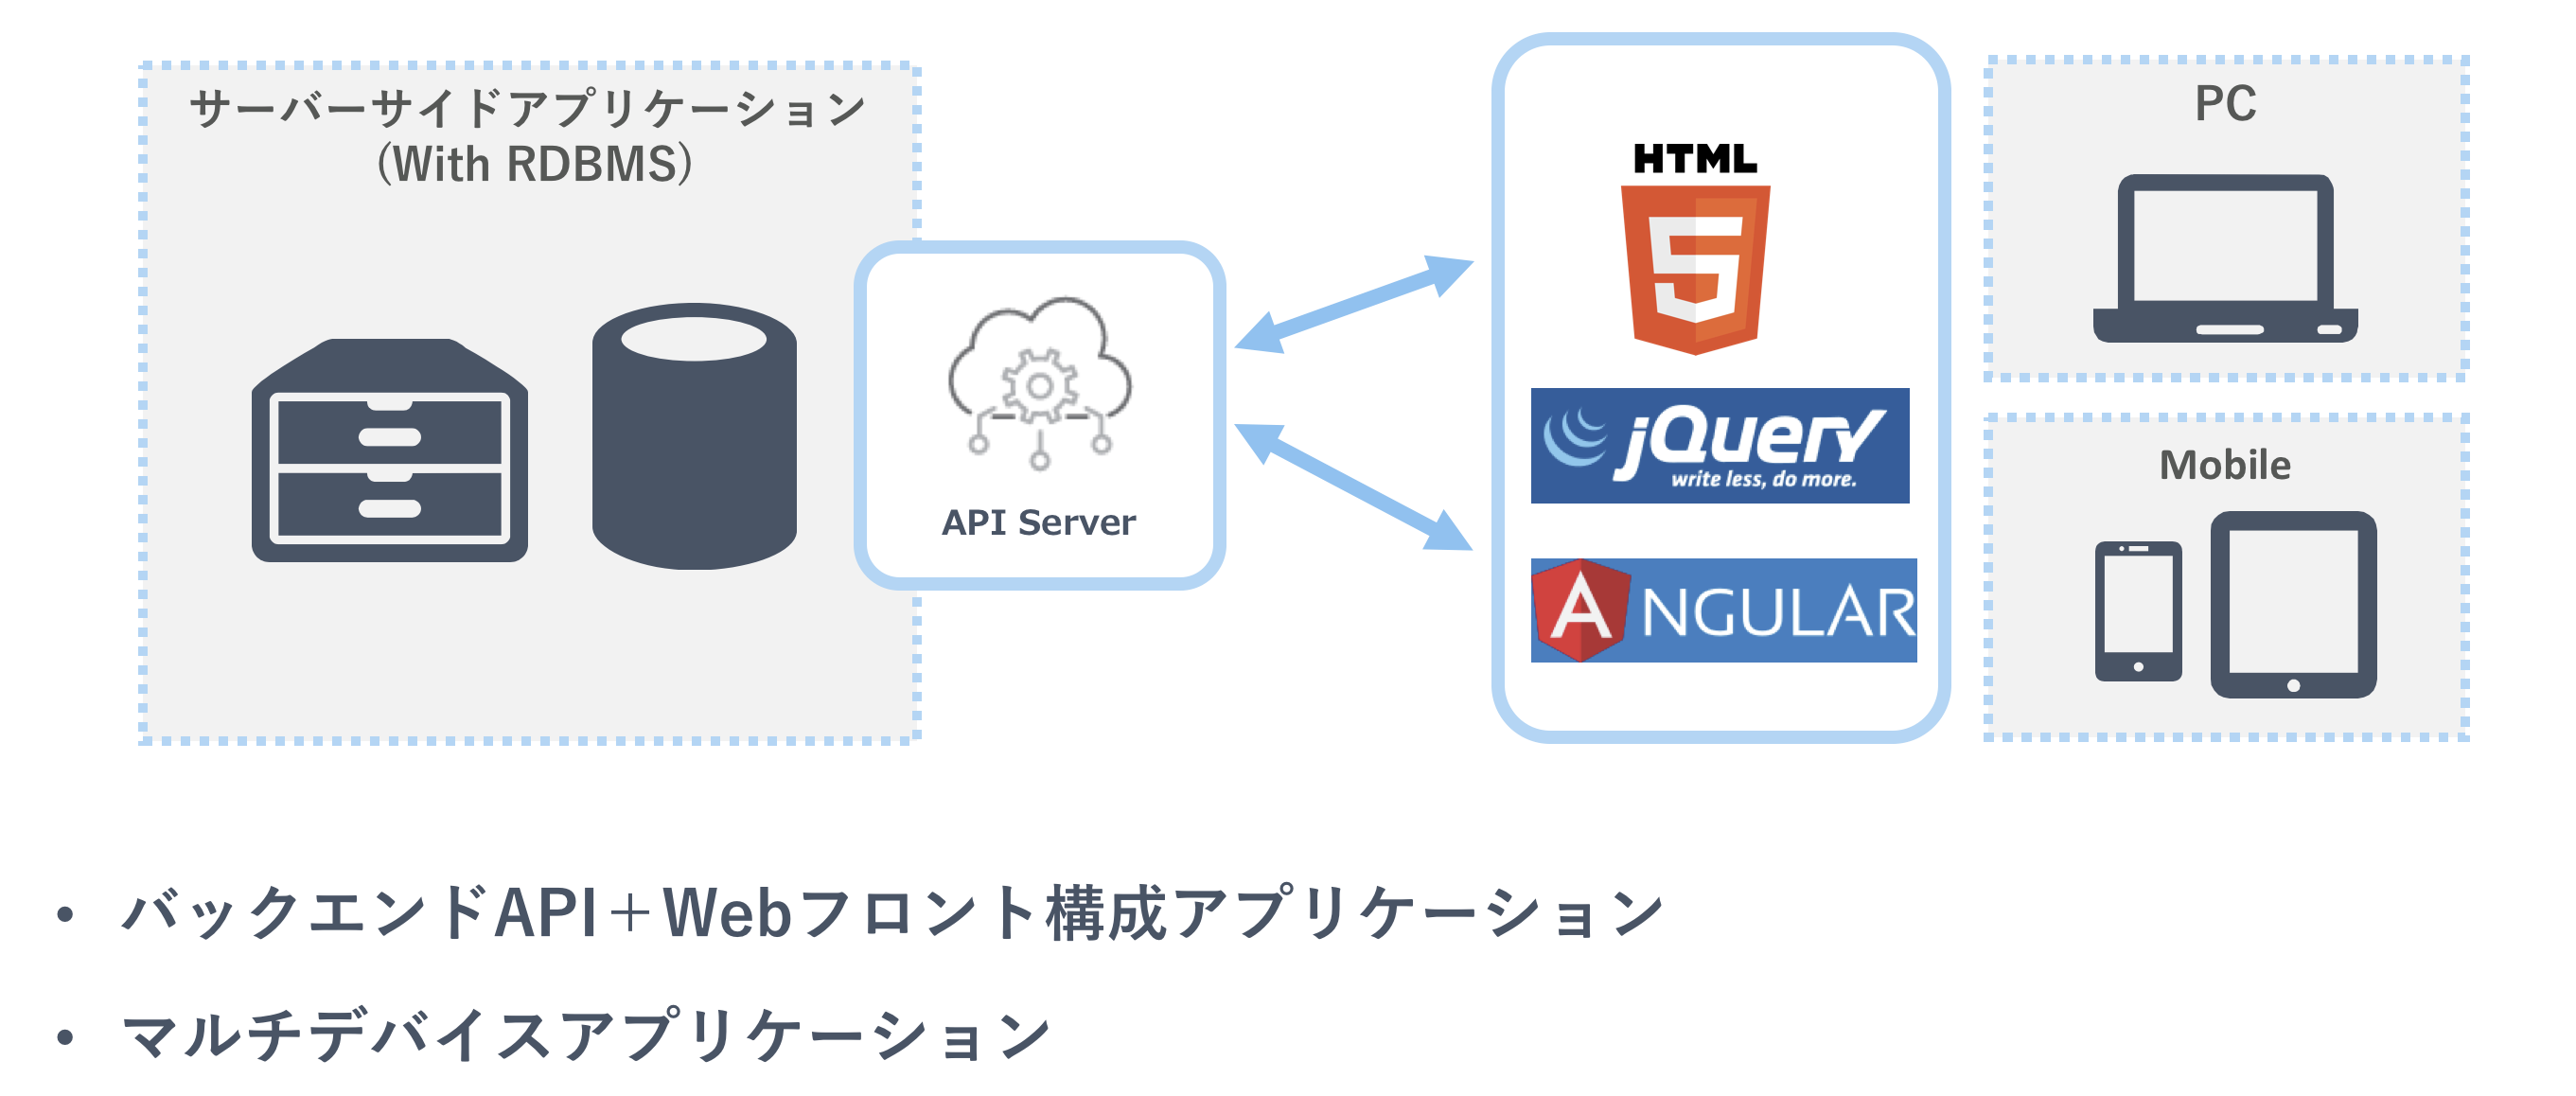
CData Software ハンズオン(RDBからWebAPIをポイント&クリックで作成 編)
動作イメージ
参考
Using AngularJS to Build Dynamic Web Pages with MySQL Data
手順
APIServerの設定
「設定 > サーバー」タブ内の「クロスオリジンリソースシェアリング (CORS)」の設定を行います。これは、Ajaxアプリケーションから複数の異なるドメインへのアクセスを許可するための設定です。
| 項目 | 値 |
|---|---|
| クロスオリジンリソースシェアリング (CORS)を有効化する | ON |
| すべてのドメインを '*' なしで許可 | ON |
| Access-Control-Allow-Methods: | GET,PUT,POST,OPTIONS |
| Access-Control-Allow-Headers: | authorization |
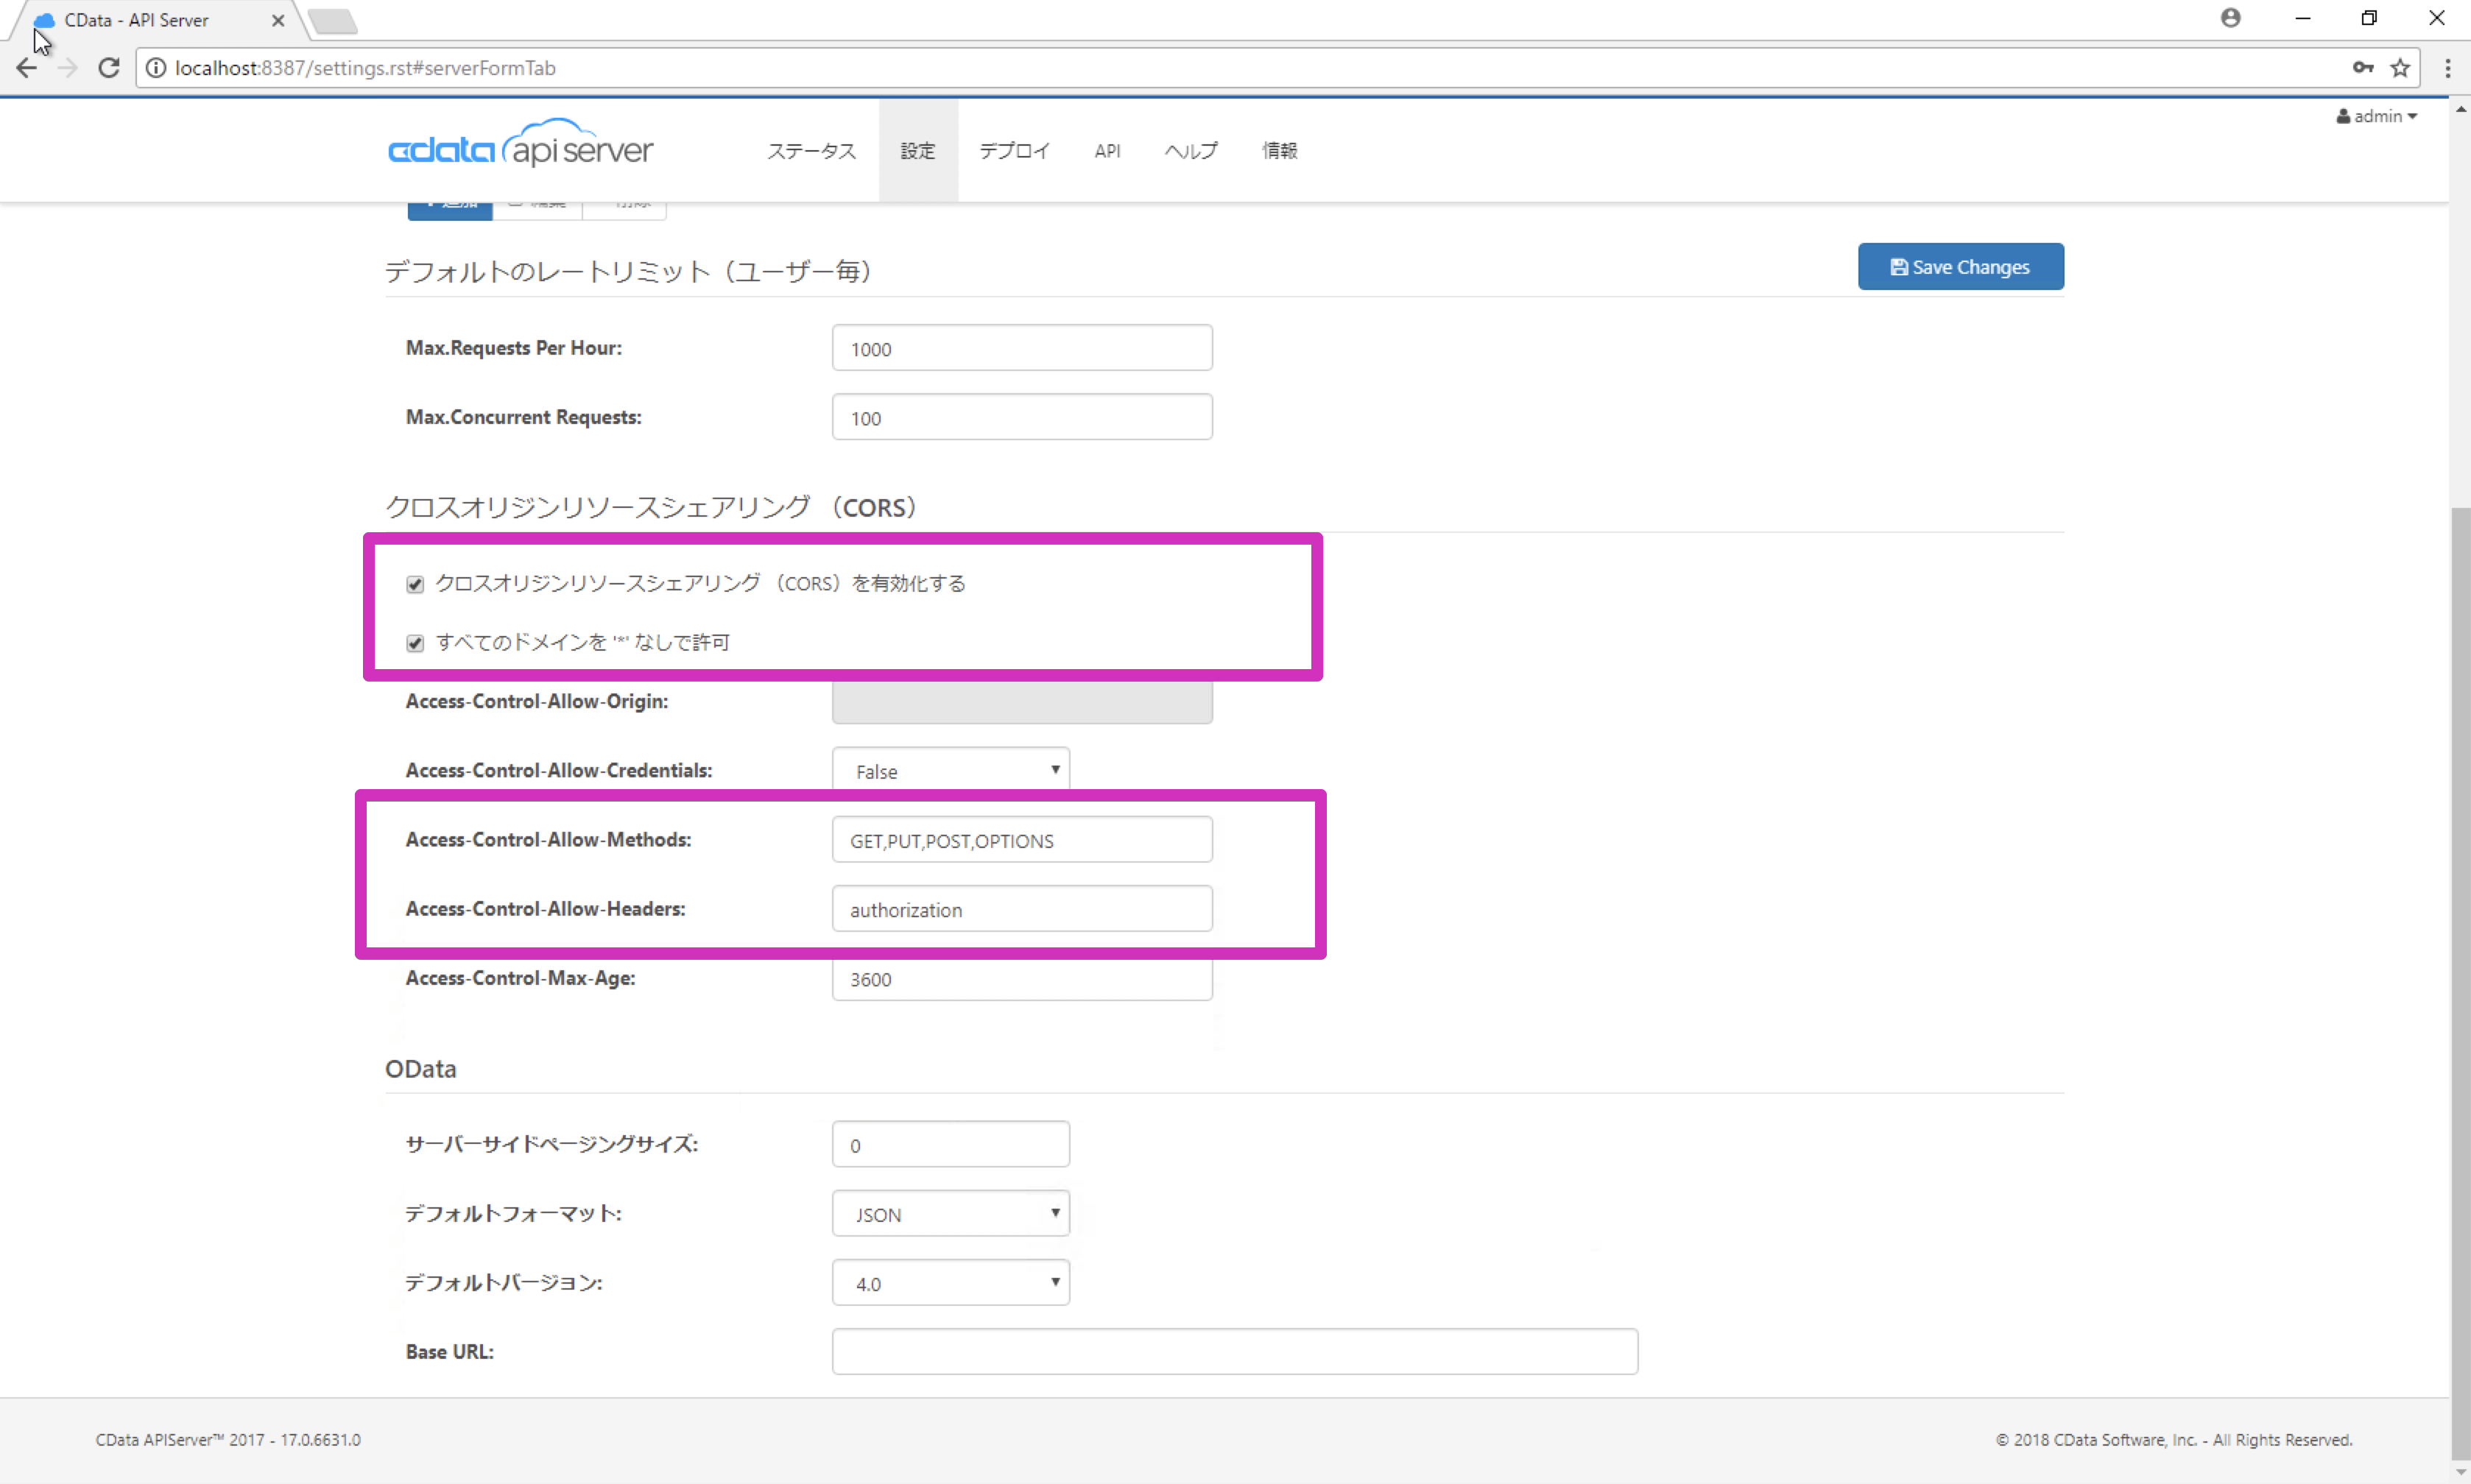
設定したら「Save Changes」ボタンをクリックして保存します。
AngularJSシングルページアプリケーションの作成
下記コードをコピーしてエディタで開きます。
<!DOCTYPE html>

<html>
<style>
table, th, td {
border: 1px solid grey;
        border-collapse: collapse;
padding: 5px;
}
table tr:nth-child(odd) {
  background-color: #f1f1f1;
}
table tr:nth-child(even) {
  background-color: #ffffff;
}
</style>
<script src="http://ajax.googleapis.com/ajax/libs/angularjs/1.4.8/angular.min.js"></script>
<body ng-app="DataApp" ng-controller="SimpleController">
<label>Select a Table</label>
<br>
<select name="tableDropDown" id="tableDropDown"
ng-options="table.name for table in data.availableTables track by table.url"
ng-model="data.selectedTable"
ng-change="getTableColumns()">
</select>
<label>Select Columns</label>
<br />
<select name="columnMultiple" id="columnMultiple"
ng-options="column.name for column in data.availableColumns | orderBy:'name' track by column.id"
ng-model="data.selectedColumns"
multiple>
</select>
<button name="getTableData" id="btnGetTableData"
ng-click="getTableData()"
ng-disabled="data.selectedColumns.length == 0">
Get {{data.selectedTable.name}} Data
</button>
<br />
<br />

<table>
<tr>
<th ng-repeat="column in data.selectedColumns | orderBy:'name'">{{column.name}}</th>
</tr>
<tr ng-repeat="row in data.tableData">
<td ng-repeat="column in data.selectedColumns">{{ row[column.name] }}</td>
</tr>
</table>
<script>
var app = angular.module('DataApp', []);
app.controller('SimpleController', function($scope, $http) {
    init();

    /*
     * Initialize the data object, which will be used with Angular to
     * build the different parts of our SPA and to retrieve data from
     * the API Server.
     */
    function init() {
    $scope.data = {
    availableTables: [],
    availableColumns: [],
    selectedTable: {},
    tableData: []
};

/*
 * Call to the API Server to get the list of tables, select the
 * first table by default, and retrieve the available columns.
 *
 * The call to the API Server returns standard OData, so the
 * data we need is in the value object in the JSON returned.
 */
$http.get("http://server:port/api.rsc",{headers: {"Authorization": "Basic "  + btoa("MyUser:MyAuthtoken")}})
.then(function (response) {
    $scope.data.availableTables = response.data.value;
    $scope.data.selectedTable = $scope.data.availableTables[0];
    $scope.getTableColumns();
    });
}

/*
 * Call to the API Server to get the list of columns for the
 * selected table.
 *
 * The data returned here is not standard OData, so we drill
 * down into the response to extract exactly the data we need
 * (an array of column names).
 *
 * With the column names retrieved, we will transform the array
 * of column names into an array of objects with a name and Id
 * field, to be used when we build an HTML select.
 */
$scope.getTableColumns = function () {
  $scope.data.tableData = [];
  $scope.data.selectedColumns = [];
  table = $scope.data.selectedTable.url;
  if (table != "") {
    $http.get("http://server:port/api.rsc/" + table + "/$metadata?@json", {headers: {"Authorization": "Basic "  + btoa("MyUser:MyAuthtoken")}})
      .then(function (response) {
          $scope.data.availableColumns = response.data.items[0]["odata:cname"];
          for (i = 0; i < $scope.data.availableColumns.length; i++) {
          $scope.data.availableColumns[i] = { id: i, name: $scope.data.availableColumns[i] };
          }
          });
  }
}

/*
 * Call to the API Server to get the requested data. We get the data
 * based on the table selected in the associated HTML select.
 * Then we create a comma-separated string of the selected columns.
 *
 * With the table and columns known, we can make the appropriate call
 * to the API Server. Because the driver returns standard OData, the
 * table data is found in the value field of the response.
 */
$scope.getTableData = function () {
  table = $scope.data.selectedTable.url;
  columnsArray = $scope.data.selectedColumns;
  columnString = "";
  for (i = 0; i < columnsArray.length; i++) {
    if (columnString != "") {
      columnString += ",";
    }
    columnString += columnsArray[i].name;
  }

  if (table != "") {
    $http.get("http://server:port/api.rsc/" + table + "?$select=" + columnString, {headers: {"Authorization": "Basic "  + btoa("MyUser:MyAuthtoken")}})
      .then(function (response) { $scope.data.tableData = response.data.value; });
  } else {
    $scope.data.tableData = [];
  }
}
});
</script>
</body>
</html>
下記部分の文字列を置換して、適当な名称(例:CDataAngular.html)でHTMLファイルを作成してローカルマシンに保存します。
| 置換前 | 置換後 | 説明 |
|---|---|---|
| http://server:port/api.rsc | http://localhost:8387/api.rsc | CDataAPIServerのサービスディレクトリエンドポイント。3箇所あり。 |
| btoa("MyUser:MyAuthtoken") | 例: btoa("CData:2p7R0w3c5C4h4i7J2b3x") | CDataAPIServer上で作成したユーザーとAuthトークンを左記の例の通りコロン区切り。3箇所あり。 |
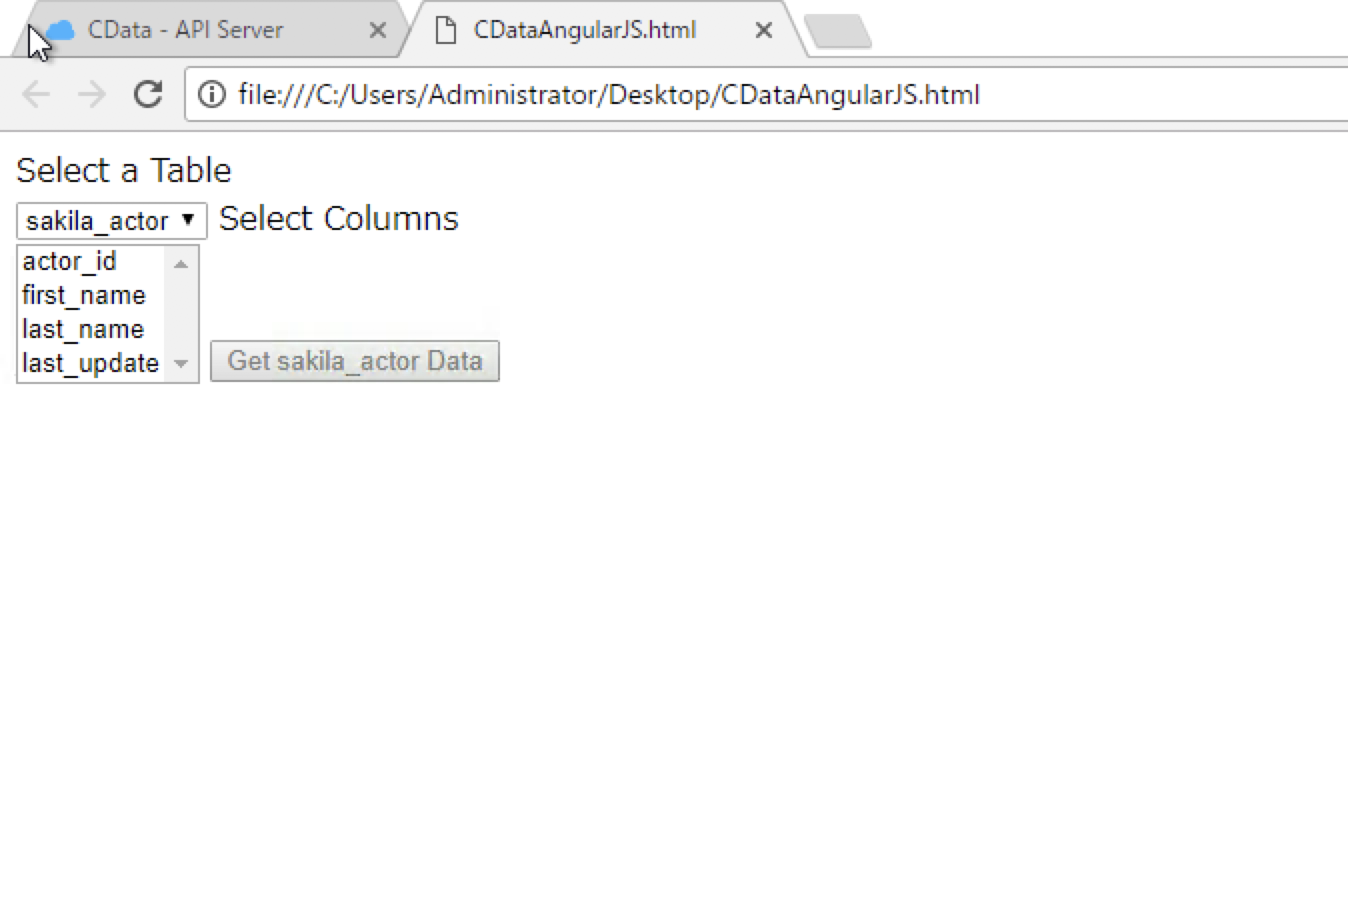
AngularJSシングルページアプリケーションの実行
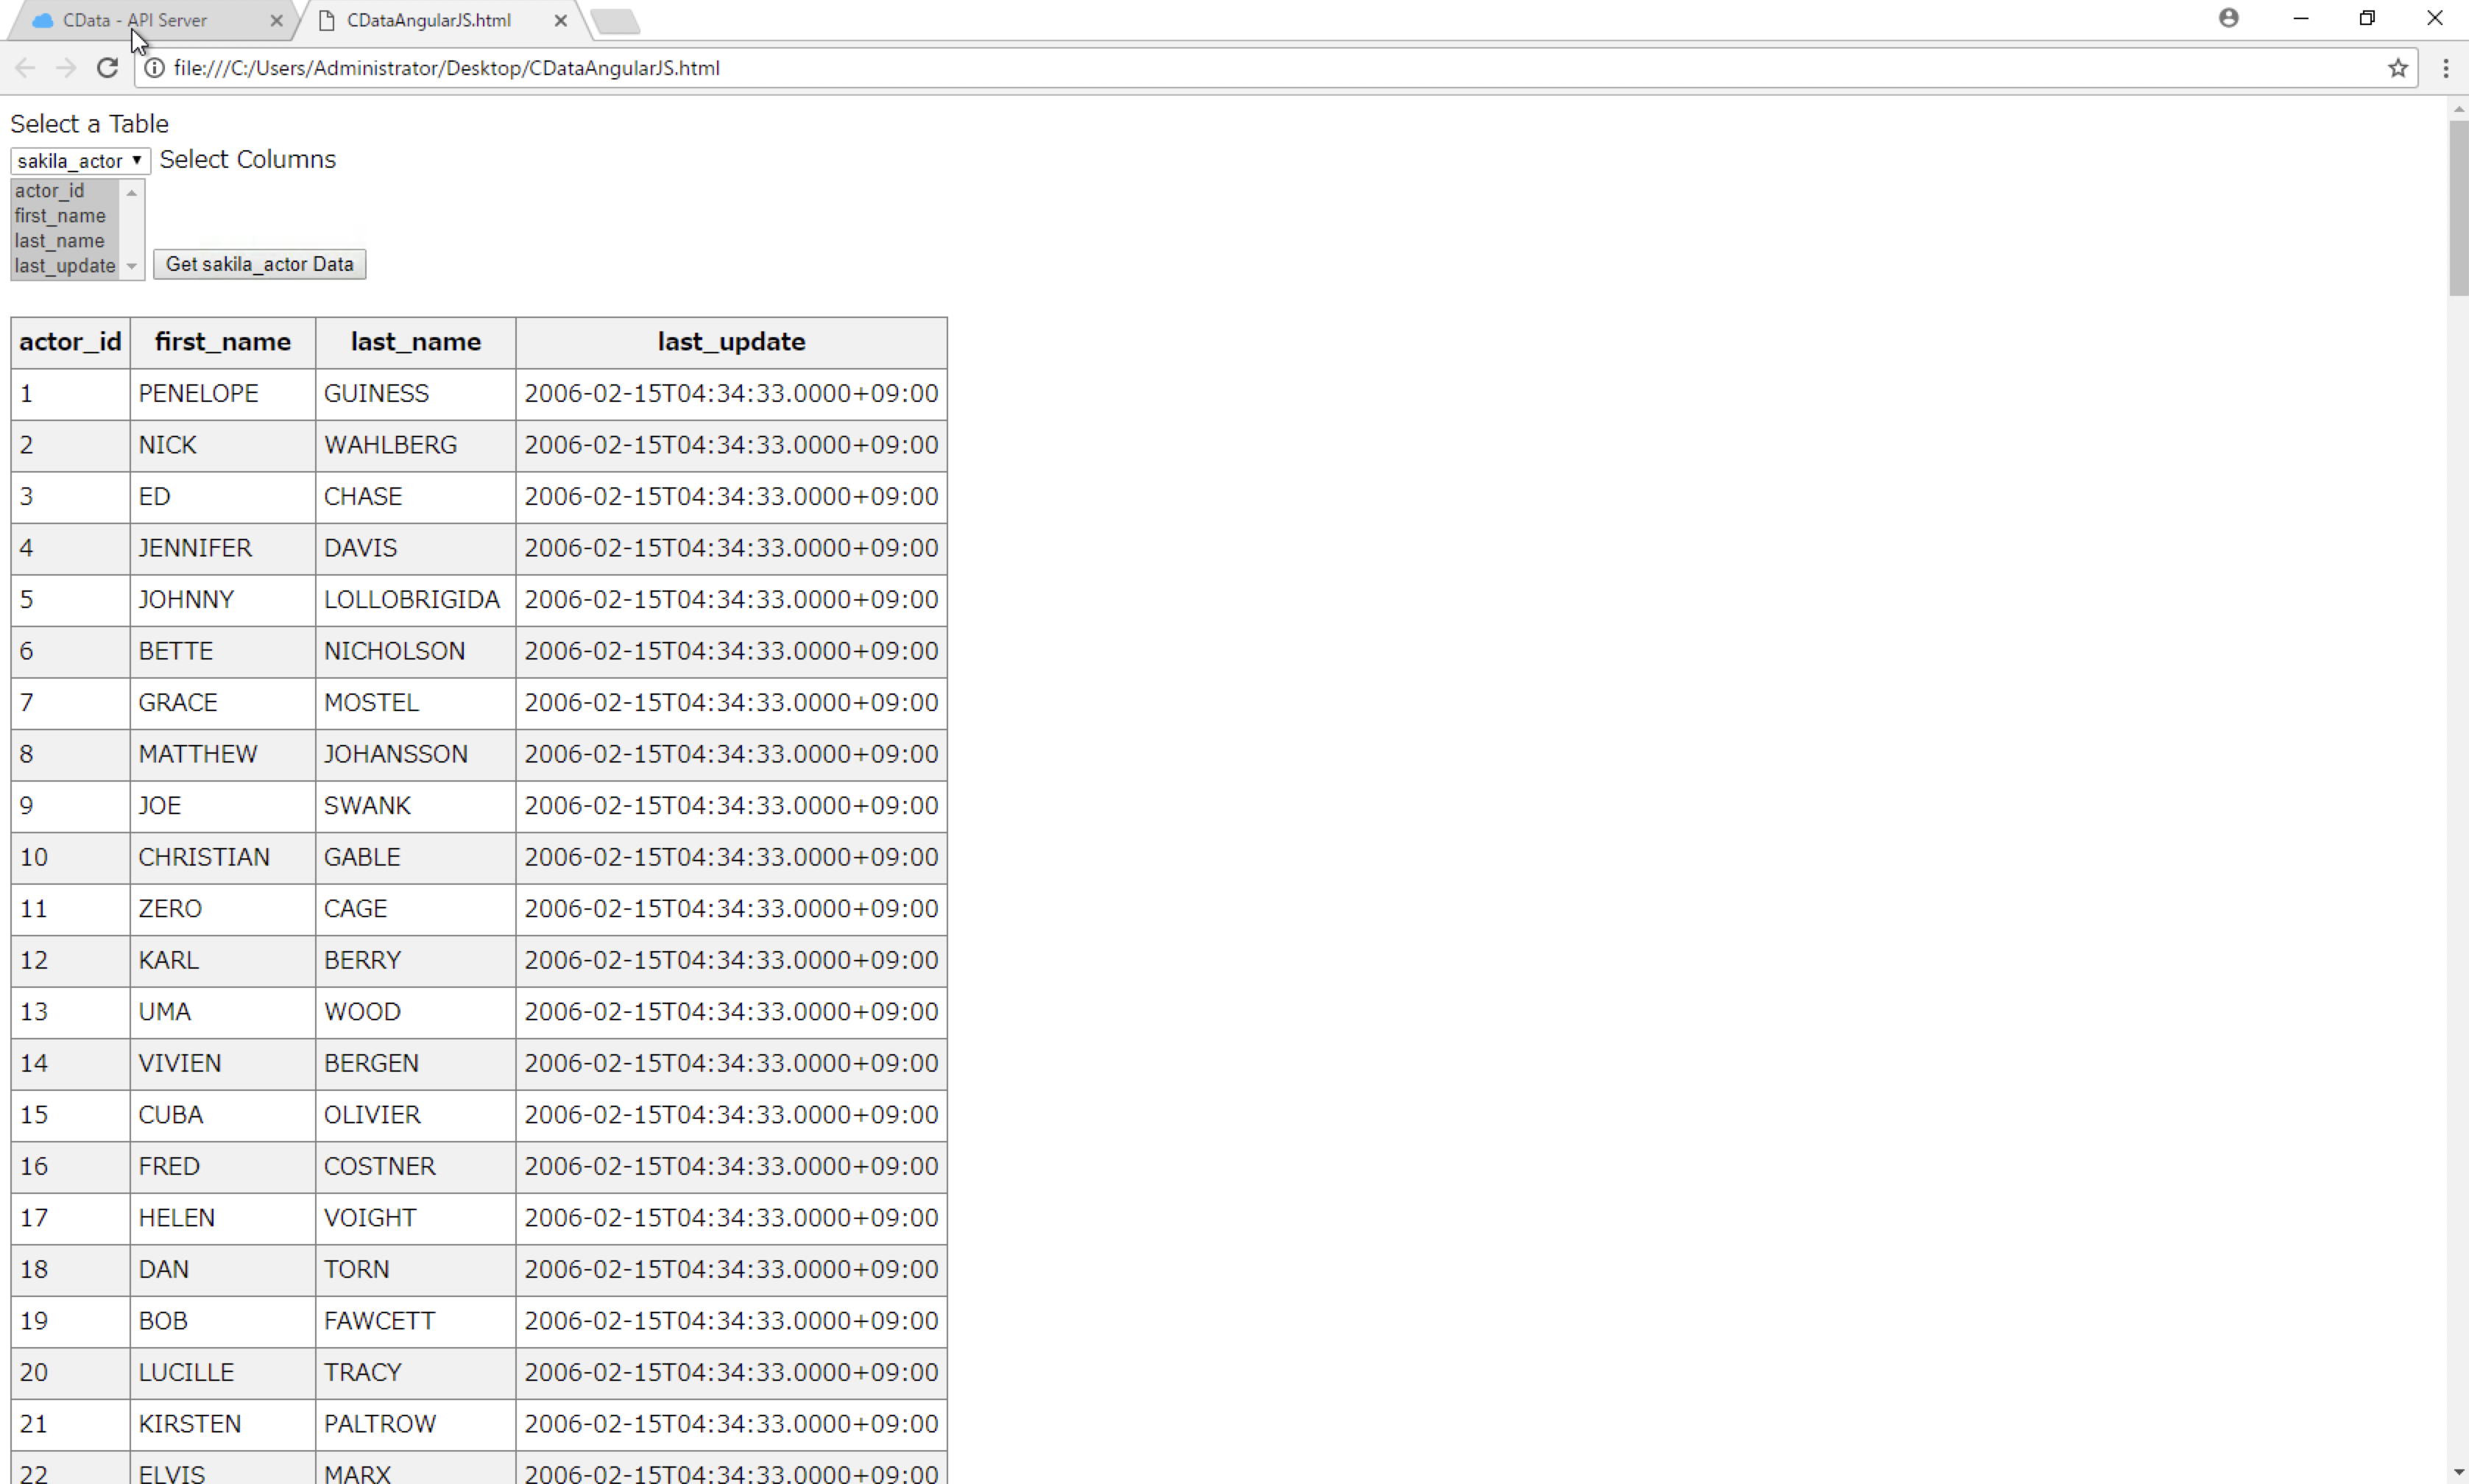
保存したHTMLファイルをブラウザで開きます。「Select a Table」のドロップダウンリストでCDataAPIServerで作成したリソースの一覧が表示されます。リソースを選択して、表示する項目(SHIFT・Controlボタンで一括選択可能)を選択して「Get_リソース名」ボタンをクリックします。
リソース名に相当するMySQLのテーブル内のデータが表示されれば成功です。
まとめ
CData API Server で作成したWebAPIにAngularJSシングルページアプリケーションからアクセスすることができました。