はじめに
今回はXクローンの実装にてフォロー機能を実装したので、自分自身の備忘録として、また今後フォロー機能を実装する方のお役に立てればと思いこちらの記事を書くことにしました。
フォロー機能の作成
要件として、ユーザーをフォローしたり、フォロー解除できる機能を実装する。
※ 前提として、ユーザー登録がすでに実装されているものとします。
フォロー機能実装に必要なファイル
作成するモデル・テーブル
- relationsipモデル
- relationsipテーブル
作成するコントローラー
- relationsipsコントローラー
フォロー機能について
- フォロー機能では、
フォローする人とフォローされる人がいる -
フォローする人とフォローされる人はどちらも、"User"である - Userは複数のUserをフォローすることができる
- Userは複数のUserにフォローされることができる
この関係性はN:Nの関係性なので中間テーブルが必要!
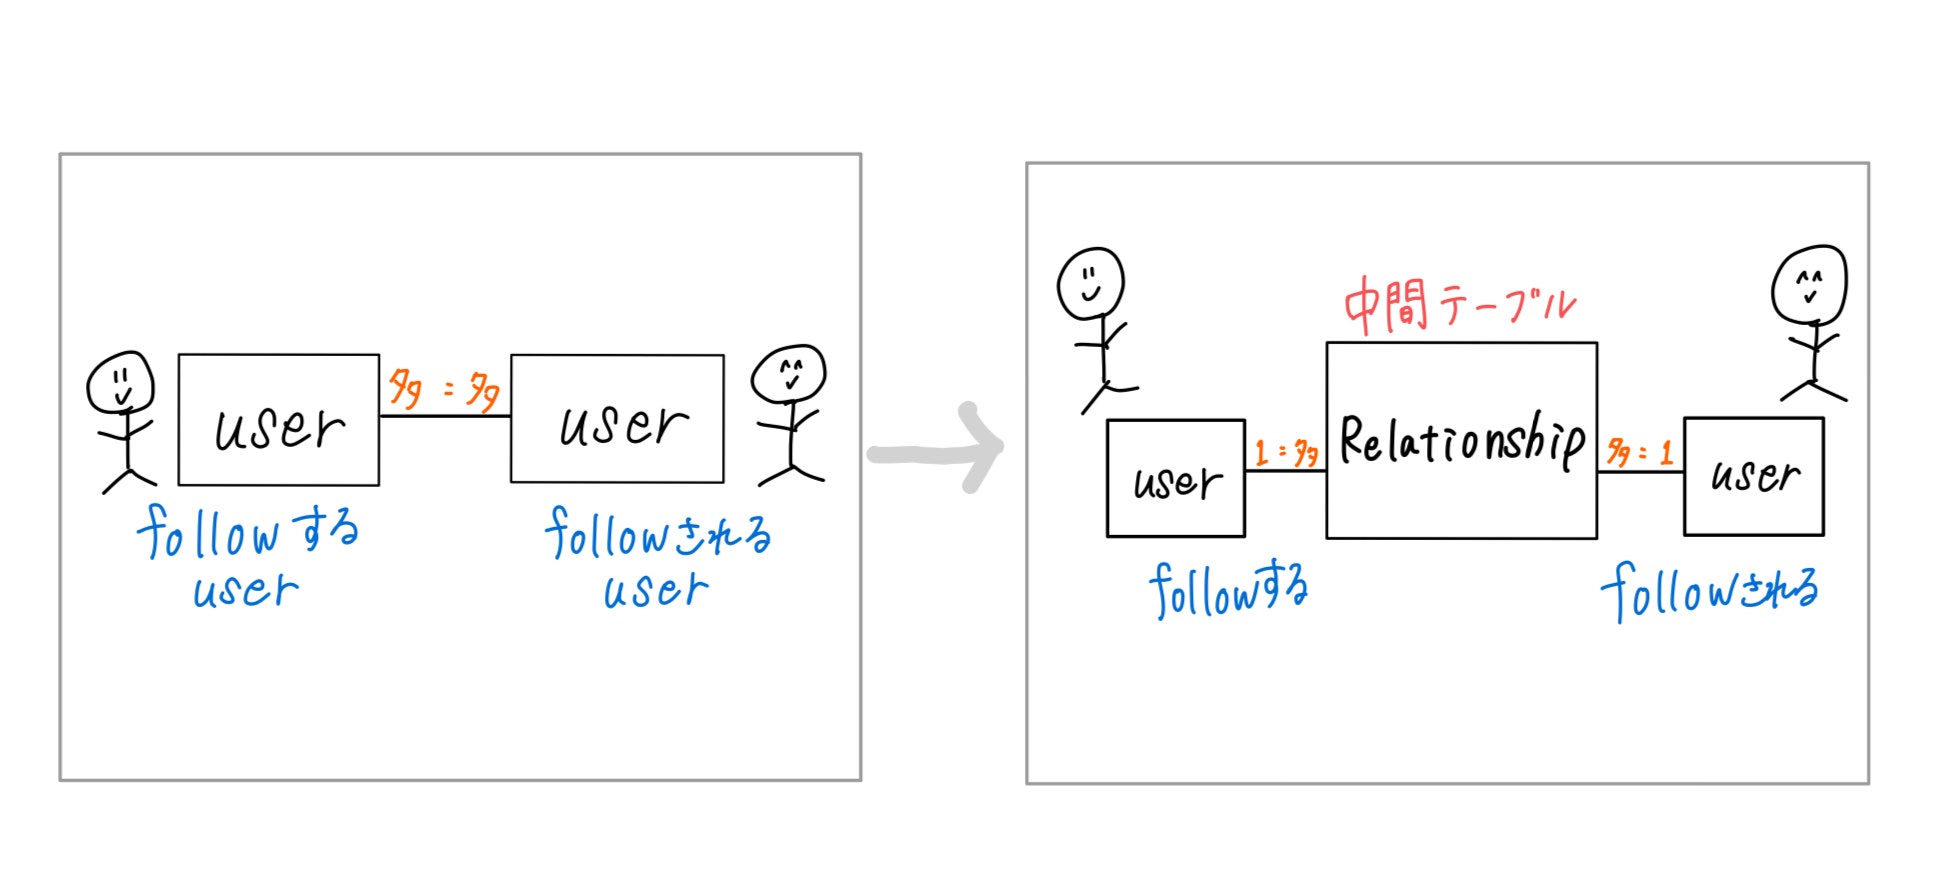
ER図で表すと...
フォローする側もフォローされる側もどちらもUserなので、今回は区別するために
- フォローするユーザー
following - フォローされたユーザー
follower
というテーブルを使用します。
(実際にはfollowingsテーブルとfollowersテーブルは存在せずuserテーブルになります)
そして、誰が誰をフォローしているかと言う情報を格納するためにrelationsipsテーブルを作成します。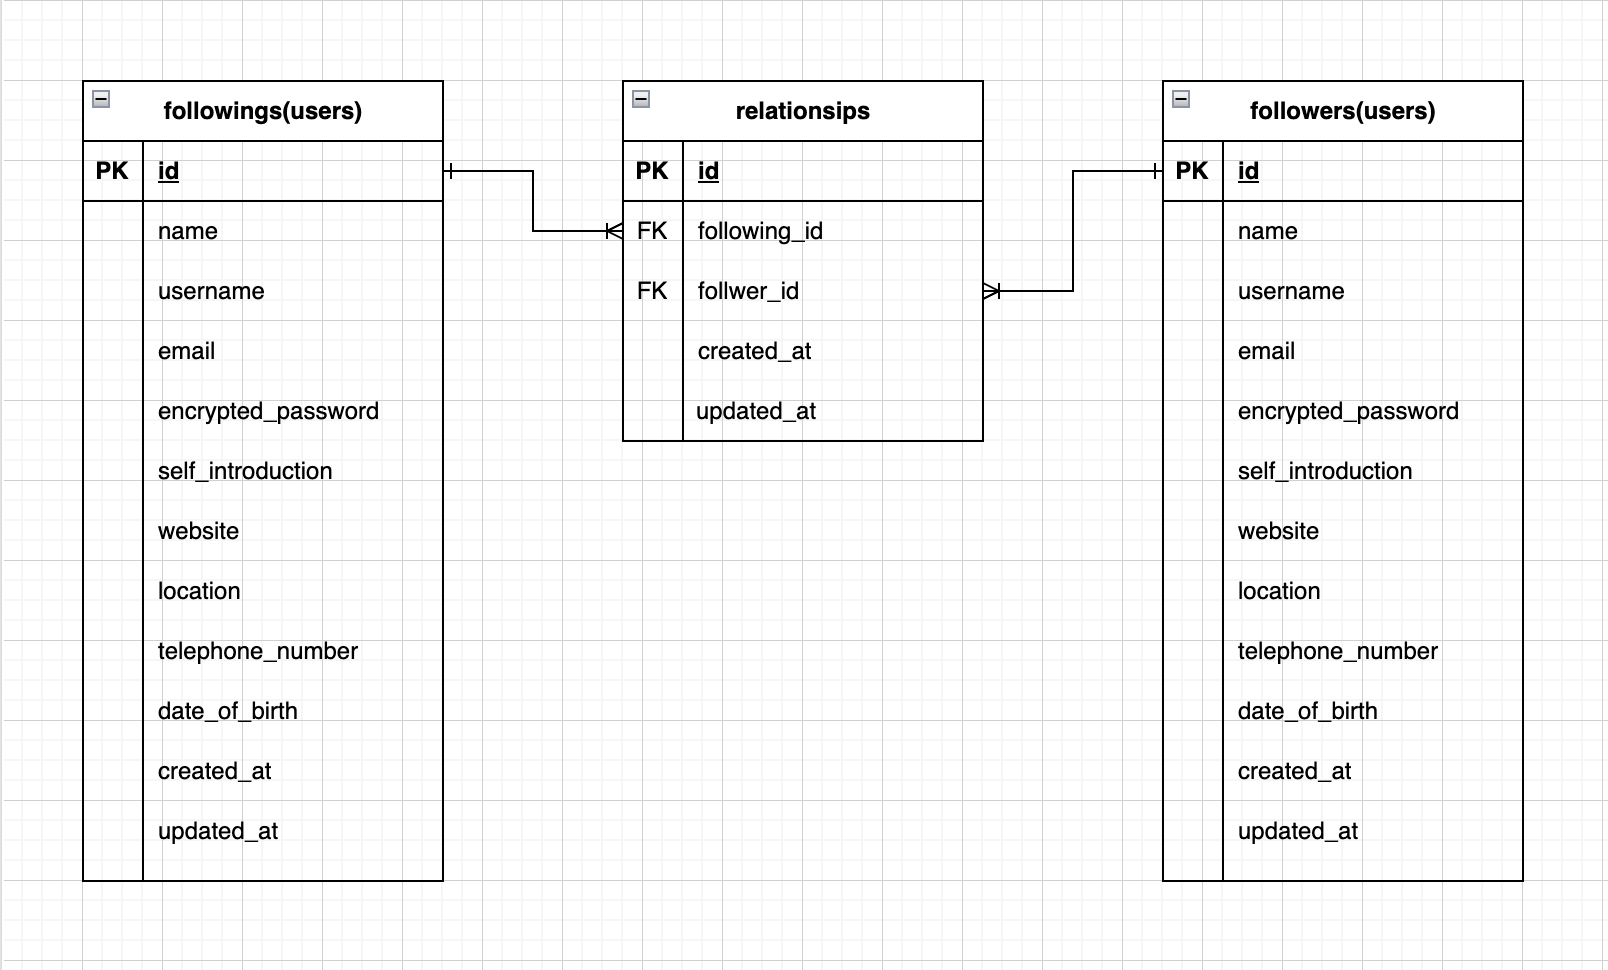
カラムの
following_id : フォローしたユーザー
follower_id : フォローされたユーザー
はややこしいので、特に注意して実装していきたいと思います。
モデルの作成
ここまで見て来たフォロー機能についてを参考にしてモデルの作成をしていきたいと思います。
followingsテーブルと、followersテーブルは実際には、usersテーブルなので、今回作成するのは、relationsipsテーブルだけになります。
rails g model Relationsip
class CreateRelationships < ActiveRecord::Migration[7.0]
  def change
    create_table :relationships do |t|
      t.references :following, foreign_key: { to_table: :users }
      t.references :follower, foreign_key: { to_table: :users }

      t.timestamps
    end
  end
end
rails db:migrate
関連付けの設定
userモデルと、relationshipモデルの関連付けを記述していきます。
class Relationship < ApplicationRecord
  belongs_to :following, class_name: 'User'
  belongs_to :follower, class_name: 'User'
end
本当であれば、belongs_to :userとするところだけど、どっちがどっちのuserかわからなくなるので、
ここでは、フォローする側とされる側のfollowingとfollowerに分けて記述しています。
また、class_nameがないと、followingsテーブルと、followersテーブルを探しに行ってしまうので、class_name: 'User'として、usersテーブルからデータを持って来てもらうように設定しています。
class_nameとは
関連名と参照先のクラス名を異なるものに置き換えることができるオプション。
モデル名を直接指定できる。
class User < ApplicationRecord
  # フォローの関係,フォローした
  has_many :relationships, foreign_key: :following_id, dependent: :destroy
  # 一覧画面で使用する(あるユーザーがフォローしている人全員をとってくる)
  has_many :followings, through: :relationships, source: :follower

  # フォロワーの関係、フォローされた
  has_many :reverse_of_relationships, class_name: 'Relationship', foreign_key: :follower_id, dependent: :destroy
  # 一覧画面で使用する(あるユーザーをフォローしている人全員をとってくる)
  has_many :followers, through: :reverse_of_relationships, source: :following
end
まずは、フォローをした、されたの関係から見ていきます。
ここでは、relationshipsとreverse_of_relationshipsと設定しました。先ほどと同じ考え方で、わかりにくいため名前を変更してつけているだけです。
class_name: "Relationship"でRelationshipテーブルを参照します。
foreign_key(外侮キー)で参照するカラムを指定しています。
次に、フォロー・フォロワーの一覧画面で、user.followersという記述でフォロワーを表示したいので、throughでスルーするテーブル、sourceで参照するカラムを指定。
上の例では、relationshipsテーブルからfollowing_idのデータをreverse_of_relationshipsテーブルからfollower_idのデータを参照します。
メソッドの作成
# あるユーザが引数で渡されたuserにフォローされているか調べるメソッド
  def is_followed_by?(user)
    reverse_of_relationships.find_by(following_id: user.id).present?
  end
ルーティングの設定
userとrelationshipは関連づけられているためuserのidが必要になる。
そのため、relationsipsをネストする。
resources :users, only: %i[show edit update] do
    member do
      get :followings, :followers
    end
    resource :relationships, only: %i[create destroy]
  end

上記のルーティングの設定ができました。
userのidを含んだ形で、個々のリソースに対してfollowingとfollowersアクションの設定ができました。
menberとは?
resourecesで作成されるルートに、決められたルート以外のルートを追加するための処理のこと。
resources以外の自分で定義したアクションへのルーティングを設定する場合に使用する。
同じような場面で使用するものとして、collectionもある。こちらの使い分けは、
- member: アクションにidが渡されるため、idを使用した特定のデータに対するアクションの場合
- collection: idを渡さない。idの必要ない全体のデータに対するアクションの場合
今回は、following,followerアクションが必要かつ、それにはidが含まれている必要があるから、memberを使用しました。
controllerの作成
rails g controller relationships
class RelationshipsController < ApplicationController
  before_action :authenticate_user!

  def create
    following = current_user.relationships.build(follower_id: params[:user_id])
    following.save
    redirect_to request.referer
  end

  def destroy
    following = current_user.relationships.find_by(follower_id: params[:user_id])
    following.destroy
    redirect_to request.referer
  end
end
  def followings
    # フォローしている人の一覧
    @user = User.find(params[:id])
    @users = @user.followings
  end

  def followers
    # フォローされている人の一覧
    @user = User.find(params[:id])
    @users = @user.followers
  end
viewの設定
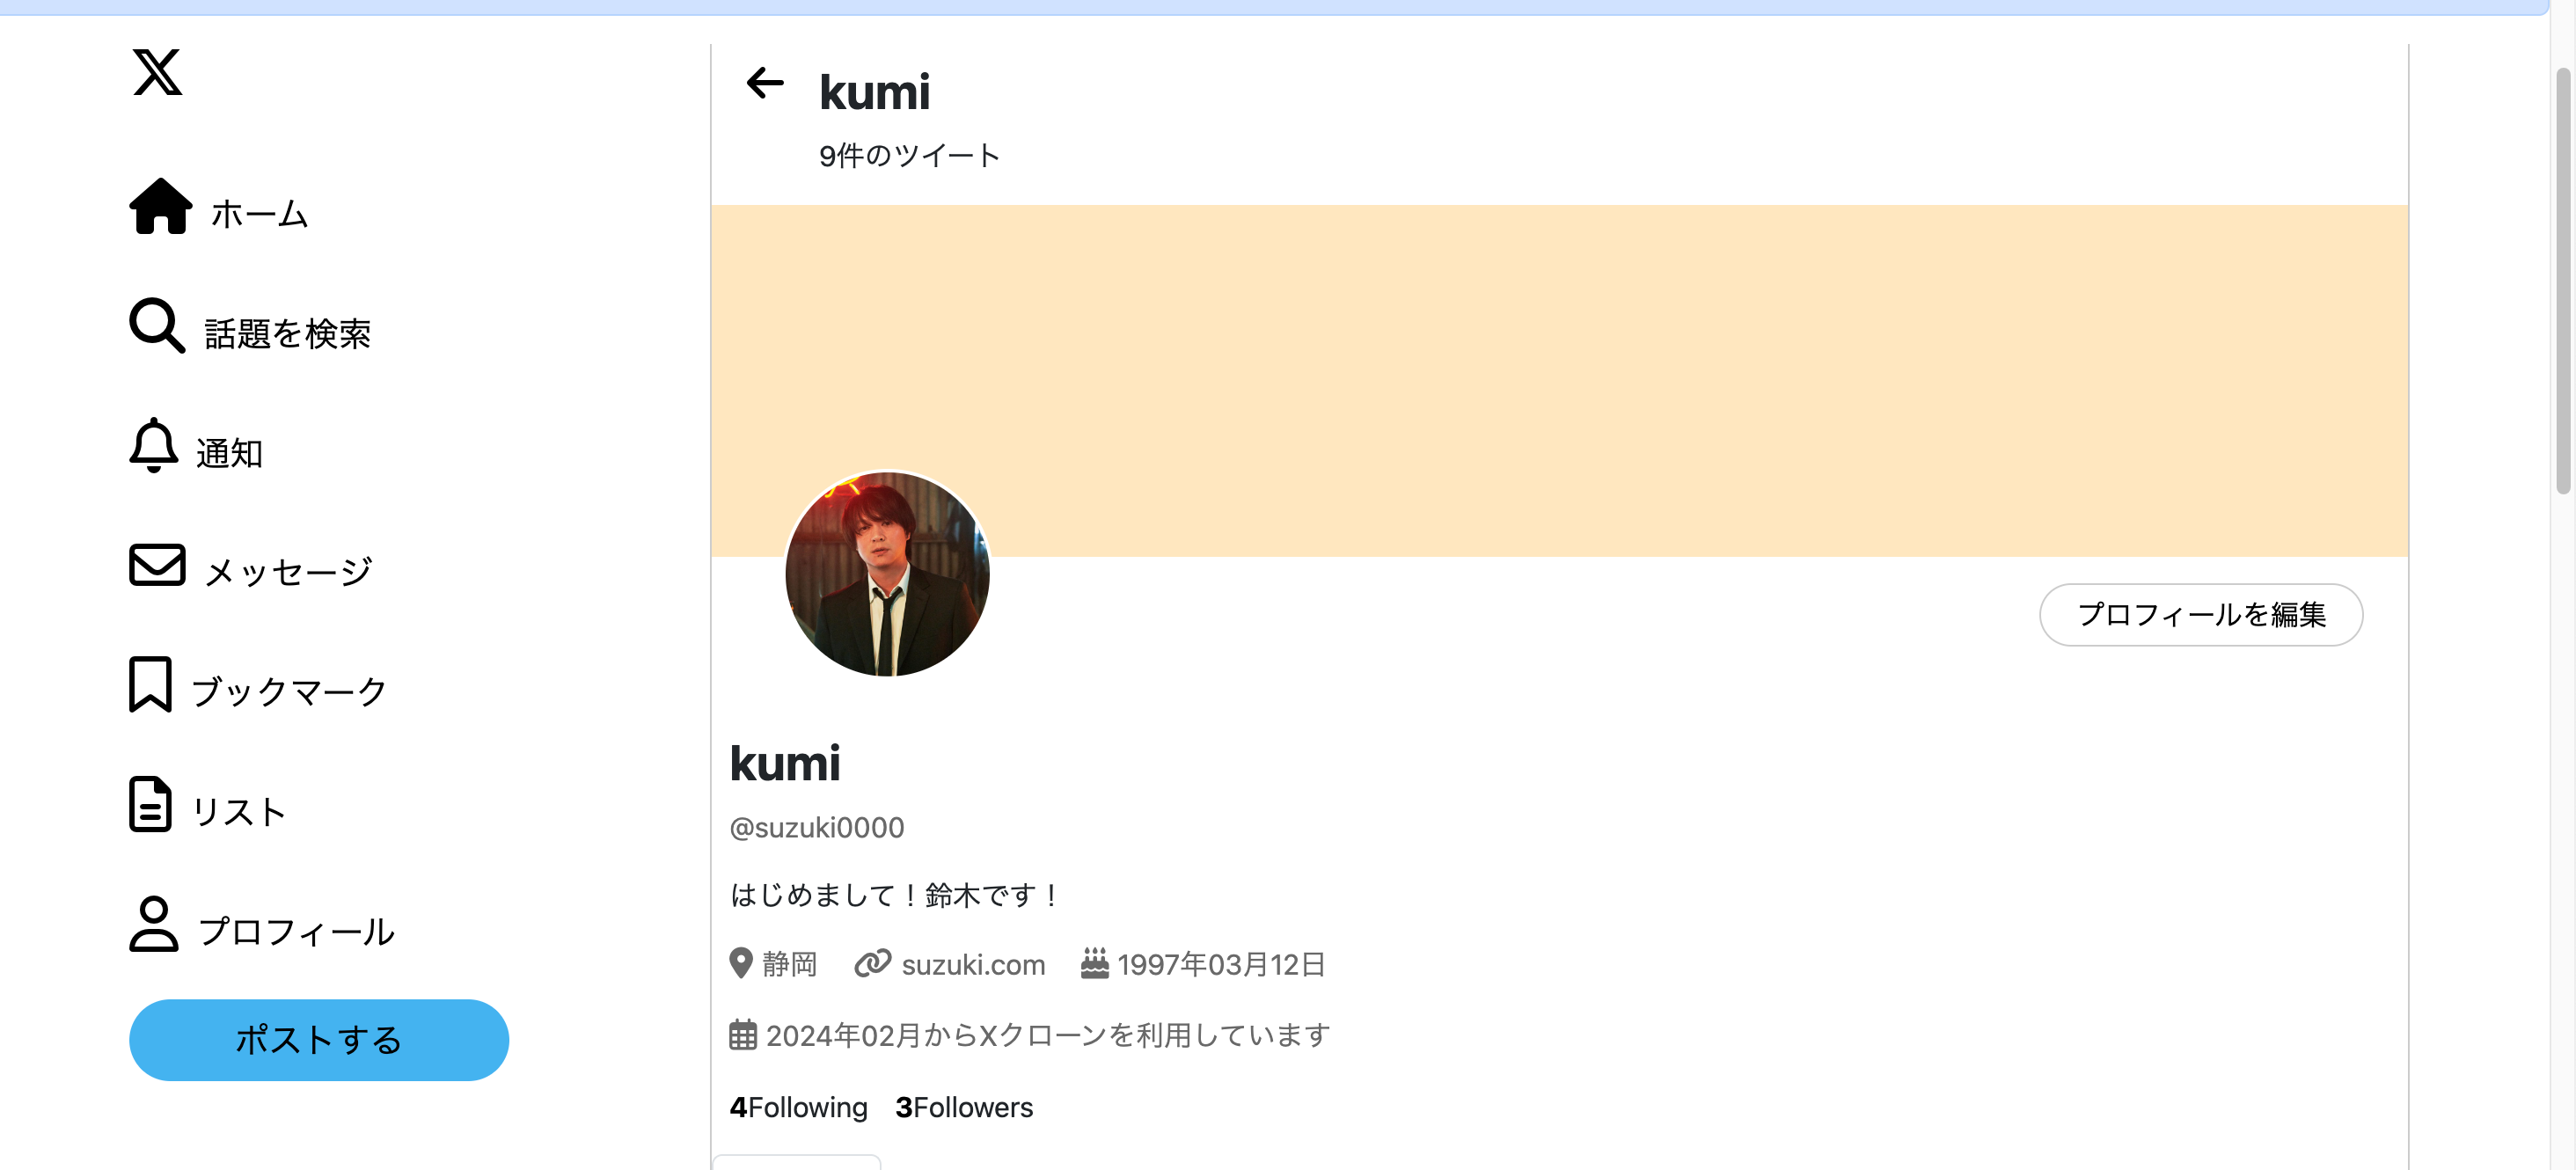
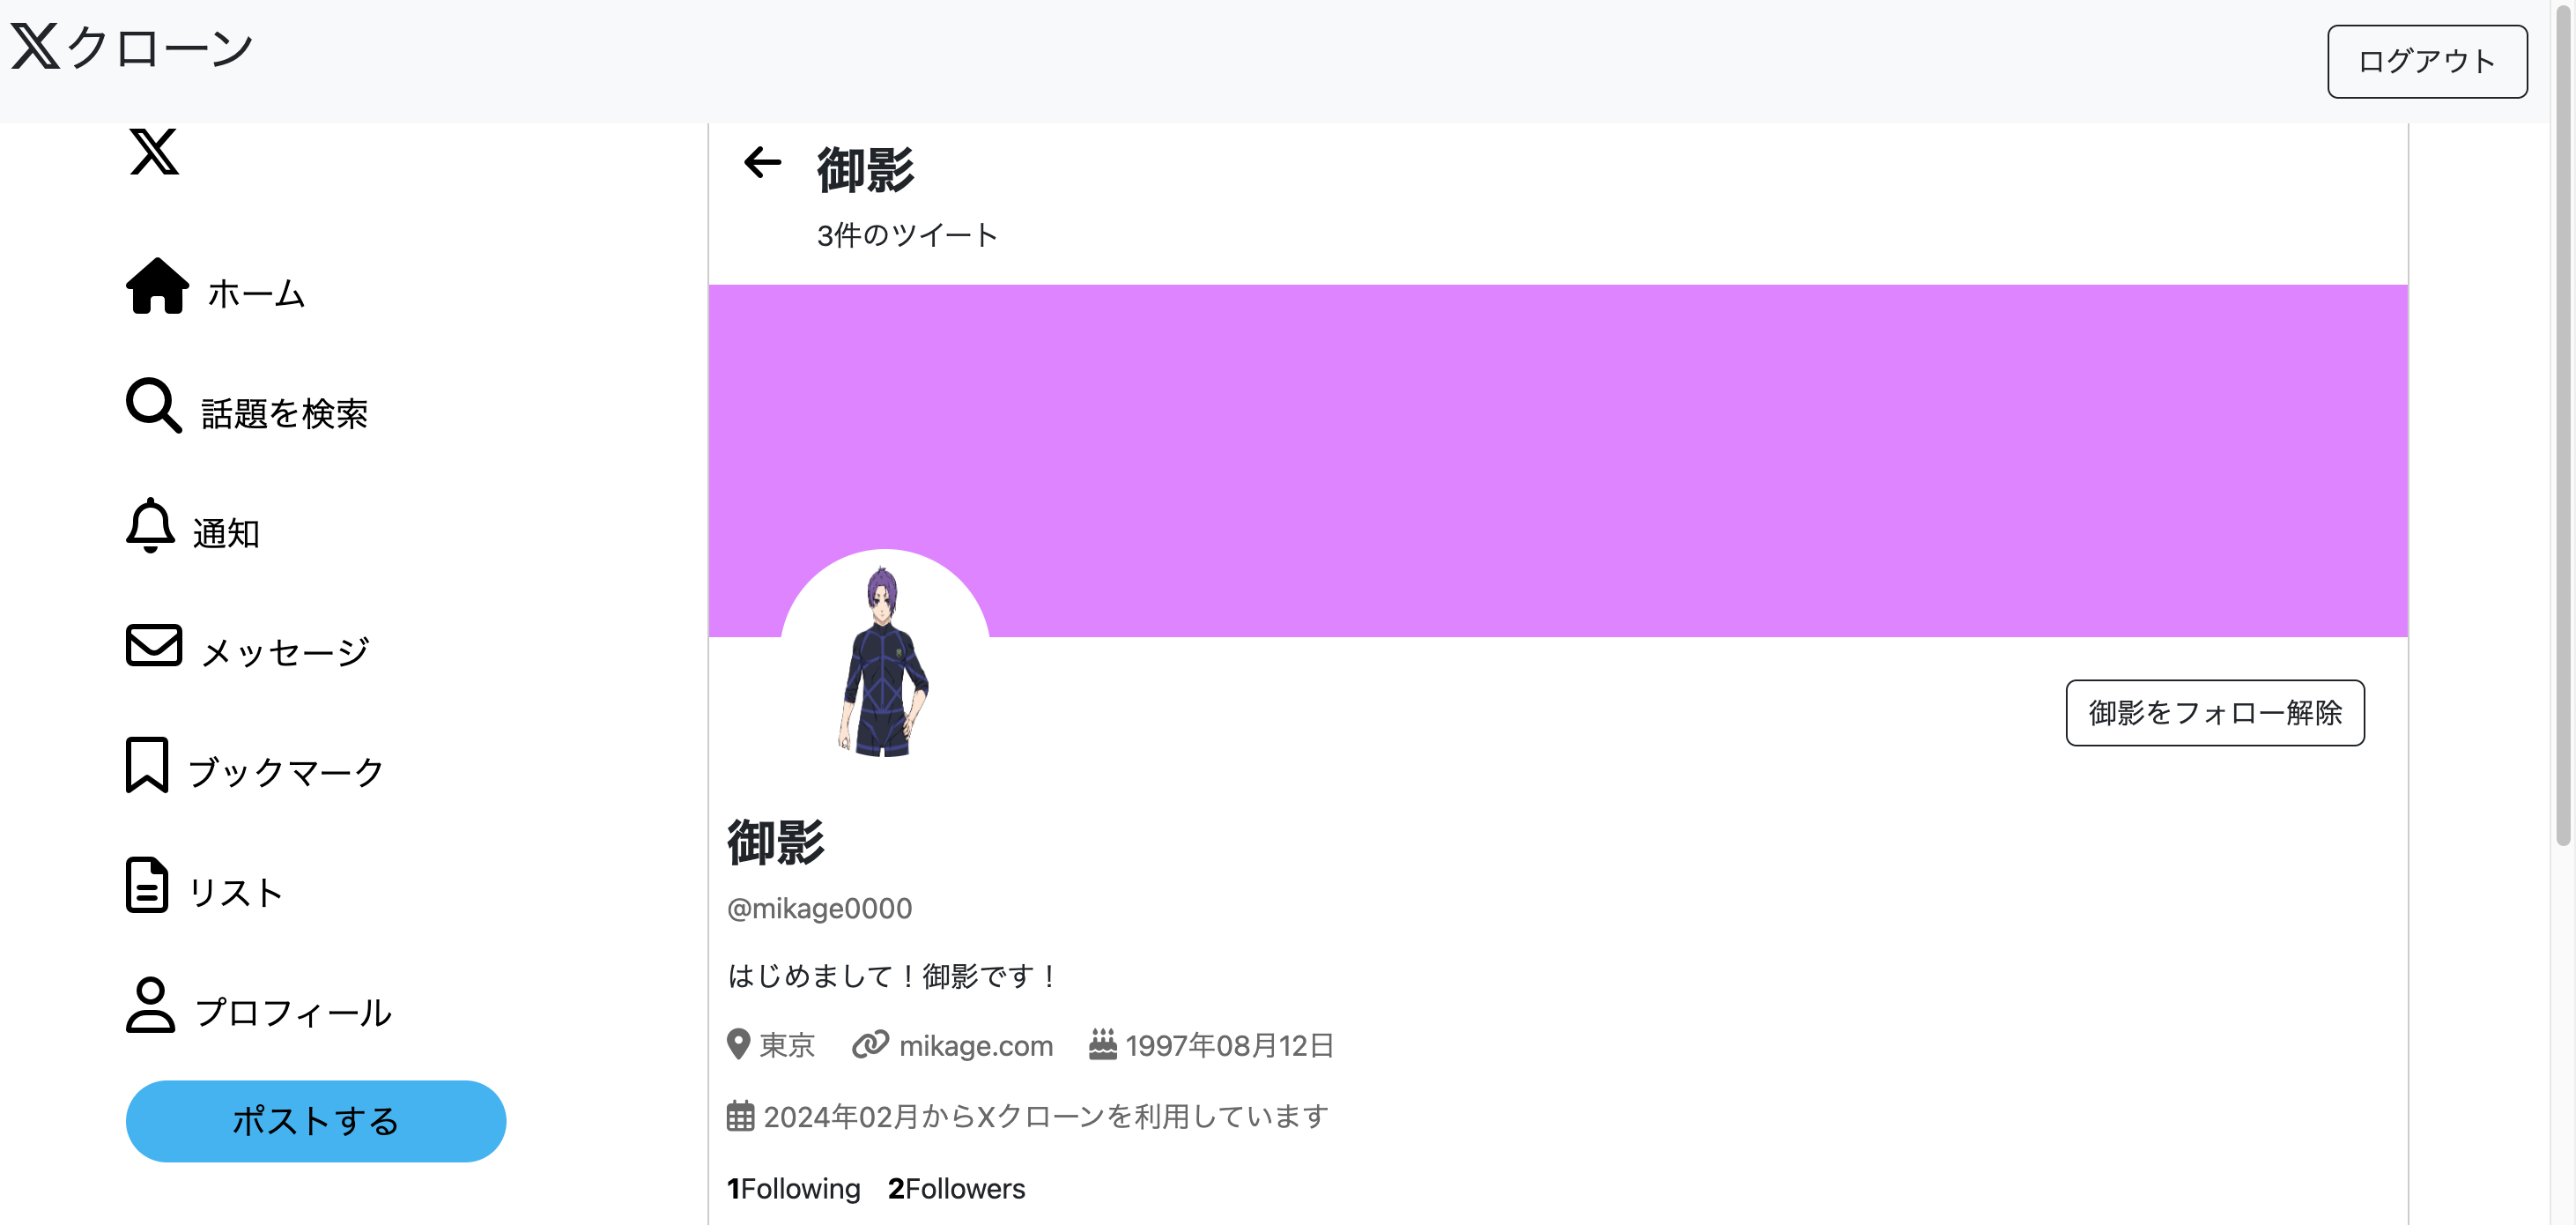
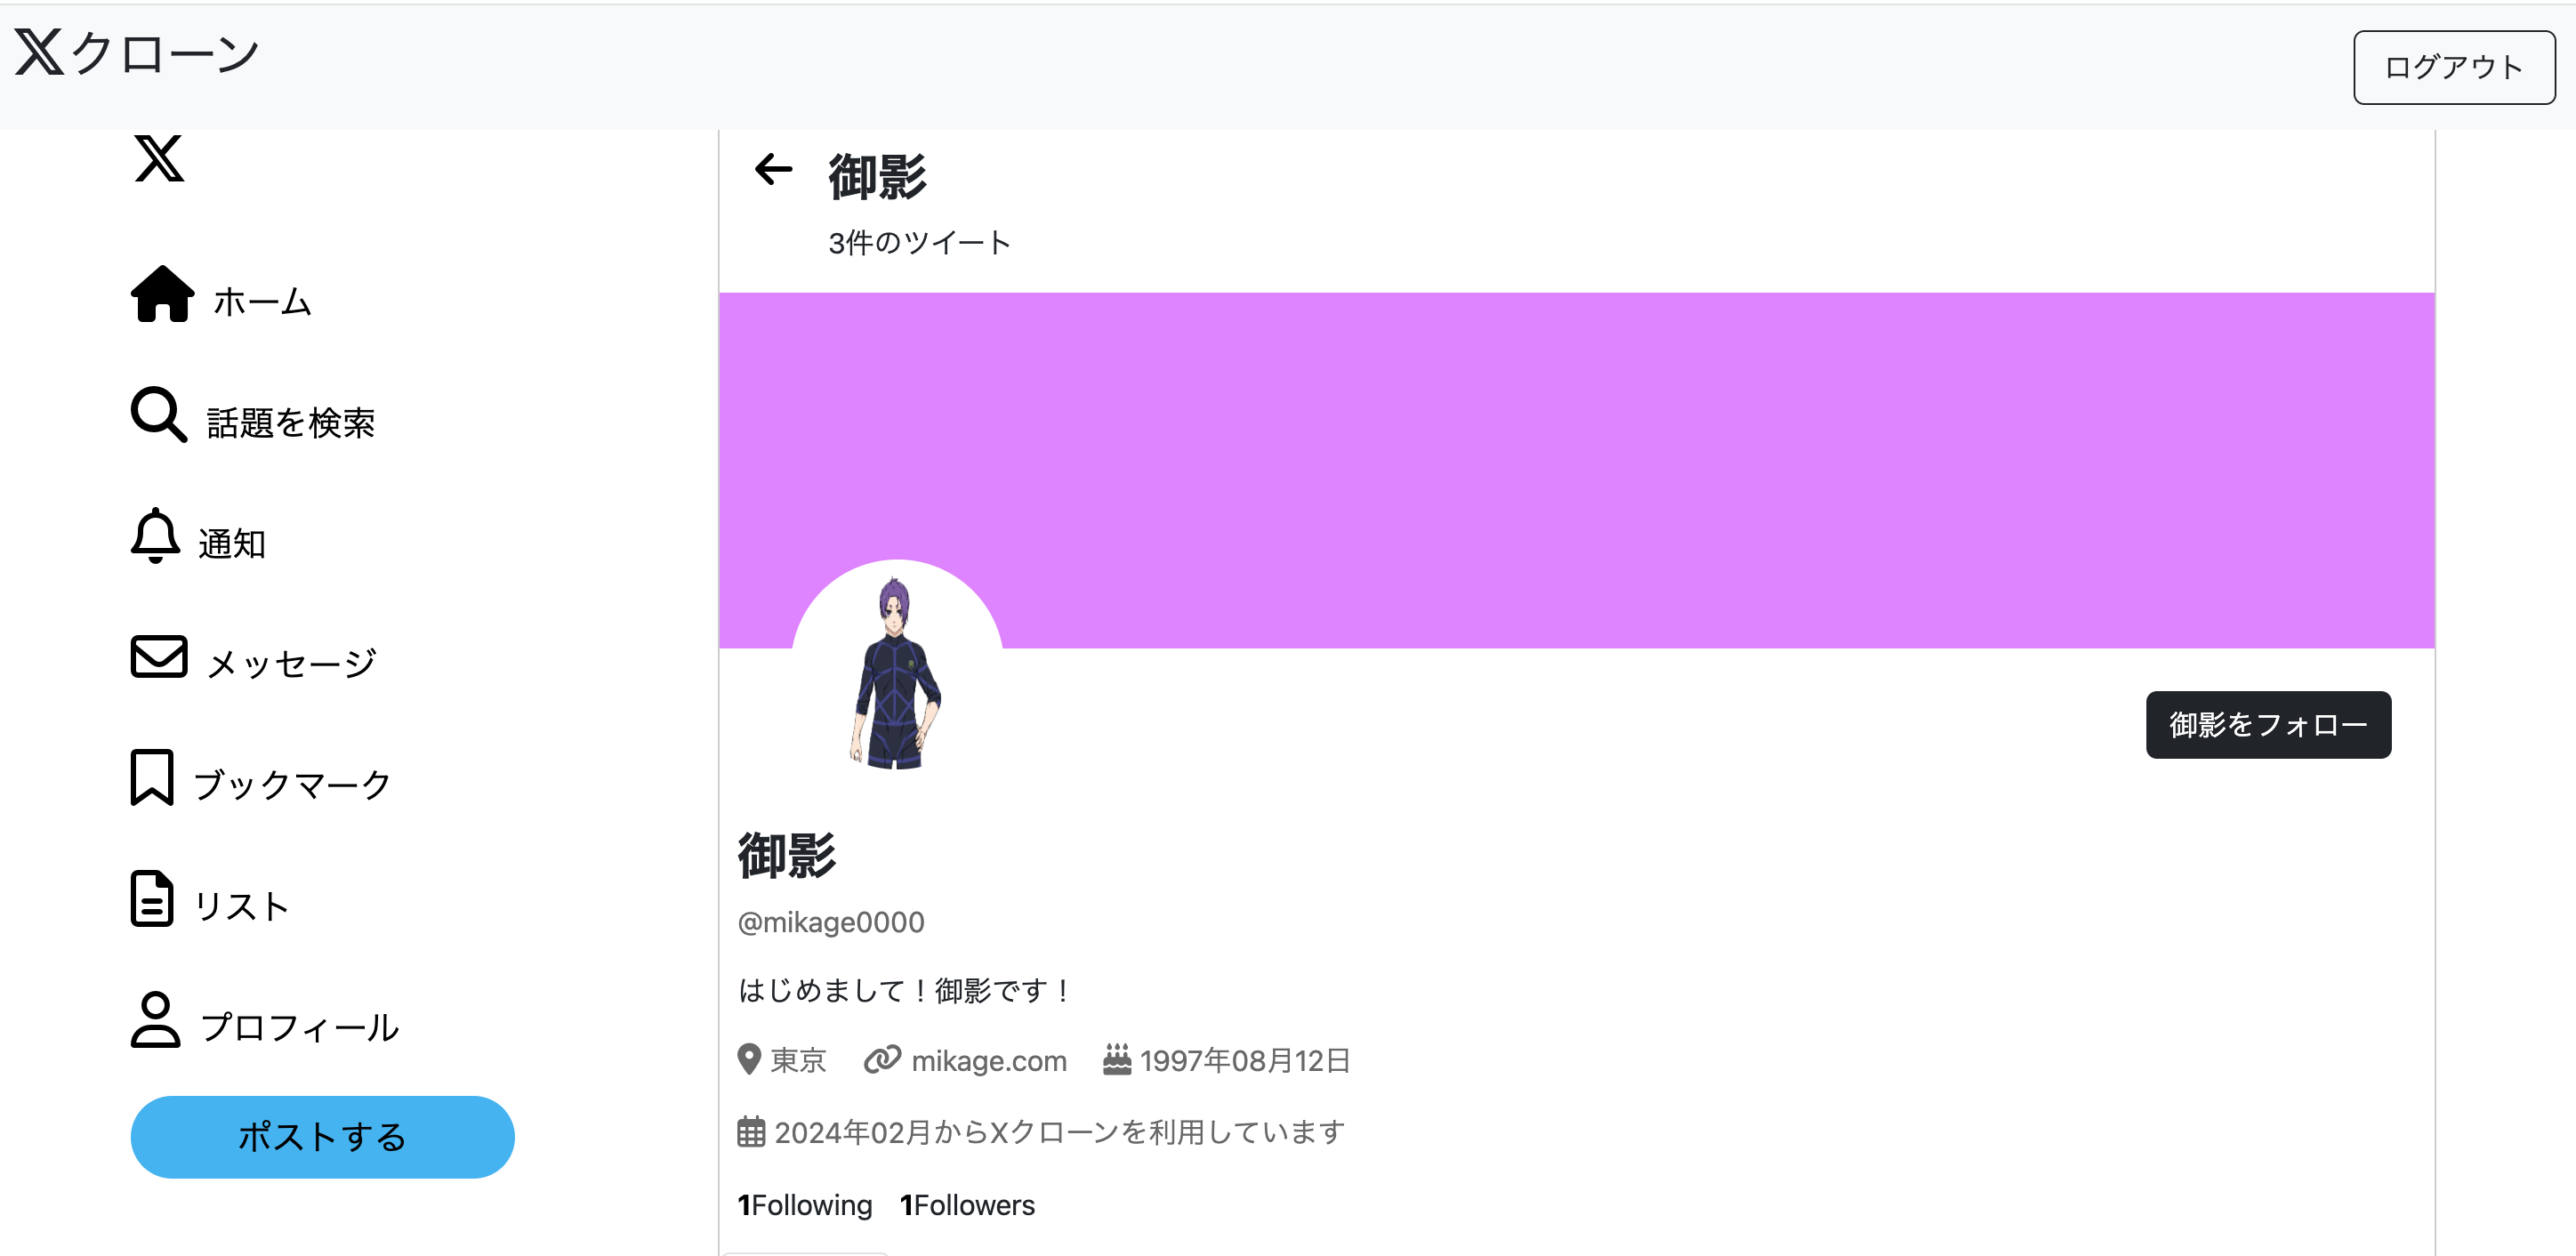
今回はこちらの画像のように、自分自身の場合は、プロフィール変更ボタン、自分ではないユーザーの場合は、フォローするボタンまたはフォロー解除するボタンを設置しました。
また、フォローしている人数と、フォローされている人数の表示もしています。
:
省略
:

# もし、user.idがcurrent_userと一致するならプロフィール編集ボタンを表示させる
- if @user.id == current_user.id
  = link_to "プロフィールを編集", edit_user_path(@user), class: "edit"

  .text-end.mt-4.me-4
    # もし、user.idがcurrent_userと一致しないならフォローボタンかフォロー解除ボタンを表示させる
    - if current_user.id != @user.id
      - if @user.is_followed_by?(current_user)
        = link_to user_relationships_path(@user), data: { "turbo-method": :delete }, class: "btn btn-outline-dark" do
          = @user.name
          | をフォロー解除
      - else
        = link_to user_relationships_path(@user), data: { "turbo-method": :post }, class: "btn btn btn-dark" do
          = @user.name
          | をフォロー

:
省略
:
.d-flex.relationsip
  .follow
    p
      span
        = link_to @user.followings.count, followings_user_path(@user), class: "follow-link-count"
      | Following
  .follow
    p
      span
        = link_to @user.followers.count, followers_user_path(@user), class: "follow-link-count"
      | Followers
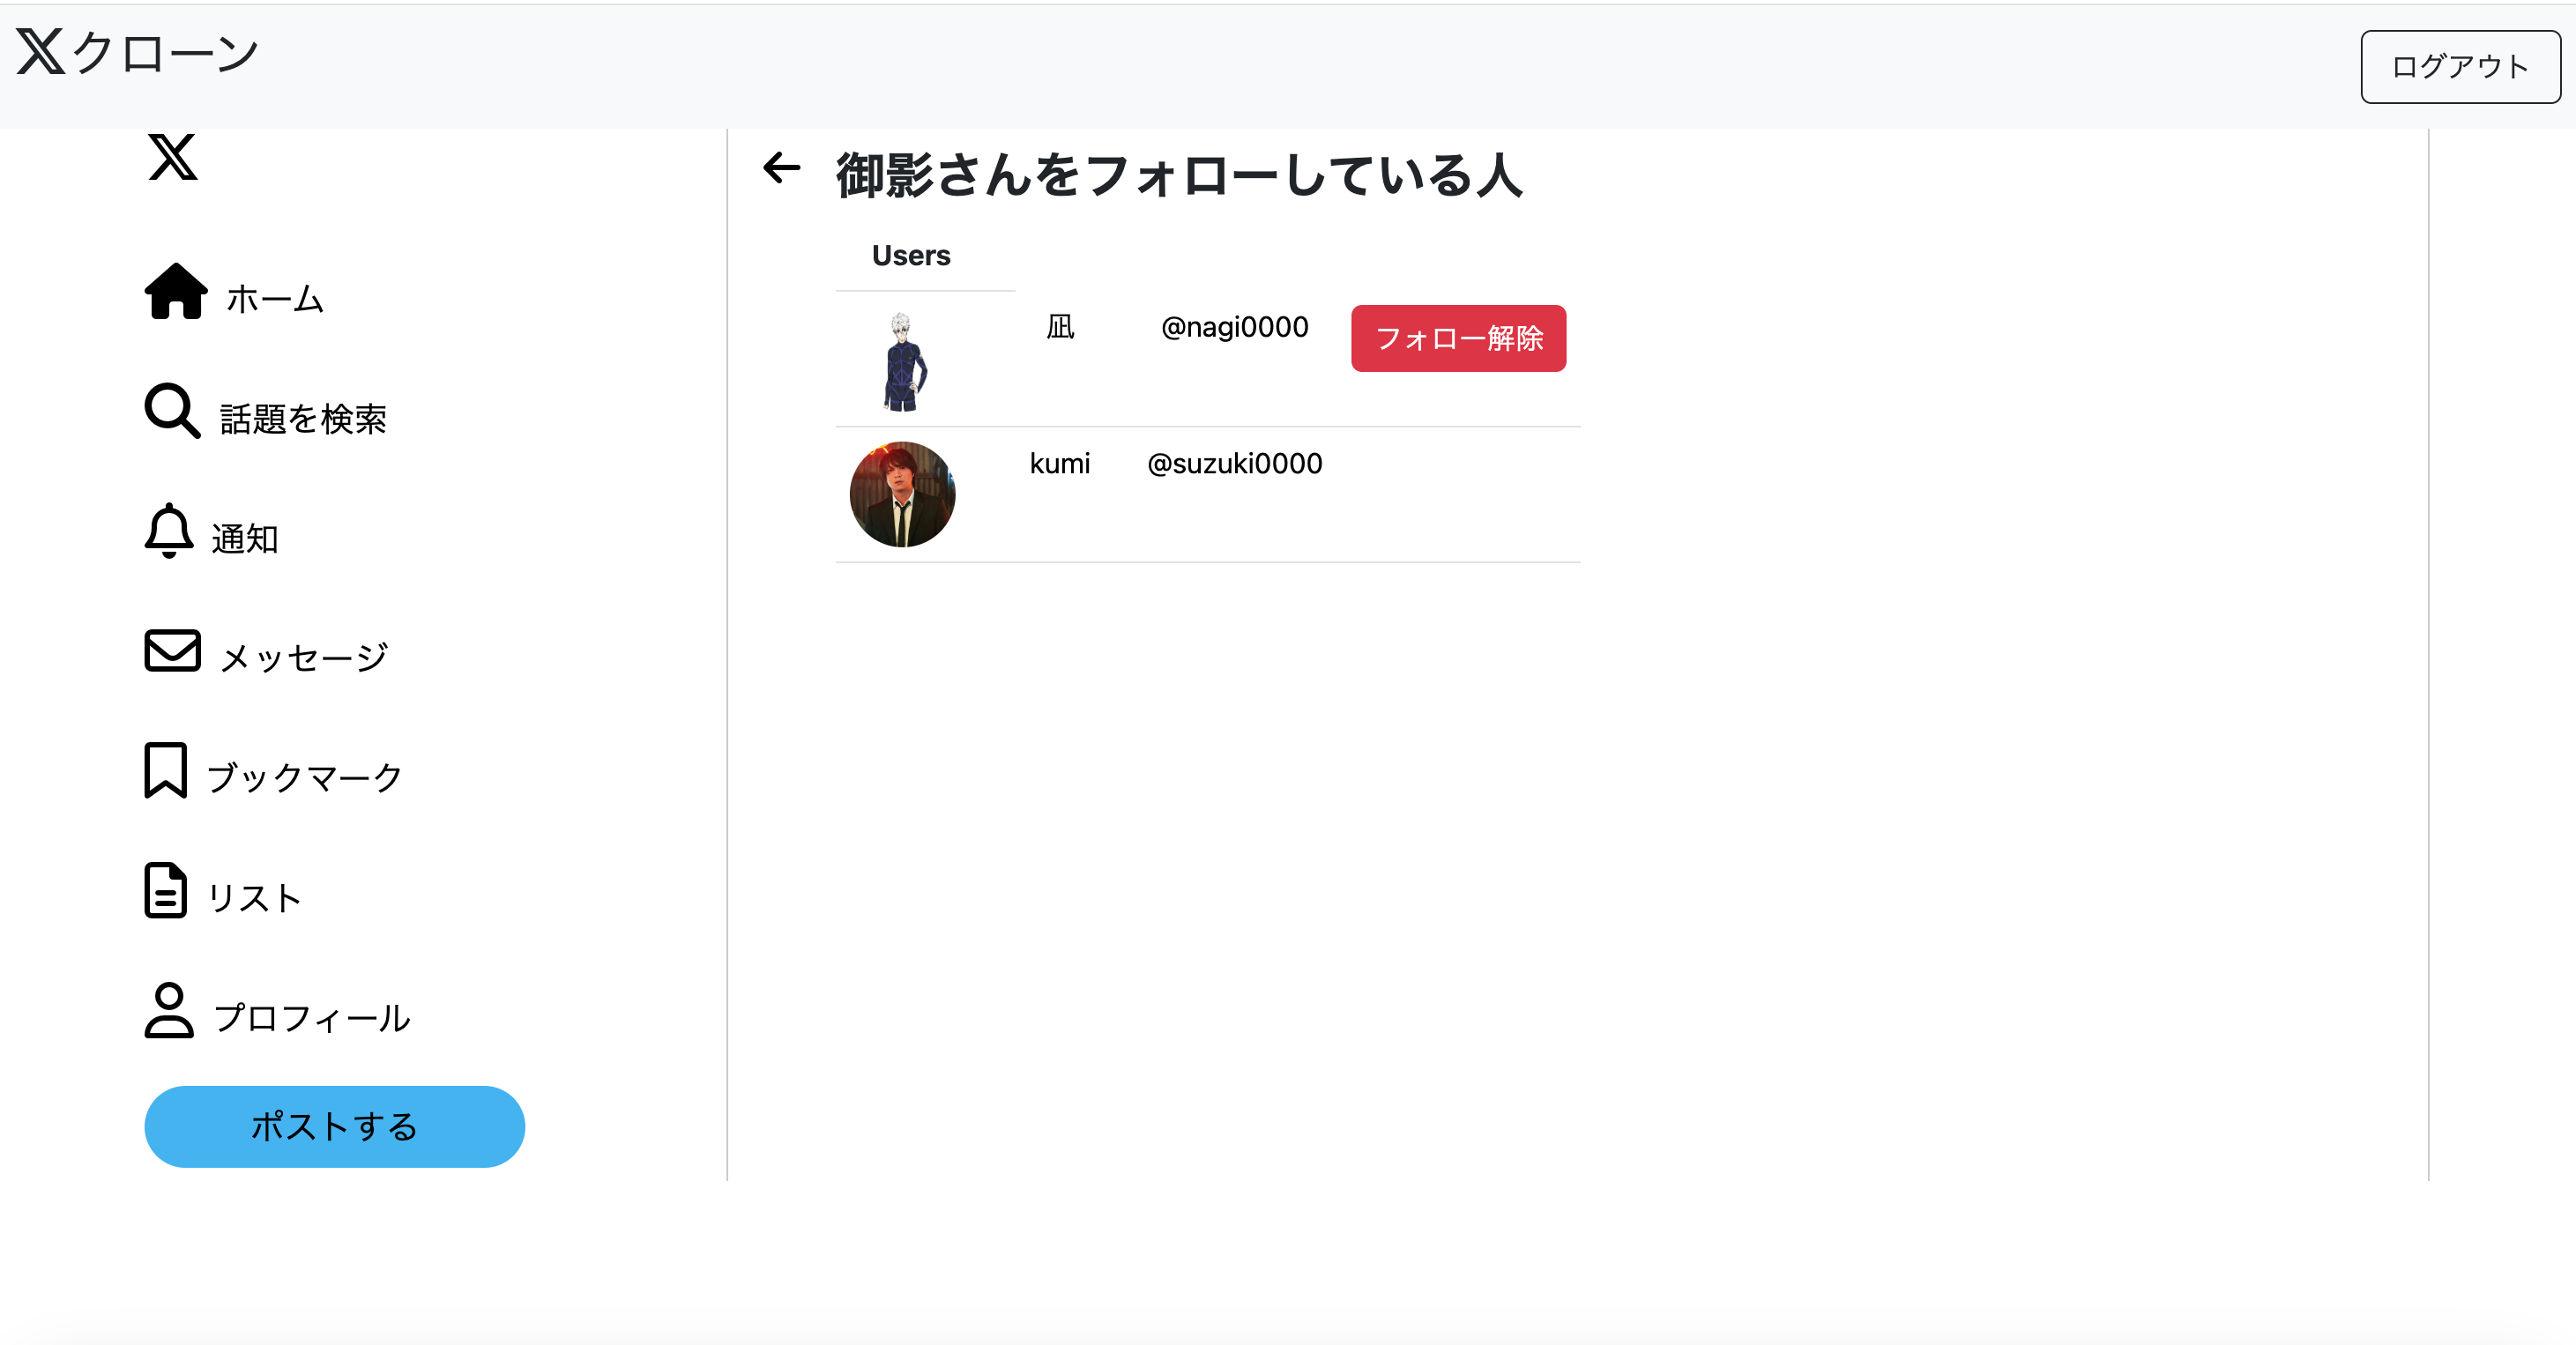
フォローしている人の人数または、フォローされている人の人数の部分をクリックすると、フォロー一覧と、フォロワー一覧に遷移するようになっているため、そのページの作成もしておく。
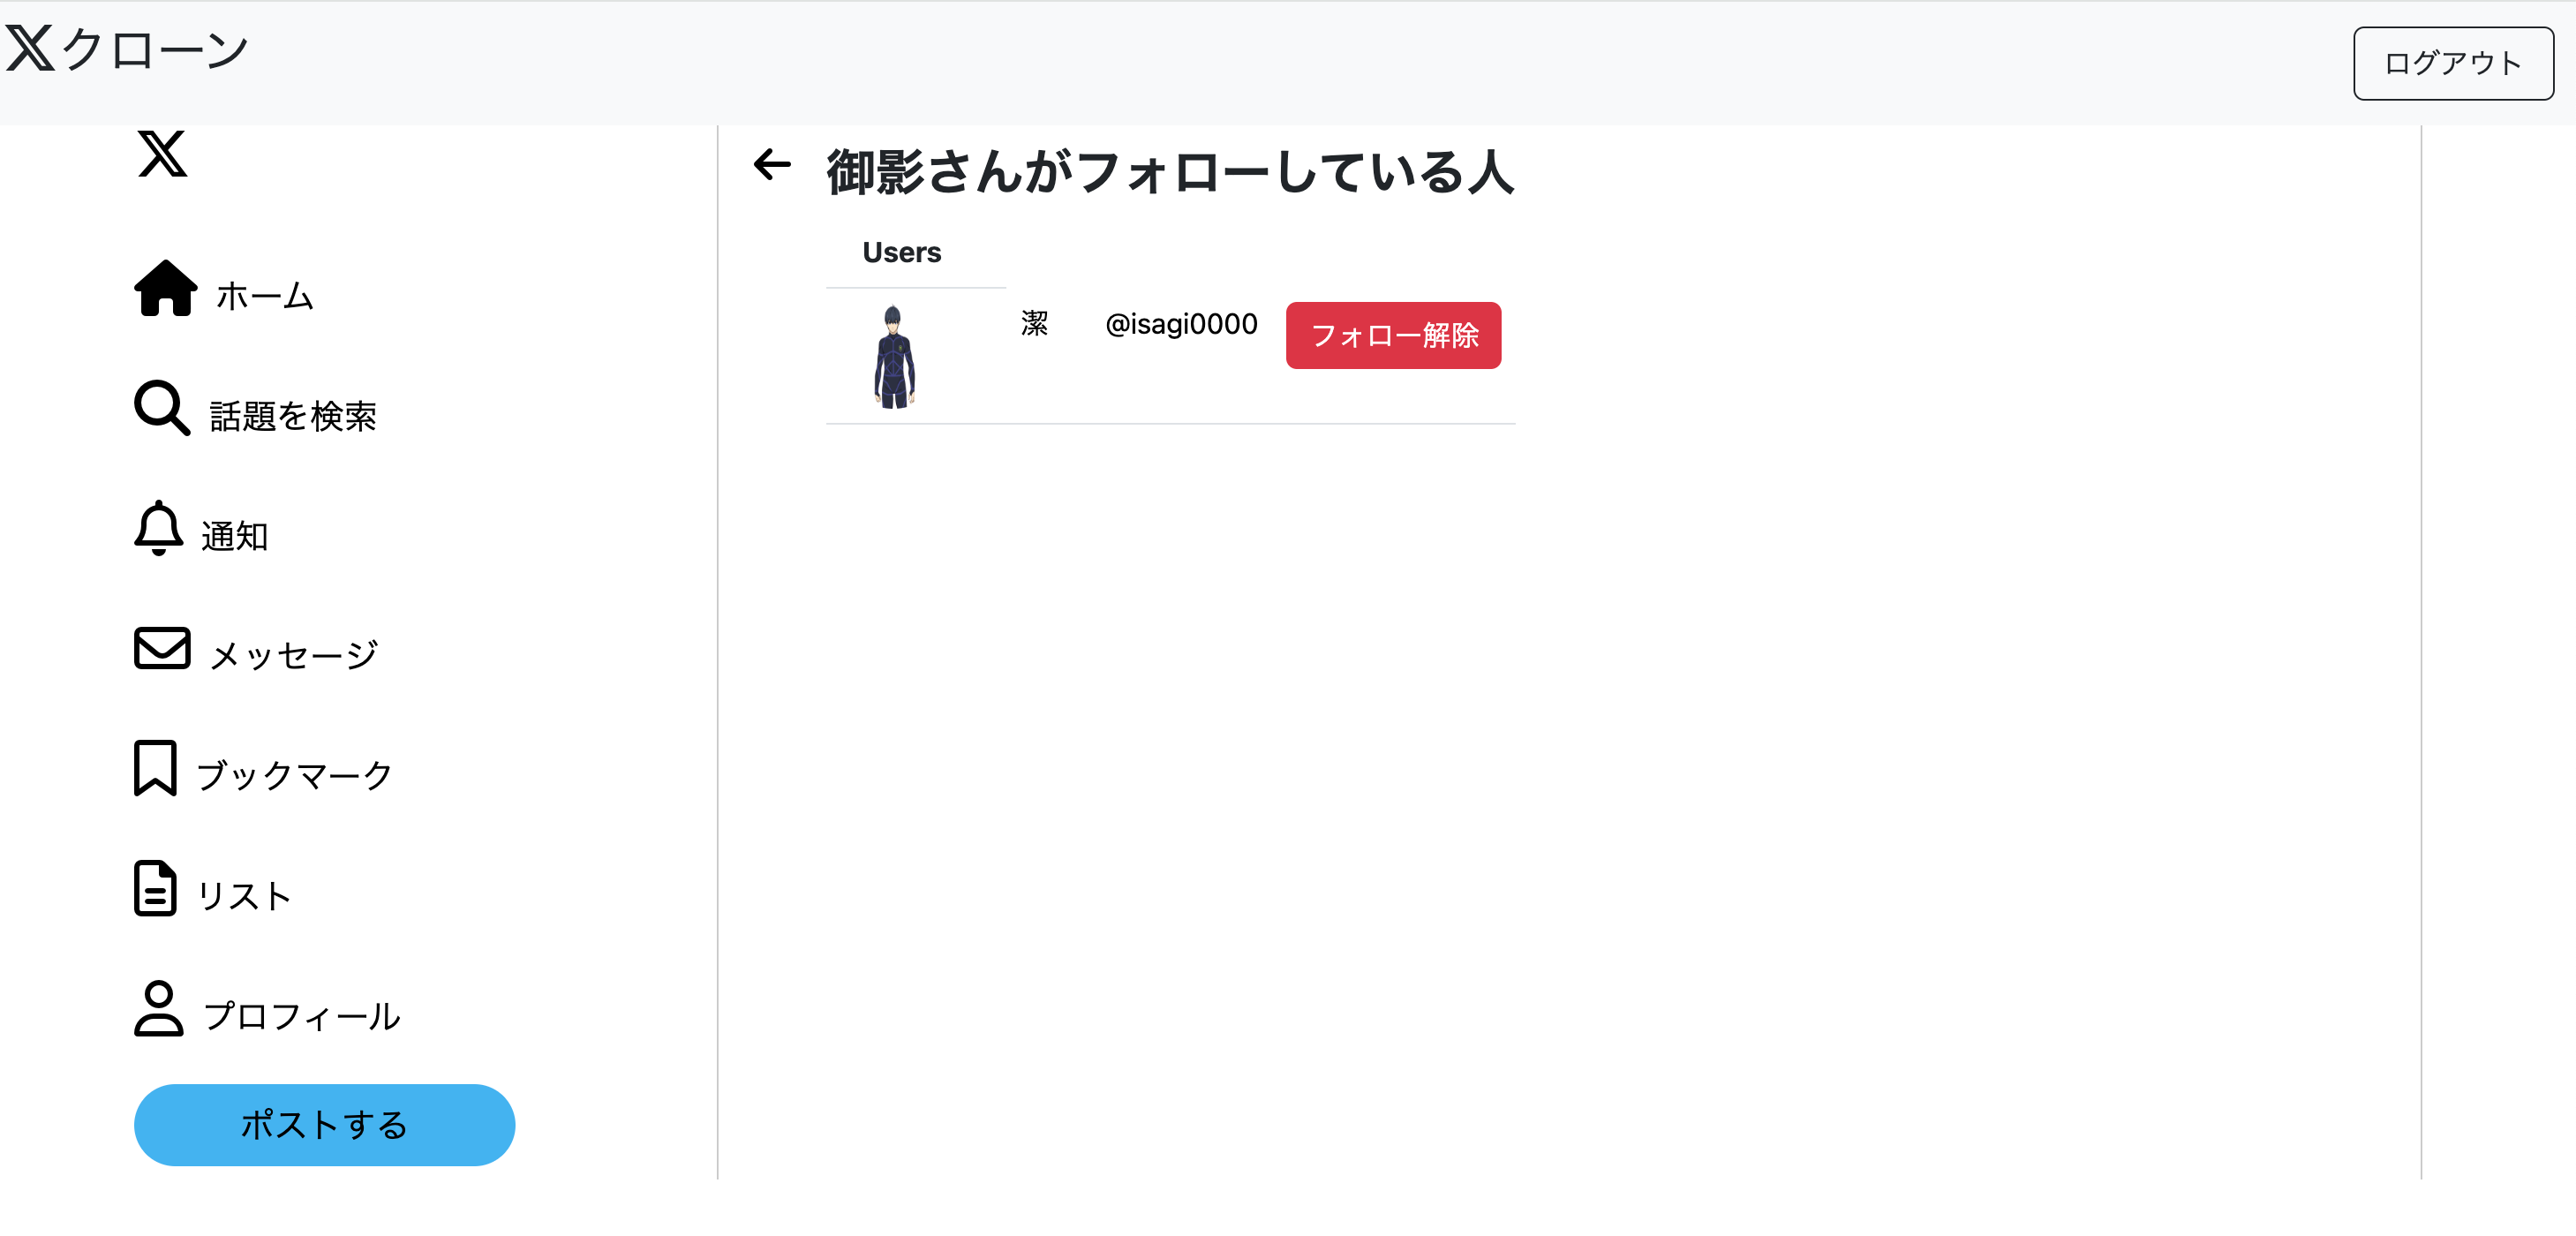
.col-md-12.border_right.border_left
  .d-flex
    div
      = link_to root_path do
        i.fa-solid.fa-arrow-left.arrow-left
    .profile_top_name
      h3
        = @user.name
        | さんがフォローしている人

      table.table.text-center
        thead
          tr
            th
              | Users
            th

        tbody
          - @users.each do |user|
            tr
              td
                - if user.icon.attached?
                  = link_to user_path(user) do
                    = image_tag user.icon, class: "icon_img"
                - else
                  = link_to user_path(user) do
                    img.home_img[src="/assets/icon.png"]
              td
              td
                = link_to user_path(user), class: "text_deco_no" do
                  = user.name
              td
              td
                = link_to user_path(user), class: "text_deco_no" do
                  | @
                  = user.username
              td

                - if user != current_user
                  - if user.is_followed_by?(current_user)
                    =link_to user_relationships_path(user), data: { "turbo-method": :delete } do
                      button.btn.btn.btn-danger[type="button"]
                        | フォロー解除
                  - else
                    =link_to user_relationships_path(user), data: { "turbo-method": :post } do
                      button.btn.btn.btn-primary[type="button"]
                        | フォロー
.col-md-12.border_right.border_left
  .d-flex
    div
      = link_to root_path do
        i.fa-solid.fa-arrow-left.arrow-left
    .profile_top_name
      h3
        = @user.name
        | さんをフォローしている人

      table.table.text-center
        thead
          tr
            th
              | Users
            th
        tbody
          - @users.each do |user|
            tr
              td
                - if user.icon.attached?
                  = link_to user_path(user) do
                    = image_tag user.icon, class: "icon_img"
                - else
                  = link_to user_path(user) do
                    img.home_img[src="/assets/icon.png"]
              td
              td
                = link_to user_path(user), class: "text_deco_no" do
                  = user.name
              td
              td
                = link_to user_path(user), class: "text_deco_no" do
                  | @
                  = user.username
              td
                - if user != current_user
                  - if user.is_followed_by?(current_user)
                    =link_to user_relationships_path(user), data: { "turbo-method": :delete } do
                      button.btn.btn.btn-danger[type="button"]
                        | フォロー解除
                  - else
                    =link_to user_relationships_path(user), data: { "turbo-method": :post } do
                      button.btn.btn.btn-primary[type="button"]
                        | フォロー
これで、フォローしている人と、フォローされている人の一覧を表示することができました。
最後に
今回初めてフォロー機能を実装して、アソシエーションの部分が少し難しく、まだ完全に理解しきれていない部分になっていると思いました。なんとなくですが、いろんな記事や動画を参考にしながら今回実装を進めることができたので良かったです。
参考ページ