はじめに
Flutterで時々利用するWidget の Keyについてのまとめです。
Keyが必要な理由と仕組みについて (1回目) ← 今回!
主にKeyとは何か?、そもそもKeyが必要になる理由についてまとめています。
Keyの種類一覧と使い方(2回目)
Keyの種類一覧とそれらの使い方について解説します。
→ Flutter Widget Keyの種類と使い方について
Keyの指定位置について(3回目)
Keyを指定する位置 (Widget) について解説します。正しい位置に設定しないと意図した動作になりません。
→ 現在準備中です。
Keyとは?
簡単に言うと、ElementからWidgetを識別するためのIDです。Keyは意図的に指定しないとデフォルトではnullです。
必要となるシーンが限定される感じですが、よく紹介されているのは以下ですね。
ただ、必要性が分かるようで分からない感じで、何となく使えている感じがします。
- ToDoアプリのようなStateをもったWidget郡のソート, 追加, 削除
- Listのスクロール位置の保存
本記事を最後まで読んで頂くと理解できると思いますが、Widgetツリーの中でノード (あるWidget) を他の場所に移動させる場合など、Widgetツリーと対になるElementツリー側から特定のWidgetを識別する必要がある場合にのみKeyを利用します。
Keyが必要な理由について
サンプルアプリを用いて、Keyの必要性を理解していきます。
タイルを入れ替える簡単なアプリ
FABをクリックする度に2つのタイル (ランダムな色で塗り潰た四角) の位置を入れ替えるだけの簡易アプリです。
ソースコードは以下です。
StatelessWidgetを用いてアプリ起動時にランダムな色のタイルを配置し、ボタンが押される度にListの順番を入れ替えるだけです。
import 'package:flutter/material.dart';
import 'dart:math';

class StatelessColorfulTile extends StatelessWidget {
  final Color _color = UniqueColorGenerator.getColor();
  @override
  Widget build(BuildContext context) {
    return Container(
        color: _color, child: Padding(padding: EdgeInsets.all(100.0)));
  }
}

class UniqueColorGenerator {
  static List _colorOptions = [
    Colors.blue,
    Colors.red,
    Colors.green,
    Colors.yellow,
    Colors.purple,
    Colors.orange,
    Colors.indigo,
    Colors.amber,
    Colors.black,
  ];
  static Random _random = new Random();
  static Color getColor() {
    if (_colorOptions.length > 0)
      return _colorOptions.removeAt(_random.nextInt(_colorOptions.length));
    else
      return Color.fromARGB(_random.nextInt(256), _random.nextInt(256),
          _random.nextInt(256), _random.nextInt(256));
  }
}

class SampleAppPageState extends State<SampleAppPage> {
  List<Widget> _tiles;
  @override
  void initState() {
    super.initState();
    _tiles = [
      StatelessColorfulTile(),
      StatelessColorfulTile(),
    ];
  }

  void _swapTiles() {
    setState(() {
      _tiles.insert(1, _tiles.removeAt(0));
    });
  }

  @override
  Widget build(BuildContext context) {
    return Scaffold(
      body: Row(children: _tiles),
      floatingActionButton: FloatingActionButton(
          child: Icon(Icons.sentiment_satisfied), onPressed: _swapTiles),
    );
  }
}
StatelessWidgetの動作
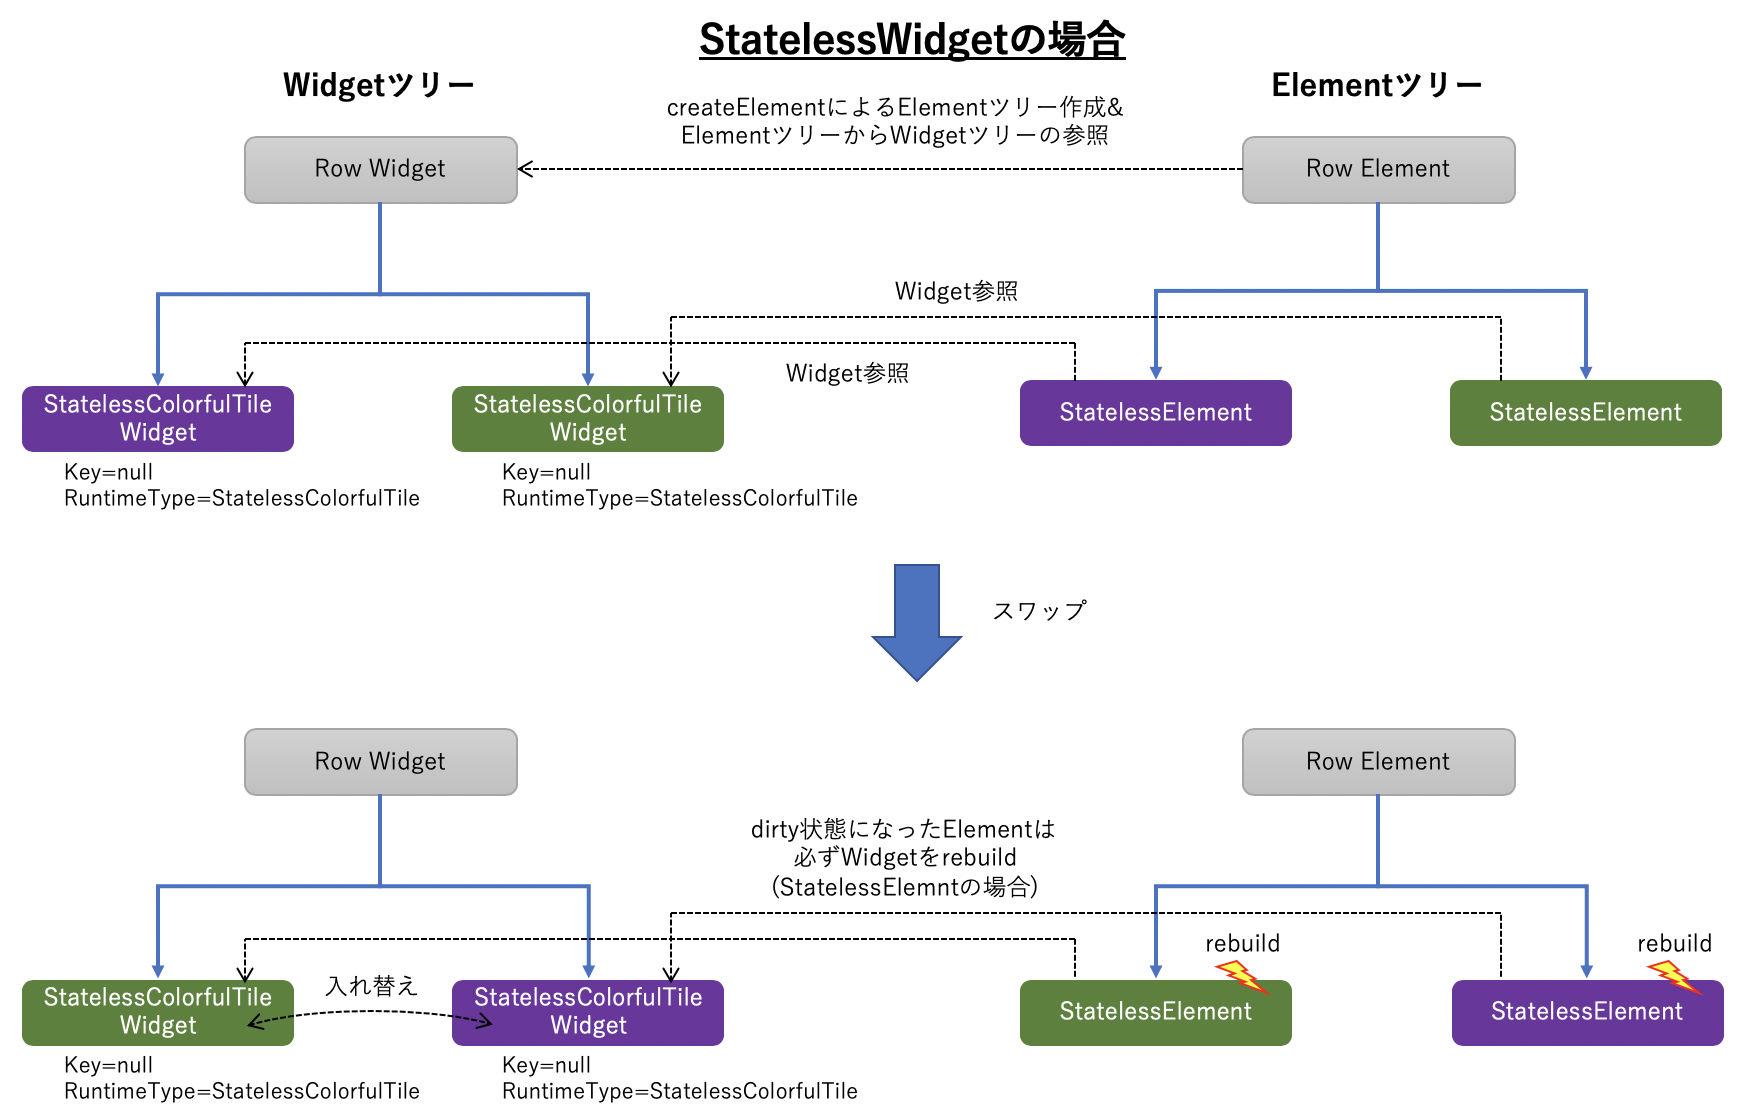
StatelessWidgetの場合、作成されるStatelessElementはStateを保有しないため、Widgetは描画毎に必ずrebuild (Widget build(BuildContext context)) が実行されます。つまり、FABを押す度にsetStateをトリガーにして、2つのタイルが再構成 (rebuild) されて、再描画され、結果的にスワップしたように見えます。
また、Flutterは各Widgetをツリー構成で管理しており、Widget/Element/RenderObjectの3つのツリーが構築されます。ざっくり、WidgetがUIパーツの構成/仕様、ElementがそのWidgetの状態管理やRenderObjectとの仲介、RenderObjectElementが描画管理という役割分担で、それぞれのツリーは相互参照の関係になります。
今回のサンプルでのツリー構成を以下に示します。
ただし、説明簡略化のためにRenderObjectElementは割愛します。
rebuild時の動きは以下のpackages/flutter/lib/src/widgets/framework.dartのコードを追ってみると分かります。
仕組みを追いかけるなら、サンプルを作成してそれをデバッガでステップ実行しながら動作確認する手法がお勧めです。
Element.updateChild → StatelessElement.update → Element.rebuild → ComponentElement.performRebuild → StatelessElement.build → StatelessColorfulTile.buildという順番でコールされます。
class StatelessElement extends ComponentElement {
  /// Creates an element that uses the given widget as its configuration.
  StatelessElement(StatelessWidget widget) : super(widget);

  @override
  StatelessWidget get widget => super.widget;

  @override
  Widget build() => widget.build(this);

  @override
  void update(StatelessWidget newWidget) {
    super.update(newWidget);
    assert(widget == newWidget);
    _dirty = true;
    rebuild(); // ← ここでrebuildがコールされる
  }
}
StatefulWidgetだとどうなるか?
今度はStatelessWidgetからStatefulWidgetに置き換えて動かしてみます。
class StatefulColorfulTile extends StatefulWidget {
  StatefulColorfulTile({Key key}) : super(key: key);

  @override
  ColorfulTileState createState() => ColorfulTileState();
}

class ColorfulTileState extends State<StatefulColorfulTile> {
  Color _color;

  @override
  void initState() {
    super.initState();
    _color = UniqueColorGenerator.getColor();
  }

  @override
  Widget build(BuildContext context) {
    return Container(
        color: _color,
        child: Padding(
          padding: EdgeInsets.all(100.0),
        ));
  }
}

class SampleAppPageState extends State<SampleAppPage> {
  List<Widget> _tiles;
  @override
  void initState() {
    super.initState();
    _tiles = [
      //StatelessColorfulTile(),
      //StatelessColorfulTile(),
      StatefulColorfulTile(), // 変更!!
      StatefulColorfulTile(), // 変更!!
    ];
  }
すると、FABを押してスワップしません。
何故でしょう?その理由こそKeyが必要な理由です。
(個人的には、フレームワークの作り上の都合な産物な気もしますが…)
StatefulWidget (Key指定なし) の動作
StatefulWidgetとStatelessWidgetの最大の違いはStateの有無です。
StatefulWidgetはsetStateをトリガーにした描画更新処理でElementのrebuildを実施するかどうかの判定に、参照する新旧のWidgetのKeyとRuntimeType (クラス名のこと) を参照しています。
ソースコードでは、Element.updateChildとWidget.canUpdateが該当部分になります。
@protected
Element updateChild(Element child, Widget newWidget, dynamic newSlot) {
  assert(() {
    if (newWidget != null && newWidget.key is GlobalKey) {
      final GlobalKey key = newWidget.key;
      key._debugReserveFor(this);
    }
    return true;
  }());
  if (newWidget == null) {
    if (child != null)
      deactivateChild(child);
    return null;
  }
  if (child != null) {
    if (child.widget == newWidget) {
      if (child.slot != newSlot)
        updateSlotForChild(child, newSlot);
      return child;
    }
    if (Widget.canUpdate(child.widget, newWidget)) { // Key,RuntimeTypeが同じならWidgetの参照だけ更新して終了
      if (child.slot != newSlot)
        updateSlotForChild(child, newSlot);
      child.update(newWidget);
      assert(child.widget == newWidget);
      assert(() {
        child.owner._debugElementWasRebuilt(child);
        return true;
      }());
      return child;
    }
    deactivateChild(child);
    assert(child._parent == null);
  }
  return inflateWidget(newWidget, newSlot);
}
@immutable
abstract class Widget extends DiagnosticableTree {
  const Widget({ this.key });
  final Key key;

  @protected
  Element createElement();

  @override
  String toStringShort() {
    return key == null ? '$runtimeType' : '$runtimeType-$key';
  }

  @override
  void debugFillProperties(DiagnosticPropertiesBuilder properties) {
    super.debugFillProperties(properties);
    properties.defaultDiagnosticsTreeStyle = DiagnosticsTreeStyle.dense;
  }

  // 新旧でRuntimeTypeとKeyが同じかどうかチェック
  static bool canUpdate(Widget oldWidget, Widget newWidget) {
    return oldWidget.runtimeType == newWidget.runtimeType
        && oldWidget.key == newWidget.key;
  }
}
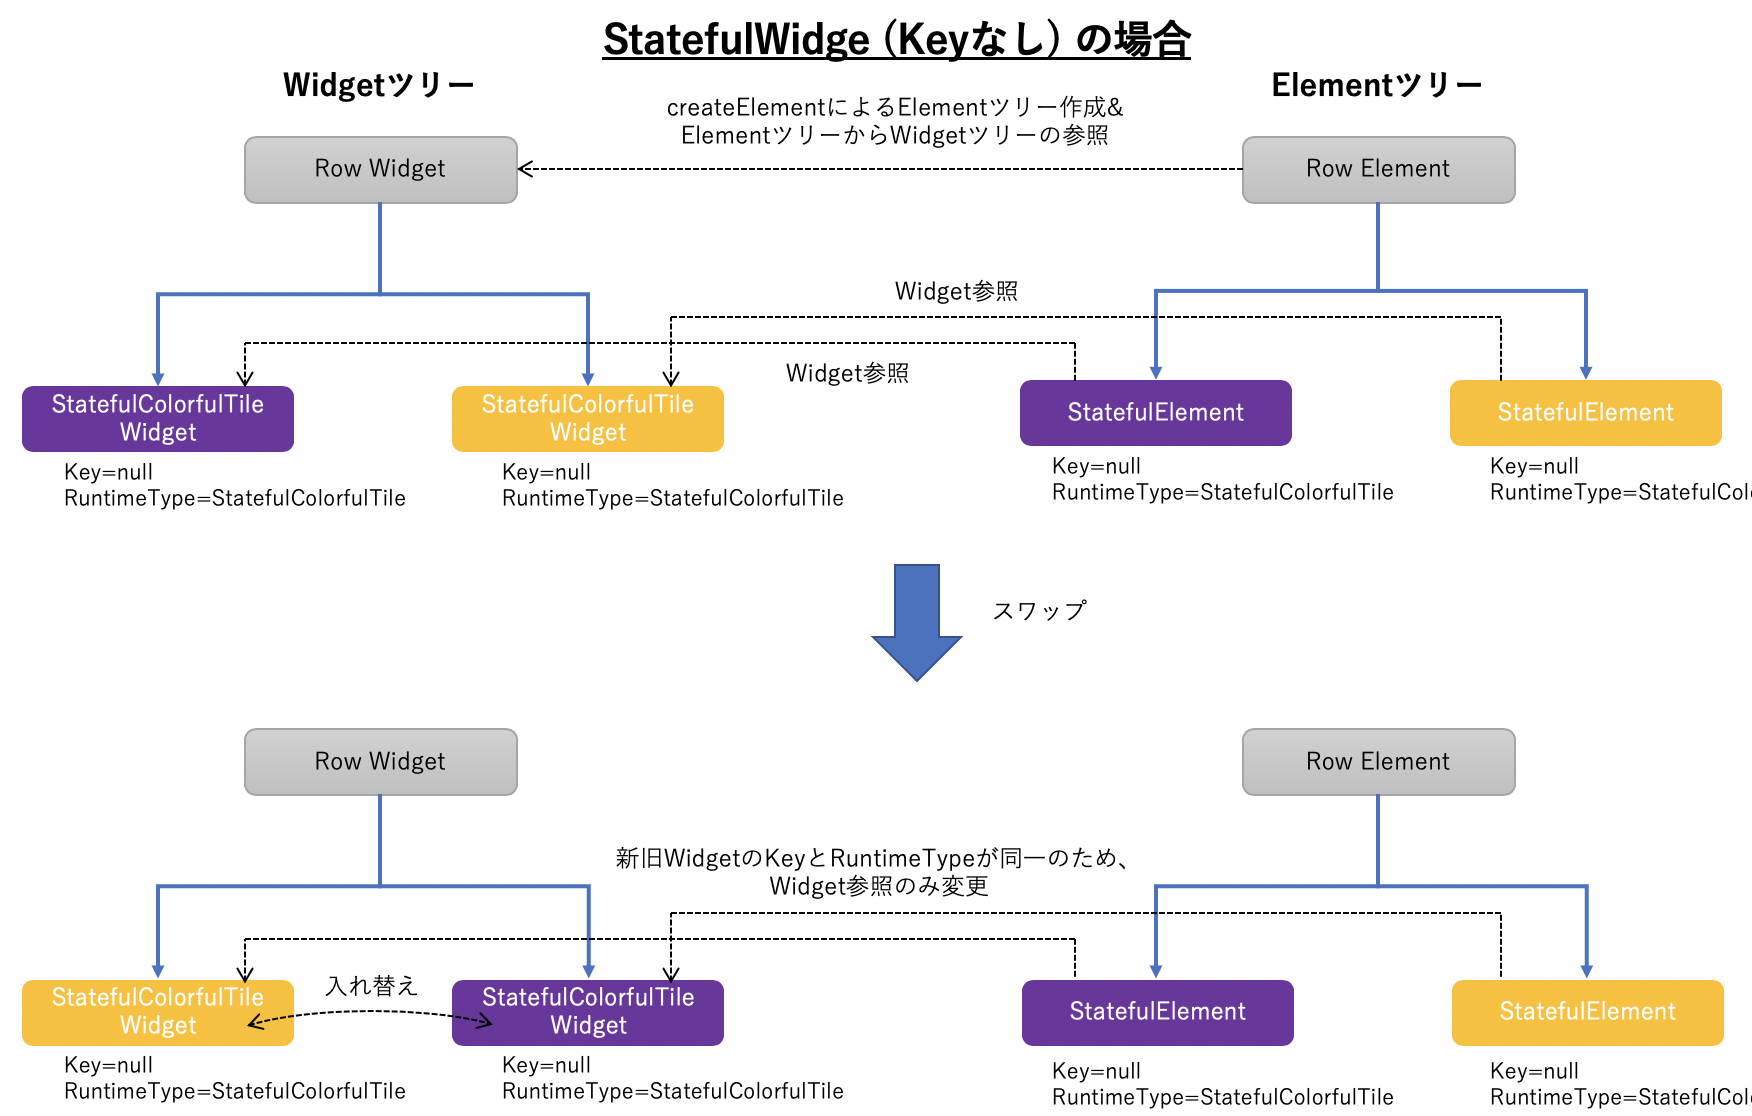
Key指定しない場合は新旧Widgetどちらもnull、RuntimeTypeは同じクラス名となり、rebuildは実施されず、ElementからWidgetへの参照だけの更新となります。その後のRenderObjectもElementがrebuildされていないため、描画処理が更新されません。
この時点でおかしな状態になっていることが分かります。
以上のことを図示すると以下のようになります。
Keyを指定して解決
先ほどの問題を解決するために、StatefulColorfulTileクラスの引数のKeyにUniqueKey()を追加します。
class SampleAppPageState extends State<SampleAppPage> {
  List<Widget> _tiles;
  @override
  void initState() {
    super.initState();
    _tiles = [
      //StatelessColorfulTile(),
      //StatelessColorfulTile(),
      //StatefulColorfulTile(),
      //StatefulColorfulTile(),
      StatefulColorfulTile(key: UniqueKey()), // 変更!!
      StatefulColorfulTile(key: UniqueKey()), // 変更!!
    ];
  }

StatefulWidget (Key指定あり) の動作
Keyを指定した場合は、Element.updateChild内の判定で新旧WidgetのKeyが異なるため、rebuild処理が走ります。ただし、rebuildといってもStatelessWidgetとは異なり、Elementツリーの同一階層内で同じKeyのElementを探し、もし存在すればそのElementと位置を入れ替えることで処理を軽量化しています。
図示すると以下のような感じになります。
