この記事は
以下の環境でPytorch3Dのチュートリアルを動作できるコンテナを作成した際の手順記録です。
- WSL2 (GPUサポートあり) on Windows11
- Pytorch1.11.0 with CUDA11.3
- pipのみ, anaconda使わない
- Pytorch3Dはソースからビルド
なぜ書いたのか(公式手順じゃ駄目?)
- 公式Pytorch3Dインストール手順が古く, CUDAバージョンが同じPytorchを取得しづらい
- 公式手順だとanacondaが要求されるが, Dockerコンテナ作成手順に組み込みづらい
などが理由です。
あとanaconda手順があるとvenvなどでの管理もできなくなってしまうため、pipのみ手順に変更しました。
手順概要
- WSL2(GPUサポートあり)環境を構築
- Dockerのデフォルトランタイムを"nvidia"に変更
- Dockerファイルを設定
- コンテナビルド、立ち上げと利用
手順詳細
1. WSL2(GPUサポートあり)環境を構築
基本的に公式手順でOK
2. Dockerのデフォルトランタイムを"nvidia"に変更
あらかじめこれをやっておかないと、Pytorch3Dビルド時にうまくビルドされません。
(ビルド中にtorch.cuda.is_available()がtrueになる必要がある)
このための手順としては
- /etc/docker/daemon.jsonを設定
- sudo service docker restart
- デフォルトRuntimeがnvidiaになっていることを確認
 $ docker info 2>/dev/null|grep "Default Runtime"
 Default Runtime: nvidia
で良いです。daemon.jsonの設定内容は以下の通り。
{
    "default-runtime": "nvidia",
    "runtimes": {
        "nvidia": {
            "path": "/usr/bin/nvidia-container-runtime",
            "runtimeArgs": []
        }
    }
}
3. Dockerfileを設定
以下を順に行っています。
- ubuntuをベース
- CUDA11.3インストール
- pytorch(CUDA11.3版)インストール
- その他必要パッケージをpip導入
- Pytorch3Dのビルドに必要なCUBとtorch/lib/THを準備
- 環境変数設定してPytorch3Dをビルド
FROM ubuntu:latest
ARG DL_DIR="${PWD}/Downloads"

# Set CUDA Compute Capability to build cpp_extension.py
# Ref: https://github.com/pytorch/extension-cpp/issues/71 and https://pytorch.org/docs/stable/cpp_extension.html
# Compute Capability (like 7.5) should be set as suitable for using device https://developer.nvidia.com/cuda-gpus
ARG TORCH_CUDA_ARCH_LIST="7.5 8.0 8.6+PTX"

# To disable interactive dialog shown at cuda installation
ARG DEBIAN_FRONTEND=noninteractive

RUN mkdir ${DL_DIR}
RUN cd ${DL_DIR}
RUN apt-get update
RUN apt-get install -y wget curl vim git python3-pip

# Install CUDA 11.3 for WSL(must be same as used in pytorch, otherwise, Pytorch3D build fails)
# Ref: https://docs.nvidia.com/cuda/wsl-user-guide/index.html#getting-started-with-cuda-on-wsl 4.2.6
RUN wget https://developer.download.nvidia.com/compute/cuda/repos/wsl-ubuntu/x86_64/cuda-wsl-ubuntu.pin
RUN mv cuda-wsl-ubuntu.pin /etc/apt/preferences.d/cuda-repository-pin-600
RUN wget https://developer.download.nvidia.com/compute/cuda/11.3.0/local_installers/cuda-repo-wsl-ubuntu-11-3-local_11.3.0-1_amd64.deb
RUN dpkg -i cuda-repo-wsl-ubuntu-11-3-local_11.3.0-1_amd64.deb
RUN apt-key add /var/cuda-repo-wsl-ubuntu-11-3-local/7fa2af80.pub
RUN apt-get update
RUN apt-get -y install cuda

# Install pytorch with CUDA 11.3 library
RUN pip3 install torch==1.11.0+cu113 torchvision==0.12.0+cu113 torchaudio==0.11.0+cu113 -f https://download.pytorch.org/whl/cu113/torch_stable.html
RUN pip3 install matplotlib notebook ipywidgets wheel

# Setup CUB 1.16.0 Reference
RUN wget https://github.com/NVIDIA/cub/archive/refs/tags/1.16.0.tar.gz
RUN tar xzf 1.16.0.tar.gz
ARG CUB_HOME=${DL_DIR}/cub-1.16.0

# Build torch/TH
RUN apt-get install -y cmake sudo libreadline-dev
RUN git clone https://github.com/torch/torch7
RUN mkdir th_build
RUN cd th_build && cmake ../torch7/lib/TH && make install && cd ..

# Build Pytorch3D
ARG FORCE_CUDA=1
RUN pip3 install 'git+https://github.com/facebookresearch/pytorch3d.git'
4. コンテナ立ち上げと利用
以下のような構成でファイル/フォルダを配置します。
”render_textured_meshes.ipynb”はPytorch3Dの公式チュートリアルからとってきたもの。
 |- docker_compose.yml
 |- workspace(ディレクトリ)
 |    |- render_textured_meshes.ipynb
 |
 |- pytorch3d(ディレクトリ)
      |- Dockerfile
      |- root_jupyter(ディレクトリ)
services:
        pytoch3d:
                build:
                        context: ./pytorch3d
                        dockerfile: Dockerfile
                restart: always
                entrypoint: bash -c "jupyter notebook --allow-root --no-browser --ip=0.0.0.0 --NotebookApp.token='' --notebook-dir=/workspace"
                deploy:
                        resources:
                                reservations:
                                        devices:
                                        - driver: nvidia
                                          count: 1
                                          capabilities: [gpu]
                ports:
                        - "8888:8888"
                volumes:
                        - ./pytorch3d/root_jupyter:/root/.jupyter
                        - ./workspace:/workspace
このディレクトリに移動して
$ docker compose build
とするとコンテナビルドが実行され、うまく行けば数十分後に
Successfully built xxxx
Successfully tagged docker_pytoch3d:latest
みたいなメッセージが表示されるはずです。あとは
$ docker compose up
としてやり、ブラウザからlocalhost:8888にアクセスして、そこで見える"render_textured_meshes.ipynb"を全実行すれば
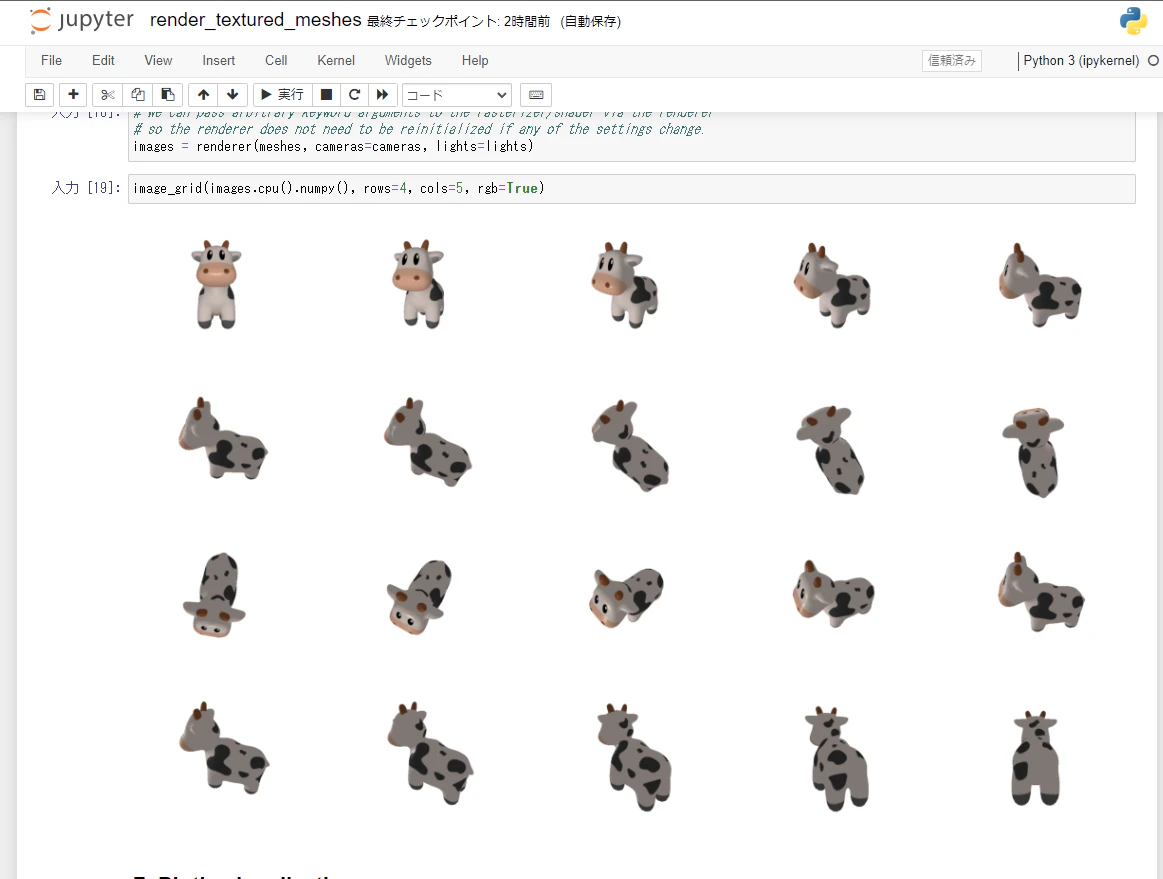
のような実行が確認できる..はずです。
ハマリポイント
Docker Desktopが邪魔することがある(?)
インストール順序などにもよるかもしれませんが、手順2.で切り替えようとしたところ
/etc/docker/daemon.jsonを変更しているのにデフォルトランタイムがrunc(デフォルト)から変わらない、
という状況になりました。
結局Docker Desktopをアンインストールした後、以下の手順でdockerを復帰しました。
$ sudo apt remove docker.io
$ sudo apt autoremove
$ curl https://get.docker.com | sh
$ sudo apt-get install -y nvidia-docker2
$ sudo service docker start
Pytorch3D公式ビルド手順では不足するライブラリ(torch/TH)がある
2022/3/21時点のビルドでは、公式に言及されているCUB以外にも, torch7/libのビルド, インストールが必要でした。
構築時にいくつかの環境変数設定が必要
いくつかのライブラリインストールが対話形式になっているので、DEBIAN_FRONTEND=noninteractiveを設定しないと処理が進みません。
また, Pytorch3Dビルド時、Pytorchのcpp_extention.pyが参照される際、TORCH_CUDA_ARCH_LIST名で1つ以上のリストが無いとビルドエラーになります。
参考:https://pytorch.org/docs/stable/cpp_extension.html
@stableの方がstableじゃないことがある
最初, 「stableの方が安定してるだろう」と思って、Pytorch3Dのビルドを
git+https://github.com/facebookresearch/pytorch3d.git@stable
としていたのですが、"import pytorch3d.io"で問題を起こすライブラリができてしまいました...
stable付きのバージョンはこちら、動作確認時のバージョンはこちらです。
jupyter-labを使うと公式チュートリアルが失敗する
最初jupyter-labの方でDockerコンテナ作ったのですが、チュートリアルに
%matplotlib notebook
が入ってて、matplotlibの3D表示がうまくできない問題にあたったのでjupyter notebookにしています。
Tutorialの一つ, Bundle adjustmentがローカル実行できない
OR if running locally uncomment and run the following cell:
# from utils import plot_camera_scene
とかなっていますが、2022/4現在のgit構成とあっていません。
上のセルにあるColab版手順に倣って
from git.pytorch3d.docs.tutorials.utils import plot_camera_scene
!mkdir data
!wget -P data https://raw.githubusercontent.com/facebookresearch/pytorch3d/main/docs/tutorials/data/camera_graph.pth
としないと駄目ですね。
(Dockerビルド以外の場合)ビルド時メモリ食いすぎ問題
Pytorch3Dビルド時、ビルドプロセス(cc1plus)が並列で走るのですが、1プロセスあたり2GBほど要求しているようで
論理コア数が多いシステムだと割と簡単にメモリ不足でビルドが失敗します。
(Dockerの場合は1プロセスしか走らないようで問題になりませんでした。その分ビルド遅いですが)
環境変数MAX_JOBSを設定してPytorch3Dをビルドすることで回避できます。
$MAX_JOBS=4 pip install 'git+https://github.com/facebookresearch/pytorch3d.git' #4プロセスまでに制限