はじめに
環境は以下
- Next.js
- CloudFront+S3
pages/index.tsxとpages/new.tsxを持つ Next.js を静的ビルドすると、ビルド結果は/index.htmlと/new/index.htmlが生成される
(next.config.js にtrailingSlash: trueを設定している場合)
URL の/にアクセスした時は、CloudFront で Default Root Object に index.html を指定しておけば、https://.../index.htmlを返してくれるので普通に表示されるが、/newにアクセスすると CloudFront は 403 エラーを返す
この場合、/newのアクセスに対して、https://.../new/index.htmlを返すようにしてあげれば、問題なくリソースを表示することができるようになる
これは CloudFront の Edge Location において、/newという URL を/new/index.htmlに書き換えるスクリプトを実行してあげることで解決ができる
これは調べるとよく紹介されているやり方で、AWS の Edge 関数のコード例にも記載されている
https://docs.aws.amazon.com/ja_jp/AmazonCloudFront/latest/DeveloperGuide/example-function-add-index.html
※ この 403 エラー問題の解決方法でいうと URL 書き換え以外に、「CloudFront ではなく、別の CDN サービスを使う」や「S3 の Static Website Hosting を設定する」など別の解決方法もある
今回実現したいことは以下になる
- CloudFront Functions で URL の書き換えを行う
- Function は GitHub でコード管理したい
- Function は TypeScript で書きたい
- CI で Function をデプロイしたい
CloudFront Functions について
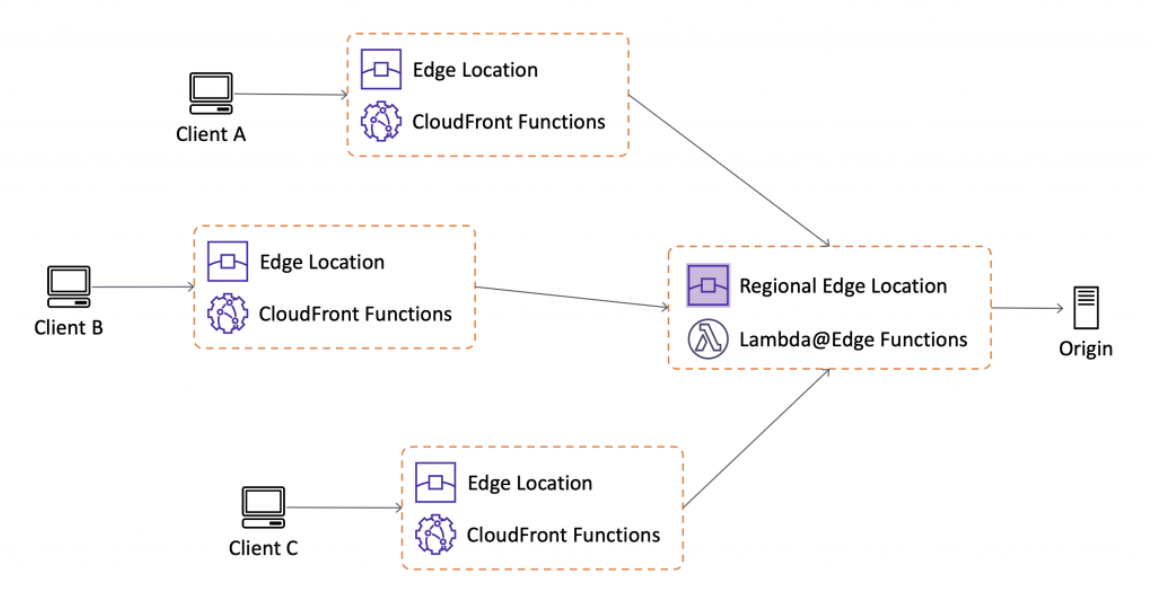
CloudFront Functions は、Lambda@Edge よりクライアントに近い Edge Location でスクリプトを実行できるので、より速いレスポンスを期待できる
具体的には、以下のことが実現できる
- Edge Location に index.html がキャッシュされる
- Edge Location 上の CloudFront Functions で URL を
/newから/new/index.htmlに書き換える - キャッシュにヒットし、index.html がクライアントにレスポンスされる
上記の AWS ブログ内に CloudFront Functions と Lambda@Edge のスペック比較表があるが、Functions の制限は厳しめ
また、他の CDN サービスと比較しても Functions の制限はかなりきつい(Netlify と Vercel は AWS Lambda だけど)
そして、言語サポートが JavaScript(ECMAScript 5.1 準拠)なので、普通に実装すると開発体験がかなり悪いので、TypeScript で実装して tsc や webpack(ts-loader)などのトランスパイラー環境を構築する必要が出てくると思う
CloudFront Functions 用の npm 管理プロジェクトを作成
mkdir functions # ディレクトリ名は適当
cd functions
npm init # package.jsonを作成
とりあえず以下みたいな感じで、依存モジュールは後で入れる
{
  "name": "function-add-index",
  "private": true,
  "scripts": {
    "build": "tsc"
  }
}
TypeScript の設定
npm i -D typescript
./node_modules/.bin/tsc --init # tsconfig.jsonを作成
tsconfig.json で重要なのは、targetオプションになる
Function は JavaScript(ECMAScript 5.1 準拠)のみで動く
{
  "compilerOptions": {
    "target": "es5",
    "module": "commonjs",
    "lib": ["es2015"],
    "outDir": "./dist",
    ...
  },
  "include": ["src/**/*.ts"]
}
libは後述のendsWithやincludesを使うために必要
moduleは指定しなくても良い(targetがes5であればデフォルトでcommonjsになる)
Function の実装
型定義があるので、インストール
npm i -D @types/aws-cloudfront-function
以下はこちらのサンプルコードを TS 化したもの
function handler(event: AWSCloudFrontFunction.Event): AWSCloudFrontFunction.Request {
  const { request } = event

  if (request.uri.endsWith('/')) {
    request.uri += 'index.html'
  } else if (!request.uri.includes('.')) {
    request.uri += '/index.html'
  }

  return request
}
CI(CircleCI 2.1)の実装
Function のデプロイ周りを全部 aws-cli 使って書くと、以下のような感じになるかなと思う
(そのうちこの辺の CircleCI Orb ができたら、置き換える前提で)
処理の流れは
-
aws cloudfront list-functionsでfunction-add-indexが存在するか判断- 存在しない場合は、新規作成(
aws cloudfront create-function) - 存在する場合は、更新(
aws cloudfront update-function)
- 存在しない場合は、新規作成(
- ETag を取得(
aws cloudfront describe-function) - 公開する(
aws cloudfront publish-function)
version: 2.1

orbs:
  node: circleci/node@4.7.0
  aws-cli: circleci/aws-cli@2.0.3

jobs:
  deploy:
    executor: node/default
    steps:
      - checkout
      - node/install-packages:
          app-dir: ./functions
      - run:
          name: Build
          working_directory: ./functions
          command: npm run build
      - aws-cli/setup
      - run:
          name: Deploy
          working_directory: ./functions
          command: |
            FN_NAME="function-add-index"
            FN_LIST=$(aws cloudfront list-functions | jq --arg fn_name $FN_NAME '.FunctionList.Items[] | select(.Name==$fn_name)')
            if [ -z "$FN_LIST" ]; then
              aws cloudfront create-function \
                --name $FN_NAME \
                --function-config Comment="Add index.html string to url",Runtime="cloudfront-js-1.0" \
                --function-code fileb://dist/index.js
            else
              ETAG_CURRENT=$(aws cloudfront describe-function --name $FN_NAME | jq -r '.ETag')
              aws cloudfront update-function \
                --name $FN_NAME \
                --function-config Comment="Add index.html string to url",Runtime="cloudfront-js-1.0" \
                --function-code fileb://dist/index.js \
                --if-match $ETAG_CURRENT
            fi
            ETAG_PUBLISH=$(aws cloudfront describe-function --name $FN_NAME | jq -r '.ETag')
            aws cloudfront publish-function \
              --name $FN_NAME \
              --if-match $ETAG_PUBLISH
上記は Function を作成・更新した後にすぐ Publish してるので、本当は公開前にテストした方が良い(一応aws cloudfront test-functionってのもある)
必要な IAM ポリシー
aws-cli/setupに設定する IAM ユーザーのポリシーは以下をアタッチする
{
  "Version": "2012-10-17",
  "Statement": [
    {
      "Sid": "VisualEditor0",
      "Effect": "Allow",
      "Action": [
        "cloudfront:DescribeFunction",
        "cloudfront:ListFunctions",
        "cloudfront:PublishFunction",
        "cloudfront:UpdateFunction",
        "cloudfront:CreateFunction"
      ],
      "Resource": "*"
    }
  ]
}
