備忘録
Step1: ACIシミュレータをダウンロードする
Step2: ダウンロードしたファイルを変換
KVMで動作させる為に、ファイルを変換させます。
#tar -xvf acisim-6.0-3d.ova
3つのファイルが生成されます。
-rw-r--r--. 1 root root        5861 8月  9  2023 acisim-6.0-3d.ovf
-rw-r--r--. 1 root root 12344762880 8月  9  2023 acisim-6.0-3d-disk1.vmdk
-rw-r--r--. 1 root root         139 8月  9  2023 acisim-6.0-3d.mf
SHA1チェックサムが書き込まれたファイルacisim-6.0-3d.mf を読み込んでファイルの破損が無い事を確認します。
#sha1sum --check acisim-6.0-3d.mf
acisim-6.0-3d-disk1.vmdk: 完了
acisim-6.0-3d.ovf: 完了
qcow2ファイルに変換します。
#qemu-img convert -O qcow2 acisim-6.0-3d-disk1.vmdk acisim-6.0-3d.qcow2
Step3.ACIのネットワークを作成します。

Step4.KVMの定義ファイルを生成します。
Cockpitで設定するとネットワークに接続する事が出来ないので、virt-managerコマンドを使用して定義ファイルを作成します。

・「既存のストレージのパスを指定して下さい」は、Step2でコンバートしたqcow2ファイルは、/var/lib/libvirt/images/に配置し、そのファイルを指定します。
・「サポート期間が切れたOSを含む」をチェックして、「Ubuntu 20.04LTS」を選択します。

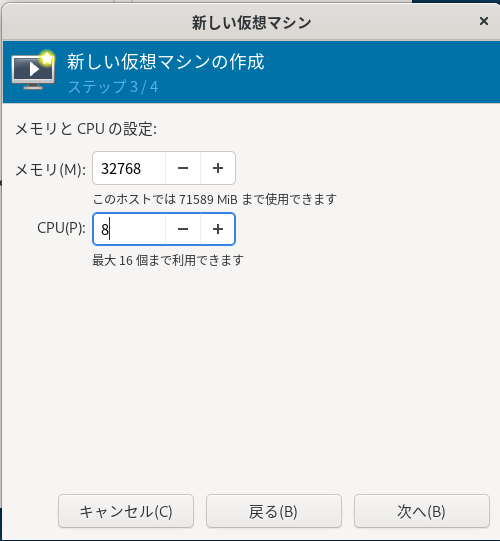
メモリ32GB/CPU 8個を選択します。
「名前」ACI 6.0-3d
「インストールの前に設定をカスタマイズする」をチェックします

インターフェースを1つ追加して2つにします。これはovfファイルに2インターフェースが定義させている為の措置です。
デバイスタイプは e1000を選択します。
なお、「概要」でチップセットを「i440FX」に変更後、デバイスタイプをe1000に選択、その後チップセットを「Q35」に戻します。

Step5: 起動
Cockpitで定義したACI Simulaterを実行させます。
Default simulater topology consists of 1 APIC, 1 leaf and 1 spine.
You can select large topology with 3 APICs, 2 leaves and 2 spones.

We recommend at least 64GB RAM and 16+ CPUs for large topology.
This system has 31 GB RAM and 8 CPUs.

Select large topology? (provide your choice in 3 minutes) [y/n]:
Cluster configuration
 Enter the fabric name [ACI Fabric1]:
 Enter the fabric ID (1-128) [1]:
 Enter the number of active controllers in the fabric (1-9) [1]:
 Is this a standby controller? [NO]:
 Entey the controller ID (1-1) [1]:
 Is this APIC connected to fabric over L3 Network ? yes/no [no]:
 Enter the POD ID (1-254) [1]:
 Enter the controlle name [apic1]:
 Enter address pool for TEP addresses [10.0.0.0/16]:
 Note: The infra VLAN ID should not be used elsewhere in your enviroment
       and should no overlap with any other reserved VLANs on other platforms.
 Entey the VLAN ID for infra network (1-4096) [4]:
 Entey address ppol for BD multicast addresses (GIPO) [225.0.0.0/15]:

Out-of-band management configuration ...
 Enable IPv6 for Out of Band Mgmt Interface? [n]:
 Entry the IPv4 address [192.168.10.1/24]:
 Entry the IPv4 address of the default gateway [192.168.10.254]:
 Entry the interface speed/duplex mode [auto]:

admin user configuration ...
 Enable strong passwords? [Y]: N
 Enter the password ofr admin:
数分すると以下の画面になります。
Ubuntu 20.04.5 LTS apic1 tty

apic1 login:
ブラウザでアクセスします。
ログインすると、APIC画面が表示されます。

以上
【補足】
ACI 4.2の場合、OSがCentOS7.0で、KVMで起動させようとする場合は、エラー(scsi_wait_scan not found)が発生してブート出来ません。