はじめに
SC(非公式) Advent Calendar 2017 24日目!クリスマスイブですね♪
その1 は概念編でしたが、今回は実装編ということで、
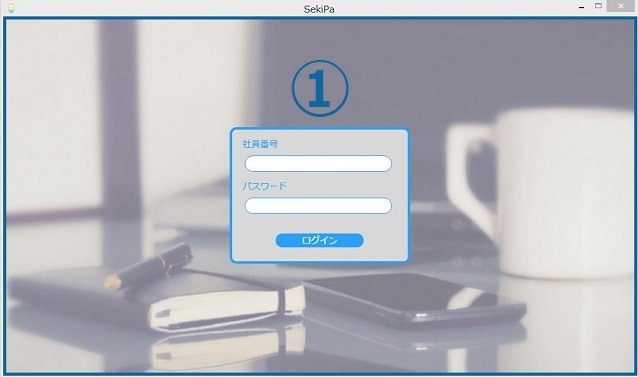
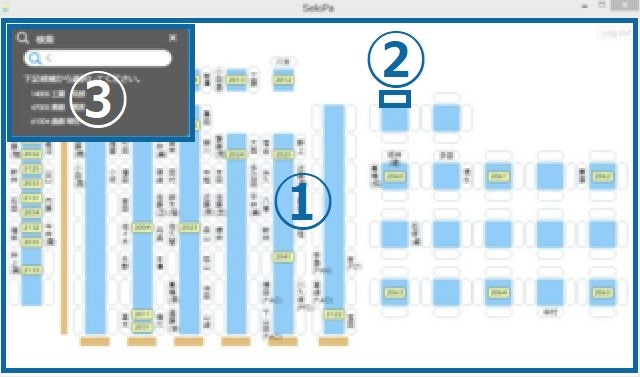
ログインからのページ遷移→座席表表示→検索→検索結果表示まで実装してみたいと思います(`・ω・´)!

electron-vueと銘打っておきながら、ほぼVue.jsのお話です。
開発時に躓いたところを中心に、参考資料をあげながらまとめています。
Main Process
ひとまずはウィンドウが立ち上がればよいので、electron-vueインストール時に自動生成されたまま変更しません。
'use strict'

import { app, BrowserWindow } from 'electron'

if (process.env.NODE_ENV !== 'development') {
  global.__static = require('path').join(__dirname, '/static').replace(/\\/g, '\\\\')
}

let mainWindow
const winURL = process.env.NODE_ENV === 'development'
  ? `http://localhost:9080`
  : `file://${__dirname}/index.html`

function createWindow () {
  mainWindow = new BrowserWindow({
    height: 563,
    useContentSize: true,
    width: 1000
  })

  mainWindow.loadURL(winURL)

  mainWindow.on('closed', () => {
    mainWindow = null
  })
}

app.on('ready', createWindow)

app.on('window-all-closed', () => {
  if (process.platform !== 'darwin') {
    app.quit()
  }
})

app.on('activate', () => {
  if (mainWindow === null) {
    createWindow()
  }
})
createWindow ()で、幅や高さ、URLなどを設定し、Electronの初期化処理終了後( = ready)にcreateWindowを呼び出すだけです。
実際には、ここでメニューバーの設定やスタートアップへの登録、自動アップデートなどを実装しています。
Renderer Process
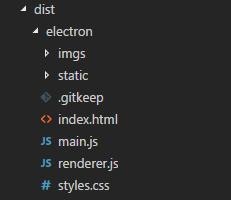
npm run buildして最終的に出来上がるディレクトリ構成は以下のようになります。
シンプルですね!
このindex.htmlの基本となるのが、index.ejsです。
<!DOCTYPE html>
<html>
  <head>
    <meta charset="utf-8">
    <title>SekiPa</title>
    <% if (htmlWebpackPlugin.options.nodeModules) { %>
      <script>
        require('module').globalPaths.push('<%= htmlWebpackPlugin.options.nodeModules.replace(/\\/g, '\\\\') %>')
      </script>
    <% } %>
  </head>
  <body>
    <div id="app"></div>
    <script>
      if (process.env.NODE_ENV !== 'development') window.__static = require('path').join(__dirname, '/static').replace(/\\/g, '\\\\')
    </script>
  </body>
</html>
bodyには<div id="app"></div>しかないぞ(´・ω・`)
どうなっているんだ(´・ω・`)?
コンポーネント
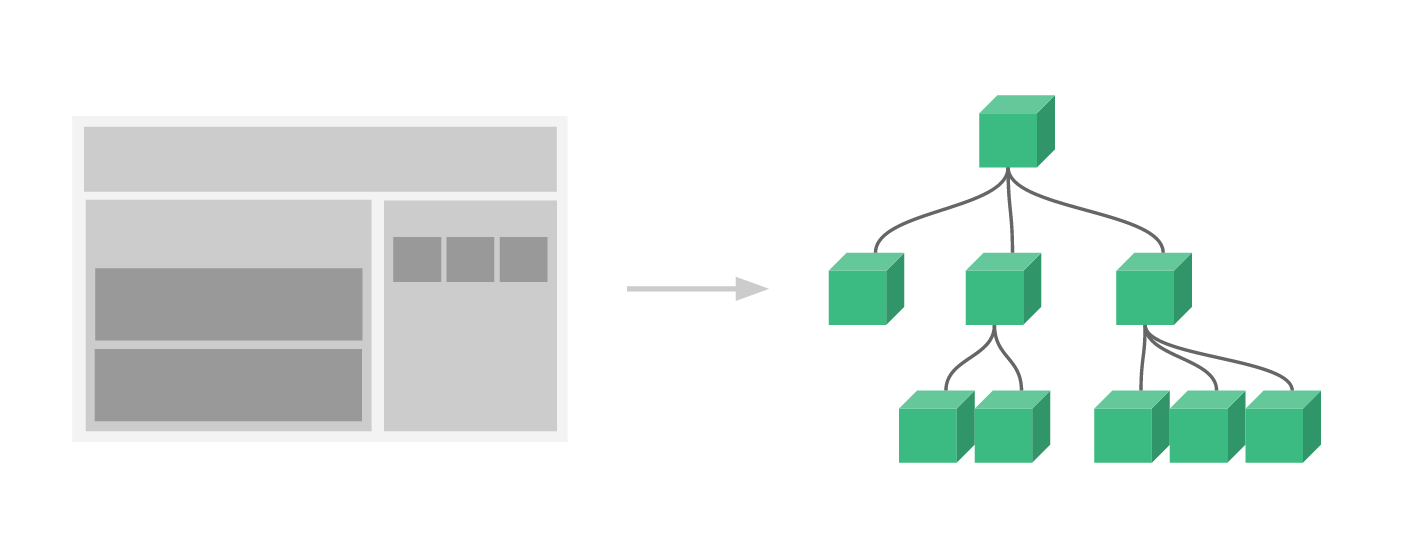
HTML要素をコンポーネントとして部品化、カプセル化することができます。
コンポーネントはVueインスタンスそのものです。
※Vue.js(日本語)はじめに
コンポーネントを組み合わせることで、アプリケーションを構築していきます。
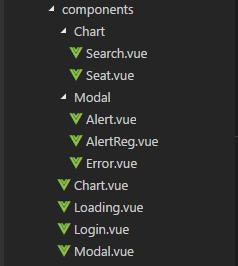
このアプリではこのようにコンポーネントを分割しています。
- Login.vue
- Chart.vue
- Seat.vue
- Search.vue
(デスクもコンポーネント化予定…)
- Loading.vue
- Modal.vue
- Alert.vue
- AlertReg.vue
- Error.vue
ルーティングの対象となるコンポーネントはLogin.vueとChart.vueのみです。
これに対して、Loading.vueやModal.vueなどレイヤーを重ねています。
(Vue.js(日本語)スタイルガイドに沿って、命名やディレクトリ構成は直す予定…)
拡張子.vueってなんだ(´・ω・`)?
単一ファイルコンポーネント
カプセル化したい単位は、ファイルの種類ごとではなく、このアプリで言えば座席、検索ウィンドウといったオブジェクト単位です。
.vueファイル内には、<template>、<script>、<style>の3種類のタグがあり、1ファイル=1コンポーネントとして扱うことができます。
※この.vueファイルは、vue-loaderによりビルド時にJavaScriptに変換されています。
ルートとなるコンポーネントApp.vueです。
<template>
  <div id="app">
    <router-view></router-view>
    <loading></loading>
    <modal></modal>
  </div>
</template>

<script>
  import Modal from './components/Modal'
  import Loading from './components/Loading'

  export default {
    components: {
      Loading, Modal
    }
  }
</script>

<style>
  #app{
    position: relative;
    zoom: 70%;
  }
  body {
    margin: 0 0 0 0;
    font-family: 'MS P明朝', 'MS PMincho','ヒラギノ明朝 Pro W3', 'Hiragino Mincho Pro', 'serif'sans-serif;
  }
  .main-layer {
    /* 省略 */
  }
  .seat-layer {
    /* 省略 */
  }
  .search-layer{
    /* 省略 */
  }
  .alert-layer{
    /* 省略 */
  }
  .loading-layer{
    /* 省略 */
  }
  .fade-enter-active, .fade-leave-active {
    transition: opacity .3s
  }
  .fade-enter, .fade-leave-to{
    opacity: 0
  }
</style>
各レイヤーやbodyなどグローバルなスタイルはこちらで定義しています。
続いて、Renderer Processのエントリーポイントとなるmain.jsです。
import Vue from 'vue'
import router from './router'
import store from './store'
import App from './App'
import httpClient from './util/http-client'

if (!process.env.IS_WEB) Vue.use(require('vue-electron'))
Vue.use(httpClient, { store })
Vue.config.productionTip = false

/* eslint-disable no-new */
new Vue({
  components: { App },
  router,
  store,
  template: '<App/>'
}).$mount('#app')
ここでApp.vueをインスタンス化して、<div id="app"></div>にmountしています。
ん?<router-view></router-view>ってなんだろう(´・ω・`)?
ルーティング ~vue-router~
vue-routerとは
シングルページアプリケーション構築のためのルーティングライブラリです。
ルート定義
まずは、コンポーネントとルートのマッピングを行います。
import Vue from 'vue'
import Router from 'vue-router'
import Login from '@/components/Login'
import Chart from '@/components/Chart'

Vue.use(Router)

const router = new Router({
  routes: [
    {
      path: '/',
      name: 'login',
      component: Login
    },
    {
      path: '/chart',
      name: 'chart',
      component: Chart,
    }
  ]
})

export default router
このアプリではログインから座席表への遷移しかありませんので、
コンポーネントとそれに対応するパスを定義して完成です。
これでrouter-viewコンポーネントがパスにマッチしたコンポーネントを描画してくれます。
ページ遷移
<router-link to="home">Home</router-link>
↓
<a href="home">Home</a>
router-linkコンポーネントを使えば、toプロパティに指定したパスへ遷移する<a>タグを生成してくれます。
※vue-router(日本語)router-link
また、routerのインスタンスメソッドを使うこともできます。
routerインスタンスメソッド
- router.push(location, onComplete?, onAbort?):履歴を追加し、遷移する
router.push('chart')
- router.go(n):パラメーターで指定されたページへ移動する
// 1ページ進む
router.go(1)

// 1ページ戻る
router.go(-1)
router.push()とrouter.go()で進む/戻るボタンを実装することができます。
- router.replace(location, onComplete?, onAbort?):履歴を追加せず、遷移する
router.replace('chart')
このアプリでは、履歴を残す必要がないので、
ログインボタン押下時にrouter.replace('chart')で遷移しています。
ナビゲーションガード
ここでは実装していませんが、
「リダイレクトされたら、必ず認証を行いたい」といった場合…
リダイレクトやキャンセルによる遷移に対して
- グローバル
- ルート単位
- コンポーネント単位
に処理をフックすることができます。
※vue-router(日本語)ナビゲーションガード
コンポーネントとページ遷移についてはわかったぞ(`・ω・´)!
Chart.vueの初期表示から検索結果表示まではこんな感じにしたい(`・ω・´)!
- 座席・社員の位置情報を取得して、Seatコンポーネントを配置
DBにX座標、Y座標、縦か横かを表すフラグを保持しています。 - 検索テキストボックスの入力値で社員の絞り込み
- 社員名ボタン押下で検索
- 該当社員の座席の色を変える
でも、ロジックはどこに書けばいいんだろう(´・ω・`)?
MVVMと状態管理 ~vuex~
この章は、Vue.jsで実現するMVVMパターン Fluxアーキテクチャとの距離をまとめたものです。
Model-View-ViewModelとは
Vue.jsは、MVVMアーキテクチャの影響を受けています。
MVVMとは、Model-View-ViewModelに分割して、設計・実装するアーキテクチャパターンのことです。
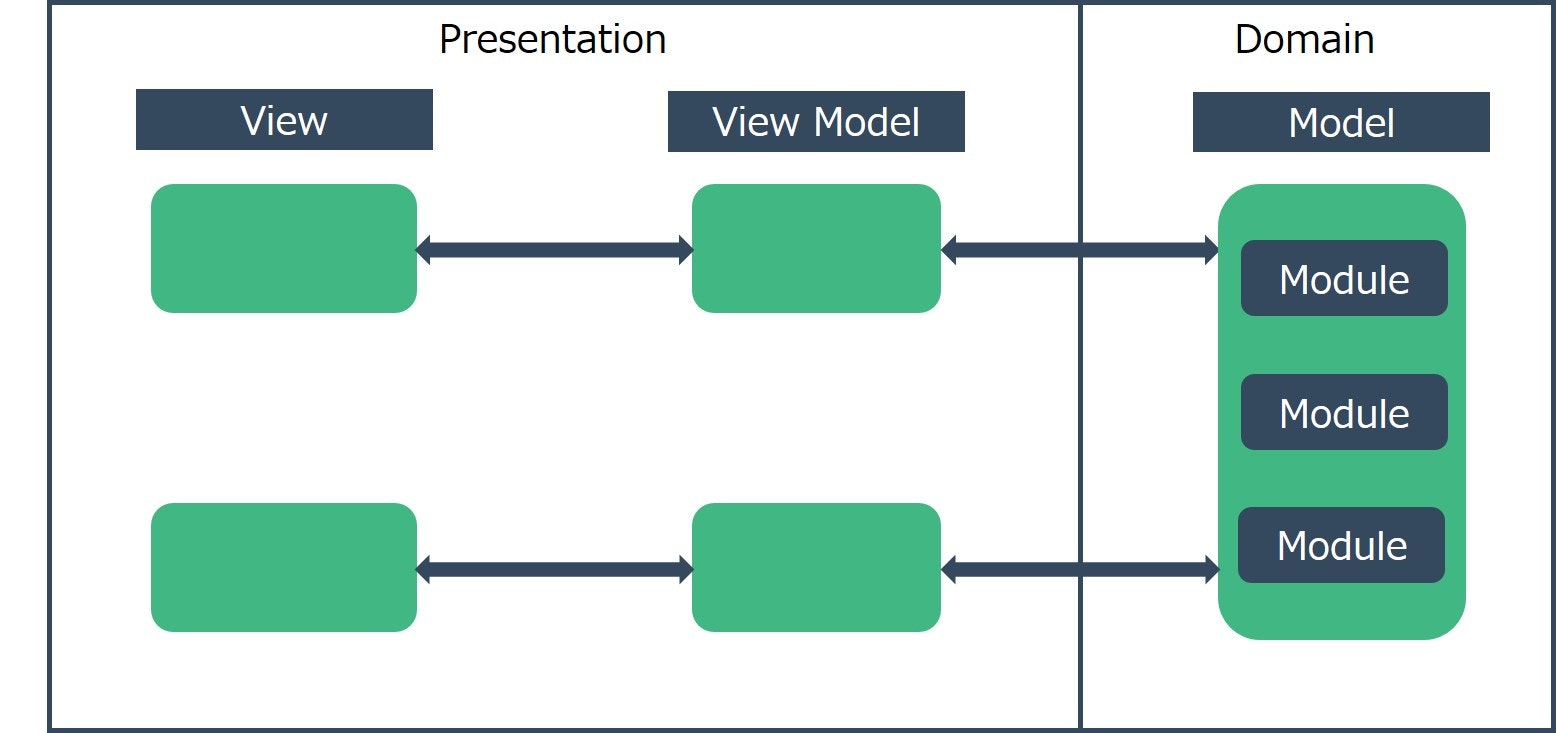
MVVMが実現しようとしているのは、**PDS(Presentation Domain Separation)**です。
PDSはその名の通り、「Presentation(UI)とDomain(ロジック)はわけましょう」という考え方です。
もしこのアプリをjQueryだけで実装しようとすると…
-
DOMがHTML外で生成されてしまう
座席表ボタンを表示するには、DBから取得した座席・社員の位置情報をループで回して、<button>タグを生成して…
このbuttonに「CSSを追加したい!」となった場合、DOMを生成しているロジックを見なければいけません。
-
様々な場所でイベントハンドラが設定されてしまう
検索イベントは初期表示で、座席登録イベントは<button>タグ生成のループでハンドルして…
どこでどのようなイベントが起きているのかが分かりづらくなってしまいます。
-
DOMが状態を管理している
検索結果を表示するには、座席表ボタンのエレメントを全て取得して、結果と一致するエレメントを探して…
何をするにも、まずDOMを見なければいけません。
このように、UIとロジックがどんどん密結合になっていき、複雑化していってしまいます。
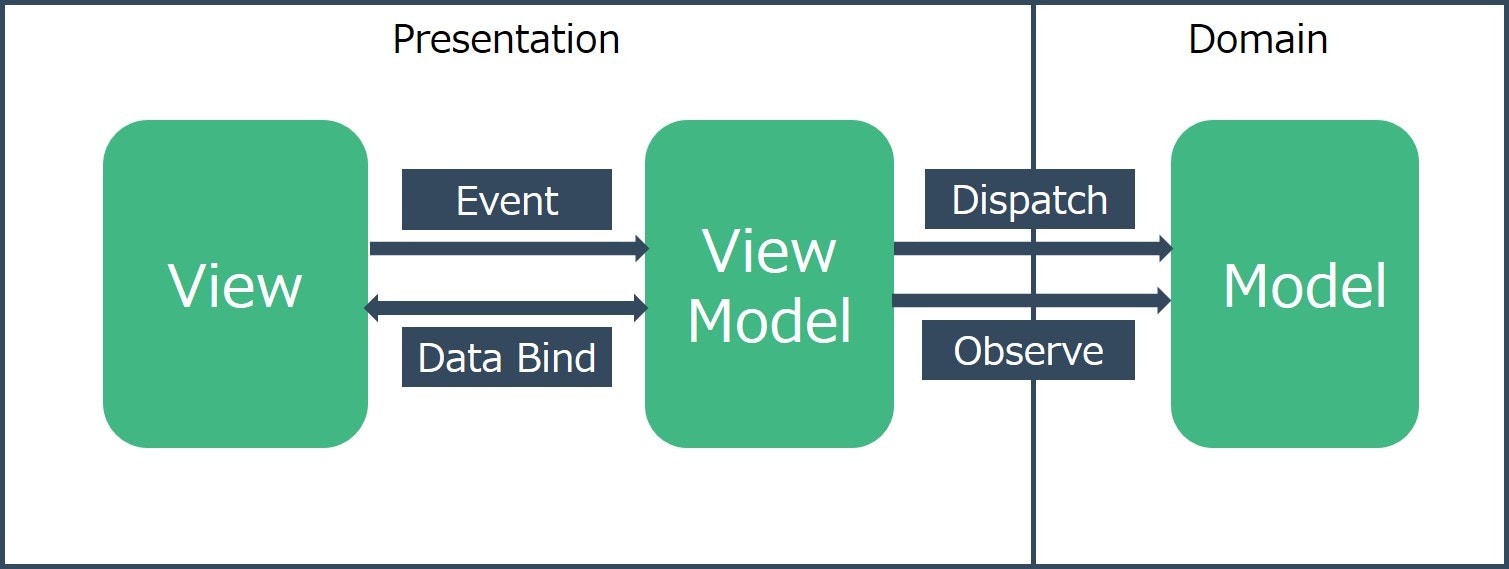
そこでまず、View(UI)とModel(ロジック)に分けます。
このViewとModelをつなげるのがViewModelです。
それでは、Model-View-ControllerのControllerと何が違うのでしょうか。
ViewModelは、Viewとバインドされたオブジェクトを持っています。
このViewとViewModelが双方向にバインドされていることが、MVVMの特徴です。
イベント発生から、Viewへの反映までを追ってみると…
- Viewでイベントが起きます。
- ViewModelは、Modelのメソッドを呼び出します。
- Modelのメソッドによる変更をViewModelは監視し、自身のオブジェクトを書き換えます。
- ViewとViewModelはバインドされているので、ViewModelの変更がViewに反映されます。
このようなフローになります。
そして、このフローが重要です。
ViewModelは、Modelのメソッドの戻り値を利用して…などということはしていません。
そうすると、どんどんModelとViewは密結合になっていってしまいます。
それを防ぐために、単方向データフローを強制してくれるのが、Vuexです。
Vuexとは
単方向データフローを実現するための状態管理ライブラリです。
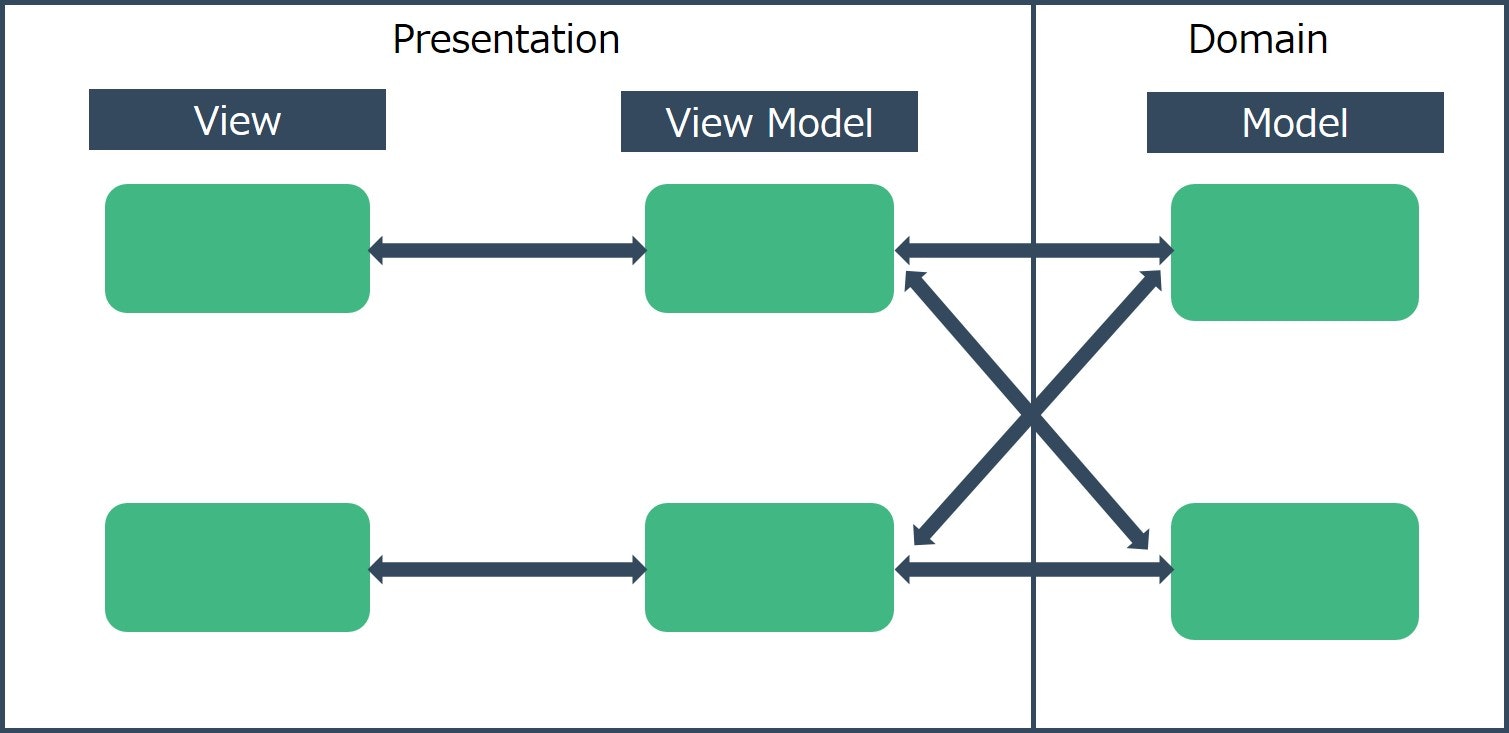
先程の例のように、ViewModelとModelが1対1になるとは限りません。
このように、「異なるViewModelから同じメソッドを呼び出したい!」ということもあると思います。
すると、またどんどん複雑化していきます。
そこで、「単一のModelにしてそこですべて管理しよう!」とうのがVuexの考え方です。
Vuexでは、この単一のModelをStoreと呼びます。
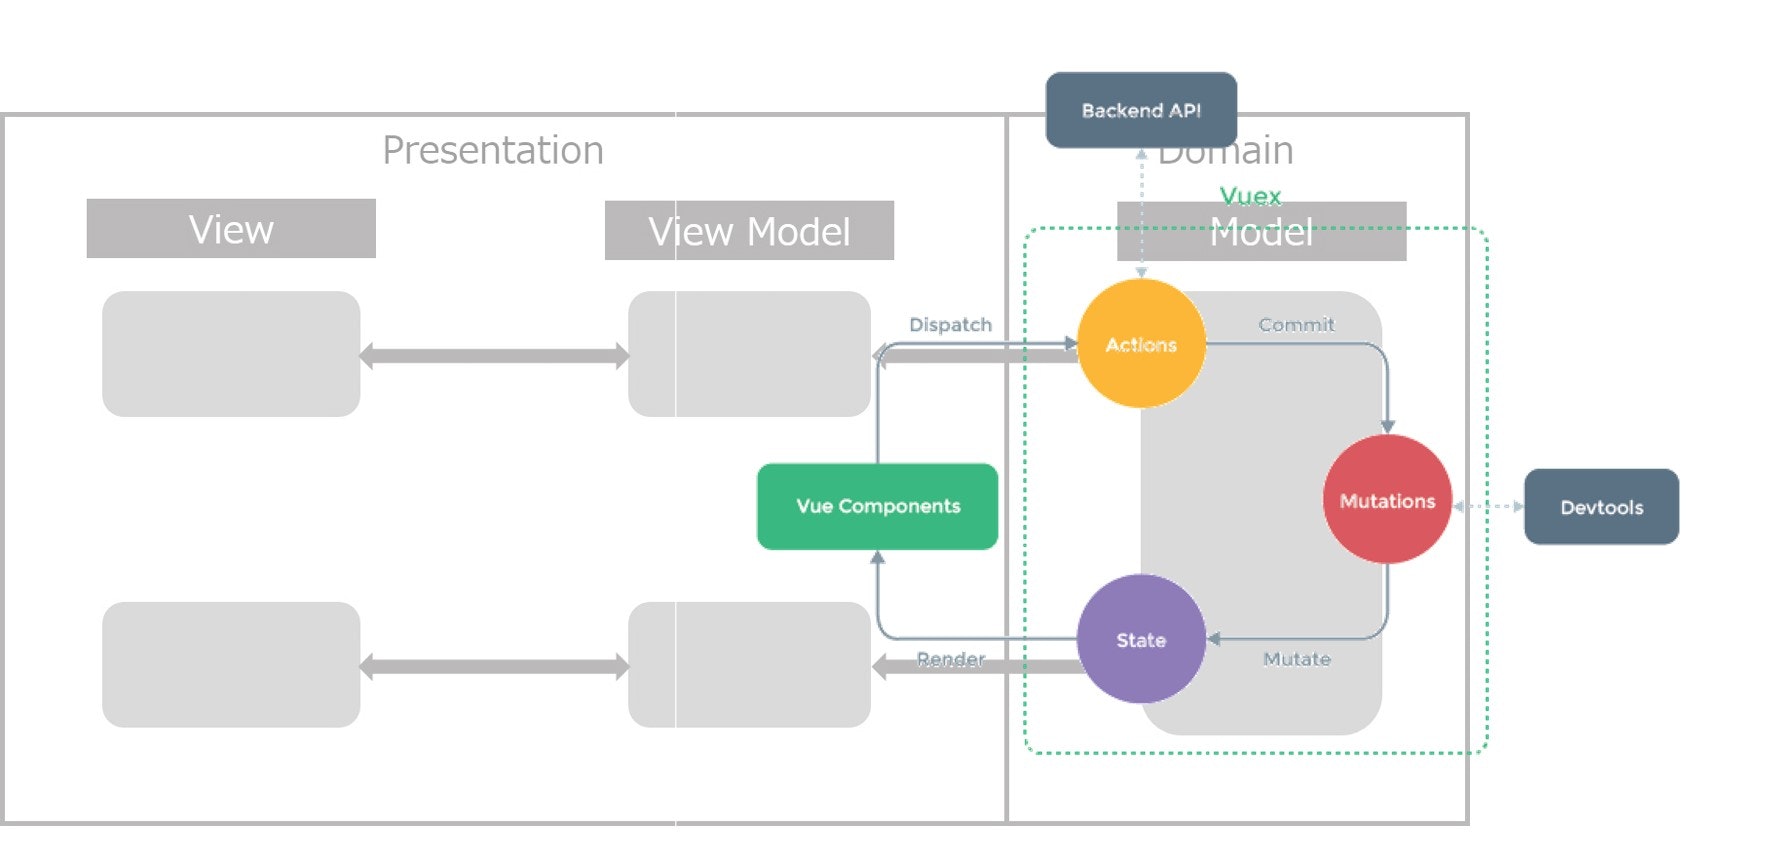
Storeの中には、Action、Mutation、Stateが定義されています。
- Action
ビジネスロジックです。非同期通信はここで行います。 - Mutation
唯一Stateの変更をすることができます。 - State
状態(アプリ内で使用したいデータなど)そのものです。
先程のイベント発生から、Viewへの反映をVuexに沿って見てみると…
- Viewでイベントが起きます。
- ViewModelは、StoreのActionを呼び出します。
- StoreのActionは、MutationをCommitしてStateを変更します。
- Stateの変更をViewModelは監視し、自身のオブジェクトを書き換えます。
- ViewとViewModelはバインドされているので、ViewModelの変更がViewに反映されます。
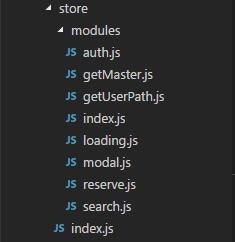
Storeの中では、このAction、Mutation、StateをModule化することができます。
このアプリではこのようにModule化しています。
よく見るVuexの図は、MVVMと照らし合わせるとこのようになります。
それでは、まずView/ViewModelにあたるChart.vueを見てみます。
<template>
  <div class="main-layer">
    <img
      class="icon"
      src="../assets/images/search_icon.png"
      @click="showSearch"
    >
    <search v-if="show"></search>
    <img
      class="rel"
      src="../assets/images/reload.png"
      @click="reload"
    >
    <button
      class="logout"
      v-if="!isGuest"
      @click="logout"
    >Log out</button>
    <div class="tables">
      <!-- 省略 デスクと内線 -->
    </div>
    <div class="seat-layer" >
      <seat
        v-for="seat in seats"
        :id="seat.SEAT_NO"
        :key="seat.SEAT_NO"
        :class="{ seatY: !seat.VERTICAL_FLG , searched: userPath.length != 0 && seat.SEAT_NO === userPath[0].SEAT_NO }"
        :style="{ left: seat.CONTENT_POSITION_X + 'px', top: seat.CONTENT_POSITION_Y + 'px' }"
        :seat="seat"
      ></seat>
    </div>
  </div>
</template>

<script>
  import Seat from './Chart/Seat'
  import Search from './Chart/Search'
  import * as messages from '@/assets/messages'
  import { mapActions, mapMutations, mapState } from 'vuex'

  export default {
    components: {
      Seat, Search
    },
    data: function () {
      return {
        empNo: JSON.parse(localStorage.getItem('authInfo')).EmpNo
      }
    },
    computed: {
      ...mapState('auth', {
        token: state => state.token,
        isGuest: state => state.isGuest
      }),
      ...mapState('search', {
        show: state => state.show
      }),
      ...mapState('getMaster', {
        seats: state => state.seatInfo
      }),
      ...mapState('getUserPath', {
        userPath: state => state.userPath
      })
    },
    created: function () {
      this.showLoading(true)
      this.fetchSeatInfo({
        Token: this.token
      })
      this.fetchEmpInfo({
        token: {
          Token: this.token,
          EmpNo: ''
        },
        loginEmpNO: this.empNo
      })
      this.getIsReserved({
        EmpNo: this.empNo,
        Token: this.token
      })
    },
    updated: function () {
      this.showLoading(false)
    },
    methods: {
      ...mapActions({
        fetchSeatInfo: 'getMaster/fetchSeatInfo',
        fetchEmpInfo: 'getMaster/fetchEmpInfo',
        getIsReserved: 'reserve/getIsReserved',
        showAlert: 'modal/showAlert'
      }),
      ...mapMutations({
        showSearch: 'search/showSearch',
        showLoading: 'loading/showLoading'
      }),
      logout: function () {
        this.showAlert({
          message: messages.I_005,
          actionName: 'auth/logout',
          param: {}
        })
      },
      reload: function () {
        this.showLoading(true)
        this.fetchSeatInfo({
          Token: this.token
        })
      }
    }
  }
</script>

<style scoped>
  /* 省略 */
</style>
<template>と<style>がView、<script>がViewModelになります。
v-for属性(´・ω・`)?computedオプション(´・ω・`)?
ディレクティブ
要素をリアクティブにするためのHTML属性です。
属性値の変化に応じたDOM操作やDOMイベントのハンドリングなどができます。
この属性により、DOMに関する操作はtemplate上に集約されます。
-
v-text
要素のtextContentを更新します。Mustache構文が使用できます。
<span v-text="message"></span>
<span>{{ message }}</span>
-
v-show
真偽値によって、要素のdisplayプロパティをblock/noneに設定します。
<h1 v-show="ok">Hello!</h1>
-
v-if
真偽値によって、DOM要素自体を作成/破棄します。
<h1 v-if="ok">Hello!</h1>
-
v-for
ソースデータに基づいて、要素を複数回描画します。
<div v-for="item in items">
  {{ item.text }}
</div>
-
v-bind
classやstyleなど通常のHTML属性をリアクティブにします。省略記法:があります。
<div :class="{ red: isRed }"></div>
<div :style="{ fontSize: size + 'px' }"></div>
-
v-model
以下の要素への入力値をバインドします。 <input><select><textarea>- コンポーネント
<input v-model="message" placeholder="edit me">
<p>Message is: {{ message }}</p>
-
v-on
要素のイベントをハンドリングします。省略記法@があります。
<button @click="doThis"></button>
<input @keyup.enter="onEnter">
コンポーネントオプション
コンポーネントの各種設定を行います。
-
templateで使用されるアセット
-
components
ここではSearchとSeatコンポーネントのみ使用するため、componentsのみです。 -
インターフェース
-
props
親コンポーネントから子コンポーネントへのデータの受け渡しはこのpropsを通して行われます。
<template>
 <div id="parent">
   <input type="text" v-model="parentMessage"></input>
   <child :message="parentMessage"></child>
 </div>
</template>

<script>
 export default {
   data: function () {
     return {
       parentMessage: '',
     }
   }
 }
</script>
<template>
  <div id="child">
    <p>Message from parent: {{ message }}</p>
  </div>
</template>

<script>
  export default {
    props: ['message']
  }
</script>
-
ローカルの状態
ViewとViewModelをバインドするオブジェクトの定義です。
ここで定義したオブジェクトはリアクティブになります。 -
data
Vueインスタンス作成時に定義されているオブジェクトのみリアクティブとなります。
Vueインスタンス作成後にリアクティブなオブジェクトを追加したい場合は、Vue.set(object, key, value)メソッド1を使う必要があります。 -
computed
computedプロパティに依存するものが更新された場合、 computedプロパティは再評価されます。
<template>
  <div id="example">
    <input type="text" v-model="message"></input>
    <p>Computed reversed message: {{ reversedMessage }}</p>
  </div>
</template>

<script>
  export default {
    data: function () {
      return {
        message: '',
      }
    },
    computed: {
      reversedMessage: function () {
        return this.message.split('').reverse().join('')
      }
    }
  }
</script>
Viewでの入力値は、v-modelディレクティブによりdataオプションにバインドされます。
computedプロパティであるreversedMessageは、messageの変更をトリガーにthis.message.split('').reverse().join('')を実行します
-
リアクティブイベント
Vueインスタンスのライフサイクルに応じてイベントをフックできます。
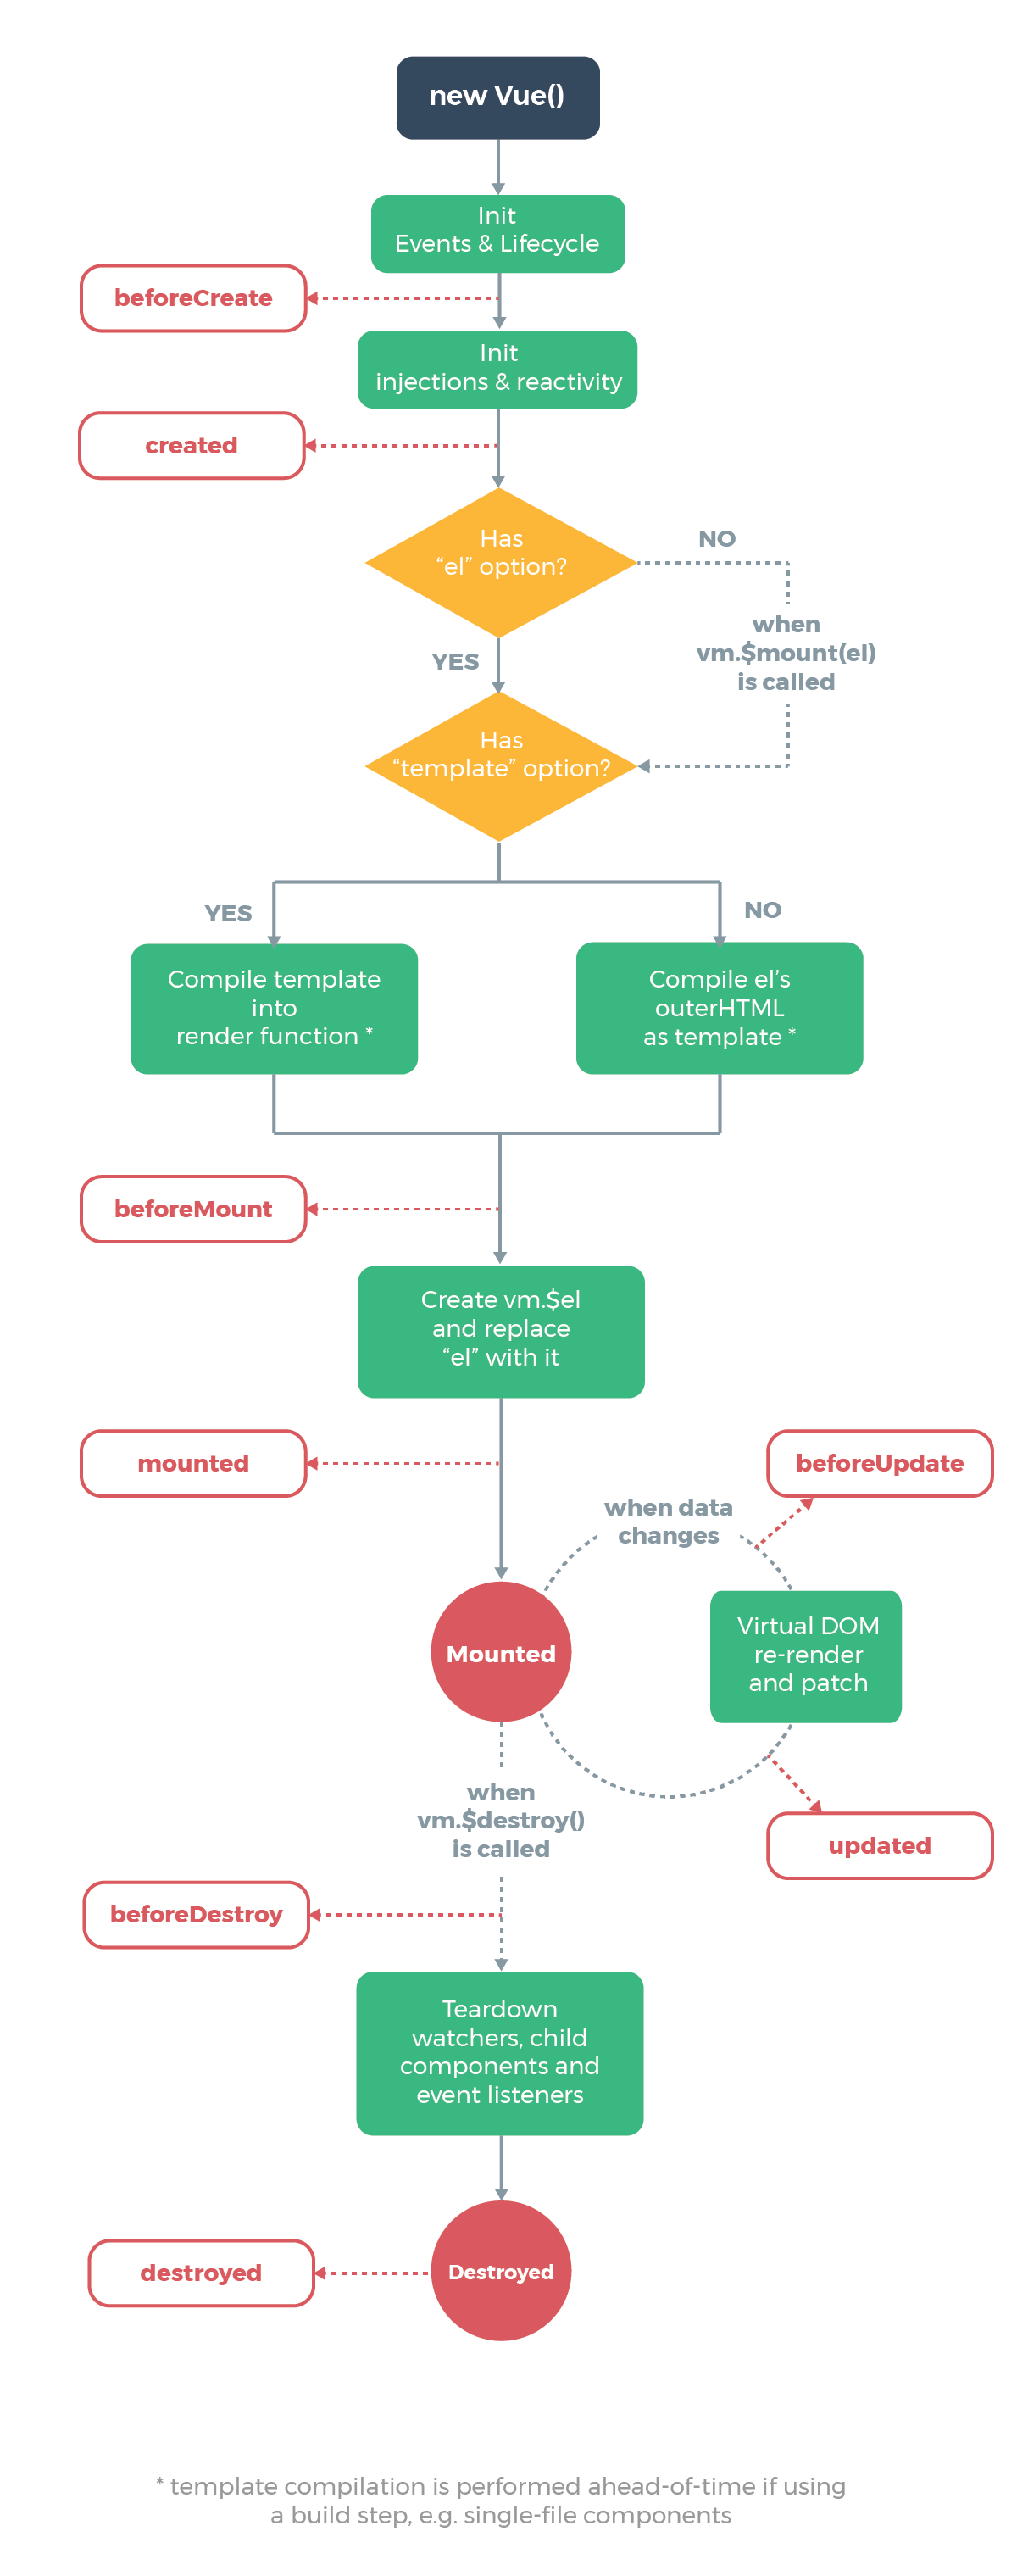
※Vue.js(日本語)Vue インスタンス ライフサイクルダイアグラム -
非リアクティブイベント
-
methods
Actionのdispatch、MutationのCommitはこちらで行います。
次に、ModelにあたるStoreを見ていきます。
こちらは社員・座席情報取得を行うgetMaster.jsです・
import Vue from 'vue'
import * as constants from '@/assets/constants'

const state = {
  seatInfo: [],
  empInfo: [],
  loginEmpName: ''
}

const mutations = {
  fetchSeatInfo (state, seatInfo) {
    state.seatInfo = seatInfo
  },
  fetchEmpInfo (state, empInfo) {
    state.empInfo = empInfo.empInfo
    state.loginEmpName = empInfo.loginEmpName
  },
  reset (state) {
    state.seatInfo = []
    state.empInfo = []
    state.loginEmpName = ''
  }
}

const actions = {
  fetchSeatInfo ({ commit }, token) {
    Vue.http.post('/seatwithemp/FetchSeatWithEmpInfo', token)
      .then((data) => {
        if (data.ProcessStatus === constants.STATUS_OK) {
          commit('fetchSeatInfo', data.SeatWithEmpInfo)
        }
      })
  },
  fetchEmpInfo ({ commit }, authInfo) {
    Vue.http.post('/emp/FetchEmpInfo', authInfo.token)
      .then((data) => {
        if (data.ProcessStatus === constants.STATUS_OK) {
          let loginEmpName = data.EmpInfo.find(emp => emp.EMP_NO === authInfo.loginEmpNO).DISPLAY_EMP_NM
          commit('fetchEmpInfo', { empInfo: data.EmpInfo, loginEmpName: loginEmpName })
        }
      })
  }
}

export default {
  namespaced: true,
  state,
  mutations,
  actions
}
namespace
namespaced: trueにすることで、State、Mutation、ActionをModuleのパスに基づくnamespaceに入れることができます。
コンポーネントをバインドするヘルパー
State、Mutation、Actionは、それぞれmapState、mapMutations、mapActionsといったヘルパーを使用することで、対応するコンポーネントオプションを生成してくれます。
ん?通信はどうなっているんだ(´・ω・`)?
通信 ~axios~
axiosとは
ブラウザやNode.jsのためのPromiseベースのHTTPクライアントです。
beseURLを指定して、interceptorsでrequest/responseのエラーハンドリングを行っています。
import axios from 'axios'
import * as constants from '@/assets/constants'
import * as messages from '@/assets/messages'

const client = axios.create({
  baseURL: 'http://xxx'
})

export default (Vue, { store }) => {
  client.interceptors.request.use((config) => {
    return config
  }, (error) => {
    store.commit('loading/showLoading', false)
    store.dispatch('modal/showError', messages.E_001)
    return Promise.reject(error)
  })

  client.interceptors.response.use((response) => {
    if (response.data.ProcessStatus === constants.STATUS_OK) {
      store.commit('modal/hideModal')
    } else if (response.data.ProcessStatus === constants.STATUS_TOKEN_ER) {
      store.dispatch('auth/logout')
      store.dispatch('modal/showError', response.data.ResponseMessage)
    } else {
      store.dispatch('modal/showError', response.data.ResponseMessage)
    }
    return response.data
  }, (error) => {
    store.commit('loading/showLoading', false)
    store.dispatch('modal/showError', messages.E_001)
    return Promise.reject(error)
  })

  Vue.http = Vue.prototype.$http = client
}
これで一通りの実装方法が見えてきました!
ページ遷移から座席表表示までを追ってみると…
- Vueインスタンスのライフサイクルイベント
createdで、VuexのヘルパーmapActionsによりバインドされたActionfetchSeatInfoをDispatchする。 - Action
fetchSeatInfoでは、APIで座席情報を取得し、MutaitonfetchSeatInfoをCommitして、StateseatInfoを更新する。 - State
seatInfoはComputedプロパティに設定されているので、StateseatInfoの更新をトリガーにSeatコンポーネントのレンダリングが行われる。 -
Seatコンポーネントのディレクティブv-for、:class、:styleによって、それぞれの座席のスタイルが適用される。
このような流れになります!座席表表示まで完成です(`・ω・´)!
ここからは一気に検索結果表示まで見ていきましょう。
<template>
  <transition name="fade">
      <div class="search-layer">
          <img
            class="icon"
            src="../../assets/images/search_icon.png"
          >
          <div class="topChar">検索</div>
          <button
            class="back"
            type="button"
            @click="hideSearch"
          >✖</button>
          <div>
              <input
                class="searchword"
                type="text"
                v-model="searchtxt"
              >
                <img
                  class="button"
                  src="../../assets/images/search_button.png"
                >
              </input>
          </div>
          <div class="announceChar">{{ this.filterEmp(searchtxt).searchMessage }}</div>
          <button
            class="rslt"
            type="button"
            v-for="emp in this.filterEmp(searchtxt).filteredEmp"
            :id="emp.EMP_NO"
            :key="emp.EMP_NO"
            @click="getpath"
          >{{ emp.EMP_NO }} {{ emp.EMP_NM }}</button>
      </div>
  </transition>
</template>

<script>
  import { mapActions, mapMutations, mapGetters, mapState } from 'vuex'

  export default {
    data: function () {
      return {
        searchtxt: null
      }
    },
    computed: {
      ...mapState('auth', {
        token: state => state.token
      }),
      ...mapGetters({
        filterEmp: 'search/filterEmp'
      })
    },
    methods: {
      ...mapActions({
        getUserPath: 'getUserPath/getUserPath'
        }),
      ...mapMutations({
        hideSearch: 'search/hideSearch'
      }),

      getpath: function (event) {
        this.getUserPath({
          EmpNo: event.target.id,
          Token: this.token
        })
        this.hideSearch()
      }
    }
  }
</script>

<style scoped>
  /* 省略 */
</style>
import * as messages from '@/assets/messages'

const state = {
  show: false,
  searchMessage: ''
}

const getters = {
  filterEmp: (state, getters, rootState) => (seachText) => {
    if (!seachText) return []

    let filteredEmp = rootState.getMaster.empInfo.filter(emp => {
      let knj = false
      let kana = false
      if (emp.EMP_NM) knj = emp.EMP_NM.replace(/\s+/g, '').startsWith(seachText)
      if (emp.EMP_KANA_NM) kana = emp.EMP_KANA_NM.replace(/\s+/g, '').startsWith(seachText)

      return knj || kana
    })
    let searchMessage = ''
    if (filteredEmp.length > 0) {
      searchMessage = messages.I_001
    } else {
      searchMessage = messages.I_002
    }

    return { filteredEmp: filteredEmp, searchMessage: searchMessage }
  }
}

const mutations = {
  showSearch (state) {
    state.show = true
  },
  hideSearch (state) {
    state.show = false
  }
}

export default {
  namespaced: true,
  state,
  mutations,
  getters
}
import Vue from 'vue'
import * as constants from '@/assets/constants'

const state = {
  userPath: []
}

const mutations = {
  setPath (state, userpath) {
    state.userPath = userpath.EmpLocation
  },
  reset (state) {
    state.userPath = []
  }
}

const actions = {
  getUserPath ({ commit }, empNo, token) {
    Vue.http.post('/emplocation/FetchAllEmpLocationInfo', empNo, token)
      .then((data) => {
        if (data.ProcessStatus === constants.STATUS_OK) {
          commit('setPath', { EmpLocation: data.EmpLocation })
        }
      })
  }
}

export default {
  namespaced: true,
  state,
  mutations,
  actions
}
あれ?transition?gettersってなんだろう(´・ω・`)?
transition
transitionとは
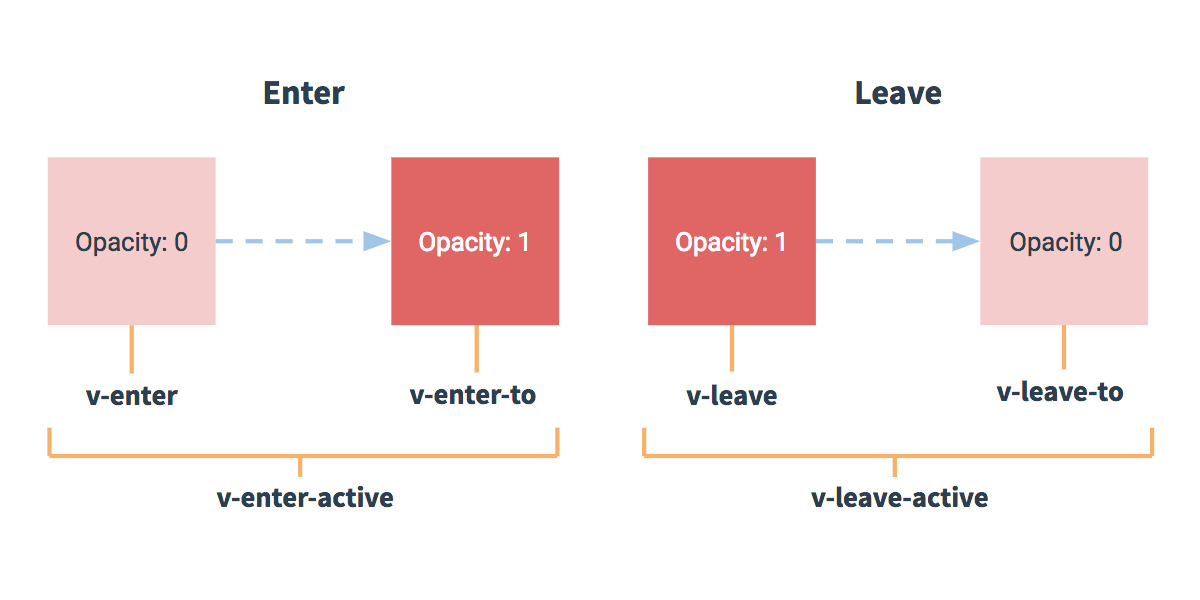
v-ifやv-showによる条件付きのレンダリングや動的コンポーネントにentering/leaving トランジションを追加することができる、ラッパーコンポーネントです。
以下の6つのクラスが用意されています。
- v-enter
- v-enter-active
- v-enter-to
- v-leave
- v-leave-active
- v-leave-to
v-の部分はtransitionコンポーネントのname属性に指定した値が設定されます。
App.vueで設定していたのは、このtransitionのスタイルになります。
  .fade-enter-active, .fade-leave-active {
    transition: opacity .3s
  }
  .fade-enter, .fade-leave-to{
    opacity: 0
  }
動的コンポーネント
component要素のis属性に、コンポーネント名を指定することでコンポーネントを動的に設定することができます。
このアプリでは、ModalコンポーネントでAlertやErrorコンポーネントの切り替えを行っています。
<template>
  <transition name="fade">
    <div class="alert-layer" v-if="show">
        <component :is="modalName" :message="message"></component>
    </div>
  </transition>
</template>
※Vue.js(日本語)Enter/Leave とトランジション一覧
State、Mutation、ActionとGetter
StoreにはGetterを作成することもできます。
このアプリでは検索結果の絞り込みに使用しています。
検索テキストボックスの入力をトリガーに、StateempInfoを前方一致検索しています。
引数にはこのモジュール内のstateだけでなく、グローバルなrootStateも設定することができます。
State、Mutation、Actionと同様に、GetterにもmapGettersヘルパーがあります。
それでは、検索から検索結果表示までを追ってみると…
-
SearchコンポーネントのcomputedプロパティfilterEmpにより、検索テキストボックスへの入力をトリガーに検索結果であるStateempInfoを取得する。 - ディレクティブ
v-forによって、社員名ボタンが表示される。 - 社員名ボタンのclickイベントで、Action
getUserPathがDispatchされ、StateuserPathが更新される。 - State
userPathの更新をトリガーに、Chartコンポーネントの:classが再評価され、searchedが適用される。
ついに、検索結果表示まで完成です(`・ω・´)!
おわりに
その2~実装編~はいかがでしたでしょうか?
やっぱり新しい知識を得ている時間は楽しいですね!
ですが…
せっかくelectron-vueでKarmaとMochaによるテスト環境が整っているのに、
テストコードが全く整っていません(´・ω・`)
次は、この辺りを勉強していきたいと思います!
まだまだ学び始めたばかりですので、誤りなどありましたらご指摘頂ければ幸いです。
-
Vue.js 2.6のリリースが2018年1~2月頃に予定されていますが、2018年3月頃に予定されている2.x-nextには、リアクティブシステムの改善が含まれ、
Vue.set(object, key, value)メソッド`を使う必要はなくなります。(2017/12/26追記)
Vue Project Roadmap
Future of Vue.js ↩
