環境
- python3.6
- gmail
機能
- pythonでhtmlメールを送信する
- htmlメール内でローカル画像を使用する
1. 設定とコーディング1
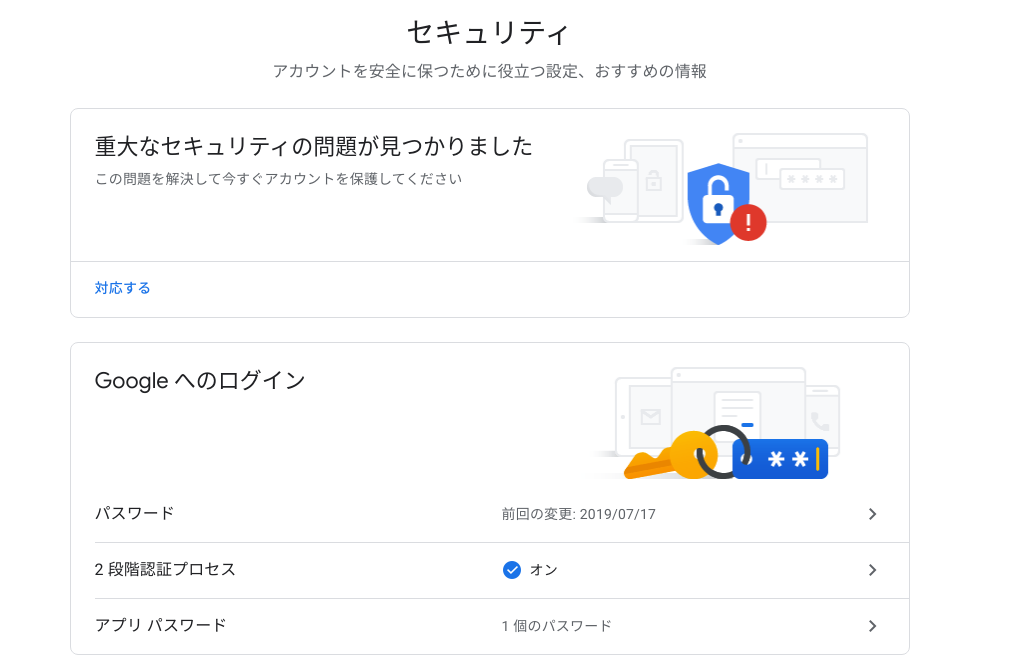
gmailのアプリ設定
googleにログイン後、次のURLに遷移する
下記の画像の画面に遷移するので、2段階認証プロセスをONにして、
アプリパスワードを作成してください。
アプリパスワードはどこかにメモをしておいて下さい。
2. 設定とコーディング2
import smtplib
import os
from email.mime.multipart import MIMEMultipart
from email.mime.text import MIMEText
from email.utils import formatdate
from email.mime.image import MIMEImage


class Mail:
    def __init__(self):
        setting_ini_dict = read_text_ini('setting_mail.ini')
        mail_dict = setting_ini_dict['mail']
        self.mail_address = mail_dict['address']
        self.mail_type = mail_dict['type']
        self.mail_password = mail_dict['password']
        self.api_url = '{ボタンを押したときに実行したい、URL}'

    def send_mail(self, to_addr, msg):
        smtpobj = smtplib.SMTP('smtp.gmail.com', 587)
        smtpobj.ehlo()
        smtpobj.starttls()
        smtpobj.ehlo()
        smtpobj.login(self.mail_address, self.mail_password)
        smtpobj.sendmail(self.mail_address, to_addr, msg.as_string())
        smtpobj.close()

    def create_mail(self, to_address, subject, body_msg, uuid):
        api_url = self.api_url + f'?auth_key={uuid}'
        body_msg = body_msg.replace('@mail_api@', api_url)
        msg = MIMEMultipart('alternative')
        msg.attach(MIMEText(body_msg, 'html'))
        with open('qiita_logo.png', 'rb') as img:
            logo_img = MIMEImage(img.read())
            logo_img.add_header('Content-ID', '<logo_image>')

        with open('mail_icon.png', 'rb') as img:
            mail_img = MIMEImage(img.read())
            mail_img.add_header('Content-ID', '<mail_image>')
        msg.attach(logo_img)
        msg.attach(mail_img)

        msg['Subject'] = subject
        msg['From'] = self.mail_address
        msg['To'] = to_address
        msg['Date'] = formatdate()
        return msg

def read_text(file_path):
    s = ""
    with open(file_path, encoding="utf-8") as f:
        s = f.read()
        # print(s)
    return s

def read_text_ini(file_path):
    """
    iniファイルからの読み込み
    Args:
        file_path: ファイルまでのパス+ファイル名

    Returns:
        ini_dic: iniファイル記載の辞書式文字列
    """
    import configparser
    ini_dict = configparser.ConfigParser()
    ini_dict.read(file_path, 'UTF-8')
    return ini_dict


mail = Mail()
to_address = '{送信したいメールアドレス}'
subject = 'メールのタイトル'
body_msg = read_text('mail_format.html')
uuid = 'testetesfsdf'
msg = mail.create_mail(to_address, subject, body_msg, uuid)
mail.send_mail(to_address, msg)
mail_format.html
<!DOCTYPE html>
<html lang="en">
<head>
    <meta charset="UTF-8">
    <title>メール認証画面</title>
</head>
<body>
<img style="width: 100px;"
     src="cid:logo_image">
<div style="background-color: #d9d9d9; width: 80%; margin: 2% 5% 10% 0; padding: 30px;">
    <p style="text-align: center;"><img style="width: 50px;" src="cid:mail_image"></p>
    <h2 style="padding-left: 4%">メールアドレスを確認してください</h2>
    <hr style="border:0; border-top:dashed; width: 96%;">
    <p style="padding-left: 4%">こちらのボタンをクリックしてメールアドレスの確認を行ってください。<br>ご協力いただきありがとうございます。</p>
    <p style="text-align: center">
        <a style="position: relative;
  display: inline-block;
  padding: 0.25em 0.5em;
  text-decoration: none;
  color: #FFF;
  background: #03A9F4;/*色*/
  border: solid 1px #0f9ada;/*線色*/
  border-radius: 4px;
  box-shadow: inset 0 1px 0 rgba(255,255,255,0.2);
  text-shadow: 0 1px 0 rgba(0,0,0,0.2);" href="@mail_api@">メールを確認する</a>
    </p>
    <hr style="border:0; border-top:dashed; width: 96%;">
    <p style="padding-left: 4%">不要な点がございましたら、サポートまでお問い合わせください。</p>
</div>
<div style="text-align: center">
    <p>このメールには返信できません。 <br>
        qiita.com Ltd. Qiita <br>
        <a href="https://qiita.com">qiita.com</a> <br>
        <a href="#">プライバシーポリシー</a>
    </p>

</div>

</body>
</html>
setting_mail.ini
# setting_mail.ini

[mail]
type = gmail
address = {先程設定したgmailアドレス}
password = {先程保存したパスワード}
qiita_logo.png
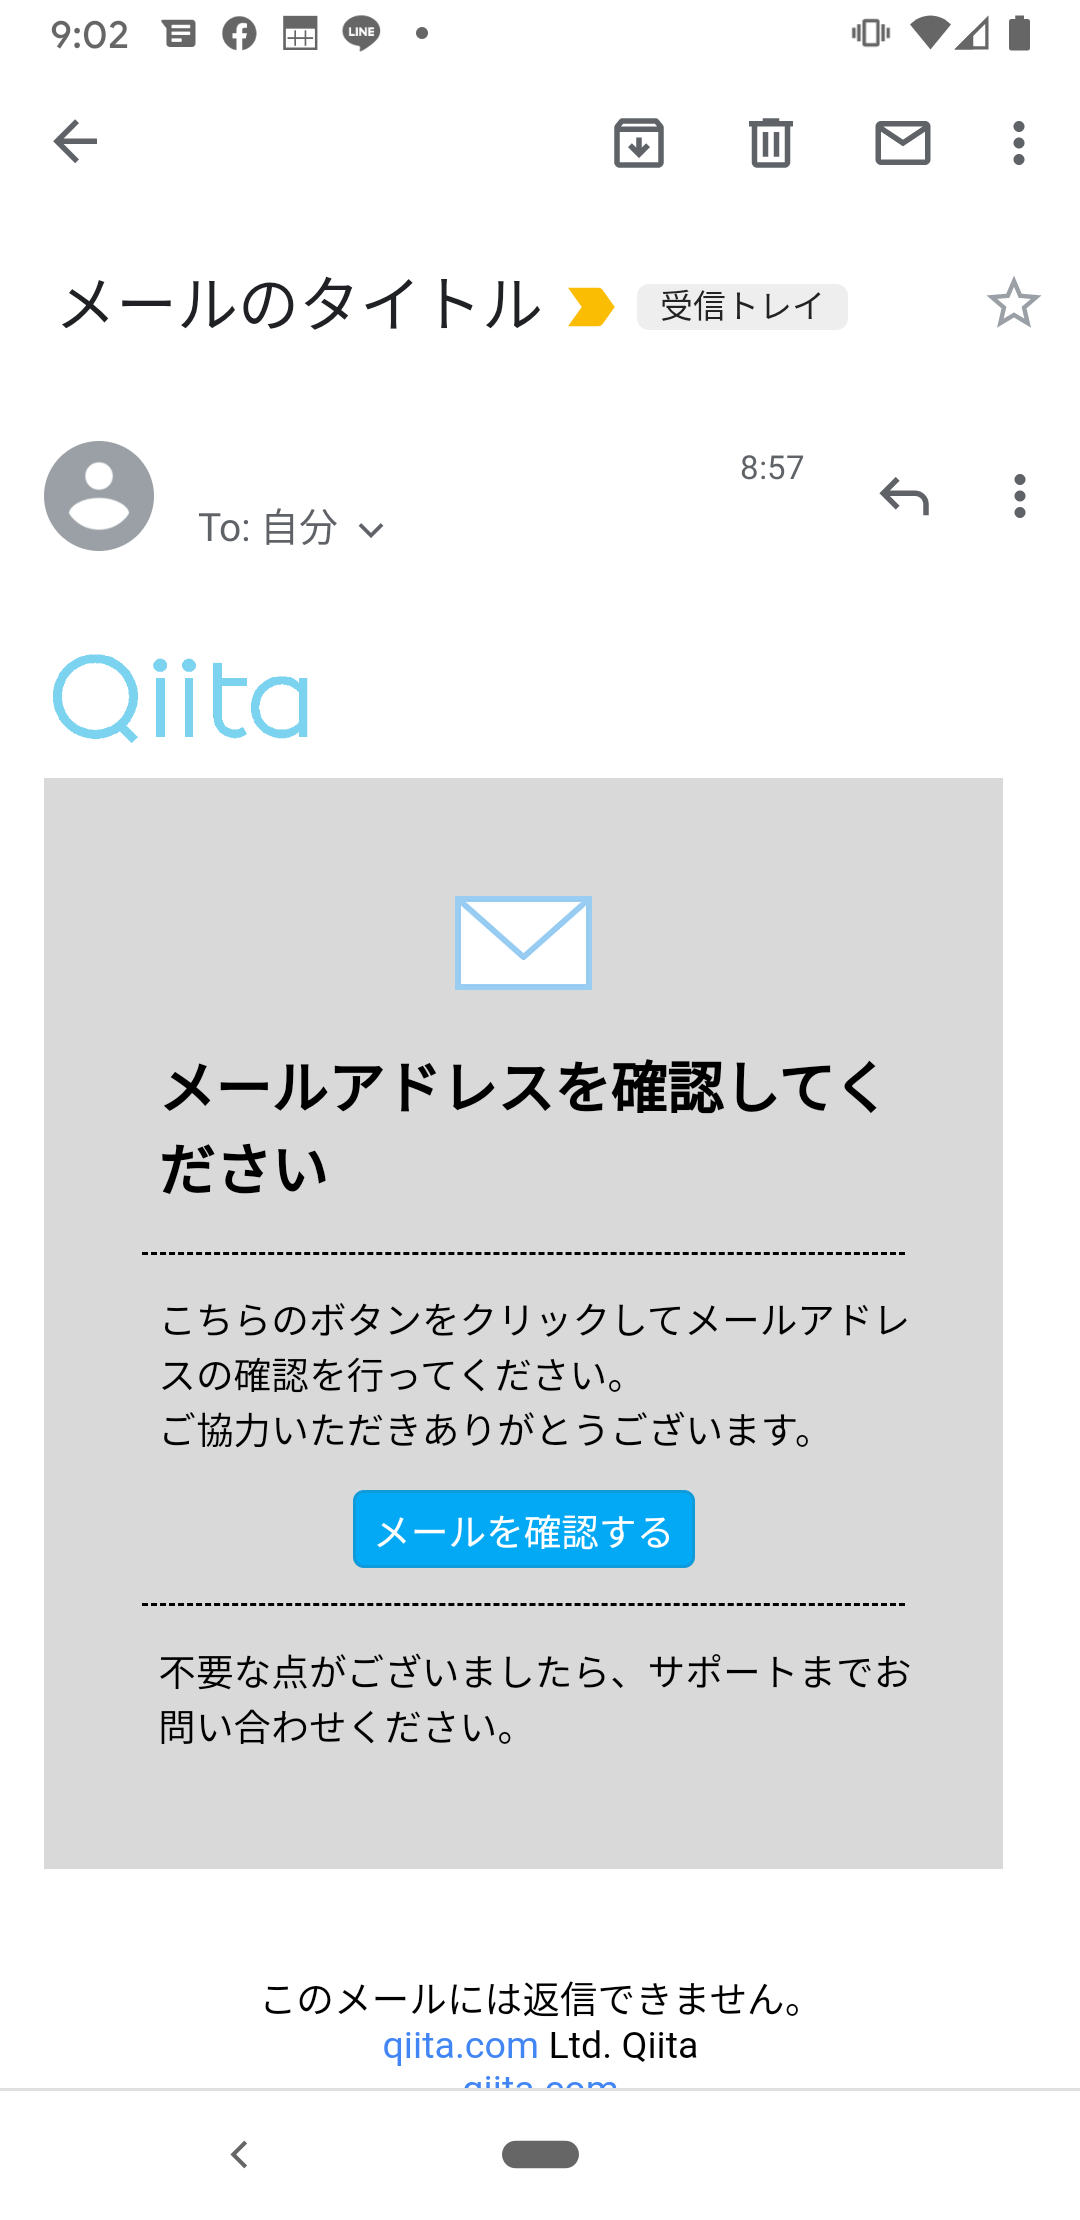
送信されるメール
まとめ
pythonとgmailを用いてhtmlメールを送信できました。
htmlにローカルの画像を入れて送信する方法でbase64で送ったりするなど、
いまでは、実行できない方法などでの記載もあったので、簡単にまとめました!


