概要
勉強会にて以下の本を参考に、画像データを用いた教師あり学習Webアプリを構築しました。
作成したアプリは以下になります。
URL:https://pokemonclassfication.herokuapp.com/
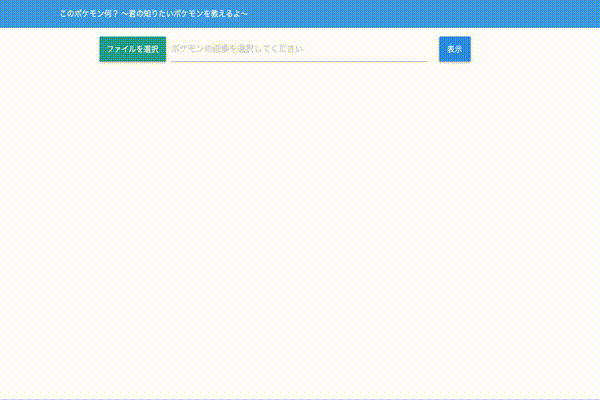
ポケモンの画像をアップロードすると画像を分類し、推測されるポケモンの情報を表示します。分析モデルにAzureのCustom Visionを活用し、WebフレームワークにはFlaskを活用しています。
本記事では主に以下を記載します。
- GoogleImageCrawlerで画像データ収集スクリプトの作成
- Custom Visonで分析モデルの構築
- モデルの検証
- Custom Vision APIを活用する実装
Flaskの実装に関する詳細な解説などは、参考にした本「実践で学ぶ機械学習活用ガイド」や「公式リファレンス」を読むことを推奨します。
Webアプリのコードはこちら:ポケモン画像分類アプリのコード
1. GoogleImageCrawlerで画像データ収集スクリプトの作成
教師あり学習で画像分類モデルを構築するためには、大量の画像が必要です。
やはり画像を手動で集めるのは、工数の無駄なのである程度は自動化したいです。
※自動で収集した画像、モデルに有用ではない画像も含まれてしまうので最終的にはある程度手動で選抜する作業など必要になります。
画像収集スクリプトはPythonのパッケージである icrawler を活用します。
ただ収集するのではなく、収集した画像の2割をテストデータとするため、フォルダを分けて収集しています。
活用したコードは以下になります。
import os
import glob
import random
import shutil
from icrawler.builtin import GoogleImageCrawler

# 画像を保存するルートディレクトリ
root_dir = 'pokemon/'
# ポケモン画像検索キーワードリスト
pokemonnames = ['ピカチュウ','ゼニガメ','ヒトカゲ','フシギダネ','カビゴン']

# 収集画像データ数
data_count = 100

for pokemonname in pokemonnames:
    crawler = GoogleImageCrawler(storage={'root_dir':root_dir + pokemonname + '/train'})

    filters = dict(
        size = 'large',
        type = 'photo'
    )

    #クローリングの実行
    crawler.crawl(
        keyword=pokemonname,
        filters=filters,
        max_num=data_count
    )

    #前回実行時のtestディレクトリが存在する場合、ファイルをすべて削除する

    if os.path.isdir(root_dir + pokemonname + '/test'):
        shutil.rmtree(root_dir + pokemonname + '/test')
    os.makedirs(root_dir + pokemonname + '/test')

    #ダウンロードファイルのリストを取得
    filelist = glob.glob(root_dir + pokemonname + '/train/*')
    #ダウンロード数の2割をtestデータとして抽出
    test_ratio = 0.2
    testfiles = random.sample(filelist, int(len(filelist) * test_ratio))

    for testfile in testfiles:
        shutil.move(testfile, root_dir + pokemonname + '/test/')
上記は、実践で学ぶ機械学習活用ガイドに記載している内容とほぼ同じです。
しかし、このコードだけでは2020年9月13日時点ではうまくいきません。
Google画像検索のAPIが変更されたのが原因だそうです。
この回避策を記載します。参考: Google Crawler is down #65
/icrawler/builtin/google.py の parseメソッドを以下のように変更すれば良いそうです。
コメントアウトしている内容が変更前の内容になります。
def parse(self, response):
    soup = BeautifulSoup(
        response.content.decode('utf-8', 'ignore'), 'lxml')
    #image_divs = soup.find_all('script')
    image_divs = soup.find_all(name='script')
    for div in image_divs:
        #txt = div.text
        txt = str(div)
        #if not txt.startswith('AF_initDataCallback'):
        if 'AF_initDataCallback' not in txt:
            continue
        if 'ds:0' in txt or 'ds:1' not in txt:
            continue
        #txt = re.sub(r"^AF_initDataCallback\({.*key: 'ds:(\d)'.+data:function\(\){return (.+)}}\);?$",
        #             "\\2", txt, 0, re.DOTALL)
        #meta = json.loads(txt)
        #data = meta[31][0][12][2]
        #uris = [img[1][3][0] for img in data if img[0] == 1]

        uris = re.findall(r'http.*?\.(?:jpg|png|bmp)', txt)
        return [{'file_url': uri} for uri in uris]
icrawlerが実際にあるディレクトリは以下の方法などで確認できます。
>>import icrawler
>>icrawler.__path__
['/~~~~~~~~/python3.7/site-packages/icrawler']
ちなみに以下のような階層になっているとおもいます。
├── pokemon
│   ├── ピカチュウ
│   │   ├── test
│   │   └── train
│   ├── ヒトカゲ
│   │   ├── test
│   │   └── train
│   ├── ゼニガメ
│   │   ├── test
│   │   └── train
│   ├── フシギダネ
│   │   ├── test
│   │   └── train
│   └── カビゴン
│       ├── test
│       └── train
│
└── collect_img_poke.py
2. Custom Visonで分析モデルの構築
Custom VisionはAzureサービスの1つで画像分類分析モデルをノンプログラミングで構築することができます。
また、APIとして公開が容易なのも特徴です。
こちら活用する場合、Azureのサブスクリプションを持つ必要があります。一ヶ月は無料で使えます。
Azure 登録
Custom Visionポータル
Custom VisionをGUIで構築する手順は以下を参考にしています。
クイック スタート:Custom Vision で分類子を構築する方法
以下、Custom VisionポータルにSign IN後の簡単な手順です。
- 最初のプロジェクトを作成するには、 [新しいプロジェクト] を選択します。 [新しいプロジェクトの作成] ダイアログ ボックスが表示されます。テキストボックスには、任意の設定、チェックボックスは以下の設定を参考にしてください。

2.Add Imageをクリックします。

- 画像にタグをつけてアップロードします。今回はピカチュウ、ヒトカゲ、ゼニガメ、フシギダネ、カビゴンの画像をアップロードしてます。

4.右上のTrainをクリックし、Quick Trainingを選択後、モーダルウィンドウのTrainをクリックします。

上記の手順で画像分類アプリが構築されます。
構築モデルの情報は以下になります。

今回精度がガバガバなのは、自動収集した画像を精査せずにアップロードしているからです。
精度をあげたい場合、自動収集した画像を精査してください。多分ピカチュウとかコスプレしている人とかが混じってたりしてます。
5.次に左上のPublishボタンをクリックするだけで、この分析モデルはAPIとしてWebで公開されます。

6.Prediction URLをクリックすると、APIと接続するための情報が記載されています。

今回は、画像をアップロードして活用するため、画像における下に記載してあるURLとPrediction-Keyを活用します。
上記の手順で簡単に画像分類モデルを構築することができ、またAPIとしてWebに公開できるのがAzure Custom Visionの特徴です。
3.モデルの検証
テスト用にダウンロードした画像を構築モデルに分析させ、その正解率を調べます。
collect_img_poke.pyと同じ階層に以下のファイルを作成します。
作成したモデルの公開URLとKeyを設定後にファイルを実行します。
import glob
import requests
import json

base_url = '<API URL>'
prediction_key = '<Key>'

poke_root_dir = 'pokemon/'
# 検証対象のポケモン名一覧
pokemonnames = ['ピカチュウ','ゼニガメ','ヒトカゲ','フシギダネ','カビゴン']

for pokename in pokemonnames:
    testfiles = glob.glob(poke_root_dir + pokename + '/test/*')
    data_count = len(testfiles)
    true_count = 0

    for testfile in testfiles:
        headers = {
            'Content-Type': 'application/json',
            'Prediction-Key': prediction_key
        }

        params = {}
        predicts = {}
        data = open(testfile, 'rb').read()
        response = requests.post(base_url, headers=headers, params=params, data=data)
        results = json.loads(response.text)

        try:
            # 予測結果のタグの数だけループ
            for prediction in results['predictions']:
                # 予測したポケモンとその確率を紐づけて格納
                predicts[prediction['tagName']] = prediction['probability']
            # 一番確率の高いポケモンを予測結果として選択
            prediction_result = max(predicts, key=predicts.get)

            # 予測結果が合っていれば正解数を増やす
            if pokename == prediction_result:
                true_count += 1

        #画像サイズ > 6MB だとCustom Vision の制限にひっかりエラーが出るまで握り潰し
        except KeyError:
            data_count -= 1
            continue

    # 正解率の算出
    accuracy = (true_count / data_count) * 100
    print('ポケモン名:' + pokename)
    print('正解率:' + str(accuracy) + '%')
以下のような結果が出力されていればOKです。
モデルの精度は低いですが、おそらく色で大雑把に判断しているんでしょうんね。
>>>python predictions_poke_test.py
ポケモン名:ピカチュウ
正解率:95.45454545454545%
ポケモン名:ゼニガメ
正解率:95.23809523809523%
ポケモン名:ヒトカゲ
正解率:81.81818181818183%
ポケモン名:フシギダネ
正解率:85.0%
ポケモン名:カビゴン
正解率:95.83333333333334%
4. Custom Vision APIを活用する実装
このアプリはFlaskで実装しています。
アプリの概要を簡単に図で表すと以下になります。

Webアプリはアップロードされた画像をCustom Visionで分析させ、その分析結果を取得します。
分析結果から、DBにある詳細な情報を取得し、その情報をHTMLに埋め込んで画面に表示しています。
このMTVモデルは、FlaskやDjangoで採用されています。
Flaskの詳細は「実践で学ぶ機械学習活用ガイド」や「公式リファレンス」を確認してください。
ここでは、図の②〜⑤に該当するCusom Visionとの連携からDB情報取得までを記載します。
全コードはこちら:ポケモン画像分類アプリのコード
以下、該当コードです。
import flaski.database
import requests
import json
import os


base_url = '<API URL>'
prediction_key = '<Key>'
POKEMON_FOLDER =  './static/images/pokemon/'

# 予測確率のしきい値(パーセント)
threshold = 60

# ポケモン情報をDBから取得し辞書型で返す
def get_pokemon_data(pokemonname):
    ses = flaski.database.db_session()
    pokemon = flaski.database.Pokemon
    pokemon_data = ses.query(pokemon).filter(pokemon.pokemon_name == pokemonname).first()

    pokemon_data_dict = {}
    if not pokemon_data is None:
        pokemon_data_dict['pokemon_name'] = pokemon_data.pokemon_name
        pokemon_data_dict['wiki_url']        = pokemon_data.wiki_url
        pokemon_data_dict['picture_path']    = os.path.join(POKEMON_FOLDER, pokemon_data.pokemon_name + '.png')

    return pokemon_data_dict

# モデルAPIの呼び出し
def callAPI(uploadFile):
    # 予測実行
    headers = {
        'Content-Type': 'application/json',
        'Prediction-Key': prediction_key
    }
    params = {}
    predicts = {}
    data = open(uploadFile, 'rb').read()
    response = requests.post(base_url, headers=headers, params=params, data=data)
    response_list = json.loads(response.text)
    result = []

    try:
        # 予測結果のタグの数だけループ
        for prediction in response_list['predictions']:
            if len(get_pokemon_data(prediction['tagName'])) != 0:
            # 確率がしきい値より大きいものを採用する
                if prediction['probability'] * 100 > threshold:
                    result.append(get_pokemon_data(prediction['tagName']))
        return result

    #画像サイズ > 6MB だとCustom Vision の制限にひっりエラーが出るまで握り潰し
    except KeyError:
        return result
def callAPI(uploadFile)はCustom Visionに画像をアップロードし、データを取得する処理になり、3.モデルの検証で記載したスクリプトの内容とほぼ同じです。
異なる点は、予測確率のしきい値(パーセント):threshold を設定しており、これ以上の適合率の情報しか取得しないようにしています。上記のコードの場合、適合率が60%以上のポケモンの情報を取得しています。
def get_pokemon_data(pokemonname)は、以下の処理でFlaskで作成したDBのテーブルに接続しています。
そして、filter処理で特定のポケモンの情報を取得しています。
ses = flaski.database.db_session()
pokemon_data = ses.query(pokemon).filter(pokemon.pokemon_name == pokemonname).first()
このようにFlaskではSQLを使わずDBの情報を取得が容易です。
DBテーブルの作成などもコードで実行可能です。
上記したコードでCustom Visionから分析結果を取得し活用しています。
このようにCustom Visionを活用したアプリ開発は非常に簡単です。
最後に
Azure Custom Visionは簡単に画像分類モデルを構築できるため、機械学習アプリを開発する入門に大変良い題材でした。
参考にした本に詳細な解説があるにも関わらず、記事を書いた理由としましては、去年出版した本のため様々な仕様変更に対応できていない部分があったからです(crawlerなど)。そこで新たに実装にした内容を本記事では書いています。Flaskの実装などに関して、あまり言及していないのは、本を読んでいただければ理解できる内容だからです。
本記事で機械学習アプリの作成概要がふわ〜っとでもわかれば幸いです。