概要
form_withを使ってフォロー機能を実装する手順を書いていきます!
以下の機能を実装していきます
1.ユーザーをフォロー/フォロー解除できる機能
2.フォローユーザー/フォロワーの一覧表示機能
Railsでフォロー機能を作る方法の記事の方を参考にしており、特にフォロー機能に関するアソシエーションの詳しい解説などはこの記事が大変参考になりました!
前提
環境
・Rails 5.2.4.2
・Ruby 2.6.5
・Slim
・devise
加えて、User系機能が実装されていることが前提となります。
上記の環境でのRailsアプリケーションのセットアップ方法
・Railsアプリケーションをセットアップ後にdeviseとSlimを導入する手順
↓実装後はこんな感じになります。(見栄えが簡素ですみません…)↓
フォロー/フォロー解除機能の実装
1.Relationshipモデル作成
$ rails g model Relationship user:references follow:references
・ここで作成されるrelationshipsテーブルが、フォローするユーザー&フォローされるユーザーにとっての中間テーブルとなる。
・userをフォローする側のユーザーモデル、followをフォローされる側のユーザーモデルとして、中間テーブルには認識させます。
2.relationshipsマイグレーションファイルの編集
class CreateRelationships < ActiveRecord::Migration[5.2]
  def change
    create_table :relationships do |t|
      t.references :user, foreign_key: true
      t.references :follow, foreign_key: { to_table: :users }

      t.timestamps

      t.index [:user_id, :follow_id], unique: true
    end
  end
end
・userとfollowでそれぞれ参照先のモデルを分けているのは、フォローする側のユーザとフォローされる側のユーザーとでは別々のモデルとして考える必要があるからです。
・t.references :user, foreign_key: true:userモデルに対する外部キーを張っています。
・t.references :follow, foreign_key: { to_table: :users } :followモデルに対する外部キーを張っています。followモデルというのは実在しない架空のモデル名で、今この時勝手に作成してます。よって、{ to_table: :users }とする事で、参照元のモデルを教えてあげています。
・t.index [:user_id, :follow_id], unique: true:user_idとfollow_idの組み合わせに一意性を持たせることでデータの重複を防ぎます、つまり同じユーザーを2度フォローされる事を防いています。
3.DBの内容を保存
$ rails db:migrate
4.RelationshipモデルにUserに対するアソシエーションを記述する。
class Relationship < ApplicationRecord
  belongs_to :user
  belongs_to :follow, class_name: "User"

  validates :user_id, presence: true
  validates :follow_id, presence: true
end
・belongs_to :user:これはいつも通りのアソシエーションです。
・belongs_to :follow, class_name: "User":followクラスに所有される事を記述していますが、上述したようにfollowは架空のクラスですので、class_name: "User"によって参照元のモデルを教えてあげます。
5.UserモデルファイルにRelationshipに対するアソシエーションを記述する。
class User < ApplicationRecord

# ==============あるユーザーがフォローしているユーザーとのアソシエーション=================
  has_many :relationships, foreign_key: "user_id",
                           dependent: :destroy
  has_many :followings, through: :relationships, source: :follow
# ==========================================================================

# ==============あるユーザーをフォローしてくれてるユーザーとのアソシエーション================
  has_many :passive_relationships, class_name: "Relationship",
                                   foreign_key: "follow_id",
                                   dependent: :destroy
  has_many :followers, through: :passive_relationships, source: :user
# ===========================================================================
end
・上記のRelationshipモデルファイルでは、あるユーザーがフォローしているユーザーにアクセスするためのアソシエーションと、あるユーザーがフォローされているユーザーにアクセスするためのアソシエーションを記述しています。
つまりどういうことか、詳しくは図で後述します。
5-1.まずは、あるユーザーがフォローしているユーザーとのアソシエーションの解説です!
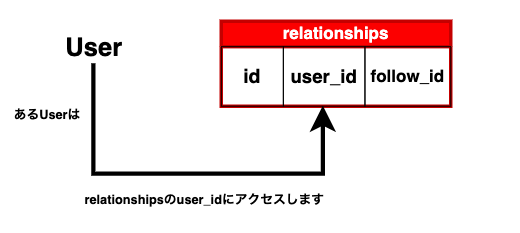
・has_many :relationships, foreign_key: "user_id", dependent: :destroy:これは、あるUserが中間テーブルrelationshipsの外部キーuser_idにアクセスする事を可能にするアソシエーションを宣言をしています。
以下のようにイメージすると分かり易いかと思います!
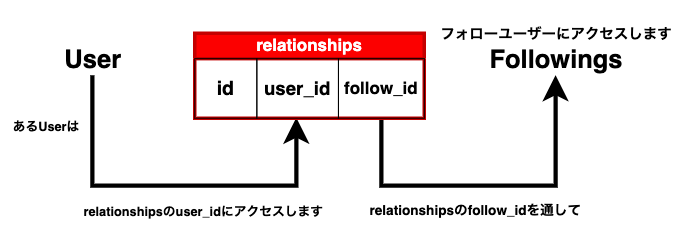
・has_many :followings, through: :relationships, source: :follow:これは、あるUserが中間テーブルrelationshipsのfollow_idを通して、followingモデルにアクセスする事を可能にするアソシエーションを宣言をしています。
イメージで言うと以下のような感じです!
・上記の2行により、
User.followingsとする事でUserがフォローしているユーザー達を取得できるようになります。これが取得できるようになると、あるUserのフォローユーザーの一覧表示などが簡単に行うことができます。
5-2.次は、あるユーザーをフォローしてくれているユーザーとのアソシエーションの解説です!
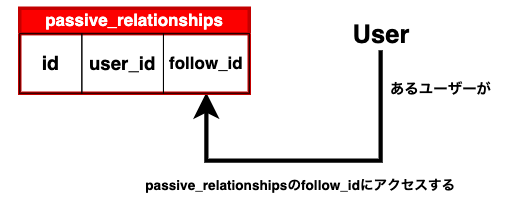
・has_many :passive_relationships, class_name: "Relationship", foreign_key: "follow_id", dependent: :destroy :これは、あるUserがpassive_relationshipsのfollow_idへアクセスする事を可能にするアソシエーションを宣言をしています。
passive_relationshipsは、この場で勝手に作った架空のモデルなので、class_name: "Relationship"として参照元のモデルを教えています。
イメージは以下の通りです!
・has_many :followers, through: :passive_relationships, source: :user:これは、あるUserがpassive_relationshipsのuser_idを通してfollowersへアクセスする事を可能にするアソシエーションの宣言をしています。
イメージは以下の通りです!
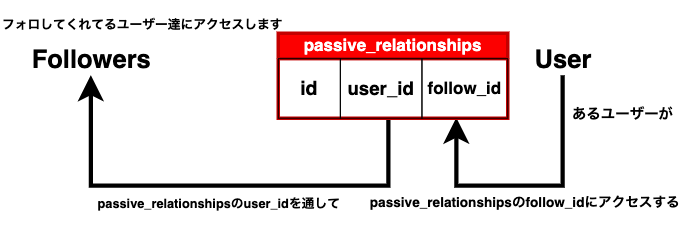
・上記の2行により、User.followersとすれば、Userをフォローしてくれているユーザー達を取得することが可能になります。これを使えば、あるユーザーをフォローしてくれているユーザーの一覧表示などが簡単に行えるようになります!
6.Userモデルファイルに、フォロー関連のインスタンスメソッドを定義する
class User < ApplicationRecord
  .
  .
  .
  #<アソシエーション関連の記述省略>
  .
  .
  .
  def following?(other_user)
    self.followings.include?(other_user)
  end

  def follow(other_user)
    unless self == other_user
      self.relationships.find_or_create_by(follow_id: other_user.id)
    end
  end

  def unfollow(other_user)
    relationship = self.relationships.find_by(follow_id: other_user.id)
    relationship.destroy if relationship
  end
end
・following?(other_user):User.followings.include?(@user)などとすることで、Userが@userのことをフォローしてるかどうかを確かめます。フォローボタン実装の際に、フォローするボタンを表示するのか、それともフォローを解除するボタンを表示するのかを条件分岐させるために使います。
・follow(other_user):User.follow(@user)とすることで、@userをフォローすることができるようにします。unless self == other_userで、自分のことをフォローできないようにしてます。find_or_create_byを使って、@userのidレコードが存在する場合はそれを参照し、なければ作成するようにしてます。
・unfollow(other_user):User.unfollow(@user)とする事で、@userのフォローを解除できるようにします。
・ユーザーをフォローするメソッド、フォロー解除するメソッドの定義ができたので、次はこれらのメソッドを使って実際にDBへアクセスしてフォロー・フォロー解除する機能をrelationshipsコントローラを作成して、実装していきます!
7.relationshipsコントローラを作成する。
$ rails g controller relationships
class RelationshipsController < ApplicationController

  before_action :set_user

  def create
    following = current_user.follow(@user)
    if following.save
      flash[:success] = "ユーザーをフォローしました"
      redirect_to @user
    else
      flash.now[:alert] = "ユーザーのフォローに失敗しました"
      redirect_to @user
    end
  end

  def destroy
    following = current_user.unfollow(@user)
    if following.destroy
      flash[:success] = "ユーザーのフォローを解除しました"
      redirect_to @user
    else
      flash.now[:alert] = "ユーザーのフォロー解除に失敗しました"
      redirect_to @user
    end
  end

  private
  def set_user
    @user = User.find(params[:relationship][:follow_id])
  end
end
・relationshipsコントローラでは、ユーザーをフォローするcreateアクション、フォローを解除するdestroyアクションしか機能しないので、createアクション、destroyアクションだけを記述します。
・フォロー/フォロー解除ボタンフォームからは、params[:relationship][:follow_id]と言う形でデータが送信されるので、find(params[:relationships][:follow_id])と言う形でデータを受け取ります。
・before_action :set_user:それぞれのアクションでは必ず@userを取得する事になるので、set_userプライベートメソッドを定義してからbefore_actionを使ってあらかじめ取得させています。
・createアクション:ログインしているユーザー(current_user)が、取得した@userをフォローしています。Userモデルファイルで定義したfollow(other_user)インスタンスメソッドを使用しています。
・destroyアクション:ログインしているユーザーが、取得したユーザーのフォローを解除しています。Userモデルファイルで定義したunfollow(other_user)インスタンスメソッドを使用しています。
・実際にDBへアクセスしてフォロー・フォロー解除する機能が仕上がったので、次は実際にフォロー・フォロー解除するためのボタンの実装を行います!
8.フォロー/フォロー解除ボタンをform_withで実装する。
_・始めに、app/viewsディレクトリ配下に、relationships/follow_form.html.slimファイルを作成してください。
- unless current_user == user
  #フォロー解除ボタン
  - if current_user.following?(user)
    = form_with model: @relationship, url: relationship_path, method: :delete, local: true do |f|
      = f.hidden_field :follow_id, value: user.id
      = f.submit "フォローを解除する"
  #フォローボタン
  - else
    = form_with model: @set_relationship, url: relationships_path, local: true do |f|
      = f.hidden_field :follow_id, value: user.id
      = f.submit "フォロー"
・- unless current_user == user:自分自身のことをフォローできないよう、ボタン自体の表示を切り替えています。ここでのuserとは、このパーシャルを配置するビューが取得する@userのことを指します。
8-1.フォロー解除ボタンの解説
・- if current_user.following?(user):ログインユーザーが相手ユーザーをフォローしているかどうかを確かめています。フォローしていればフォロー解除ボタンを表示し、フォローしていなければフォローボタンを表示するようにしています。
・= form_with model: @relationship, url: relationship_path, method: :delete, local: true do |f|:こちらはフォロー解除用のボタンです。
model: @relationshipの@relationshipはインスタンス変数で、ログインユーザーと相手ユーザーとのRelationshipを取得しています。
(app/views/users/show.html.slimにこのフォローボタンのフォームを配置するなら、app/controllers/users_controller.rbファイルのshowアクションに、@relationshipインスタンス変数を定義する事になります。)
url: relationship_pathは、relationshipsコントローラのdestroyアクションへのルーティングです。ルーティングの記述はあとで行います。
method: :deleteでは、HTTPリクエストでDELETEメソッドを指定しています。
local: trueは、これを付けないとフォームの送信の仕様がAjaxになり、データを送信できなくなるのでform_withでは必ず記述します。
・f.hidden_field :follow_id, value: user.id:この部分は、実際に完成形のソースコードを見てみるとわかりやすいです。__

:follow_idを指定することで、params[:relationship][:follow_id]と言う形でデータが送信されます。relationshipsコントローラのset_userプライベートメソッドで定義した部分では、このデータを受け取っています。
value: user.idを指定することで、:follow_idにフォローしている相手ユーザーのidが格納されて、データが送信されます。
8-2.フォローボタン
・= form_with model: @set_relationship, url: relationships_path, local: true do |f|:相手ユーザーをフォローするためのフォームです。
__model: @set_relationship__の@set_relationshipインスタンス変数では空のモデルを生成しており、この空のモデルを参照して、params[:relationship][:follow_id]と言う形でデータが送信されるようにします。
url: relationships_pathは、relationshipsコントローラのcreateアクションへのルーティングです。ルーティングの記述は後で行います。
・= f.hidden_field :follow_id, value: user.id:これも実際の完成後のソースコードを確認してみます。

フォロー解除ボタンと同じで、params[:relationship][:follow_id]と言う形でデータが送信されてます。
・フォロー/フォロー解除ボタンの作成が完了しましたので、次はこのデータが正常にアクションへ送られるようルーティングを設定します!
9.relationshipsコントローラへのルーティングを追加する。
Rails.application.routes.draw do
  .
  .
  #<他のルーティングは省略>
  .
  .
  resources :relationships, only: [:create, :destroy]
・$ rails routes | grep relationshipコマンドで、追加されたルーティングを確認してみます。
$ rails routes | grep relationship
  relationships  POST   /relationships(.:format)                                                        relationships#create
  relationship   DELETE /relationships/:id(.:format)                                                             relationships#destroy
・これでrelationships_pathでフォロー/relationship_pathでフォロー解除できるようになってるのが確認できたかと思います。
10.フォロー/フォロー解除ボタンを配置する。
・相手ユーザーのページに飛んだ際にフォローしたり、フォロー解除できるようにする場合を考えて、app/views/users/show.html.slimファイルに配置していきたいと思います。
h1 ユーザープロフィールページ
p
  = "名前 : "
  = @user.username

# ================フォローボタンの追加=============================

  = render 'relationships/follow_form', user: @user

# ============================================================

p= link_to "プロフィール編集", edit_user_path(current_user)
__・user: @user__:パーシャルに記述したuserが、showアクションで定義されている@userを参照しています。
・ボタンの配置はできましたが、このままではボタンは機能しません。先ほども述べたように、@relationshipインスタンス変数と、@set_relationshipインスタンス変数を、showアクションに定義してあげなければならないからです。
11.app/controllers/users_controller.rbのshowアクションに、インスタンス変数を定義する。
class UsersController < ApplicationController
  .
  .
  .
  def show
    @user = User.find(params[:id])
    @relationship = current_user.relationships.find_by(follow_id: @user.id)
    @set_relationship = current_user.relationships.new
  end
  .
  .
  .
end
・@relationship = current_user.relationships.find_by(follow_id: @user.id):フォロー解除フォームで参照しているインスタンス変数です。ここでcurrent_userと@userとのrelationshipsを取得することで、フォームにてparams[:relationship][:follow_id]のようにデータを送信することができるようになります。
・@set_relationship = current_user.relationships.new:フォローするフォームで参照しているインスタンス変数です。params[:relationship][:follow_id]と言う形にしてデータを送信したいので、このように空のインスタンス変数を生成してます。
・以上で、ユーザーをフォロー/フォロー解除する機能の実装が完了しました!
次は、フォローしているユーザー/フォローしてくれているユーザーを一覧で表示する機能を実装していきます!
フォローユーザー/フォロワーの一覧表示機能
1.始めにフォローユーザー/フォロワーの一覧ページへのリンクをビューに作成する
・app/views/users/show.html.slimに、そのユーザーのフォローユーザー/フォロワーの一覧ページへのリンクを追加します。
h1 ユーザープロフィールページ
p
  = "名前 : "
  = @user.username

# ==============フォロー/フォロワー一覧ページへのリンク=================

  = link_to "フォロー: #{@user.followings.count}", followings_user_path(@user.id)
  = "/"
  = link_to "フォロワー: #{@user.followers.count}", followers_user_path(@user.id)

# ============================================================

  = render 'relationships/follow_form', user: @user
p= link_to "プロフィール編集", edit_user_path(current_user)
・フォローユーザー/フォロワーへのアクセスは、先ほどUserモデルファイルで定義したfollowings/followersを使います。
・@user.followings.count :ユーザーのフォローしているユーザーの数を表示してます。
・followings_user_path(@user.id):URLがusers/:id/followingsとなるパスを指定したいので、左記のように記述します。この形のパスを指定できるように、ルーティングの記述を後で行ってあげます。
・フォロワー一覧ページへのアクセスも、フォローユーザー一覧ページへアクセスするのと同じような方法で記述しています。
2.フォロー/フォロワー一覧ページへのルーティングを追加する。
Rails.application.routes.draw do
  .
  .
  .
  resources :users do
    get :followings, on: :member
    get :followers, on: :member
  end
  .
  .
  .
end
・上記のように記述したら$ rails routes | grep followコマンドでルーティングを確認してみます。
$ rails routes | grep follow
  followings_user  GET    /users/:id/followings(.:format)                                                          users#followings
  followers_user   GET    /users/:id/followers(.:format)                                                           users#followers
・followings_user_pathはフォローユーザー一覧のページへ、followers_user_pathはフォロワー一覧ページへ飛ぶようになったので、これでOKです。
・followingsアクションも、followersアクションもusersリソースにネストさせたので、usersコントローラで2つのアクションを定義します。
3.usersコントローラにfollowingsアクション、followersアクションを追加する。
class UsersController < ApplicationController
  .
  .
  .
  def followings
    @user = User.find(params[:id])
    @users = @user.followings.all
  end

  def followers
    @user = User.find(params[:id])
    @users = @user.followers.all
  end
  .
  .
  .
・followingsアクション内では、@userのフォローしているユーザー全てを、followersアクション内では、@userのフォロワー全てを取得しています。
4.フォローユーザー/フォロワー一覧を表示するビューを作成する。
・app/views/usersディレクトリに、followings.html.slimファイルとfollowers.html.slimファイルを作成します。
h2 フォローしている方々

- @users.each do |user|
  hr
  = "username: "
  = link_to user.username, user_path(user.id)
h2 フォロワーの皆さん

- @users.each do |user|
  hr
  = "username: "
  = link_to user.username, user_path(user.id)
・以上で、フォローユーザー/フォローユーザー一覧ページの作成が完了しました!