はじめに
Homebrewに問題がないかbrew doctorコマンドでチェックしたところ、問題が溢れ出てきたので一個ずつ解決していきました。
エラー時の環境
macOS Catalina バージョン 10.15.4
Xcode バージョン11.4
エラー内容
$ brew doctor
 Please note that these warnings are just used to help the Homebrew  maintainers
 with debugging if you file an issue. If everything you use Homebrew for is
 working fine: please don't worry or file an issue; just ignore this. Thanks!

# 1つ目のエラー
 Warning: A newer Command Line Tools release is available.
 Update them from Software Update in System Preferences or run:
   softwareupdate --all --install --force

# 2つ目のエラー
 Warning: You have unlinked kegs in your Cellar.
 Leaving kegs unlinked can lead to build-trouble and cause brews that depend on
 those kegs to fail to run properly once built. Run `brew link` on these:
   node

# 3つ目のエラー
 Warning: Your Xcode (11.4) is outdated.
 Please update to Xcode 11.4.1 (or delete it).
 Xcode can be updated from the App Store.
1つ目のエラー
Warning: A newer Command Line Tools release is available.
Update them from Software Update in System Preferences or run:
  softwareupdate --all --install --force
→$ softwareupdate --all --install --forceコマンドを実行せよとの指示が出ているので実行します。
$ softwareupdate --all --install --force
→これで解決しない場合はApp Developerで最新版をインストールすれば解決できました。
2つ目のエラー
Warning: You have unlinked kegs in your Cellar.
Leaving kegs unlinked can lead to build-trouble and cause brews that depend on
those kegs to fail to run properly once built. Run `brew link` on these:
   node
→こちらも$ brew linkをnodeへ実行しろとのことなので、指示に従いコマンドを実行。
$ brew link node
Error: Could not symlink share/doc/node/gdbinit
Target /usr/local/share/doc/node/gdbinit
already exists. You may want to remove it:
    rm '/usr/local/share/doc/node/gdbinit'

To force the link and overwrite all conflicting files:
    brew link --overwrite node

To list all files that would be deleted:
    brew link --overwrite --dry-run node
→しかし、上記のようなエラーが出てしまいました。
→share/doc/node/gdbinitファイルにsymlink(シンボリックリンク)を作成できないから、そのターゲットのファイルを削除もしくは強制的に上書きするよう指示が出されました。(シンボリックリンクとは何ぞやという方はこちらの記事が大変参考になるかと思います。)
→では指示通りに$ brew link --overwrite nodeコマンドを実行してみます。
$ brew link --overwrite node
Error: Could not symlink share/doc/node/gdbinit
/usr/local/share/doc/node is not writable.
→そして再びエラー。/usr/local/share/doc/node ディレクトリがis not writableつまり書き込み権限がないと言われているので、このディレクトリの書き込み出来るようにユーザー権限を、現アカウントに委譲します。
→書き込み可能にするには、以下のようにコマンドを実行していきます。
$ cd /usr/local/share/doc
$ sudo chown -R $USER node
Password:
→まずnodeディレクトリがあるdocディレクトリに移動します。
→chownコマンドで、ユーザー権限を現アカウントに委譲することで、ディレクトリへ対する書き込みの権限が与えられます(chownコマンドについてはこちらの記事が参考になります)。
→上記のようにパスワードの入力を求められる場合は、PCにログインするときに設定しているパスワードを入力する。
→これで書き込み可能になったので、再び$ brew linkコマンドを実行します。
$ brew link --overwrite node
Linking /usr/local/Cellar/node/14.2.0...
Error: Could not symlink share/systemtap/tapset/node.stp
/usr/local/share/systemtap/tapset is not writable.
→しかし、今度はまた別のファイルの書き込み権限がないとのエラーが出てしまいました。
→これも書き込み可能にしたいので、先ほどの手順と同様に書き込みの権限を与えます。
$ cd /usr/local/share/systemtap
$ sudo chown -R $USER tapset
→tapsetディレクトリがあるsystemtapディレクトリに移動する。
→chownコマンドでユーザー権限を現アカウントに委譲して書き込みできるようにします。
→そして$ brew linkコマンドを実行します。
$ brew link --overwrite node
Linking /usr/local/Cellar/node/14.2.0...
Error: Could not symlink lib/dtrace/node.d
/usr/local/lib/dtrace is not writable.
→再び、上記2つのエラー同様書き込み権限がないという旨のエラーが出ました。
→同じくディレクトリに対しての書き込み権限を与えます。
$ cd /usr/local/lib
$ sudo chown -R $USER dtrace
→distraceディレクトリがあるlibディレクトリに移動する。
→chownコマンドでユーザー権限を現アカウントに委譲。
→そして$ brew linkコマンドを実行します。
$ brew link --overwrite node
Linking /usr/local/Cellar/node/14.2.0... 7 symlinks created
→今度は上手くリンクが張れたみたいです(よかった…)。
ちなみに
※chownコマンド実行時、「Operation not permitted」というエラーが出てしまう場合があるので、もしそうなってしまった場合は以下を参考にしてみてください。(自分はこの状況に直面しました)
解決策
これは、ターミナルの環境設定自体を変更してあげれば解決できますので、手順を説明していきます。
1.Macの「システム環境設定を開く」
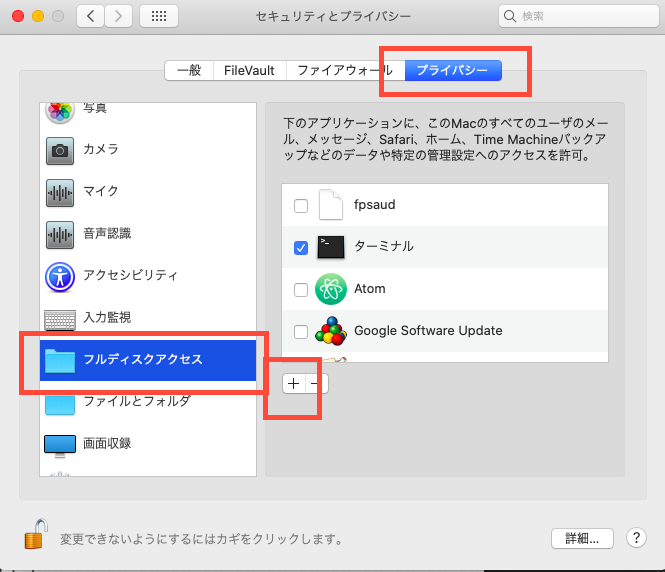
2.右にある「プライバシー」タブを開く。
3.左側をスクロールして、「フルディスクアクセス」を開く。
4.「+」マークを押して、「ターミナル」を検索し、ターミナルを選択しチェックを付ける(変更できない場合は、左下の鍵マークをクリックすれば変更できるようになります)。
話が脱線しましたが、3つ目のエラー修正。
Warning: Your Xcode (11.4) is outdated.
Please update to Xcode 11.4.1 (or delete it).
Xcode can be updated from the App Store.
→Xcodeを11.4.1へアップデートしてくださいとの指示なので、それに従います。
→App DeveloperでXcode 11.4.1をダウンロードしてインストールします。
→インストールしたXcodeファイルはApplicationsディレクトリ配下に移動します。
→__もし、上記ではXcodeアップデートのエラーが直らなかったという場合は、以下の方法を試してみてください。__
1.Xcode.appを開きます。
2.Xcodeタブから、Preferencesを選択して開きます。
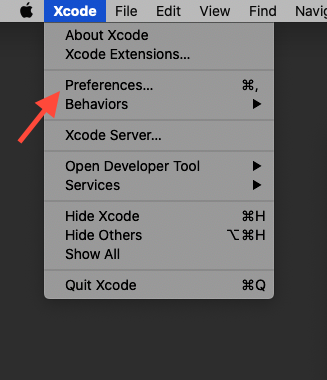
3.Locationタブを開いて、Command Line Toolsの欄を新しくインストールしたXcodeのバージョンに変更します。

以上でエラー修正が完了したかと思うので、$ brew doctorコマンドで確認してみます。
$ brew doctor
Your system is ready to brew.
→上手く行きました!
参考
https://wtnvenga.hatenablog.com/entry/2017/11/15/125430
→symlink関連でのエラーにとても参考になりました。
https://gori.me/mac/mac-tips/112082
→ターミナルの設定で参考になりました。