この記事を読むとできるようになること
Google Calendar に登録されている本日の予定を、Google Chat, Chatwork, LINE に毎朝リマインド通知できるようになる。
全部やるのに必要になるアカウントは、
- Chatwork
- LINE
- LINE Developer
の4つで、開発に必要なのは Web Browser だけ。利用するのに料金はかからない。
GoogleやChatworkは、Admin権限等不要で、一般ユーザでできる。
Google Apps Script とは
Google が提供している JavaScript ベースなプログラミング言語で、色んなことができますが、Google の提供しているサービスとの連携が簡単にできます。
昨今、非エンジニアであっても、面倒くさいことは全部 Python にやらせよう!という風潮がありますが、Python の場合、あれこれインストールしたりしないといけないという意味では、ちょっとハードルが高いです。一方で、Google App Script(GAS)の場合、必要なのは、ブラウザと Google のアカウントだけなので、非エンジニアであっても簡単に始められます。更に、GSuite を利用している会社も多いことと思いますので、面倒くさいことは、割と Google 絡みだったりすることも多いのではないでしょうか。
言語も基本的には JavaScript なので、困ったらググれば大抵のことは解決します。
という訳で、今回は、Googleカレンダーのイベントを取得して Chat ツールに送るリマインダー的な Bot を作ってみたいと思います。
Hello, World
まずは Google Drive に行って、適当なところにファイルを作成します。
今回は、My Drive の下に bot というディレクトリを作って、そこで作業したいと思います。
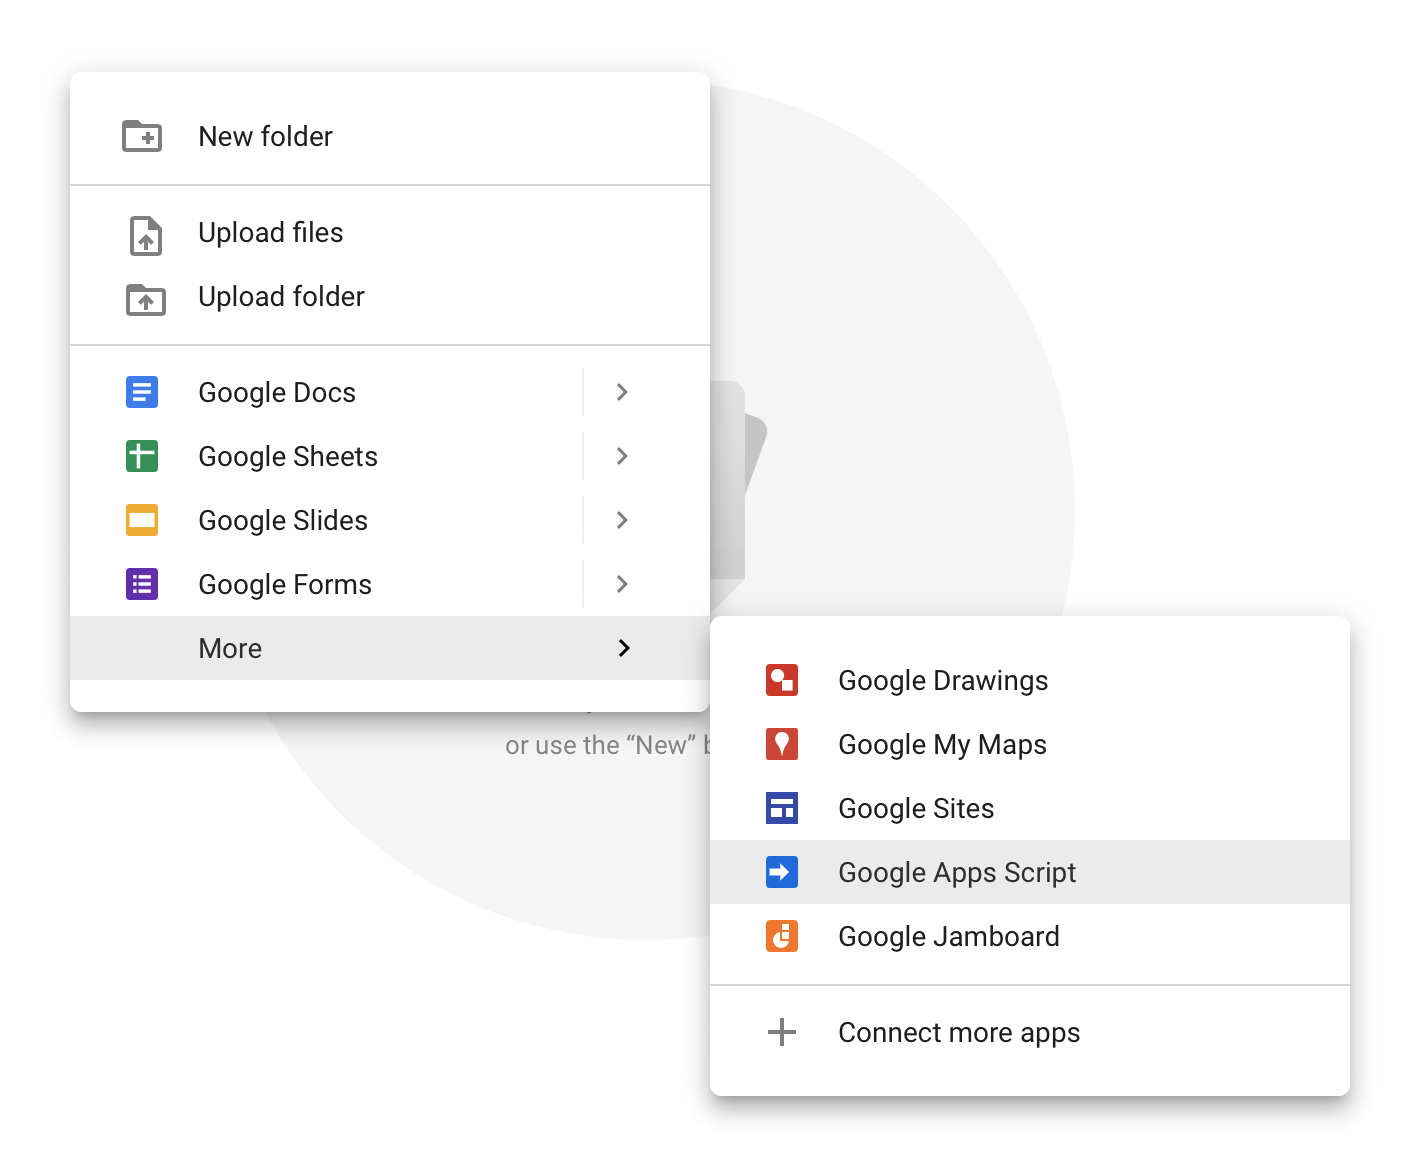
bot ディレクトリに行ったら、左上の ”+ New” ボタンか 右クリックメニューから more > Google Apps Script を選択します。
そうすると、こんな感じのページに遷移します。

Project 名に、helloWolrd などとつけて、myFunction の中身を以下のように書き換えます。
function myFunction() {
  console.log('Hello, World');
}
保存は Ctrl+s でできます。保存出来たら、メニューの ▶ ボタンをクリックすると実行することができます。今は、実行しても何も起こっていないように見えますが、メニューの View > Logs と選択すると、console.log で出力した内容が確認できます。

はい。というわけで、Hello, World できました。基本的な流れはこんな感じです。プログラムが完成したら、自動実行するための Trigger を設定しますが、一番最後にやります。
Google Calendar のイベントを取得する
Google Calendar の API でできることはここにまとまっているので、読んでやってみてください。今回は、Calendar から今日のイベントを取得してみたいと思います。
まずは、GAS ファイルを作り、notifyEvents とでも命名しておきます。
まずは、カレンダーに行き、左メニューのカレンダーリストからイベントを取得したカレンダーの ”︙” をクリックし、Settings and sharing を選択します。そうすると設定ページに移動するので、下の方の Integrate calendar のセクションに Calendar ID という項目があるので、それをコピーし、以下のコードの{Calender ID}の部分にペーストしてください。
function notifyEvents() {
  const calendarId = '{Calendar ID}';
  const calendar = CalendarApp.getCalendarById(calendarId);
}
これを実行しても何も起きないので、カレンダー名を取得し、Log に吐き出してみます。
function notifyEvents() {
  const calendarId = '{Calendar ID}';
  const calendar = CalendarApp.getCalendarById(calendarId);
  const calendarName = calendar.getName();

  console.log(calendarName);
}
これを実行すると、まずはカレンダーへのアクセスに対するレビューがあるので、画面の指示に従い、許可します。そして実行が完了するのを待って、ログを開くとカレンダー名が表示されます。ログがまだないよと言われた場合は、しばらく待ってみてください。
なお、CalendarApp というのは import したりする必要はなく、実際に自分で打ってみると分かりますが、method などを補完してくれます。便利。
では、続けてカレンダーに登録された本日のイベントを取得し、ログに出してみます。
function notifyEvents() {
  const calendarId = '{Calendar ID}';
  const calendar = CalendarApp.getCalendarById(calendarId);
  const calendarName = calendar.getName();

  const today = new Date();
  const calendarEvents = calendar.getEventsForDay(today);

  console.log(calendarEvents);
}
実行すると、[ {}, {}, {} ] と何やら3件のデータが取得されたらしいが、中身は見せてくれない感じになります。実際にこのカレンダーには、本日3件のイベントが登録されています。何もない場合は、[] と空配列が返ってきます。イベントがあったら、それを表示し、なかったらないよと通知するようにしたいと思います。なお、本日だけじゃなくて、期間指定したい場合は、getEventsメソッドを使います。
function notifyEvents() {
  const calendarId = '{Calendar ID}';
  const calendar = CalendarApp.getCalendarById(calendarId);
  const calendarName = calendar.getName();

  const today = new Date();
  const calendarEvents = calendar.getEventsForDay(today);

  if (calendarEvents.length) {
    for (var event of calendarEvents) {
      var eventTitle = event.getTitle() ? event.getTitle() : '(no title)';
      console.log(eventTitle);
    }
  } else {
    console.log('ないよ');
  }
}
タイトルなしのイベントは、getTitle では何も返ってこないので、カレンダーの表示と同様、(no title) と入れることにしました。
カレンダーのイベントには、時間が指定されているものと、されていないものがあるので、時間指定のあるものは、それも表示してみましょう。と同時に、イベント名だけ送られてきても困るので、気の利いたメッセージも付け加えましょう。
function notifyEvents() {
  const calendarId = '{Calendar ID}';
  const calendar = CalendarApp.getCalendarById(calendarId);
  const calendarName = calendar.getName();

  const today = new Date();
  const calendarEvents = calendar.getEventsForDay(today);

  var message = 'おはよう朝です。\n' +
                 Utilities.formatDate(today, 'GMT+0900', 'MM/dd') +
                'の' + calendarName + 'の予定を通知します\n' +
                '-----------------------------------------';

  if (calendarEvents.length) {
    for (var event of calendarEvents) {
      var eventTitle = event.getTitle() ? event.getTitle() : '(no title)';
      message = message + '\n- ' + eventTitle;
      if (!event.isAllDayEvent()) {
        message = message + ' at '+
                  Utilities.formatDate(event.getStartTime(), 'GMT+0900', 'HH:mm') + '~' +
                  Utilities.formatDate(event.getEndTime(), 'GMT+0900', 'HH:mm') + '(JST)';
      }
    }
  } else {
    message = message + '\nないよ';
  }

  console.log(message);
}
はい。これでカレンダーのイベントを無事取得することができました。
今回は、イベントのタイトル、開始時刻、終了時刻だけを取得しましたが、他にも色々取れるので、getXX メソッドや isXX メソッドを見てみてください。
Google Chat にポストする
Google Chat 使ってる人ってあんまりいないのかな?と思いますが、GSuite についてるんで、Google 内なので、まずはそこにポストしてみたいと思います。
下準備として、Chat ルームの Webhook を設定します。
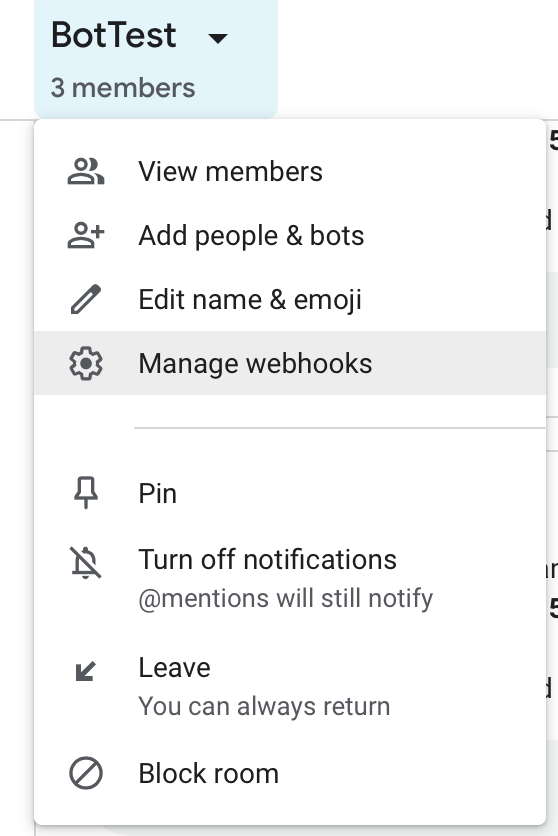
メッセージを送信したいルームに行って、Manage webhooks というのを探してください。で、設定してください。そうすると URL が発行されるので、それをコピーし、以下の{Webhook URL}に貼り付け。
function notifyEvents() {
  const calendarId = '{Calendar ID}';
  const calendar = CalendarApp.getCalendarById(calendarId);
  const calendarName = calendar.getName();

  const today = new Date();
  const calendarEvents = calendar.getEventsForDay(today);

  var message = 'おはよう朝です。\n' +
                 Utilities.formatDate(today, 'GMT+0900', 'MM/dd') +
                'の' + calendarName + 'の予定を通知します\n' +
                '-----------------------------------------';

  if (calendarEvents.length) {
    for (var event of calendarEvents) {
      var eventTitle = event.getTitle() ? event.getTitle() : '(no title)';
      message = message + '\n- ' + eventTitle;
      if (!event.isAllDayEvent()) {
        message = message + ' at '+
                  Utilities.formatDate(event.getStartTime(), 'GMT+0900', 'HH:mm') + '~' +
                  Utilities.formatDate(event.getEndTime(), 'GMT+0900', 'HH:mm') + '(JST)';
      }
    }
  } else {
    message = message + '\nないよ';
  }

  postToChat(message);
}

function postToChat(message) {
  const chatWebhook = '{Webhook URL}';
  const messageText = { 'text': message };
  const options = {
    'method': 'POST',
    'headers': {
      'Content-Type': 'application/json; charset=UTF-8'
    },
    'payload': JSON.stringify(messageText)
  };
  var result = UrlFetchApp.fetch(chatWebhook, options);
  Logger.log(result);
}
これまた Chat アクセスへのレビューを求められるので、よしなに。
Chatwork にポストする
まずは、Chatwork API Token を取得します。
サービス連携>API Token と進んで発行し、それを控えておきます。
次に、ポストしたいチャットルームの ID を控えます。URLの #!ridxxxxxx の xxxxxx(数字)の部分です。
Chatwork APIドキュメントを見ながらせっせと実装しても良いのですが、GAS から Chatwork を利用する便利なライブラリが用意されているので、それを使います。
メニューのResources > Libraries で、M6TcEyniCs1xb3sdXFF_FhI-MNonZQ_sTを追加。Version は最新のもので、今回は18にしました。

以下コードに、Token と Room ID を設定して実行。
function notifyEvents() {
  ...
  //postToChat(message);
  postToChatwork(message);
}

function postToChat(message) {...}

function postToChatwork(message) {
  const chatworkToken = '{Chatwork API Token}';
  const chatworkRoomId = '{Chatwork Room ID}';
  const chatworkClient = ChatWorkClient.factory({token: chatworkToken});
  chatworkClient.sendMessage({room_id: chatworkRoomId, body: message});
}
諸々省略しましたが、こんだけです。
LINE にポストする
LINE はちょっと面倒くさいですが、ちょっとだけです。
今回は、自分にだけメッセージを一方的に送れれば良いので、メッセージの送り先は自分固定にします。
流れとしては、
- LINE Developers にて、Provider を作成し、Messaging API Channel を作る
- Messaging API の設定で、Channel access token (long-lived) を発行する→ Token 控える
- Messaging API の設定で、Auto-reply messages, Greeting messages を Disabled にする(必要ないので)
- Basic settings の Your user ID を控える
- GAS を Web App として Publish し、URL を控える
- Messaging API の設定で、Webhook を 5 で控えた URL に設定する
- QR コードを読み込んでフレンド登録する
- GAS を実行する
です。
LINE Developers の細かい説明は、他の記事などを見てもらうとして、GAS のコードは、以下のようになります。前述のステップ2と4で控えた Token と user ID を入れてください。
...
function postToLine(message) {
  const lineToken = '{LINE Token}';
  const lineMessagePushUrl = 'https://api.line.me/v2/bot/message/push';
  const lineHeaders = {
    "Content-Type": "application/json; charset=UTF-8",
    "Authorization": "Bearer " + lineToken
  };
  const linePayload = {
    "to" : "{User ID}",
    "messages" : [{
      "type": "text",
      "text": message
    }]
  };
  const options = {
    "method": "POST",
    "headers": lineHeaders,
    "payload": JSON.stringify(linePayload)
  };
  var result = UrlFetchApp.fetch(lineMessagePushUrl, options);
  Logger.log(result);
}
Trigger を設定し、毎朝実行されるようにする
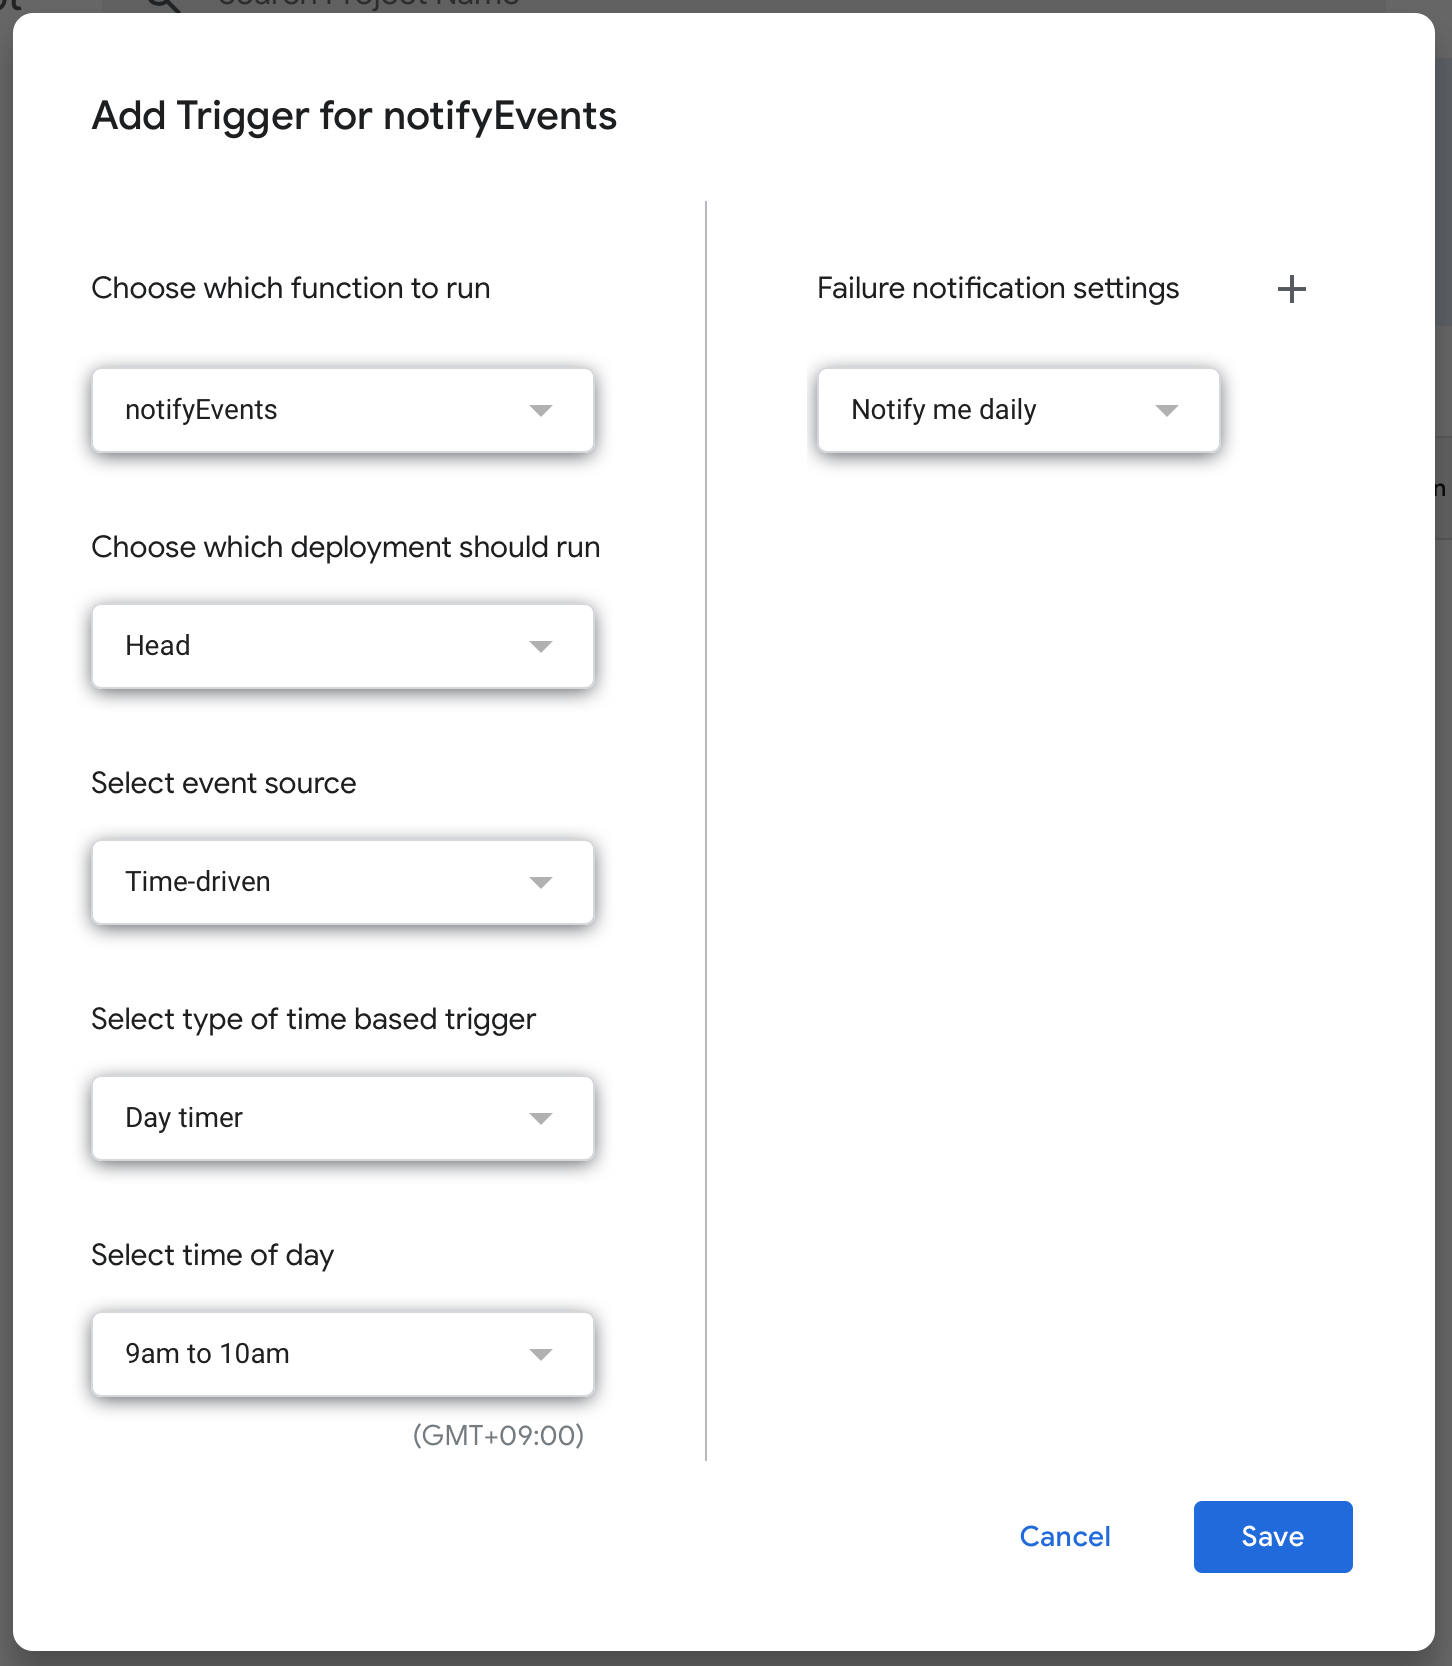
最後に、自動実行の設定を行いましょう。メニューの ▶ の隣の時計なのか虫眼鏡なのかのボタンをクリックすると Trigger 設定のページに遷移するので、新しく Trigger を作成してください。
今回は、毎朝一度だけ通知するというようにしたいので、Time-driven, Day timer, 9am to 10am という設定にしました。お好きに設定してください。9時から10時という謎の幅についてですが、数日動かしてみたところ 9時46分とか、毎日バラバラです。気持ち悪い気がしなくもないですが、私の場合は、始業前に通知が来てれば良いので良しとしました。
これでおしまいなんですが、そうするとですね、土日にも通知が来ることになって、せっかくの週末気分が台無しです。なので、土日にはメッセージを送らないように GAS に処理を追加します。祝日は…やれないこともないですが、今回は、まぁ良いでしょう。
function notifyEvents() {
  const calendarId = 'kura@indigames.net';
  const calendar = CalendarApp.getCalendarById(calendarId);
  const calendarName = calendar.getName();

  const today = new Date();
  const dayOfWeek = today.getDay();
  if (dayOfWeek === 0 || dayOfWeek === 6) return;

  const calendarEvents = calendar.getEventsForDay(today);
  ...
}
...
終わりに
Google Apps Script でググると、Spreadsheet から…というものが多く、Excel の Macro 相当のものなのかなぁという印象もあり、誰もメンテできない秘伝の GAS みたいなものが頭を過りましたが、サーバレスで JavaScript が実行できる環境、しかも無料と考えると、非常に有用なサービスなのではないかと思います。
ちょっとしたものは、Google Apps Script でという選択肢は持っておいても良いかなと。
今回のサンプルは、メッセージが英語になってますが、github に置いてあります。