目的
温湿度計を使って屋内外の様子をダッシュボードで確認したい。
https://qiita.com/kunikada/items/815822ba08aabbfc5f89
という記事を以前書いたのですが、いつの間にか公式のWebAPIが用意されていてBluetoothによる値の取得は不要となっていました。WebAPIを利用したやり方を投稿します。ほぼ前回のコピペです。
概要
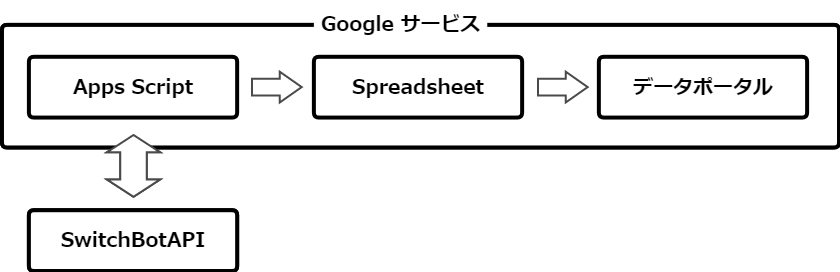
APIから値を取得してGoogleスプレッドシートに記録するところまでGoogleAppsScriptで行います。これをデータソースとしてGoogleデータポータルで視覚化します。
https://github.com/OpenWonderLabs/SwitchBotAPI
以上の流れです。
準備
APIを通じてクラウド上のデータを取得するため、ハブを購入したうえで、アプリから温湿度計のクラウドサービスをオンにする必要があります。
手順
SwitchBot温湿度計の設置
購入したら電池を入れて計測する場に設置します。屋外に設置する場合は防水対策をしてください。何かで囲えばいいのですが、金属だと通信に支障が出ます。
次の手順で必要となるBLEのMACアドレスを調べるためとAPIトークンを取得するため、SwitchBotのアプリをインストールします。
Googleスプレッドシートの作成
任意の場所、名前でスプレッドシートを作成します。
このとき1行目を下の画像のように入力してください。(_tと_hの前をBLEのMACアドレスに)
次の手順でURLが必要です。

APIトークンの取得
SwitchBotのアプリから確認します。
- プロフィールを開く
- 設定を開く
- アプリバージョンを10回タップする
- 開発者向けオプションにトークンが表示される
Google Apps Scriptの作成
任意の場所、名前でGoogle Apps Scriptを作成します。
作成する方法、準備については他の記事を参照してください。
https://qiita.com/tags/googleappsscript
スクリプトを下の内容に書き換えます。
// Compiled using ts2gas 4.1.0 (TypeScript 4.3.5)
var Config = /** @class */ (function () {
    function Config() {
    }
    Config.SPREADSHEET_ID = '********'; // ここにスプレッドシートのURLを記載
    Config.SWITCHBOT_API_TOKEN = '********'; // ここにAPIのトークンを記載
    Config.DEVICE_IDS = ['ffc94cae1c41', 'c41cf24cd1da']; // 記録対象のMACアドレスを記載
    return Config;
}());
var API = /** @class */ (function () {
    function API() {
        this.HOST = 'https://api.switch-bot.com';
    }
    API.prototype.setStatus = function (bot) {
        var url = this.HOST + ("/v1.0/devices/" + bot.deviceId + "/status");
        var response = UrlFetchApp.fetch(url, {
            method: 'get',
            headers: {
                Authorization: Config.SWITCHBOT_API_TOKEN
            }
        });
        var responseData = JSON.parse(response.getContentText());
        if (responseData.statusCode !== 100) {
            console.error('status code is not 100.');
        }
        bot.humidity = responseData.body.humidity;
        bot.temperature = responseData.body.temperature;
    };
    return API;
}());
var SwitchBot = /** @class */ (function () {
    function SwitchBot(_deviceId) {
        this._deviceId = _deviceId;
    }
    Object.defineProperty(SwitchBot.prototype, "deviceId", {
        get: function () {
            return this._deviceId;
        },
        enumerable: false,
        configurable: true
    });
    return SwitchBot;
}());
var MySpreadsheet = /** @class */ (function () {
    function MySpreadsheet(id, sheetId) {
        if (sheetId === void 0) { sheetId = 0; }
        if (id.match(/^https:\/\//)) {
            this.ss = SpreadsheetApp.openByUrl(id);
        }
        else {
            this.ss = SpreadsheetApp.openById(id);
        }
        this.sheet = this.ss.getSheets()[sheetId];
    }
    MySpreadsheet.prototype.headers = function () {
        var range = this.sheet.getRange(1, 1, 1, this.sheet.getMaxColumns());
        return range.getValues()[0];
    };
    MySpreadsheet.prototype.appendRow = function (row) {
        var insertRow = [];
        this.headers().forEach(function (name, index) {
            insertRow.push((name && name in row) ? row[name] : "");
        });
        this.ss.appendRow(insertRow);
    };
    MySpreadsheet.prototype.unshiftRow = function (row) {
        this.sheet.insertRowAfter(1);
        var range = this.sheet.getRange(2, 1, 1, this.sheet.getMaxColumns());
        this.headers().forEach(function (name, index) {
            if (name) {
                range.getCell(1, index + 1).setValue(row[name]);
            }
        });
    };
    return MySpreadsheet;
}());
var Message = /** @class */ (function () {
    function Message() {
        this._bots = [];
        this._message = {};
    }
    Message.prototype.addBot = function (bot) {
        this._bots.push(bot);
    };
    Message.prototype.post = function () {
        var key;
        if (this._bots.length === 0) {
            console.error('no bot.');
        }
        for (var i in this._bots) {
            key = this._bots[i].deviceId.toLowerCase() + "_t";
            this._message[key] = this._bots[i].temperature;
            key = this._bots[i].deviceId.toLowerCase() + "_h";
            this._message[key] = this._bots[i].humidity;
        }
        this._message['created_at'] = Utilities.formatDate(new Date(), Session.getScriptTimeZone(), "yyyy-MM-dd HH:mm:ss");
        var ss = new MySpreadsheet(Config.SPREADSHEET_ID);
        ss.unshiftRow(this._message);
    };
    return Message;
}());
function myFunction() {
    var api = new API();
    var message = new Message();
    for (var i in Config.DEVICE_IDS) {
        var bot = new SwitchBot(Config.DEVICE_IDS[i].toUpperCase());
        api.setStatus(bot);
        message.addBot(bot);
    }
    message.post();
}
Google Apps Scriptのトリガーを設定
定期的に値を取得するため、トリガーを設定します。
実行頻度はGoogleデータポータルの内容によりますが、15分程度でよいかと思います。
Googleデータポータルの設定

具体的な手順は省きますが、試行錯誤した結果、画像のようなものができました。
上に温度、下に湿度、屋内外のデータと差異を一つに表示します。左側が履歴で右側に現在値を表示しています。
履歴については、色々とパラメータはありますが時系列グラフ1つで設定できます。
現在値の表示は、ドーナツグラフ2つとスコアカード2つを重ねて表示しています。データソースもスプレッドシートの別シートで専用のデータを作成しています。
もし質問があればコメントからどうぞ。
備考
- 複数個の温湿度計を同じ場所に設置しても値にズレがあり個体差があることがわかります。アプリから個別の校正ができるようになっているのは確認しましたが、出力値に反映されるのかは未検証です。反映されないようであればスクリプト側での対応が必要です。
参考
SwitchBot API
https://github.com/OpenWonderLabs/SwitchBotAPI
Google Apps Script リファレンス
https://developers.google.com/apps-script/reference
Googleデータポータル ヘルプ
https://support.google.com/datastudio/?hl=ja