はじめに
私はネットワークエンジニアをかれこれ10年弱やっているのですが、ふとネットワーク技術を初心者に戻って一から学び直してみたいと思いました。
きっかけは「世界一流エンジニアの思考法」という本の中で、著者が普段から使っているプログラミング言語を初心者に戻って一から学びなおしたというエピソードがあり、マイクロソフト(米国本社)に勤めていたら一からの学び直すことはプライドが邪魔しそうだけどそれよりも自らのスキルアップのために振り切って進むのは凄いなと、感銘を受けたからです。
自分もやってみようと。初心者に戻って一から学びなおしてみることで新たな発見や気づきがあるかもしてないと思い、今回このようなネットワーク技術を初心者に戻って一から学び直すという企画を立ててみました。
構成図はこちら
さて本題に入ります。
今回構築するネットワークの構成はこちらです。
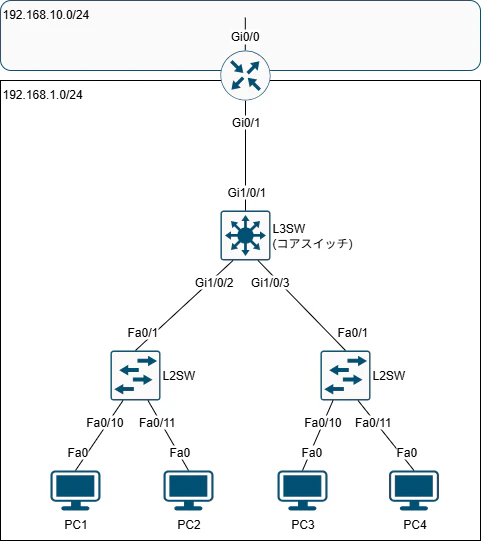
はい、めちゃくちゃシンプルですね。
構築するにあたって以下を考慮しています。
- シングルVLAN (VLAN10) で構成する
- DGW : L2SWはL3SWに、L3SWはルータに向ける
- L2/L3SWに管理用インターフェイスを設定し、telnet接続可能な状態にする
- L2/L3SWは将来的に冗長構成を組む想定で、ポートを設計する
あとはここからどんどん発展させていきたいと考えていて、DHCPでIPアドレス払い出しとかSTP、ダイナミックルーティングで経路広報などなど。
それはこれから実践していって追々記事にしていきます。
構築してみましょう
ホスト名はこちらになっています。
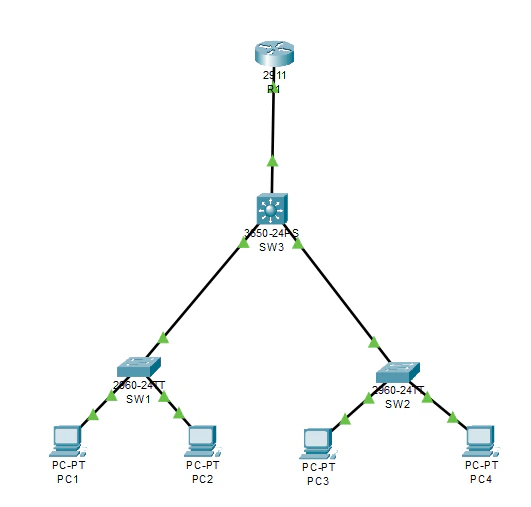
はい、めちゃくちゃシンプルですね。
規模が大きくなるにつれてホスト名も厳密に決めていかないといけなくなるタイミングが来ると思いますが、一旦これでいきます。
設定箇所に抜粋しますが、長くなってしまって大変恐縮です、、。
!
hostname SW1
!
enable password cisco
!
interface FastEthernet0/1
 description ##To_SW3##
 switchport access vlan 10
 switchport mode access
 no shutdown
!
interface FastEthernet0/10
 description ##To_PC##
 switchport access vlan 10
 switchport mode access
 no shutdown
!
interface FastEthernet0/11
 description ##To_PC##
 switchport access vlan 10
 switchport mode access
 no shutdown
!
interface Vlan1
 no ip address
 shutdown
!
interface Vlan10
 ip address 192.168.1.100 255.255.255.0
 no shutdown
!
ip default-gateway 192.168.1.110
!
line vty 0 4
 password cisco
 login
line vty 5 15
 no login
!
!
hostname SW2
!
enable password cisco
!
interface FastEthernet0/1
 description ##To_SW3##
 switchport access vlan 10
 switchport mode access
 no shutdown
!
interface FastEthernet0/10
 description ##To_PC##
 switchport access vlan 10
 switchport mode access
 no shutdown
!
interface FastEthernet0/11
 description ##To_PC##
 switchport access vlan 10
 switchport mode access
 no shutdown
!
interface Vlan1
 no ip address
 shutdown
!
interface Vlan10
 ip address 192.168.1.101 255.255.255.0
 no shutdown
!
ip default-gateway 192.168.1.110
!
line vty 0 4
 password cisco
 login
line vty 5 15
 no login
!
!
hostname SW3
!
enable password cisco
!
interface GigabitEthernet1/0/1
 description ##To_R1##
 switchport access vlan 10
 switchport mode access
 no shutdown
!
interface GigabitEthernet1/0/2
 description ##To_PC##
 switchport access vlan 10
 switchport mode access
 no shutdown
!
interface GigabitEthernet1/0/3
 description ##To_PC##
 switchport access vlan 10
 switchport mode access
 no shutdown
!
interface Vlan10
 ip address 192.168.1.110 255.255.255.0
 no shutdown
!
ip classless
ip route 0.0.0.0 0.0.0.0 192.168.1.254
!
line vty 0 4
 password cisco
 login
!
!
hostname R1
!
enable password cisco
!
interface GigabitEthernet0/0
 ip address 192.168.10.254 255.255.255.0
!
interface GigabitEthernet0/1
 ip address 192.168.1.254 255.255.255.0
 no shutdown
!
line vty 0 4
 password cisco
 login
!
設定箇所に抜粋したのですが、長くなってしまって大変恐縮です、、。(2回目)
各インターフェイスに「no shutdown」を入れていますが、デフォルトで解放されていポートもあるかもしれません。
職業病なのか接続ポートは「no shutdown」を入れるのが身体に染みついている節があるので、今回もコマンドを打っています。
ただしR1の interface はデフォルトで shutdown になっています。interface GigabitEthernet0/0 を「no shutdown」としていないのは現段階では隣接ネットワークとの接続が無いためです。
あと interface Vlan1 は使わないので shutdown にしています。他のポートも然りです。(上記のコンフィグには掲載していません)
再認識したポイント
- L2SWには interface vlan10 に IPアドレスを設定して SVI にして、GiポートにVLAN(access)を指定してあげることで相互通信可能な状態となります
- L3SW でデフォルトゲートウェイを指定する時は「ip default-gateway」ではなく、「ip route 0.0.0.0 0.0.0.0」で指定してあげましょう
おしまい
今回はこれで以上です。
最初の方にも書きましたがこれから規模を大きくしていきたいのと、今のこの小規模構成でも追加できる要素はあるので、次回以降に続けていきたいと思います。
それでは。