はじめに
とある事情でUWPアプリ間でストリーミングをすることになり、最初OSC(OpenSound Control protocol)を使ったのですが繋がる気配がない…
MSDNを見たところ、
ネットワーク分離の結果として、Windows では、同じコンピューターで実行される 2 つの UWP アプリ間での、ローカル ループバック アドレス (127.0.0.0) 経由であるか明示的なローカル IP アドレスの指定によるかに関係なく、ソケット接続 (Sockets または WinSock) の確立を禁止しています。 UWP アプリが別の UWP アプリとの通信に使うメカニズムについて詳しくは、「アプリ間通信」をご覧ください。
とのこと。…は?ムリジャン。(C#のOSCはSocketで構成されている)
UWPアプリ間の通信ができないかと調べたところ、AppServiceを使えばできるらしいので、それの使い方について解説していきます。(AzureのAppServiceは関係がない。)
日本語の資料が少なくて大変だった。なお、今回の参考資料は以下です。
- DesktopBridge アプリで UWP アプリと Win32 アプリの連携方法
- Create and consume an app service
- Convert an app service to run in the same process as its host app
受信側
まず、受信側の設定をする必要があるのでそちらを先に説明します。インプロセスとアウトプロセスの二種類あるのですが、インプロセスのほうを作っていきます。
コード編
まず、受信した際の処理をする関数を作ります。なお、App.xmal.cs内にあるAppクラスを書き換えていきます。
    //関数名はなんでもいい
    private async void OnAppServiceRequestReceived(AppServiceConnection sender, AppServiceRequestReceivedEventArgs args)
    {
        AppServiceDeferral messageDeferral = args.GetDeferral();
        ValueSet message = args.Request.Message;

        //受信したデータの取り出し
        string text   = message["Content1"] as string;
        int number    = message["Content2"] as int;
        int[] numbers = message["Content3"] as int[];

        /*
           いろいろ処理する
        */

        //送信元へのレスポンス作成
        ValueSet returnMessage = new ValueSet();
        returnMessage.Add("hoge", "piyo");
        //送信元へレスポンスする
        await args.Request.SendResponseAsync(returnMessage);

        //処理おわりのおまじない(実はなくてもどうかはなった)
        messageDeferral.Complete();
    }
ここででるValueSetについて少し解説。
ValueSetは通信する際に使ういろいろな基本型+一次元配列を一緒に収められるDictionary型だと思えば十分です。収められないときは送信側でエラーが出ます。
では次に、どちらかのアプリが中断した時の関数を作ります。
    //同じく関数名はなんでも
    private void OnAppServicesCanceled(IBackgroundTaskInstance sender, BackgroundTaskCancellationReason reason)
    {
        _appServiceDeferral.Complete();
    }

    private void AppServiceConnection_ServiceClosed(AppServiceConnection sender, AppServiceClosedEventArgs args)
    {
        _appServiceDeferral.Complete();
    }
それでは、作成した関数を登録します。
    protected override void OnBackgroundActivated(BackgroundActivatedEventArgs args)
    {
        base.OnBackgroundActivated(args);
        IBackgroundTaskInstance taskInstance = args.TaskInstance;
        AppServiceTriggerDetails appService = taskInstance.TriggerDetails as AppServiceTriggerDetails;
        _appServiceDeferral = taskInstance.GetDeferral();
        //作成した関数名を入れること
        taskInstance.Canceled += OnAppServicesCanceled;
        _appServiceConnection = appService.AppServiceConnection;
        //下二つも同じく
        _appServiceConnection.RequestReceived += OnAppServiceRequestReceived;
        _appServiceConnection.ServiceClosed += AppServiceConnection_ServiceClosed;
    }
結果として以下のようなコードがApp.xmal.csに追加されます。
using Windows.ApplicationModel.AppService;
using Windows.ApplicationModel.Background;
...

sealed partial class App : Application
{
    private AppServiceConnection _appServiceConnection;
    private BackgroundTaskDeferral _appServiceDeferral;

    ...

    protected override void OnBackgroundActivated(BackgroundActivatedEventArgs args)
    {
        base.OnBackgroundActivated(args);
        IBackgroundTaskInstance taskInstance = args.TaskInstance;
        AppServiceTriggerDetails appService = taskInstance.TriggerDetails as AppServiceTriggerDetails;
        _appServiceDeferral = taskInstance.GetDeferral();
        taskInstance.Canceled += OnAppServicesCanceled;
        _appServiceConnection = appService.AppServiceConnection;
        _appServiceConnection.RequestReceived += OnAppServiceRequestReceived;
        _appServiceConnection.ServiceClosed += AppServiceConnection_ServiceClosed;
    }

    private async void OnAppServiceRequestReceived(AppServiceConnection sender, AppServiceRequestReceivedEventArgs args)
    {
        AppServiceDeferral messageDeferral = args.GetDeferral();
        ValueSet message = args.Request.Message;

        //受信したデータの取り出し
        string text   = message["Content1"] as string;
        int number    = message["Content2"] as int;
        int[] numbers = message["Content3"] as int[];

        /*
           いろいろ処理する
        */

        //送信元へのレスポンス作成
        ValueSet returnMessage = new ValueSet();
        returnMessage.Add("hoge", "piyo");
        //送信元へレスポンスする
        await args.Request.SendResponseAsync(returnMessage);

        //処理おわりのおまじない(実はなくてもどうかはなった)
        messageDeferral.Complete();
    }

    private void OnAppServicesCanceled(IBackgroundTaskInstance sender, BackgroundTaskCancellationReason reason)
    {
        _appServiceDeferral.Complete();
    }

    private void AppServiceConnection_ServiceClosed(AppServiceConnection sender, AppServiceClosedEventArgs args)
    {
        _appServiceDeferral.Complete();
    }
}
設定編
次に、受信側のプロジェクトの設定をしていきます。
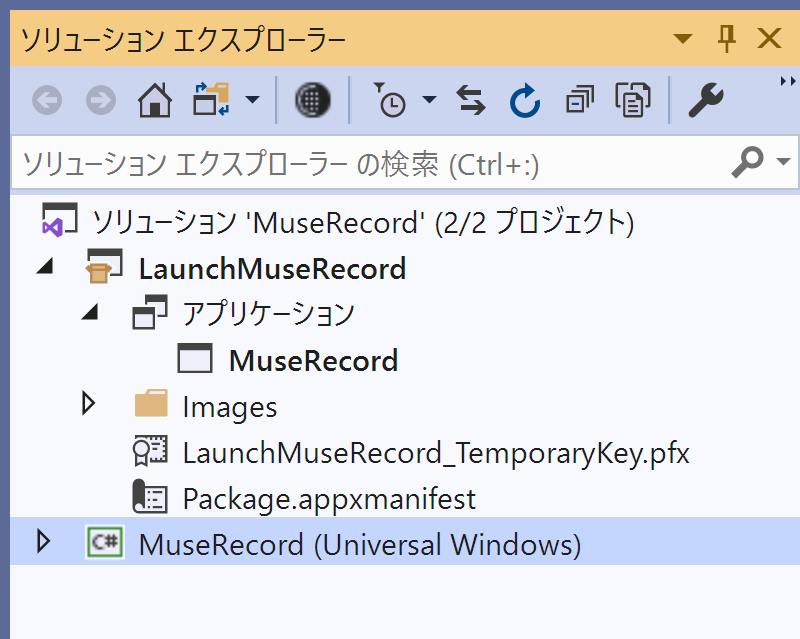
ソリューションエクスプローラーで、以下のような構成になっていることを確認してください。参考にしていたところがこういう構成になっていたのでこうでないとわからないです。

上のLaunchMuseRecordにあたる部分がない人はソリューションを右クリック->追加->新しいプロジェクト->Windows アプリケーション パッケージ プロジェクトを作成し、図のアプリケーションを右クリック->参照の追加で上の図のような状態になります。
ここで、Package.appxmanifestをクリックすると以下のようになると思います。

この宣言というところに行き、AppServiceを使うということを宣言する必要があります。以下のように名前を決めて宣言を追加します。この名前は後で使うので記録しておきましょう。

そしてもう一つ、パッケージ化というところに行き、このアプリのパッケージファミリー名を取得します。これも後で使うので記録しましょう。

送信側
送信側はコードのみです。
    class SendToTarget
    {
        private SemaphoreSlim sm = new SemaphoreSlim(1, 1);
        private AppServiceConnection connection;
        private bool connect = false;

        //通信接続するための関数
        public async Task Open()
        {
            //ロックかけなかったら死んだのでかけた
            await sm.WaitAsync().ConfigureAwait(false);
            AppServiceConnectionStatus r;
            try
            {
                connection = new AppServiceConnection();
                connection.AppServiceName = "AppServiceの宣言した名前";
                connection.PackageFamilyName = "確認したパッケージのファミリーネーム";
                r = await connection.OpenAsync();
            }
            finally
            {
                sm.Release();
            }
            if (r != AppServiceConnectionStatus.Success)
            {
                connection = null;
                throw new Exception("failed open stream.");
            }
            else
            {
                connect = true;
            }
        }

        //通信を切る時のだけど、あってるのかはわかんない。
        public async Task Close()
        {
            await sm.WaitAsync().ConfigureAwait(false);
            try
            {
                connect = false;
                connection.Dispose();
            }
            finally
            {
                sm.Release();
            }
        }

        //これを呼び出せばデータを送れる
        public async Task PushData()
        {
            ValueSet msg = new ValueSet
                    {
                        { "Content1", "hoge" },
                        { "Content2", 0 },
                        { "Content3",  new int[]{1, 2, 3, 4}}
                    };
            //ここでは、宣言時に値を入れたが以下のように追加することも可能
            msg.Add("Example", 3.141592);
            await PushData(msg);
        }

        //データを送るのを実行する関数
        private async Task PushData(ValueSet message)
        {
            if (connection == null)
            {
                await Open();
            }

            if (connect)
            {
                try
                {
                    //データを送信し、レスポンスを待つ。
                    var res = await connection.SendMessageAsync(message);
                    Debug.WriteLine(res.Status + " , " + res.Message);
                }
                catch (ObjectDisposedException)
                {
                }
                catch (NullReferenceException)
                {
                }
            }
        }
    }
おわりに
ある程度理解したら、割と簡単でした。サンプルが少なかったのがつらかった。
あと、200回/s以上通信するのに、全て内容を互いにデバッグ出力していたので重くなりすぎて、デバック中、急にアプリが死んだりしてた。デバック出力のしすぎ注意。