概要
これをやった。
手順
2. Create and set up a Firebase project
- Firebaseプロジェクトを初期化し、webアプリ
</>(FriendlyChatという名前にした)を追加する - Firebase AuthenticationでのGoogle認証を有効にする
- Cloud Firestoreを有効にする(メッセージを保存する)
- Cloud Storageを有効にする(チャットの写真などのファイルをあげる)
- locationは3で指定したものと同じになるらしい
3. Get the sample code
$ git clone https://github.com/firebase/friendlyeats-web
$ cd friendlyeats-web
4. Install the Firebase command-line interface
# Firebase HostingをCLIで行うためのライブラリをインストール
$ npm -g install firebase-tools

$ firebase login

# web-startディレクトリをfirebaseプロジェクトに結びつける
$ cd web-start && firebase use --add
5. Run the starter app locally
$ firebase serve --only hosting
# ->ローカルでサーバが立ち上がった。ブラウザでlocalhost:5000を開く
以下の様な感じ。これからGoogle認証機能の実装をする必要がある。

6. Import and configure Firebase
- Firebase SDKをwebアプリにimportする。public/index.htmlにて以下の様にそれぞれがimportされていることを確認できた。最後の一行では(Firebase Hostingを使っているため)init.jsをimportすることによってFirebaseのどのプロジェクトを使用しているかが指定される(→http://localhost:5000/__/firebase/init.js で確認可能)
index.html
<!-- Import and configure the Firebase SDK -->
<!-- These scripts are made available when the app is served or deployed on Firebase Hosting -->
<!-- If you do not want to serve/host your project using Firebase Hosting see https://firebase.google.com/docs/web/setup -->
<script src="/__/firebase/7.16.1/firebase-app.js"></script>
<script src="/__/firebase/7.16.1/firebase-auth.js"></script>
<script src="/__/firebase/7.16.1/firebase-storage.js"></script>
<script src="/__/firebase/7.16.1/firebase-messaging.js"></script>
<script src="/__/firebase/7.16.1/firebase-firestore.js"></script>
<script src="/__/firebase/7.16.1/firebase-performance.js"></script>
<script src="/__/firebase/init.js"></script>
7. Set up user sign-in
- main.js内の以下の関数を定義する
- function signIn()
- function signOut()
- function initFirebaseAuth()
- function getProfilePicUrl(), function getUserName()
- function isUserSignedIn()
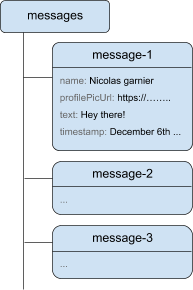
8. Write messages to Cloud Firestore
- webアプリからfirestoreにデータを送信する
main.js
// Saves a new message to your Cloud Firestore database.
function saveMessage(messageText) {
  // Add a new message entry to the database.
  return firebase.firestore().collection('messages').add({
    name: getUserName(),
    text: messageText,
    profilePicUrl: getProfilePicUrl(),
    timestamp: firebase.firestore.FieldValue.serverTimestamp()
  }).catch(function(error) {
    console.error('Error writing new message to database', error);
  });
}
9. Read messages
- 本題2
- 本プロジェクトでは最新12件のメッセージを表示する。
- webアプリでfirebaseからメッセージを同期するための関数を作る
main.js
// Loads chat messages history and listens for upcoming ones.
function loadMessages() {
  // Create the query to load the last 12 messages and listen for new ones.
  var query = firebase.firestore()
                  .collection('messages')
                  .orderBy('timestamp', 'desc')
                  .limit(12);

  // Start listening to the query.
  query.onSnapshot(function(snapshot) {
    snapshot.docChanges().forEach(function(change) {
      if (change.type === 'removed') {
        deleteMessage(change.doc.id);
      } else {
        var message = change.doc.data();
        displayMessage(change.doc.id, message.timestamp, message.name,
                       message.text, message.profilePicUrl, message.imageUrl);
      }
    });
  });
}
10. Send images
- メッセージはFirestoreに保存でいいが、画像に関してはCloud Storageに保存にする
- 画像のアップロード中には
Loadingという文言が表示される - 内部的には、
- 一旦fireStoreにiconのURLをあげたものとしてmessageを送信
- CloudStorageにあげた写真を登録
- 2で挙げられたpublicURLで1のURLを更新、それがチャットラインに反映される
- 画像ファイルを引数にとり、それをCloud Storageにアップロードするための関数を作る
main.js
// Saves a new message containing an image in Firebase.
// This first saves the image in Firebase storage.
function saveImageMessage(file) {
  // 1 - We add a message with a loading icon that will get updated with the shared image.
  firebase.firestore().collection('messages').add({
    name: getUserName(),
    imageUrl: LOADING_IMAGE_URL,
    profilePicUrl: getProfilePicUrl(),
    timestamp: firebase.firestore.FieldValue.serverTimestamp()
  }).then(function(messageRef) {
    // 2 - Upload the image to Cloud Storage.
    var filePath = firebase.auth().currentUser.uid + '/' + messageRef.id + '/' + file.name;
    return firebase.storage().ref(filePath).put(file).then(function(fileSnapshot) {
      // 3 - Generate a public URL for the file.
      return fileSnapshot.ref.getDownloadURL().then((url) => {
        // 4 - Update the chat message placeholder with the image's URL.
        return messageRef.update({
          imageUrl: url,
          storageUri: fileSnapshot.metadata.fullPath
        });
      });
    });
  }).catch(function(error) {
    console.error('There was an error uploading a file to Cloud Storage:', error);
  });
}
11. Show notifications
- Firebase Cloud Messaging(FCM)を用いてチャットサイトが(開いていない時でも)メッセージ受信を通知するプッシュ通知を有効にしたい。
- ブラウザのサービスワーカーを使う。
Service Workerというブラウザ技術が使われており、サイトを表示していなくともバックグラウンドでJavaScriptを動作させることが可能になります。これを用いることで、サイトが開かれていないブラウザにもプッシュ通知を配信することが実現できます。
- 原理としては
- ユーザーがブラウザで「プッシュ通知を有効にする」にAllowと答える
- そのブラウザのdevise tokenがuidとともに、Firestoreに送信され、保存される
webアプリ側で、notificationのsenderのFCMのidを設定する
manifest.json
{
  "name": "Friendly Chat",
  "short_name": "Friendly Chat",
  "start_url": "/index.html",
  "display": "standalone",
  "orientation": "portrait",
  "gcm_sender_id": "103953800507" ### FCMのid
}
webブラウザでサービスワーカーを起動する
firebase-messaging-sw.js
importScripts('/__/firebase/6.0.4/firebase-app.js');
importScripts('/__/firebase/6.0.4/firebase-messaging.js');
importScripts('/__/firebase/init.js');

firebase.messaging();
通知の許可をとる、もしとれたら(device_id,uid)をfirestoreに送信する
main.js
// messaging device token(FCM)をdatastoreに送信する
function saveMessagingDeviceToken() {
  // Save the device token in the realtime datastore
  firebase.messaging().getToken().then(function (currentToken) {
    if (currentToken) {
      console.log('Got FCM device token', currentToken);
      // Saving the Device token to the datastore
      firebase.firestore().collection('fcmTokens').doc(currentToken)
        .set({
          uid: firebase.auth().currentUser.uid
        });
    } else {
      // Need to request permissions to show notifications.
      // この中で再びsaveMessagingDeviceToken()を呼び出す
      requestNotificationsPermissions();
    }
  }).catch(function (error) {
    console.error('Unable to get messaging token.', error);
  })
}

// Requests permissions to show notifications.
// 初回は必ず叩かれる
// ここが成功すれば、firebase.messaging().getToken()でトークンが取れる様になる(多分)
function requestNotificationsPermissions() {
  // Request permissions to send notifications.
  console.log('Requesting notifications permission...');
  firebase.messaging().requestPermission().then(function () {
    // Notification permission granted
    saveMessagingDeviceToken();
  }).catch(function (error) {
    console.error('Unable to get permission to notify.', error);
  })
}
これらのFCMのServerKey(Settings>CloudMessagings)とdevise tokenを使って通知を送る(うまくいかなかった)
Cloud Functionを使うことでメッセージが送られたら自動で通知を飛ばすことができる様になる。
curl -H "Content-Type: application/json" \
     -H "Authorization: key=YOUR_SERVER_KEY" \
     -d '{
           "notification": {
             "title": "New chat message!",
             "body": "There is a new message in FriendlyChat",
             "icon": "/images/profile_placeholder.png",
             "click_action": "http://localhost:5000"
           },
           "to": "YOUR_DEVICE_TOKEN"
         }' \
     https://fcm.googleapis.com/fcm/send
12. Cloud Firestore security rules
- 以下の様なルールにした(詳細は読んで確認してください)
service cloud.firestore {
  match /databases/{database}/documents {
    // Messages:
    //   - Anyone can read.
    //   - Authenticated users can add and edit messages.
    //   - Validation: Check name is same as auth token and text length below 300 char or that imageUrl is a URL.
    //   - Deletes are not allowed.
    match /messages/{messageId} {
      allow read;
      allow create, update: if request.auth != null
                    && request.resource.data.name == request.auth.token.name
                    && (request.resource.data.text is string
                      && request.resource.data.text.size() <= 300
                      || request.resource.data.imageUrl is string
                      && request.resource.data.imageUrl.matches('https?://.*'));
      allow delete: if false;
    }
    // FCM Tokens:
    //   - Anyone can write their token.
    //   - Reading list of tokens is not allowed.
    match /fcmTokens/{token} {
      allow read: if false;
      allow write;
    }
  }
}
- FireStore > Database > Rulesでこれをベタがき、でける。が、
- ローカルでfirestore.rulesファイルに上記を書いて、これをfirebase.jsonで読み込ませる旨を設定して、
firebase deploy --only firestoreでもいける。
13. Cloud Storage security rules
- CloudStorageを以下のルールを満たす様にする
- Allow each user to write only to their own specific folders
- Allow anyone to read from Cloud Storage
- Make sure that the files uploaded are images
- Restrict the size of the images that can be uploaded to maximum 5 MB
// Returns true if the uploaded file is an image and its size is below the given number of MB.
function isImageBelowMaxSize(maxSizeMB) {
  return request.resource.size < maxSizeMB * 1024 * 1024
      && request.resource.contentType.matches('image/.*');
}

service firebase.storage {
  match /b/{bucket}/o {
    match /{userId}/{messageId}/{fileName} {
      allow write: if request.auth != null && request.auth.uid == userId && isImageBelowMaxSize(5);
      allow read;
    }
  }
}
(メモ) #10でfile_pathは以下の様に定義した。
firebase.auth().currentUser.uid + '/' + messageRef.id + '/' + file.name
- これをStorage > Rulesからベタうちしてもいいし、
- ローカルでstorage.rulesファイルに上記を書いて、これをfirebase.jsonで読み込ませる旨を設定して、
firebase deploy --only storageでもいける。
14. Collect performance data
15. Deploy your app using Firebase Hosting
- firebase.rulesに
"hosting": {"public": "./public"}という文言を加えて、firebase deploy --except functionsでデプロイ。 - 以下の2つのURLにデプロイされる
- https://.firebaseapp.com
- https://.web.app
