はじめに
この記事は、シスコシステムズ合同会社の同士による Cisco Systems Japan Advent Calendar 2020 の 20 日目として投稿しています。
そもそも Intel OpenVINO™(以下OpenVINO)って何?Cisco とどんな関係があるの?という疑問もあると思いますのでそのあたりも含めてご紹介しようと思います。
この記事でできるようになること
- 機械学習による画像認識の流れがわかる
- Intel OpenVINO™とは何かがわかる
- Intel OpenVINO™の利用方法がわかる
- Intel OpenVINO™を利用して基本的な物体認識ができる
- 物体認識に必要なモデルの利用方法がわかる
- モデルを組み合わせた複合的な物体認識ができる
最終的にこんなことができます
-
カメラからリアルタイムで顔認識
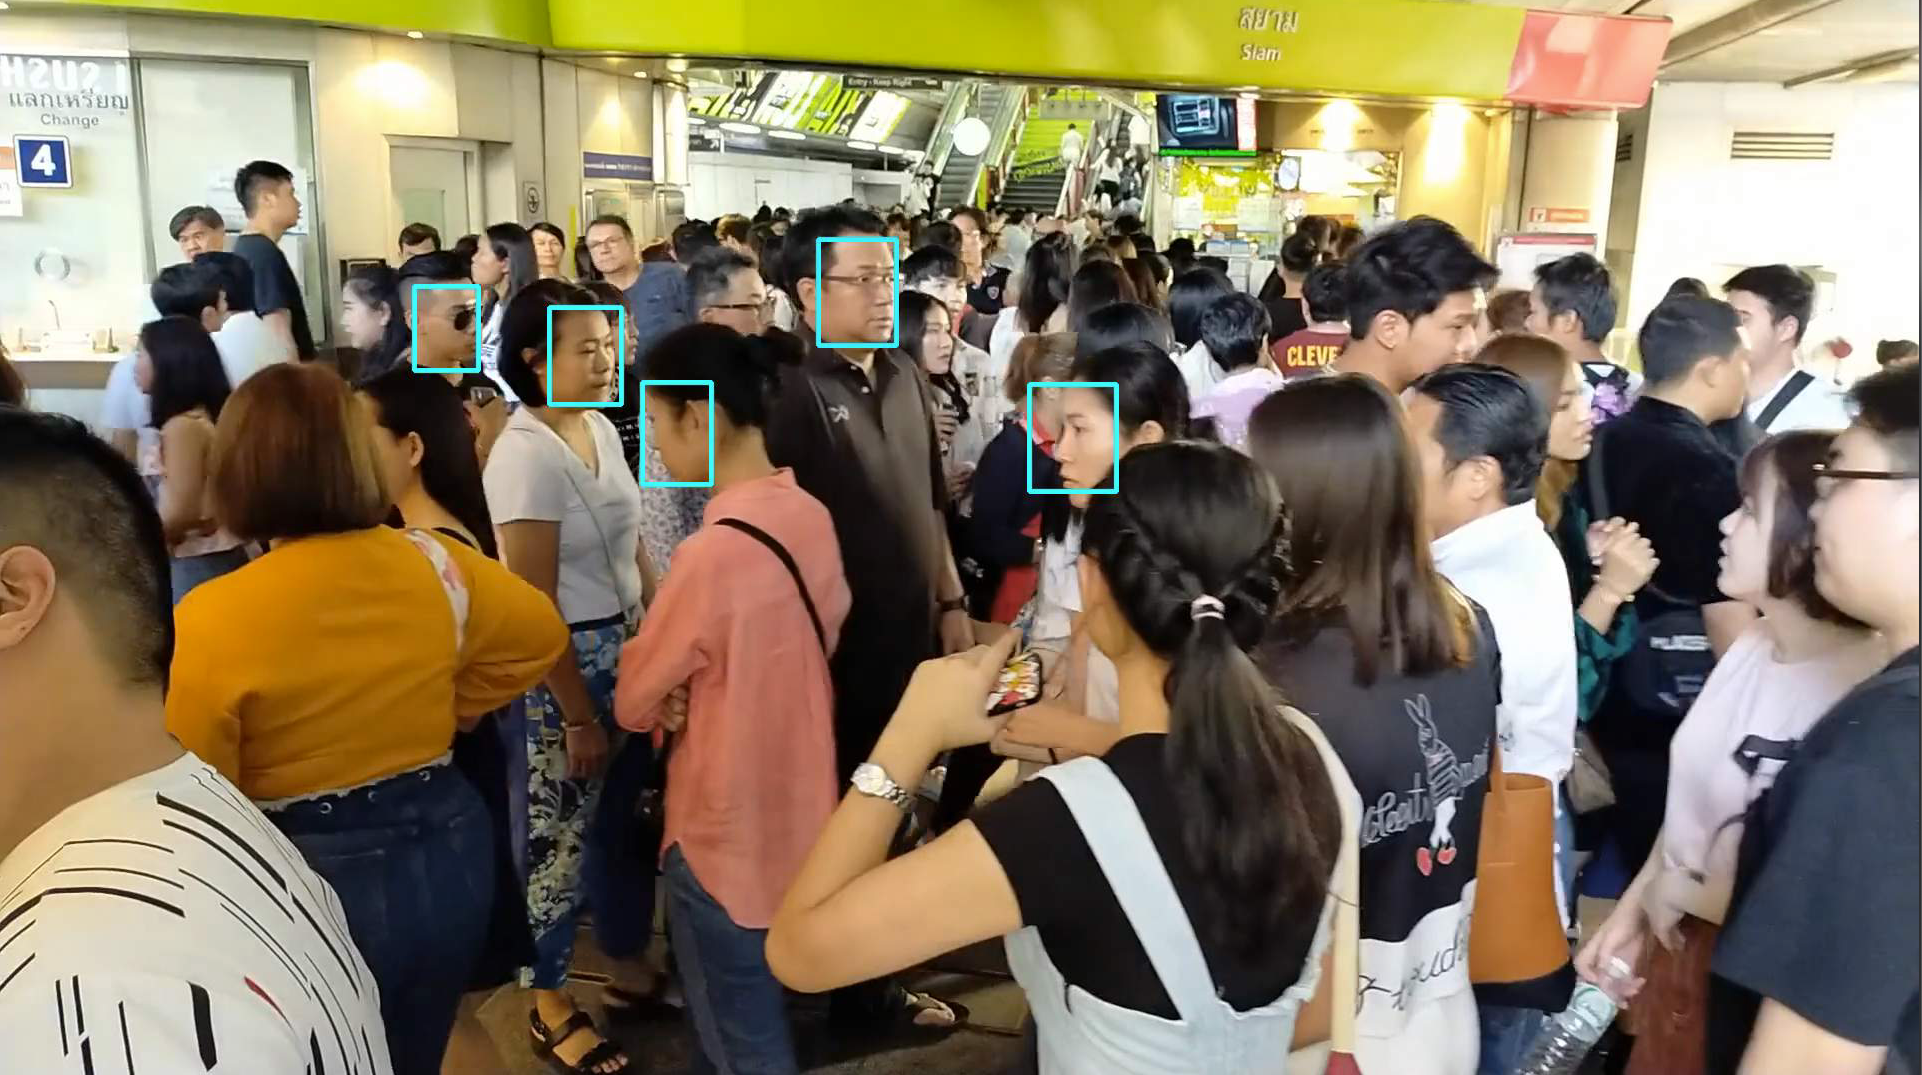
-
カメラからリアルタイムで感情認識

-
上記の二つを組み合わせてリアルタイムな顔と感情認識

Intel OpenVINO™ とは?
公式ページから
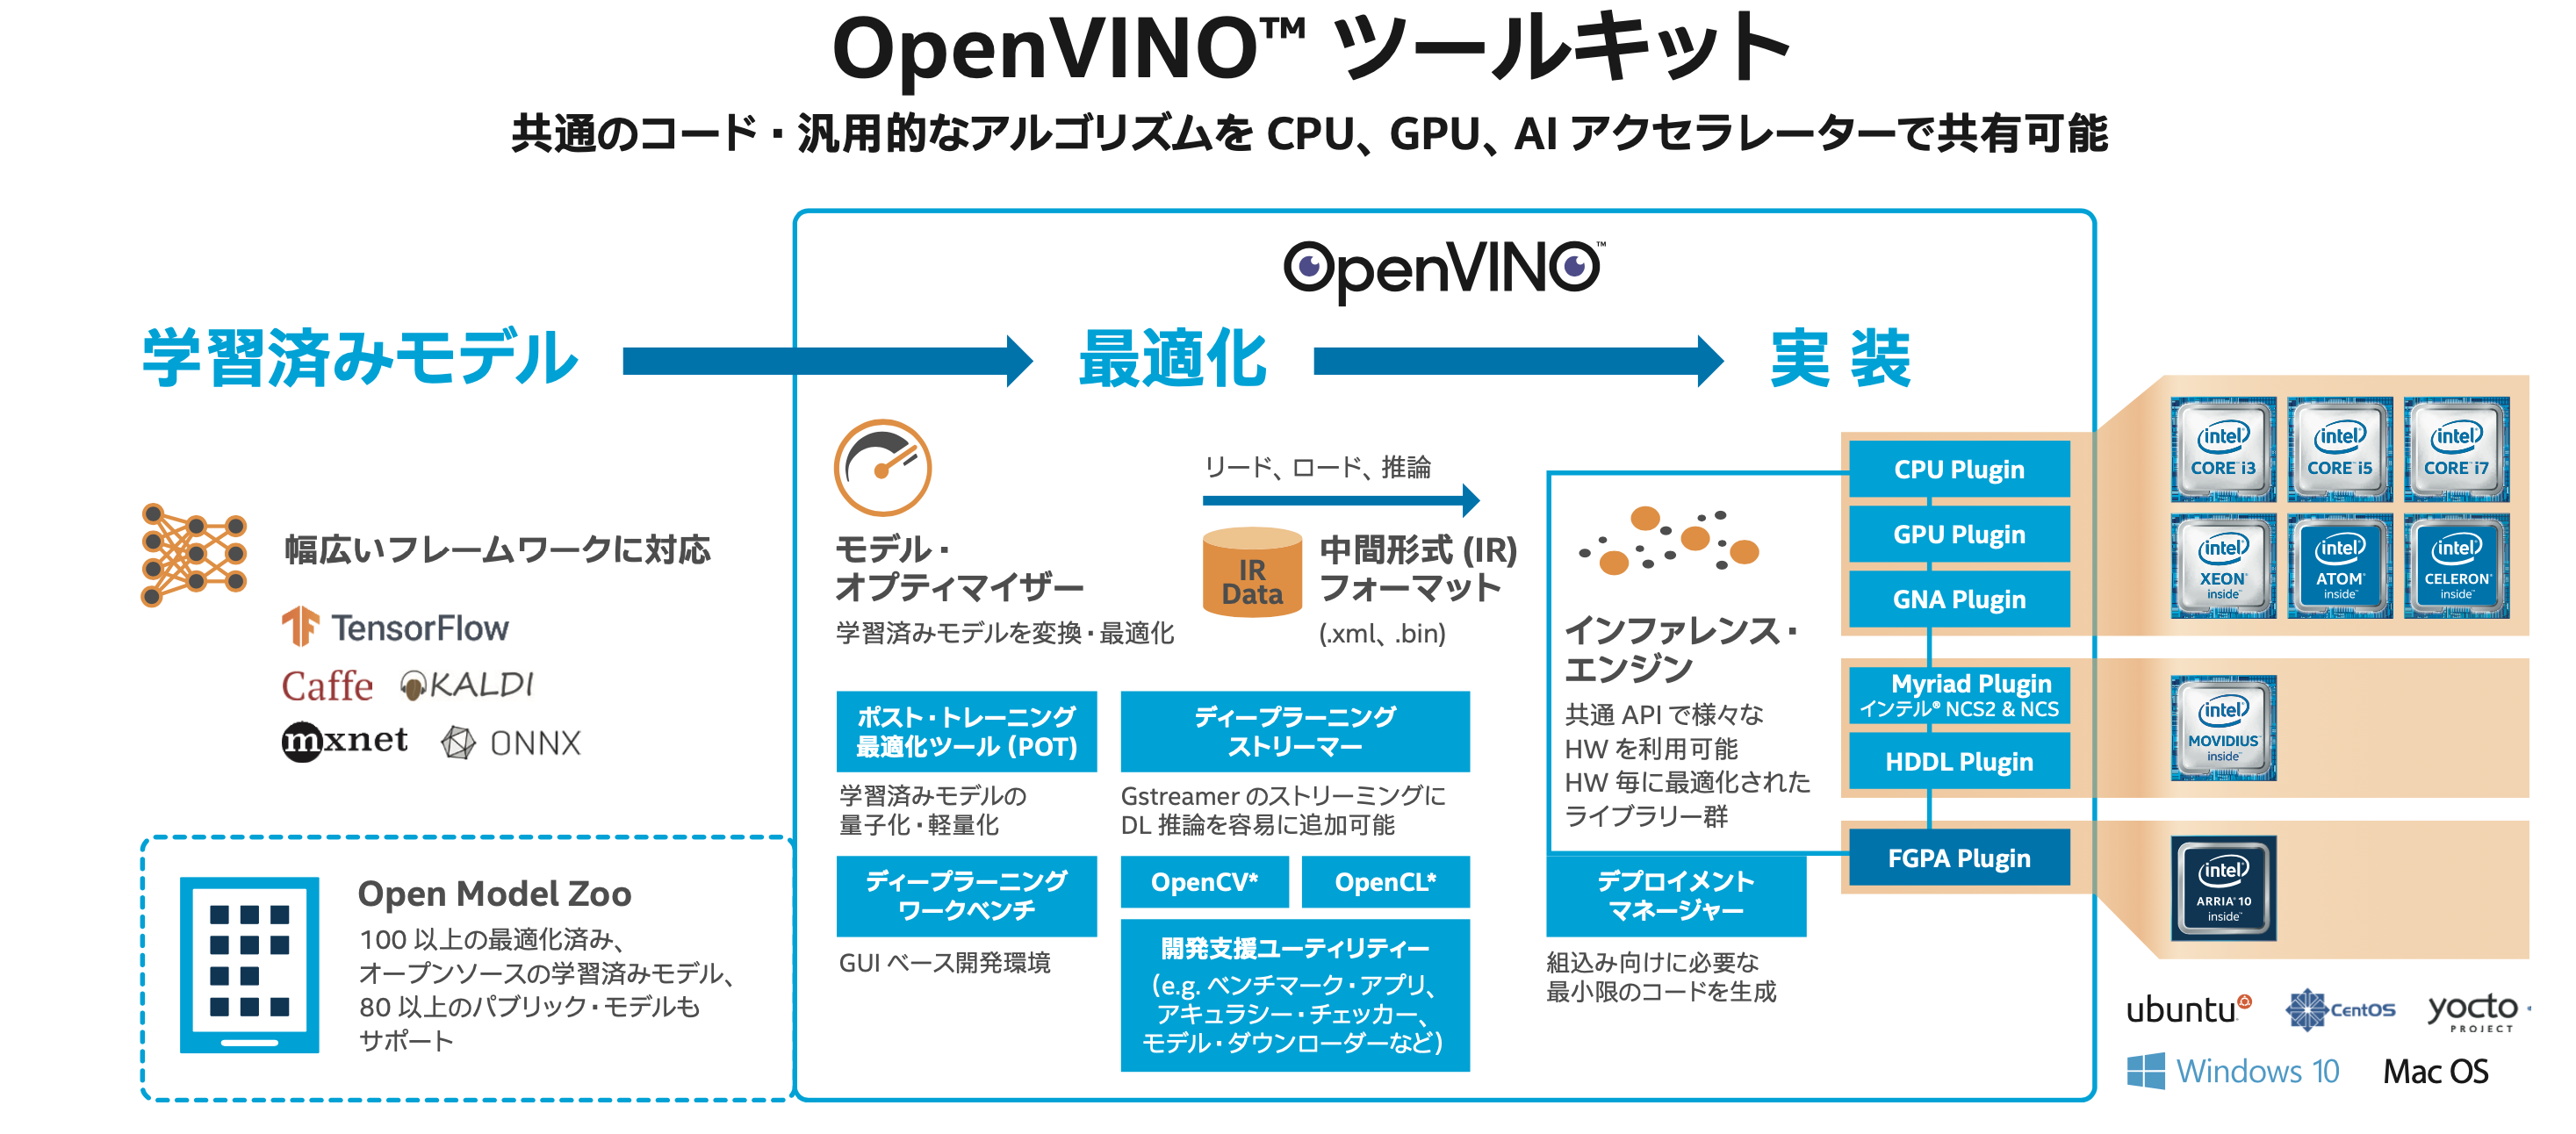
OpenVINO™ ツールキットは、インテル・アーキテクチャーの CPU、内蔵 GPU、インテル® FPGA、インテル® Movidius™ ビジョン・プロセッシング・ユニット (VPU) といった、インテルが 提供するさまざまなハードウェアでディープラーニング推論をより高速に実行するためのソフトウェア開発環境 / ライブラリー・スイートです。
開発者はツールキットに含まれるモデル・オプティマイザーを使用して、業界標準の DL フレームワークで作成した学習済みモデルデータを、さまざまなインテルのハードウェア上で動作するように最適化を行い、OpenVINO™ ツールキットの推論エンジンで使用する中間表現フォーマット (IR) に変換します。推論エンジンは CPU、内蔵 GPU、FPGA、VPU それぞれの性能を最大限に引き出すライブラリーで構成されています。
https://www.intel.co.jp/content/www/jp/ja/internet-of-things/solution-briefs/openvino-toolkit-essential-brief.html
初めての方にはなんのことだろうという感じだと思いますので、詳しく解説していきます。
まず、そもそも機械学習による画像認識とはどういう流れで行われるのでしょうか。
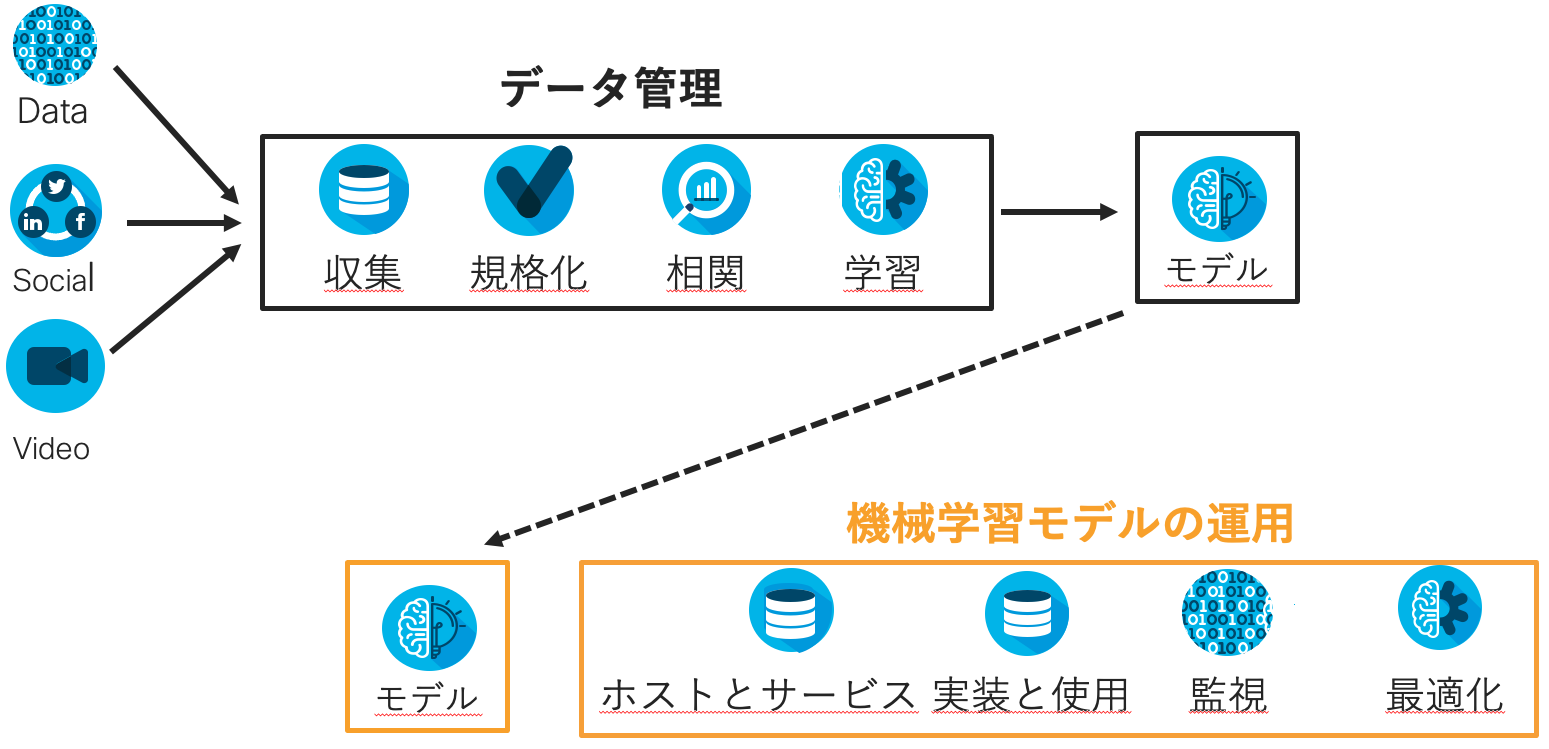
主に機械学習は上記のようにモデルの作成とモデルの運用という部分に分割されます。
そして、実際にこのモデルを使用して推論処理を行うことにより様々なアプリケーションが実装されています。
モデルを作成する際にもCPUやGPUなどのコンピューティングリソースは必要になりますが、学習するときほどではないにせよモデルを使用して推論する際にもコンピューティングリソースは必要になります。これまでは組み込み系のハードウェア、例えば監視カメラなどではコンピューティングリソースの制限などから推論処理をするためにはそれなりの場所と電力が必要でした。こういったことがハードルとなって、推論を利用したアプリケーションの活用が場所・価格・電力など様々な観点から遅れがちになっていました。
Intel OpenVINO™はこうした課題を解決するためのプラットフォームです。
後ほど詳しくご説明いたしますが、機械学習モデル精度をある程度保持したまま単純化することにより、推論精度への影響を最小限にしながら処理負荷を劇的に削減することでCPU, GPU, FPGA, VPUなどIntelの様々なプラットフォーム上で推論処理をさせることが可能となっております。以下のような特徴があります。
特徴
- 非常に多くの機械学習モデルがすぐに利用可能(Open Model ZOO)
- CPU, GPU, FPGA, VPUなど様々なプラットフォームでの動作が可能
- クラウドでの開発環境も提供(Intel DevCloud for the Edge)
- 活用支援のためのトレーニングプログラムが充実
Ciscoとの関連性
Ciscoと画像認識のような機械学習分野はあまり結びつきを持たないイメージをお持ちの方もいらっしゃるかと思います。
あまり馴染みのない製品もあるかとは思いますが、ネットワーク機器だけではなくて以下のような製品群にて機械学習が利用されております。

2020年12月9日、10日で行われたWebexOneというイベントでもWebexの新製品発表が行われましたが、会議のその中にもリアルタイム自動翻訳やコールセンターの音声認識及び機械学習による自動音声応答など様々な分野の製品で機械学習が使用されております。
https://www.webexoneevent.com/
IntelとCiscoとは古くから様々な分野でパートナーシップを結んでいます。最近では2020年11月12日に発表されました「5Gショーケース」のエコパートナー様としてご支援いただいております。
https://www.cisco.com/c/m/ja_jp/5g-showcase.html#~customer-partner
Intel OpenVINO™を利用してみよう
それでは実際にIntel OpenVINO™を使用してみましょう。
OpenVINOを使用した開発環境は主にローカルコンピュータ上で行うものと上述のIntel DevCloud for the Edgeというクラウド上で行うものとがあります。
クラウド上につきましては最後の方で軽く触れますが、Webアプリケーションへの組み込みなど柔軟性の観点から本稿ではローカルコンピュータ上での開発環境を使用致します。
なお、OpenVINOはCPPも利用できますが、本稿では開発言語としてPythonを使用致しますので、Python環境の構築についても触れていきます。
OpenVINO利用の手順は以下の通りとなります。
- Intel Basic Accountの作成
- OpenVINOのダウンロード
- OpenVINOのインストール
- Python実行環境構築
- 任意のエディタでCodeを記述
- 実行及び結果の確認
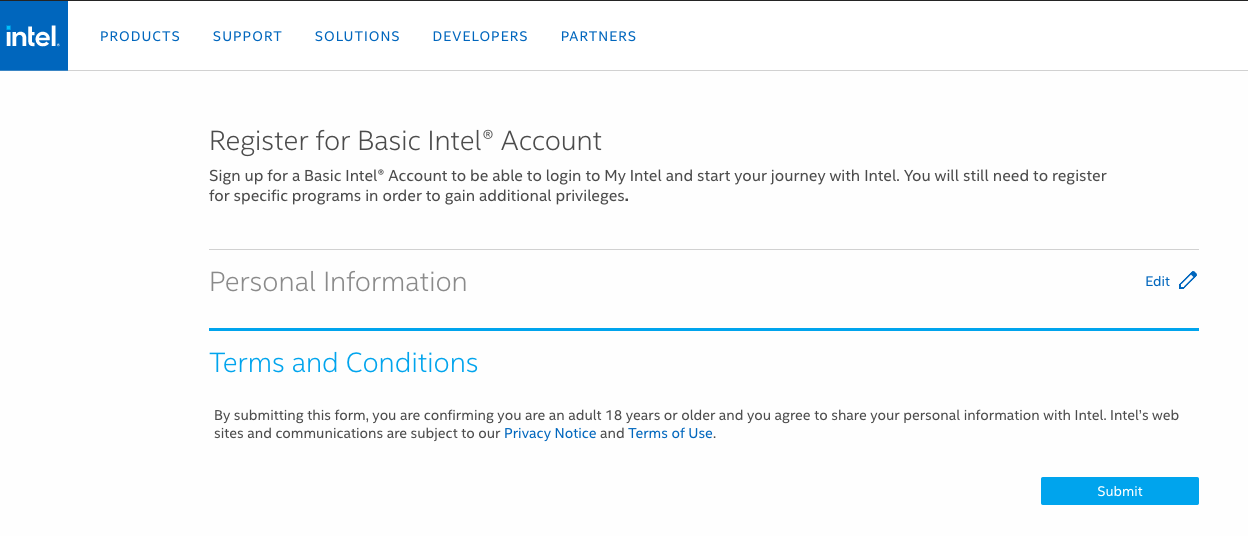
Intel Basic Accountを作成しよう
Register for Basic Intel® Accountにアクセスし、必要情報を入力します。入力する箇所が多いですが、めげないで入力しましょう。
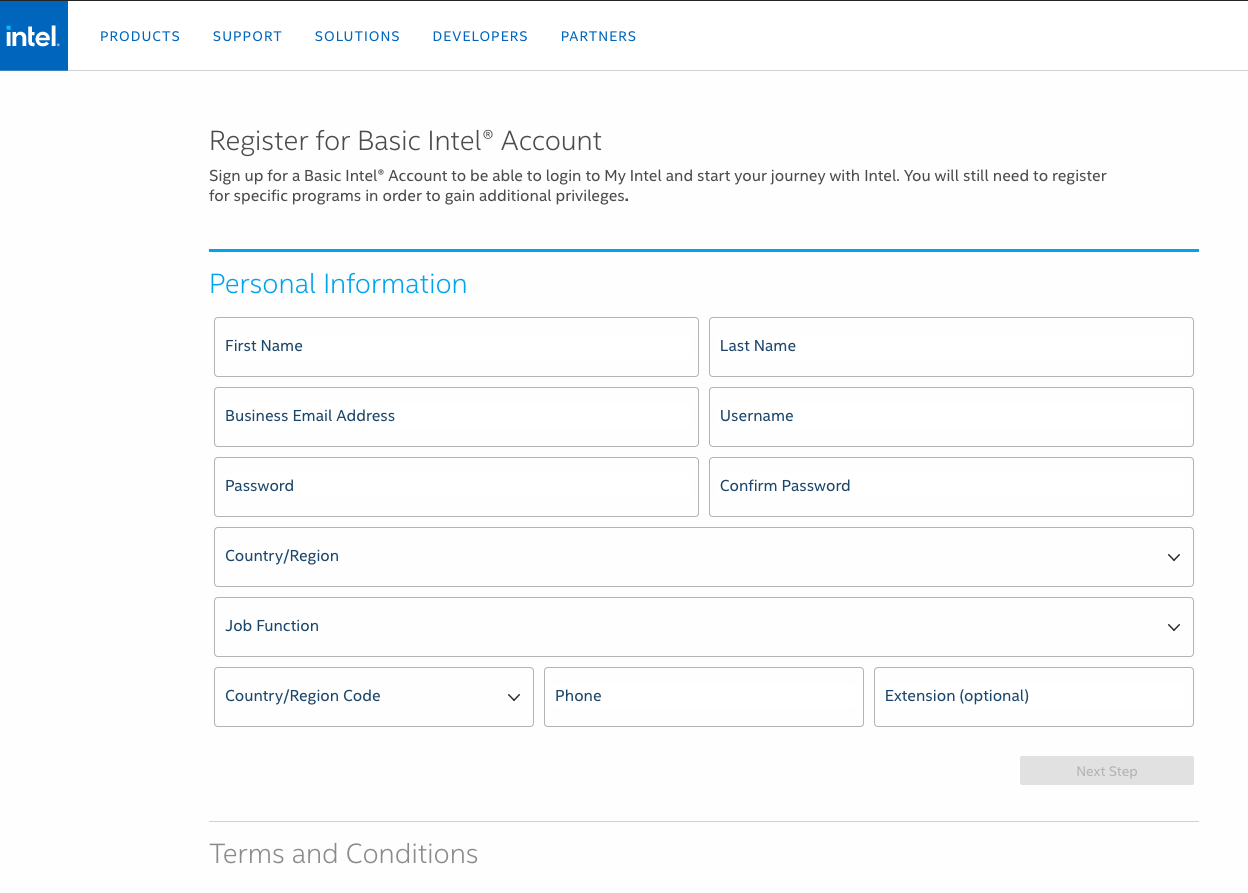
入力したらNext Stepをクリックし、Privacy NoticeとTerms of Useに同意しSubmitをクリック。
OpenVINOのダウンロードをしてみよう
OpenVINO Downloadにアクセスし、ダウンロードする対象を選択します。以下のように選択します。
- Operating System: macOS
- Distribution: Web and Local Install
- Installer Type: Local
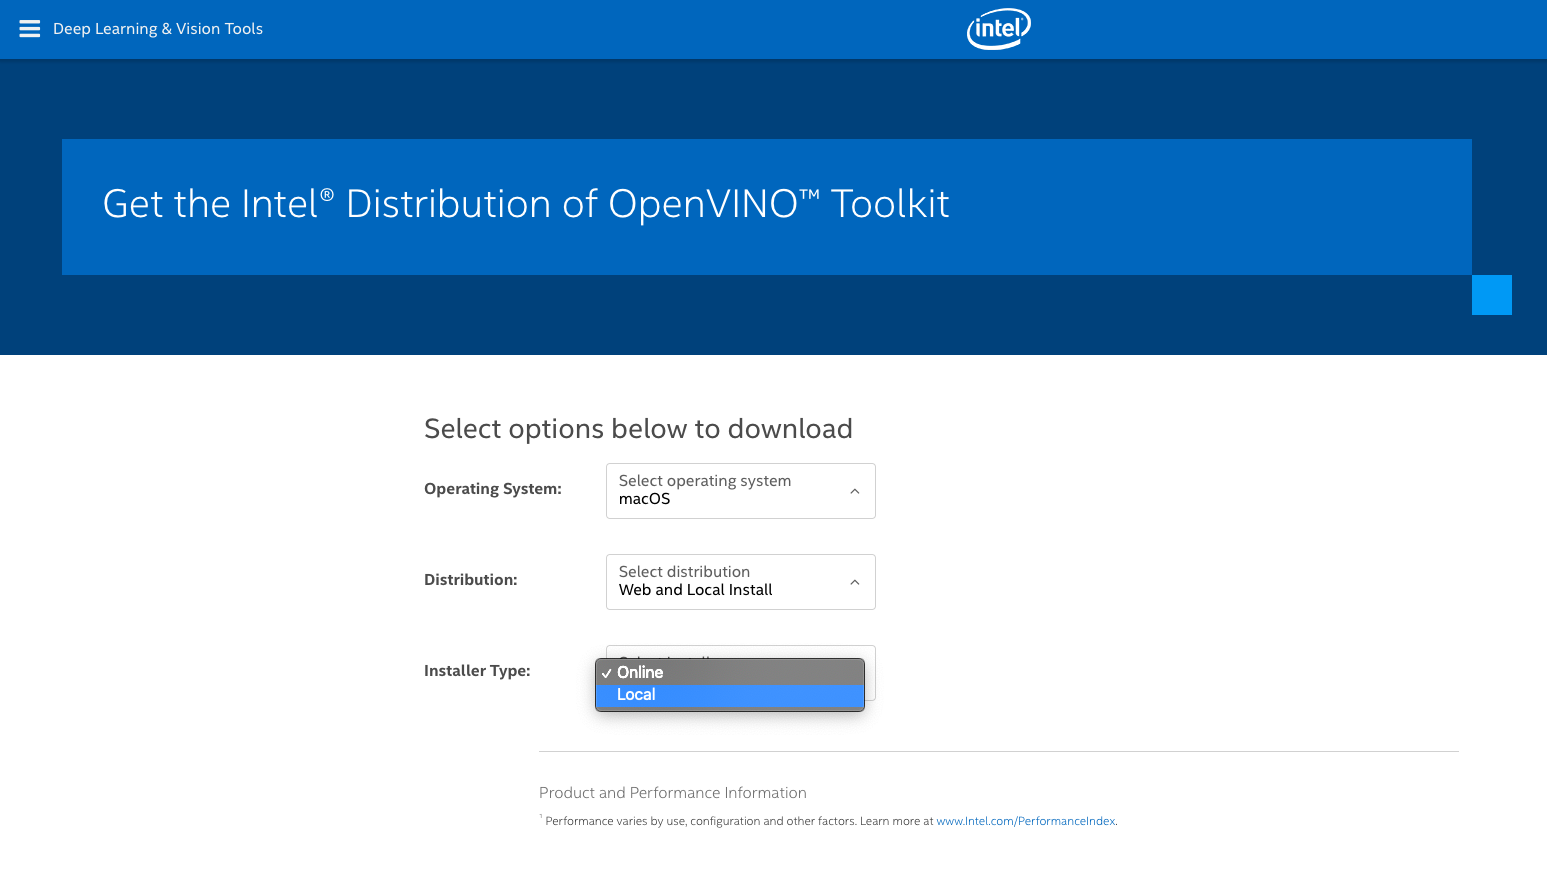
Register & Downloadを選択します。

Choose a Versionは2021.1を選択し、Full Packageを選択します。
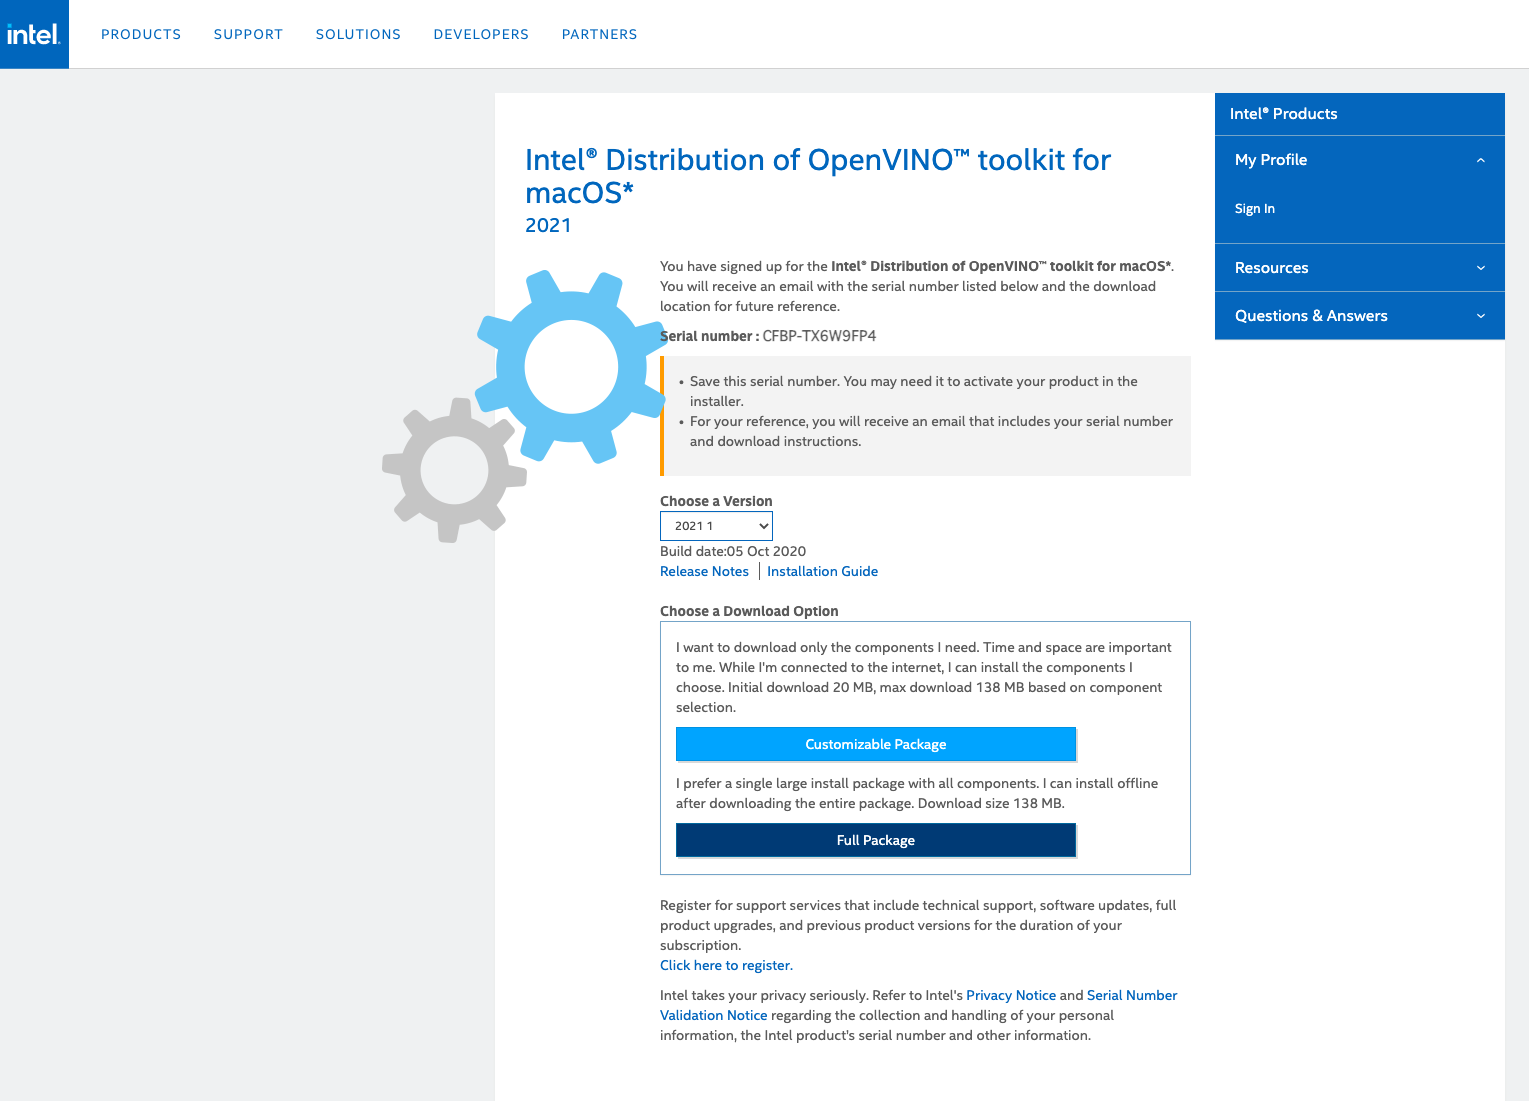
m_openvino_toolkit_p_2021.1.110.dmgというファイルがダウンロードされます。
OpenVINO をインストールしてみよう
インストールの前提条件として以下の要件が必要になります。
一番下のApple Xcode IDEはOptionalです。
- CMake 3.10 or higher
- Python 3.6 - 3.7
- Apple Xcode* Command Line Tools
(Optional) Apple Xcode* IDE (not required for OpenVINO, but useful for development)
インストール時にはCMakeが必要となりますので、homebrewでインストールしておきます。
$ brew install cmake
$ brew install cmake
Updating Homebrew...
Warning: Treating cmake as a formula. For the cask, use homebrew/cask/cmake
==> Downloading https://homebrew.bintray.com/bottles/cmake-3.19.1.catalina.bottle.tar.gz
Already downloaded: /Users/ktsutsum/Library/Caches/Homebrew/downloads/0908e631c8236f534e13e47da5070f8b651b7f59a5a97cd70899729d83baddd3--cmake-3.19.1.catalina.bottle.tar.gz
==> Pouring cmake-3.19.1.catalina.bottle.tar.gz
==> Caveats
Emacs Lisp files have been installed to:
  /usr/local/share/emacs/site-lisp/cmake
==> Summary
🍺  /usr/local/Cellar/cmake/3.19.1: 6,366 files, 63.9MB
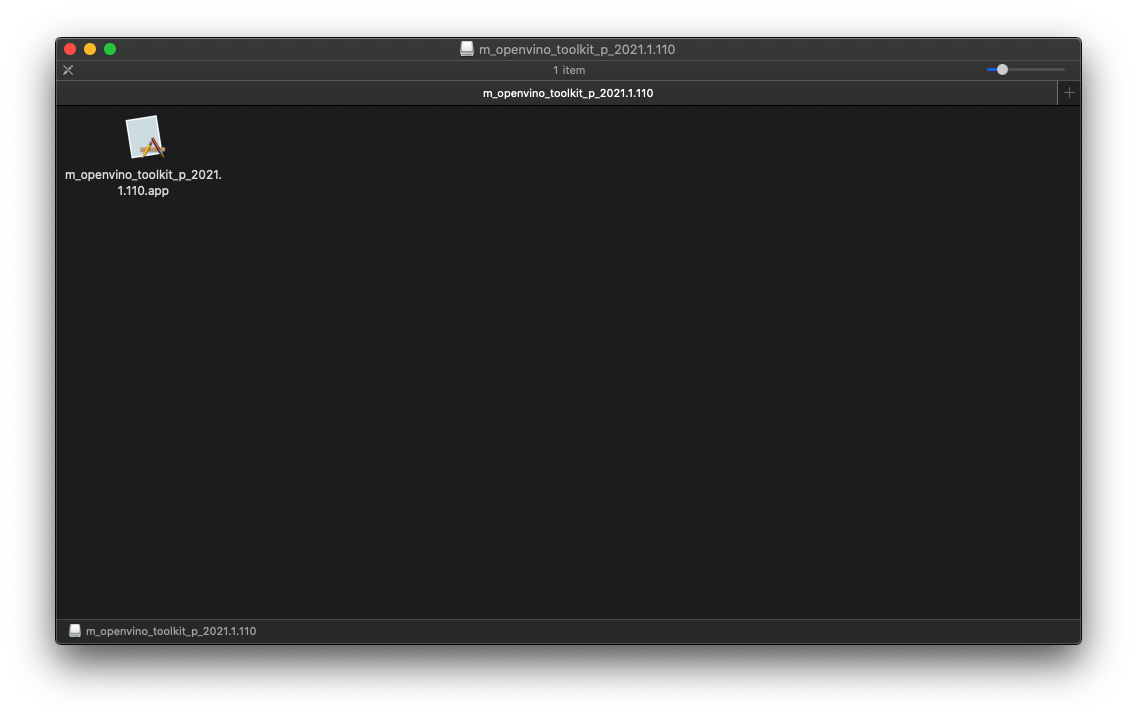
先ほどダウンロードしたm_openvino_toolkit_p_2021.1.110.dmgというファイルをダブルクリックして開きます。
以下のファイルをダブルクリックします。
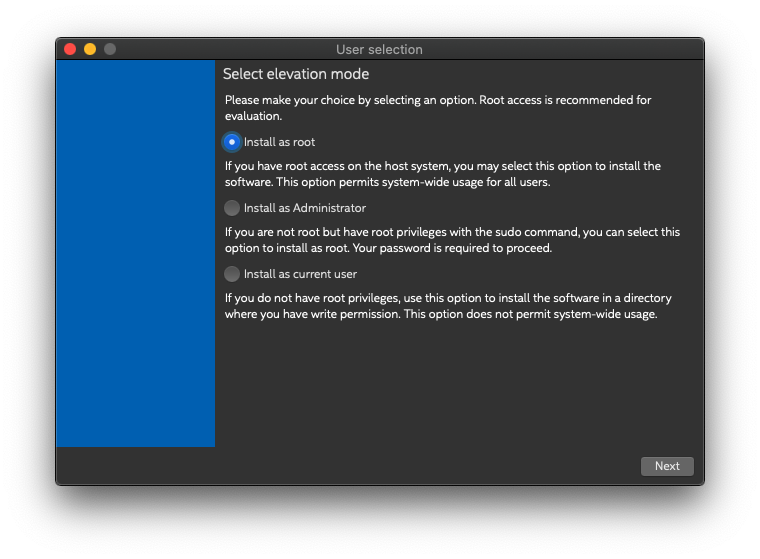
ここではRootとしてインストールしています。
なぜか再度ロゴが表示されます。
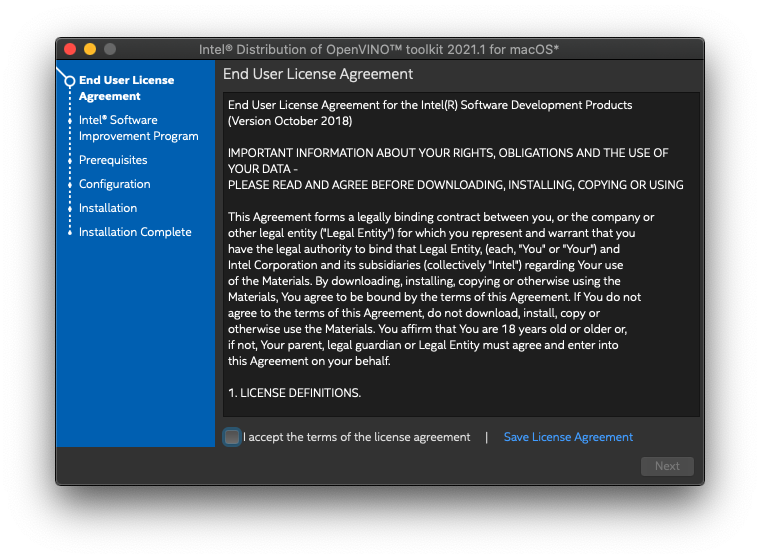
ライセンスに同意します。
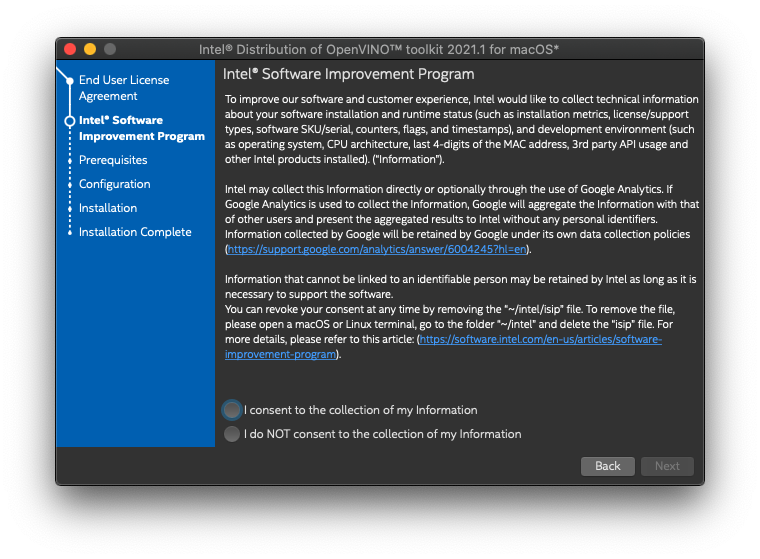
情報提供を選択します。
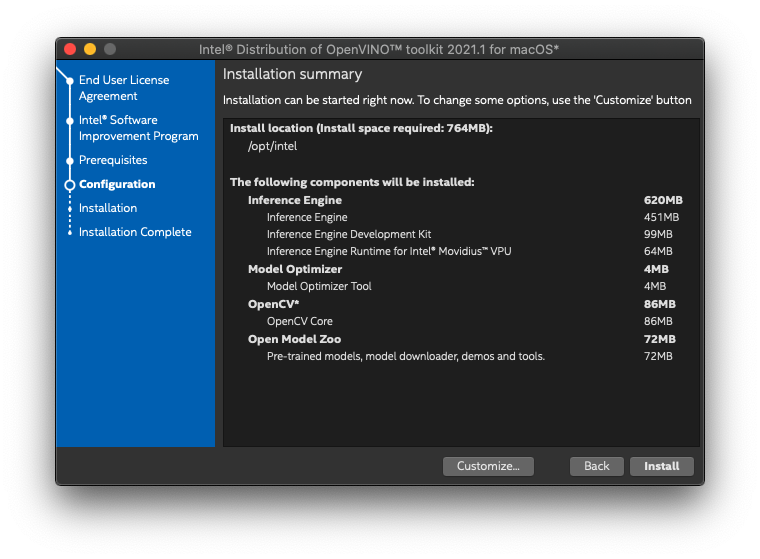
インストール内容を確認します。
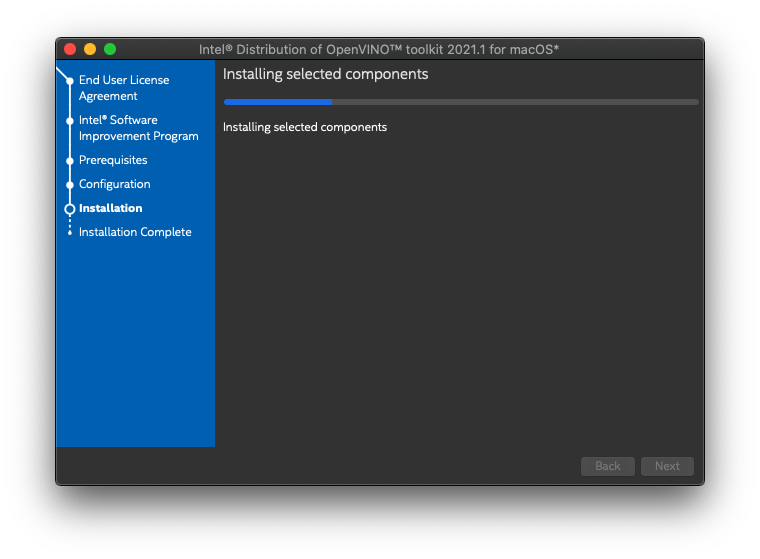
インストールを待ちます。
最初のパートが終わったと表示されます。残りはFinishをクリックするとWebページに飛ばされます。
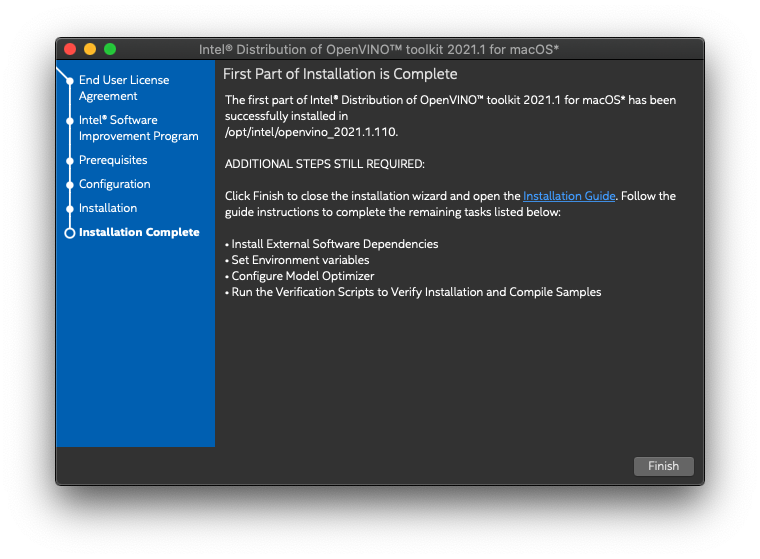
こちらのWebページに飛ばされます。

ここからは次のPython環境セットアップと一緒に進めていきます。
Python実行環境を構築しよう
さて、次はPythonの実行環境を構築していきます。
1. pipenvのインストール
できるだけ環境を汚さないように仮想環境を作成します。仮想環境を作成する方法としてしてはAnacondaやpyenv,viratualenv等色々ありますが、今回は作成したCodeをWebアプリ化&コンテナ化するために必要パッケージをpackage-list.txtとして提示してくれるpipenvを利用します。
いつもどおりbrewでインストールしていきます。
brew brewってなんやねん
macOS対応のパッケージ管理ソフトウェアです。Windowsでも使用できます。以下のリンクにある説明どおりにインストールすると今後も便利かと思います。
https://brew.sh/index_ja
さて、気を取り直してpipenvをインストールしていきます。
$ brew install pipenv
出力結果は長いのでこんな感じです
$ brew install pipenv
Updating Homebrew...
==> Downloading https://homebrew.bintray.com/bottles/openssl%401.1-1.1.1i.catalina.bottle.tar.gz
==> Downloading from https://d29vzk4ow07wi7.cloudfront.net/066b9f114617872e77fa3d4afee2337daabc2c181d7564fe60a5b26d89d69742?response-content-disposition=attachment%3Bfilename%3D%22o
######################################################################## 100.0%
==> Downloading https://homebrew.bintray.com/bottles/readline-8.1.catalina.bottle.tar.gz
==> Downloading from https://d29vzk4ow07wi7.cloudfront.net/fe4de019cf549376a7743dcb0c86db8a08ca2b6d0dd2f8cb796dd7cf973dc2e9?response-content-disposition=attachment%3Bfilename%3D%22r
######################################################################## 100.0%
==> Downloading https://homebrew.bintray.com/bottles/sqlite-3.34.0.catalina.bottle.tar.gz
==> Downloading from https://d29vzk4ow07wi7.cloudfront.net/7e04c1fcd0294ec7625e43eea05714d8bb4d15d24675c99484f1403fdcb438ec?response-content-disposition=attachment%3Bfilename%3D%22s
######################################################################## 100.0%
==> Downloading https://homebrew.bintray.com/bottles/python%403.9-3.9.1.catalina.bottle.tar.gz
==> Downloading from https://d29vzk4ow07wi7.cloudfront.net/2b9946108e230384c48fcb4fcc07febd31e3987a7b9e66ee952e2c4f153a5dee?response-content-disposition=attachment%3Bfilename%3D%22p
######################################################################## 100.0%
==> Downloading https://homebrew.bintray.com/bottles/pipenv-2020.11.15.catalina.bottle.tar.gz
Already downloaded: /Users/ktsutsum/Library/Caches/Homebrew/downloads/eabcd8eb2a82ad7fbdd5f958a38256bd254a0d5fdf059e6217946c1a46fe950d--pipenv-2020.11.15.catalina.bottle.tar.gz
==> Installing dependencies for pipenv: openssl@1.1, readline, sqlite and python@3.9
==> Installing pipenv dependency: openssl@1.1
==> Pouring openssl@1.1-1.1.1i.catalina.bottle.tar.gz
==> Caveats
A CA file has been bootstrapped using certificates from the system
keychain. To add additional certificates, place .pem files in
  /usr/local/etc/openssl@1.1/certs

and run
  /usr/local/opt/openssl@1.1/bin/c_rehash

openssl@1.1 is keg-only, which means it was not symlinked into /usr/local,
because macOS provides LibreSSL.

If you need to have openssl@1.1 first in your PATH run:
  echo 'export PATH="/usr/local/opt/openssl@1.1/bin:$PATH"' >> /Users/ktsutsum/.bash_profile

For compilers to find openssl@1.1 you may need to set:
  export LDFLAGS="-L/usr/local/opt/openssl@1.1/lib"
  export CPPFLAGS="-I/usr/local/opt/openssl@1.1/include"

For pkg-config to find openssl@1.1 you may need to set:
  export PKG_CONFIG_PATH="/usr/local/opt/openssl@1.1/lib/pkgconfig"

==> Summary
🍺  /usr/local/Cellar/openssl@1.1/1.1.1i: 8,067 files, 18.5MB
==> Installing pipenv dependency: readline
==> Pouring readline-8.1.catalina.bottle.tar.gz
==> Caveats
readline is keg-only, which means it was not symlinked into /usr/local,
because macOS provides BSD libedit.

For compilers to find readline you may need to set:
  export LDFLAGS="-L/usr/local/opt/readline/lib"
  export CPPFLAGS="-I/usr/local/opt/readline/include"

For pkg-config to find readline you may need to set:
  export PKG_CONFIG_PATH="/usr/local/opt/readline/lib/pkgconfig"

==> Summary
🍺  /usr/local/Cellar/readline/8.1: 48 files, 1.6MB
==> Installing pipenv dependency: sqlite
==> Pouring sqlite-3.34.0.catalina.bottle.tar.gz
==> Caveats
sqlite is keg-only, which means it was not symlinked into /usr/local,
because macOS already provides this software and installing another version in
parallel can cause all kinds of trouble.

If you need to have sqlite first in your PATH run:
  echo 'export PATH="/usr/local/opt/sqlite/bin:$PATH"' >> /Users/ktsutsum/.bash_profile

For compilers to find sqlite you may need to set:
  export LDFLAGS="-L/usr/local/opt/sqlite/lib"
  export CPPFLAGS="-I/usr/local/opt/sqlite/include"

For pkg-config to find sqlite you may need to set:
  export PKG_CONFIG_PATH="/usr/local/opt/sqlite/lib/pkgconfig"

==> Summary
🍺  /usr/local/Cellar/sqlite/3.34.0: 11 files, 4.1MB
==> Installing pipenv dependency: python@3.9
==> Pouring python@3.9-3.9.1.catalina.bottle.tar.gz
==> /usr/local/Cellar/python@3.9/3.9.1/bin/python3 -s setup.py --no-user-cfg install --force --verbose --install-scripts=/usr/local/Cellar/python@3.9/3.9.1/bin --install-lib=/usr/lo
==> /usr/local/Cellar/python@3.9/3.9.1/bin/python3 -s setup.py --no-user-cfg install --force --verbose --install-scripts=/usr/local/Cellar/python@3.9/3.9.1/bin --install-lib=/usr/lo
==> /usr/local/Cellar/python@3.9/3.9.1/bin/python3 -s setup.py --no-user-cfg install --force --verbose --install-scripts=/usr/local/Cellar/python@3.9/3.9.1/bin --install-lib=/usr/lo
==> Caveats
Python has been installed as
  /usr/local/bin/python3

Unversioned symlinks `python`, `python-config`, `pip` etc. pointing to
`python3`, `python3-config`, `pip3` etc., respectively, have been installed into
  /usr/local/opt/python@3.9/libexec/bin

You can install Python packages with
  pip3 install <package>
They will install into the site-package directory
  /usr/local/lib/python3.9/site-packages

See: https://docs.brew.sh/Homebrew-and-Python
==> Summary
🍺  /usr/local/Cellar/python@3.9/3.9.1: 4,452 files, 70.9MB
==> Installing pipenv
==> Pouring pipenv-2020.11.15.catalina.bottle.tar.gz
==> Caveats
Bash completion has been installed to:
  /usr/local/etc/bash_completion.d
==> Summary
🍺  /usr/local/Cellar/pipenv/2020.11.15: 1,868 files, 25.4MB
==> Upgrading 2 dependents:
poppler 20.11.0 -> 20.12.0, diff-pdf 0.4.1_7 -> 0.4.1_8
==> Upgrading poppler 20.11.0 -> 20.12.0
==> Downloading https://homebrew.bintray.com/bottles/qt-5.15.2.catalina.bottle.tar.gz
==> Downloading from https://d29vzk4ow07wi7.cloudfront.net/51ab78a99ff3498a236d15d9bed92962ddd2499c4020356469f7ab1090cf6825?response-content-disposition=attachment%3Bfilename%3D%22q
######################################################################## 100.0%
==> Downloading https://homebrew.bintray.com/bottles/poppler-20.12.0.catalina.bottle.tar.gz
==> Downloading from https://d29vzk4ow07wi7.cloudfront.net/d89f6b867a6f012f44886b157f35f33179c583af93ace39329e7b62d2482eb31?response-content-disposition=attachment%3Bfilename%3D%22p
######################################################################## 100.0%
==> Installing dependencies for poppler: qt
==> Installing poppler dependency: qt
==> Pouring qt-5.15.2.catalina.bottle.tar.gz
==> Caveats
We agreed to the Qt open source license for you.
If this is unacceptable you should uninstall.

qt is keg-only, which means it was not symlinked into /usr/local,
because Qt 5 has CMake issues when linked.

If you need to have qt first in your PATH run:
  echo 'export PATH="/usr/local/opt/qt/bin:$PATH"' >> /Users/ktsutsum/.bash_profile

For compilers to find qt you may need to set:
  export LDFLAGS="-L/usr/local/opt/qt/lib"
  export CPPFLAGS="-I/usr/local/opt/qt/include"

For pkg-config to find qt you may need to set:
  export PKG_CONFIG_PATH="/usr/local/opt/qt/lib/pkgconfig"

==> Summary
🍺  /usr/local/Cellar/qt/5.15.2: 10,688 files, 367.9MB
==> Installing poppler
==> Pouring poppler-20.12.0.catalina.bottle.tar.gz
🍺  /usr/local/Cellar/poppler/20.12.0: 474 files, 26.8MB
Removing: /usr/local/Cellar/poppler/20.11.0... (476 files, 26.7MB)
Removing: /Users/ktsutsum/Library/Caches/Homebrew/poppler--20.11.0.catalina.bottle.tar.gz... (8.1MB)
==> Upgrading diff-pdf 0.4.1_7 -> 0.4.1_8
==> Downloading https://homebrew.bintray.com/bottles/diff-pdf-0.4.1_8.catalina.bottle.tar.gz
# =#=-#  #
curl: (22) The requested URL returned error: 404 Not Found
Error: Failed to download resource "diff-pdf"
Download failed: https://homebrew.bintray.com/bottles/diff-pdf-0.4.1_8.catalina.bottle.tar.gz
Warning: Bottle installation failed: building from source.
==> Downloading https://homebrew.bintray.com/bottles/automake-1.16.3.catalina.bottle.tar.gz
==> Downloading from https://d29vzk4ow07wi7.cloudfront.net/25fe47e5fb1af734423e1e73f0dc53637e89d825ef8d8199add239352b5b974e?response-content-disposition=attachment%3Bfilename%3D%22a
######################################################################## 100.0%
==> Downloading https://github.com/vslavik/diff-pdf/releases/download/v0.4.1/diff-pdf-0.4.1.tar.gz
==> Downloading from https://github-production-release-asset-2e65be.s3.amazonaws.com/353360/b335c080-3951-11ea-98d4-aa100bba0fcf?X-Amz-Algorithm=AWS4-HMAC-SHA256&X-Amz-Credential=AK
######################################################################## 100.0%
Warning: A newer Command Line Tools release is available.
Update them from Software Update in System Preferences or run:
  softwareupdate --all --install --force

If that doesn't show you an update run:
  sudo rm -rf /Library/Developer/CommandLineTools
  sudo xcode-select --install

Alternatively, manually download them from:
  https://developer.apple.com/download/more/.

==> Installing dependencies for diff-pdf: automake
==> Installing diff-pdf dependency: automake
==> Pouring automake-1.16.3.catalina.bottle.tar.gz
🍺  /usr/local/Cellar/automake/1.16.3: 131 files, 3.4MB
==> Installing diff-pdf
==> ./configure --prefix=/usr/local/Cellar/diff-pdf/0.4.1_8
Last 15 lines from /Users/ktsutsum/Library/Logs/Homebrew/diff-pdf/01.configure:
checking for style of include used by make... GNU
checking dependency style of clang++... none
checking for pkg-config... /usr/local/Homebrew/Library/Homebrew/shims/mac/super/pkg-config
checking pkg-config is at least version 0.9.0... yes
checking for POPPLER... no
configure: error: Package requirements (poppler-cairo >= 0.10 poppler-glib >= 0.10 cairo-pdf) were not met:

No package 'poppler-cairo' found

Consider adjusting the PKG_CONFIG_PATH environment variable if you
installed software in a non-standard prefix.

Alternatively, you may set the environment variables POPPLER_CFLAGS
and POPPLER_LIBS to avoid the need to call pkg-config.
See the pkg-config man page for more details.

READ THIS: https://docs.brew.sh/Troubleshooting

These open issues may also help:
diff-pdf failing to build on macOS 10.15.7 https://github.com/Homebrew/homebrew-core/issues/66385

Error: A newer Command Line Tools release is available.
Update them from Software Update in System Preferences or run:
  softwareupdate --all --install --force

If that doesn't show you an update run:
  sudo rm -rf /Library/Developer/CommandLineTools
  sudo xcode-select --install

Alternatively, manually download them from:
  https://developer.apple.com/download/more/.


==> Checking for dependents of upgraded formulae...
==> No broken dependents to reinstall!
==> Caveats
==> openssl@1.1
A CA file has been bootstrapped using certificates from the system
keychain. To add additional certificates, place .pem files in
  /usr/local/etc/openssl@1.1/certs

and run
  /usr/local/opt/openssl@1.1/bin/c_rehash

openssl@1.1 is keg-only, which means it was not symlinked into /usr/local,
because macOS provides LibreSSL.

If you need to have openssl@1.1 first in your PATH run:
  echo 'export PATH="/usr/local/opt/openssl@1.1/bin:$PATH"' >> /Users/ktsutsum/.bash_profile

For compilers to find openssl@1.1 you may need to set:
  export LDFLAGS="-L/usr/local/opt/openssl@1.1/lib"
  export CPPFLAGS="-I/usr/local/opt/openssl@1.1/include"

For pkg-config to find openssl@1.1 you may need to set:
  export PKG_CONFIG_PATH="/usr/local/opt/openssl@1.1/lib/pkgconfig"

==> readline
readline is keg-only, which means it was not symlinked into /usr/local,
because macOS provides BSD libedit.

For compilers to find readline you may need to set:
  export LDFLAGS="-L/usr/local/opt/readline/lib"
  export CPPFLAGS="-I/usr/local/opt/readline/include"

For pkg-config to find readline you may need to set:
  export PKG_CONFIG_PATH="/usr/local/opt/readline/lib/pkgconfig"

==> sqlite
sqlite is keg-only, which means it was not symlinked into /usr/local,
because macOS already provides this software and installing another version in
parallel can cause all kinds of trouble.

If you need to have sqlite first in your PATH run:
  echo 'export PATH="/usr/local/opt/sqlite/bin:$PATH"' >> /Users/ktsutsum/.bash_profile

For compilers to find sqlite you may need to set:
  export LDFLAGS="-L/usr/local/opt/sqlite/lib"
  export CPPFLAGS="-I/usr/local/opt/sqlite/include"

For pkg-config to find sqlite you may need to set:
  export PKG_CONFIG_PATH="/usr/local/opt/sqlite/lib/pkgconfig"

==> python@3.9
Python has been installed as
  /usr/local/bin/python3

Unversioned symlinks `python`, `python-config`, `pip` etc. pointing to
`python3`, `python3-config`, `pip3` etc., respectively, have been installed into
  /usr/local/opt/python@3.9/libexec/bin

You can install Python packages with
  pip3 install <package>
They will install into the site-package directory
  /usr/local/lib/python3.9/site-packages

See: https://docs.brew.sh/Homebrew-and-Python
==> pipenv
Bash completion has been installed to:
  /usr/local/etc/bash_completion.d
==> qt
We agreed to the Qt open source license for you.
If this is unacceptable you should uninstall.

qt is keg-only, which means it was not symlinked into /usr/local,
because Qt 5 has CMake issues when linked.

If you need to have qt first in your PATH run:
  echo 'export PATH="/usr/local/opt/qt/bin:$PATH"' >> /Users/ktsutsum/.bash_profile

For compilers to find qt you may need to set:
  export LDFLAGS="-L/usr/local/opt/qt/lib"
  export CPPFLAGS="-I/usr/local/opt/qt/include"

For pkg-config to find qt you may need to set:
  export PKG_CONFIG_PATH="/usr/local/opt/qt/lib/pkgconfig"
2. 仮想環境の準備
作業フォルダに移動したら、pipenvでpythonの仮想環境を作成していきます。
以下のような書式でpythonのバージョンを指定します。OpenVINOはpython3.7までの対応のため今回はpython3.7にて環境を作成していきます。
$ pipenv --python 3.7
$ pipenv --python 3.7
Virtualenv already exists!
Removing existing virtualenv...
Warning: the environment variable LANG is not set!
We recommend setting this in ~/.profile (or equivalent) for proper expected behavior.
Creating a virtualenv for this project...
Pipfile: /Users/ktsutsum/openvino/demos/Pipfile
Using /usr/bin/python3 (3.7.3) to create virtualenv...
⠇ Creating virtual environment...created virtual environment CPython3.7.3.final.0-64 in 458ms
  creator CPython3macOsFramework(dest=/Users/ktsutsum/.local/share/virtualenvs/demos-UH30-bME, clear=False, global=False)
  seeder FromAppData(download=False, pip=bundle, setuptools=bundle, wheel=bundle, via=copy, app_data_dir=/Users/ktsutsum/Library/Application Support/virtualenv)
    added seed packages: pip==20.2.4, setuptools==50.3.2, wheel==0.35.1
  activators BashActivator,CShellActivator,FishActivator,PowerShellActivator,PythonActivator,XonshActivator

✔ Successfully created virtual environment!
Virtualenv location: /Users/ktsutsum/.local/share/virtualenvs/demos-UH30-bME
3. 仮想環境を使用してOpenVINOインストールの続き
仮想環境利用してOpenVINOの残りのセットアップを進めていきましょう。
まず先ほど作成した仮想環境のShellに入ります。
$ pipenv shell
https://docs.openvinotoolkit.org/latest/openvino_docs_install_guides_installing_openvino_macos.html
OpenVINOインストール続きはこちらのページをご参照いただきながら進め行ければと思います。
環境変数をSourceします。
(demos) bash-3.2$ source /opt/intel/openvino_2021/bin/setupvars.sh
[setupvars.sh] OpenVINO environment initialized
Model Optimizerのインストールに必要なパッケージを事前にインストールします。
(demos) bash-3.2$ cd /opt/intel/openvino_2021/deployment_tools/model_optimizer/install_prerequisites
(demos) bash-3.2$ sudo ./install_prerequisites.sh
WARNING: The directory '/Users/ktsutsum/Library/Caches/pip' or its parent directory is not owned or is not writable by the current user. The cache has been disabled. Check the permissions and owner of that directory. If executing pip with sudo, you may want sudo's -H flag.
Ignoring tensorflow: markers 'python_version >= "3.8"' don't match your environment
Requirement already satisfied: tensorflow<2.0,>=1.15.2 in /Users/ktsutsum/.local/share/virtualenvs/demos-UH30-bME/lib/python3.7/site-packages (from -r /opt/intel/openvino_2021.1.110/deployment_tools/model_optimizer/install_prerequisites/../requirements.txt (line 1)) (1.15.4)
Requirement already satisfied: mxnet<=1.5.1,>=1.0.0 in /Users/ktsutsum/.local/share/virtualenvs/demos-UH30-bME/lib/python3.7/site-packages (from -r /opt/intel/openvino_2021.1.110/deployment_tools/model_optimizer/install_prerequisites/../requirements.txt (line 3)) (1.5.1)
Requirement already satisfied: networkx>=1.11 in /Users/ktsutsum/.local/share/virtualenvs/demos-UH30-bME/lib/python3.7/site-packages (from -r /opt/intel/openvino_2021.1.110/deployment_tools/model_optimizer/install_prerequisites/../requirements.txt (line 4)) (2.5)
Requirement already satisfied: numpy>=1.13.0 in /Users/ktsutsum/.local/share/virtualenvs/demos-UH30-bME/lib/python3.7/site-packages (from -r /opt/intel/openvino_2021.1.110/deployment_tools/model_optimizer/install_prerequisites/../requirements.txt (line 5)) (1.19.4)
Requirement already satisfied: protobuf>=3.6.1 in /Users/ktsutsum/.local/share/virtualenvs/demos-UH30-bME/lib/python3.7/site-packages (from -r /opt/intel/openvino_2021.1.110/deployment_tools/model_optimizer/install_prerequisites/../requirements.txt (line 6)) (3.14.0)
Requirement already satisfied: onnx>=1.1.2 in /Users/ktsutsum/.local/share/virtualenvs/demos-UH30-bME/lib/python3.7/site-packages (from -r /opt/intel/openvino_2021.1.110/deployment_tools/model_optimizer/install_prerequisites/../requirements.txt (line 7)) (1.8.0)
Requirement already satisfied: test-generator==0.1.1 in /Users/ktsutsum/.local/share/virtualenvs/demos-UH30-bME/lib/python3.7/site-packages (from -r /opt/intel/openvino_2021.1.110/deployment_tools/model_optimizer/install_prerequisites/../requirements.txt (line 8)) (0.1.1)
Requirement already satisfied: defusedxml>=0.5.0 in /Users/ktsutsum/.local/share/virtualenvs/demos-UH30-bME/lib/python3.7/site-packages (from -r /opt/intel/openvino_2021.1.110/deployment_tools/model_optimizer/install_prerequisites/../requirements.txt (line 9)) (0.6.0)
Requirement already satisfied: six in /Users/ktsutsum/.local/share/virtualenvs/demos-UH30-bME/lib/python3.7/site-packages (from test-generator==0.1.1->-r /opt/intel/openvino_2021.1.110/deployment_tools/model_optimizer/install_prerequisites/../requirements.txt (line 8)) (1.15.0)
Requirement already satisfied: requests<3,>=2.20.0 in /Users/ktsutsum/.local/share/virtualenvs/demos-UH30-bME/lib/python3.7/site-packages (from mxnet<=1.5.1,>=1.0.0->-r /opt/intel/openvino_2021.1.110/deployment_tools/model_optimizer/install_prerequisites/../requirements.txt (line 3)) (2.25.0)
Requirement already satisfied: graphviz<0.9.0,>=0.8.1 in /Users/ktsutsum/.local/share/virtualenvs/demos-UH30-bME/lib/python3.7/site-packages (from mxnet<=1.5.1,>=1.0.0->-r /opt/intel/openvino_2021.1.110/deployment_tools/model_optimizer/install_prerequisites/../requirements.txt (line 3)) (0.8.4)
Requirement already satisfied: decorator>=4.3.0 in /Users/ktsutsum/.local/share/virtualenvs/demos-UH30-bME/lib/python3.7/site-packages (from networkx>=1.11->-r /opt/intel/openvino_2021.1.110/deployment_tools/model_optimizer/install_prerequisites/../requirements.txt (line 4)) (4.4.2)
Requirement already satisfied: typing-extensions>=3.6.2.1 in /Users/ktsutsum/.local/share/virtualenvs/demos-UH30-bME/lib/python3.7/site-packages (from onnx>=1.1.2->-r /opt/intel/openvino_2021.1.110/deployment_tools/model_optimizer/install_prerequisites/../requirements.txt (line 7)) (3.7.4.3)
Requirement already satisfied: astor>=0.6.0 in /Users/ktsutsum/.local/share/virtualenvs/demos-UH30-bME/lib/python3.7/site-packages (from tensorflow<2.0,>=1.15.2->-r /opt/intel/openvino_2021.1.110/deployment_tools/model_optimizer/install_prerequisites/../requirements.txt (line 1)) (0.8.1)
Requirement already satisfied: wrapt>=1.11.1 in /Users/ktsutsum/.local/share/virtualenvs/demos-UH30-bME/lib/python3.7/site-packages (from tensorflow<2.0,>=1.15.2->-r /opt/intel/openvino_2021.1.110/deployment_tools/model_optimizer/install_prerequisites/../requirements.txt (line 1)) (1.12.1)
Requirement already satisfied: tensorflow-estimator==1.15.1 in /Users/ktsutsum/.local/share/virtualenvs/demos-UH30-bME/lib/python3.7/site-packages (from tensorflow<2.0,>=1.15.2->-r /opt/intel/openvino_2021.1.110/deployment_tools/model_optimizer/install_prerequisites/../requirements.txt (line 1)) (1.15.1)
Requirement already satisfied: termcolor>=1.1.0 in /Users/ktsutsum/.local/share/virtualenvs/demos-UH30-bME/lib/python3.7/site-packages (from tensorflow<2.0,>=1.15.2->-r /opt/intel/openvino_2021.1.110/deployment_tools/model_optimizer/install_prerequisites/../requirements.txt (line 1)) (1.1.0)
Requirement already satisfied: google-pasta>=0.1.6 in /Users/ktsutsum/.local/share/virtualenvs/demos-UH30-bME/lib/python3.7/site-packages (from tensorflow<2.0,>=1.15.2->-r /opt/intel/openvino_2021.1.110/deployment_tools/model_optimizer/install_prerequisites/../requirements.txt (line 1)) (0.2.0)
Requirement already satisfied: keras-preprocessing>=1.0.5 in /Users/ktsutsum/.local/share/virtualenvs/demos-UH30-bME/lib/python3.7/site-packages (from tensorflow<2.0,>=1.15.2->-r /opt/intel/openvino_2021.1.110/deployment_tools/model_optimizer/install_prerequisites/../requirements.txt (line 1)) (1.1.2)
Requirement already satisfied: tensorboard<1.16.0,>=1.15.0 in /Users/ktsutsum/.local/share/virtualenvs/demos-UH30-bME/lib/python3.7/site-packages (from tensorflow<2.0,>=1.15.2->-r /opt/intel/openvino_2021.1.110/deployment_tools/model_optimizer/install_prerequisites/../requirements.txt (line 1)) (1.15.0)
Requirement already satisfied: grpcio>=1.8.6 in /Users/ktsutsum/.local/share/virtualenvs/demos-UH30-bME/lib/python3.7/site-packages (from tensorflow<2.0,>=1.15.2->-r /opt/intel/openvino_2021.1.110/deployment_tools/model_optimizer/install_prerequisites/../requirements.txt (line 1)) (1.34.0)
Requirement already satisfied: absl-py>=0.7.0 in /Users/ktsutsum/.local/share/virtualenvs/demos-UH30-bME/lib/python3.7/site-packages (from tensorflow<2.0,>=1.15.2->-r /opt/intel/openvino_2021.1.110/deployment_tools/model_optimizer/install_prerequisites/../requirements.txt (line 1)) (0.11.0)
Requirement already satisfied: gast==0.2.2 in /Users/ktsutsum/.local/share/virtualenvs/demos-UH30-bME/lib/python3.7/site-packages (from tensorflow<2.0,>=1.15.2->-r /opt/intel/openvino_2021.1.110/deployment_tools/model_optimizer/install_prerequisites/../requirements.txt (line 1)) (0.2.2)
Requirement already satisfied: opt-einsum>=2.3.2 in /Users/ktsutsum/.local/share/virtualenvs/demos-UH30-bME/lib/python3.7/site-packages (from tensorflow<2.0,>=1.15.2->-r /opt/intel/openvino_2021.1.110/deployment_tools/model_optimizer/install_prerequisites/../requirements.txt (line 1)) (3.3.0)
Requirement already satisfied: wheel>=0.26 in /Users/ktsutsum/.local/share/virtualenvs/demos-UH30-bME/lib/python3.7/site-packages (from tensorflow<2.0,>=1.15.2->-r /opt/intel/openvino_2021.1.110/deployment_tools/model_optimizer/install_prerequisites/../requirements.txt (line 1)) (0.35.1)
Requirement already satisfied: keras-applications>=1.0.8 in /Users/ktsutsum/.local/share/virtualenvs/demos-UH30-bME/lib/python3.7/site-packages (from tensorflow<2.0,>=1.15.2->-r /opt/intel/openvino_2021.1.110/deployment_tools/model_optimizer/install_prerequisites/../requirements.txt (line 1)) (1.0.8)
Collecting numpy>=1.13.0
  Downloading numpy-1.18.5-cp37-cp37m-macosx_10_9_x86_64.whl (15.1 MB)
     |████████████████████████████████| 15.1 MB 2.3 MB/s
Requirement already satisfied: h5py in /Users/ktsutsum/.local/share/virtualenvs/demos-UH30-bME/lib/python3.7/site-packages (from keras-applications>=1.0.8->tensorflow<2.0,>=1.15.2->-r /opt/intel/openvino_2021.1.110/deployment_tools/model_optimizer/install_prerequisites/../requirements.txt (line 1)) (3.1.0)
Requirement already satisfied: idna<3,>=2.5 in /Users/ktsutsum/.local/share/virtualenvs/demos-UH30-bME/lib/python3.7/site-packages (from requests<3,>=2.20.0->mxnet<=1.5.1,>=1.0.0->-r /opt/intel/openvino_2021.1.110/deployment_tools/model_optimizer/install_prerequisites/../requirements.txt (line 3)) (2.10)
Requirement already satisfied: urllib3<1.27,>=1.21.1 in /Users/ktsutsum/.local/share/virtualenvs/demos-UH30-bME/lib/python3.7/site-packages (from requests<3,>=2.20.0->mxnet<=1.5.1,>=1.0.0->-r /opt/intel/openvino_2021.1.110/deployment_tools/model_optimizer/install_prerequisites/../requirements.txt (line 3)) (1.26.2)
Requirement already satisfied: certifi>=2017.4.17 in /Users/ktsutsum/.local/share/virtualenvs/demos-UH30-bME/lib/python3.7/site-packages (from requests<3,>=2.20.0->mxnet<=1.5.1,>=1.0.0->-r /opt/intel/openvino_2021.1.110/deployment_tools/model_optimizer/install_prerequisites/../requirements.txt (line 3)) (2020.12.5)
Requirement already satisfied: chardet<4,>=3.0.2 in /Users/ktsutsum/.local/share/virtualenvs/demos-UH30-bME/lib/python3.7/site-packages (from requests<3,>=2.20.0->mxnet<=1.5.1,>=1.0.0->-r /opt/intel/openvino_2021.1.110/deployment_tools/model_optimizer/install_prerequisites/../requirements.txt (line 3)) (3.0.4)
Requirement already satisfied: markdown>=2.6.8 in /Users/ktsutsum/.local/share/virtualenvs/demos-UH30-bME/lib/python3.7/site-packages (from tensorboard<1.16.0,>=1.15.0->tensorflow<2.0,>=1.15.2->-r /opt/intel/openvino_2021.1.110/deployment_tools/model_optimizer/install_prerequisites/../requirements.txt (line 1)) (3.3.3)
Requirement already satisfied: setuptools>=41.0.0 in /Users/ktsutsum/.local/share/virtualenvs/demos-UH30-bME/lib/python3.7/site-packages (from tensorboard<1.16.0,>=1.15.0->tensorflow<2.0,>=1.15.2->-r /opt/intel/openvino_2021.1.110/deployment_tools/model_optimizer/install_prerequisites/../requirements.txt (line 1)) (50.3.2)
Requirement already satisfied: werkzeug>=0.11.15 in /Users/ktsutsum/.local/share/virtualenvs/demos-UH30-bME/lib/python3.7/site-packages (from tensorboard<1.16.0,>=1.15.0->tensorflow<2.0,>=1.15.2->-r /opt/intel/openvino_2021.1.110/deployment_tools/model_optimizer/install_prerequisites/../requirements.txt (line 1)) (1.0.1)
Requirement already satisfied: importlib-metadata in /Users/ktsutsum/.local/share/virtualenvs/demos-UH30-bME/lib/python3.7/site-packages (from markdown>=2.6.8->tensorboard<1.16.0,>=1.15.0->tensorflow<2.0,>=1.15.2->-r /opt/intel/openvino_2021.1.110/deployment_tools/model_optimizer/install_prerequisites/../requirements.txt (line 1)) (3.3.0)
Requirement already satisfied: cached-property in /Users/ktsutsum/.local/share/virtualenvs/demos-UH30-bME/lib/python3.7/site-packages (from h5py->keras-applications>=1.0.8->tensorflow<2.0,>=1.15.2->-r /opt/intel/openvino_2021.1.110/deployment_tools/model_optimizer/install_prerequisites/../requirements.txt (line 1)) (1.5.2)
Requirement already satisfied: zipp>=0.5 in /Users/ktsutsum/.local/share/virtualenvs/demos-UH30-bME/lib/python3.7/site-packages (from importlib-metadata->markdown>=2.6.8->tensorboard<1.16.0,>=1.15.0->tensorflow<2.0,>=1.15.2->-r /opt/intel/openvino_2021.1.110/deployment_tools/model_optimizer/install_prerequisites/../requirements.txt (line 1)) (3.4.0)
Installing collected packages: numpy
  Attempting uninstall: numpy
    Found existing installation: numpy 1.19.4
    Uninstalling numpy-1.19.4:
      Successfully uninstalled numpy-1.19.4
Successfully installed numpy-1.18.5
[WARNING] All Model Optimizer dependencies are installed globally.
[WARNING] If you want to keep Model Optimizer in separate sandbox
[WARNING] run install_prerequisites.sh venv {caffe|tf|tf2|mxnet|kaldi|onnx}
こちらで仮想環境の構築とOpenVINOインストールは完了です。
実際に Code を書いてみよう
それでは実際にCodeを書いていきましょう。
今回使用するモジュールは以下のとおりです。はじめにこれらをImportします。
エディタはお好きなものを利用して良いと思います。私は普通にvimを使っています。
| 名称 | 概要 |
|---|---|
| openvino | OpenVINO本体 |
| Numpy | Pythonの数値計算を行うライブラリ |
| Sys | Python のインタプリタや実行環境に関連 |
# 必要なモジュール、ライブラリをインポート
import cv2
import numpy as np
import sys
sys.path.append
from openvino.inference_engine import IENetwork, IECore
なにやらIE NetworkとIE Coreというものが出てきましたね。
IEはInference Engineの略です。IENetworkというモジュールは今回の2021.1バージョンからIECoreに統合されましたので使用しないのですが、
2020バージョンを利用する場合の後方互換性としてCode上残してあります。
Inference Engineというのはモデルをモデルオプティマイザーによって最適化したものです。最適化とは何をしているかというと精度をほぼ失うことなくモデルの重みの再量子化を行うことにより処理負荷を劇的に下げるような変換です。
ここで、今回使用するモデルのご紹介をいたします。
| モデル名称 | emotions_recognition_retail_0003 |
|---|---|
| Input face orientation | Frontal |
| Rotation in-plane | 2±15˚ |
| Rotation out-of-plane | Yaw: ±15˚ / Pitch: ±15˚ |
| Min object width | 64 pixels |
| GFlops | 0.126 |
| MParams | 2.483 |
| Source framework | Caffe |
| https://docs.openvinotoolkit.org/2019_R1/_emotions_recognition_retail_0003_description_emotions_recognition_retail_0003.html |
| モデル名称 | face-detection-retail-0004 |
|---|---|
| AP (WIDER) | 83.00% |
| GFlops | 1.067 |
| MParams | 0.588 |
| Source framework | Caffe |
| https://docs.openvinotoolkit.org/2019_R1/_face_detection_retail_0004_description_face_detection_retail_0004.html |
上記モデルを読み込みます。
# Face Detection Model
net = ie.read_network(model='intel/face-detection-retail-0004/FP16/face-detection-retail-0004.xml', weights='intel/face-detection-retail-0004/FP16/face-detection-retail-0004.bin')
exec_net = ie.load_network(network=net, device_name="CPU", num_requests=0)

# Emotion Detection Model
net_emotion = ie.read_network(model='intel/emotions-recognition-retail-0003/FP16/emotions-recognition-retail-0003.xml', weights='intel/emotions-recognition-retail-0003/FP16/emotions-recognition-retail-0003.bin')
exec_net_emotion = ie.load_network(network=net_emotion, device_name="CPU", num_requests=0)
ここで、モデルへのパス指定をしていますが、まだモデルは手元にないと思いますのでモデルをダウンローダーを使って手に入れましょう。
(face-detection) bash-3.2$ python3 /opt/intel/openvino_2021/deployment_tools/tools/model_downloader/downloader.py --name face-detection-retail-0004
Traceback (most recent call last):
  File "/opt/intel/openvino_2021/deployment_tools/tools/model_downloader/downloader.py", line 25, in <module>
    import requests
ModuleNotFoundError: No module named 'requests'
requests moduleをインストールします
(face-detection) bash-3.2$ pipenv install requests
Installing requests...
Adding requests to Pipfile's [packages]...
✔ Installation Succeeded
Pipfile.lock (9be4f8) out of date, updating to (444a6d)...
Locking [dev-packages] dependencies...
Locking [packages] dependencies...
Building requirements...
Resolving dependencies...
✔ Success!
Updated Pipfile.lock (444a6d)!
Installing dependencies from Pipfile.lock (444a6d)...
  🐍   ▉▉▉▉▉▉▉▉▉▉▉▉▉▉▉▉▉▉▉▉▉▉▉▉▉▉▉▉▉▉▉▉ 0/0 — 00:00:00
もう一度チャレンジ
(face-detection) bash-3.2$ python3 /opt/intel/openvino_2021/deployment_tools/tools/model_downloader/downloader.py --name face-detection-retail-0004
Traceback (most recent call last):
  File "/opt/intel/openvino_2021/deployment_tools/tools/model_downloader/downloader.py", line 37, in <module>
    import common
  File "/opt/intel/openvino_2021.1.110/deployment_tools/open_model_zoo/tools/downloader/common.py", line 33, in <module>
    import yaml
ModuleNotFoundError: No module named 'yaml'
pyyaml moduleをインストールします
(face-detection) bash-3.2$ pipenv install pyyaml
Installing pyyaml...
Adding pyyaml to Pipfile's [packages]...
✔ Installation Succeeded
Pipfile.lock (444a6d) out of date, updating to (c30804)...
Locking [dev-packages] dependencies...
Locking [packages] dependencies...
Building requirements...
Resolving dependencies...
✔ Success!
Updated Pipfile.lock (c30804)!
Installing dependencies from Pipfile.lock (c30804)...
  🐍   ▉▉▉▉▉▉▉▉▉▉▉▉▉▉▉▉▉▉▉▉▉▉▉▉▉▉▉▉▉▉▉▉ 0/0 — 00:00:00
今度こそ
(face-detection) bash-3.2$ python3 /opt/intel/openvino_2021/deployment_tools/tools/model_downloader/downloader.py --name face-detection-retail-0004
################ || Downloading face-detection-retail-0004 ||################

========== Downloading /Users/ktsutsum/openvino/demos/face-detection/intel/face-detection-retail-0004/FP32/face-detection-retail-0004.xml
... 100%, 98 KB, 166814 KB/s, 0 seconds passed

========== Downloading /Users/ktsutsum/openvino/demos/face-detection/intel/face-detection-retail-0004/FP32/face-detection-retail-0004.bin
... 100%, 2297 KB, 12116 KB/s, 0 seconds passed

========== Downloading /Users/ktsutsum/openvino/demos/face-detection/intel/face-detection-retail-0004/FP16/face-detection-retail-0004.xml
... 100%, 97 KB, 210379 KB/s, 0 seconds passed

========== Downloading /Users/ktsutsum/openvino/demos/face-detection/intel/face-detection-retail-0004/FP16/face-detection-retail-0004.bin
... 100%, 1148 KB, 20286 KB/s, 0 seconds passed

========== Downloading /Users/ktsutsum/openvino/demos/face-detection/intel/face-detection-retail-0004/FP16-INT8/face-detection-retail-0004.xml
... 100%, 240 KB, 257964 KB/s, 0 seconds passed

========== Downloading /Users/ktsutsum/openvino/demos/face-detection/intel/face-detection-retail-0004/FP16-INT8/face-detection-retail-0004.bin
... 100%, 586 KB, 13932 KB/s, 0 seconds passed
これでモデルをダウンローダーが完了です。
これと同じことをemotions-recognition-retail-0003についても実施します。
ここでは割愛しますが、上記のコマンドのモデル名だけを変更して実施してみてください。
続いて解析本体部分となります。非常に短いCodeです。
本稿ではOpenVINOについて取り上げておりますので、その他の説明については簡易にとどめておきます。
cap = cv2.VideoCapture(1)

while True:
    ret, frame = cap.read()

    if ret == False:
        continue

    img = cv2.resize(frame, (300, 300))
    img = img.transpose((2, 0, 1))
    img = np.expand_dims(img, axis=0)

    out = exec_net.infer(inputs={'data': img})

    out = out['detection_out']
    out = np.squeeze(out)

    for detection in out:
        confidence = float(detection[2])

        xmin = int(detection[3] * frame.shape[1])
        ymin = int(detection[4] * frame.shape[0])
        xmax = int(detection[5] * frame.shape[1])
        ymax = int(detection[6] * frame.shape[0])

        if confidence > 0.5:
            cv2.rectangle(frame, (xmin, ymin), (xmax, ymax), color=(xmin, ymin, 0), thickness=3)

            frame_face = frame[ymin:ymax, xmin:xmax]

            img = cv2.resize(frame_face, (64, 64))
            img = img.transpose((2, 0, 1))
            img = np.expand_dims(img, axis=0)

            out = exec_net_emotion.infer(inputs={'data': img})

            out = out['prob_emotion']
            out = np.squeeze(out)

            index_max = np.argmax(out)

            list_emotion = ['neutral', 'happy', 'sad', 'surprise', 'anger']

            cv2.putText(frame, list_emotion[index_max], (xmin, ymin - 10), cv2.FONT_HERSHEY_SIMPLEX, 1, (xmin, ymin, 0), 2)

    cv2.imshow('image', frame)

    key = cv2.waitKey(1)
    if key != -1:
        break

cap.release()
cv2.destoryAllWindows()
まず以下の部分ですが、opencvを使用して内蔵カメラからの画像を取り込んでいます。
cv2.VideoCapture(1)の数字部分(1)はお手もと環境により異なります。通常は(0)の場合が多いです。
retにはtrue or false, frameには画像が配列で取り込まれます。画像がある場合ret = trueとなります。
cap = cv2.VideoCapture(1)

while True:
    ret, frame = cap.read()

    if ret == False:
        continue
次にこちら。
    img = cv2.resize(frame, (300, 300))
    img = img.transpose((2, 0, 1))
    img = np.expand_dims(img, axis=0)
- resizeにより入力に必要なサイズ(300, 300)へ変換しています。
- transposeにより(h, w, c)から(c, h, w)への変換をしています。
- h : height(高さ)
- w : width(幅)
- c : channel(チャネル:色情報)
OpenCVは(h, w, c)の順番で画像を取り込みますがこのモデルでは以下のように(c, w, h)の順番で渡してやる必要があリます。
- expand_dimsで次元の追加
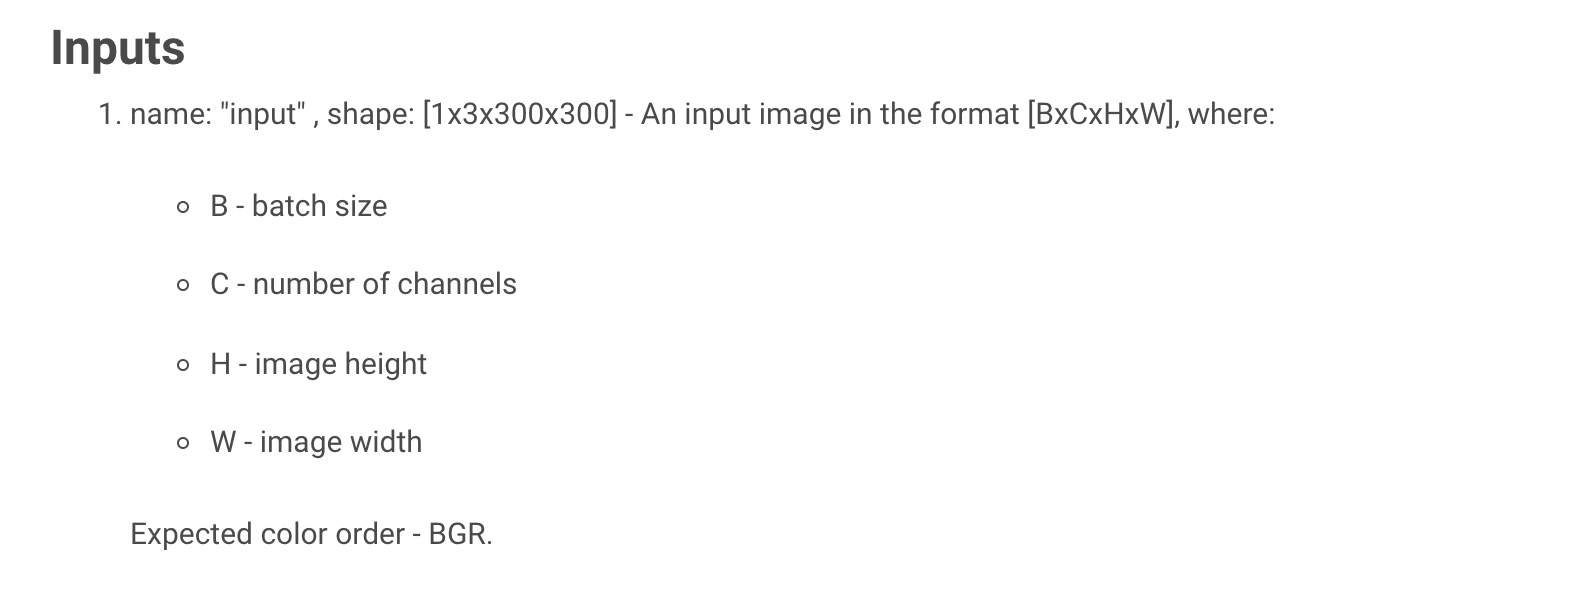
上記のように入力が期待するものは[1x3x300x300]です。ただここまでの変換だと[3x300x300]と1次元足りません。
expand_dims(axis = 0)と指定することにより次元を追加し[1x3x300x300]とすることが可能です。
次のセクションに行きましょう。
out = exec_net.infer(inputs={'data': img})
imgに対して事前に定義したexec_netのinferメソッドを利用し推論を実施します。
out = out['detection_out']
ではoutのデータはどのようなものでしょうか?実際にprintしてみると以下のようなarrayで返されてきます。
detection_outという名前だということがわかりますので、out = out['detection_out']としています。
{'detection_out': array([[[[0.        , 1.        , 1.        , ..., 0.1926786 ,
          0.77813023, 0.92338395],
         [0.        , 1.        , 0.02098523, ..., 0.9338631 ,
          0.99440974, 1.0033596 ],
         [0.        , 1.        , 0.01355048, ..., 0.01246494,
          0.70711267, 0.40890545],
         ...,
         [0.        , 0.        , 0.        , ..., 0.        ,
          0.        , 0.        ],
         [0.        , 0.        , 0.        , ..., 0.        ,
          0.        , 0.        ],
         [0.        , 0.        , 0.        , ..., 0.        ,
          0.        , 0.        ]]]], dtype=float32)}
ここで、outputのshapeを見てみましょう。[1, 1, N, 7]だということがわかりますが、はじめの[1, 1]は実際の処理には不要です。
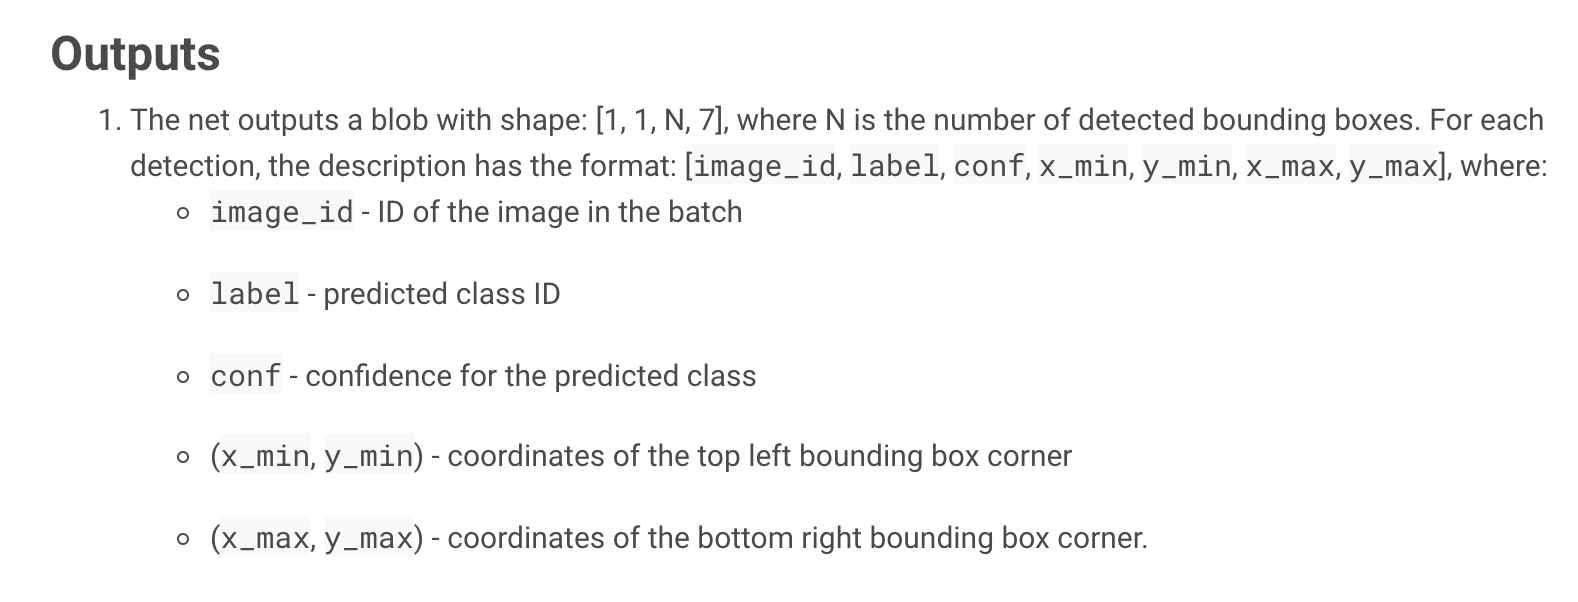
そういった場合は、1次元の要素を削除できるsqueezeメソッドを利用します。
out = np.squeeze(out)
さて、上記の[N, 7]という行列の"7"の中身を見てみましょう。以下のようになっています。
- image_id - ID of the image in the batch : 1個
- label - predicted class ID : 1個
- conf - confidence for the predicted class : 1個
- (x_min, y_min) - coordinates of the top left bounding box corner : 2個
- (x_max, y_max) - coordinates of the bottom right bounding box corner. : 2個
for detection in out:
        confidence = float(detection[2])

        xmin = int(detection[3] * frame.shape[1])
        ymin = int(detection[4] * frame.shape[0])
        xmax = int(detection[5] * frame.shape[1])
        ymax = int(detection[6] * frame.shape[0])
Confidenceというここが顔だよという確信度をconfidenceに入れています。
下の部分では顔部分のx_min(x座標の最小値)、y_min(y座標の最小値)、x_max(x座標の最大値)、y_max(y座標の最大値)を求めています。
x_min, y_min, x_max, y_maxは0-1までの少数で与えられるため、実際のframeサイズを乗算して実際の一を割り出しています。
ちなみに、NというのはBounding Boxの個数です。この1個めの座標、2個めの座標というような感じです。
if confidence > 0.5:
            cv2.rectangle(frame, (xmin, ymin), (xmax, ymax), color=(xmin, ymin, 0), thickness=3)

            frame_face = frame[ymin:ymax, xmin:xmax]
ここからは多少まとめて説明していきます。
Confidenceが0.5以上のものを選んで顔部分のBounding Boxの個数を減らしていきます。
cv2.rectangleメソッドを利用し四角形を書いていきます。
frame_faceには顔部分の領域だけをndarrayとして切り出します。スライスを使います。
ここから先はemotions-recognition-retail-0003モデルを使用し、上記で切り出した顔領域に対して感情認識を行っていきます。
            img = cv2.resize(frame_face, (64, 64))
            img = img.transpose((2, 0, 1))
            img = np.expand_dims(img, axis=0)
顔領域認識モデルと同じ処理を行っていきます。
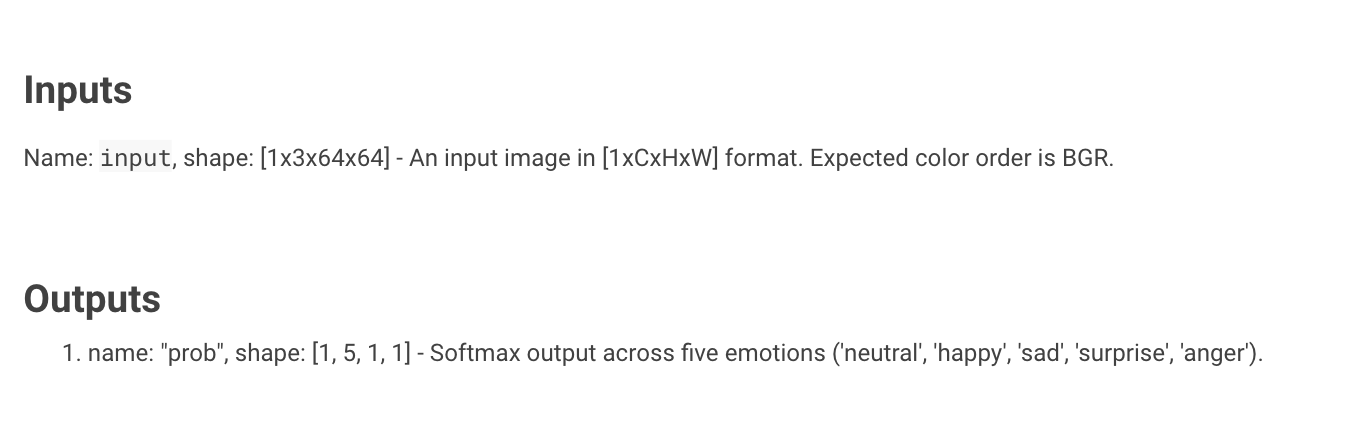
感情認識モデルは上記の通りinputの画像が64 x 64を期待するモデルです。
- resizeにより入力に必要なサイズ(64, 64)へ変換しています。
- transposeにより(h, w, c)から(c, h, w)への変換をしています。
            out = exec_net_emotion.infer(inputs={'data': img})

            out = out['prob_emotion']
            out = np.squeeze(out)
outにはexec_net_emotion.inferにより感情認識した結果が入ります。
どのような形式で結果が入るかというと上記にある通り、shape[1, 5, 1, 1]となり、2番めの要素として以下の5種類の感情に分類された結果が入ります。
- neutral
- happy
- sad
- surprise
- anger
ここでもoutがどういう結果になるか見てみましょう。
{'prob_emotion': array([[[[8.9757685e-03]],

        [[9.8825932e-01]],

        [[1.2316966e-03]],

        [[7.2518183e-04]],

        [[8.0798665e-04]]]], dtype=float32)}
prob_emotionという名前の配列になっているということがわかります。
ということですので、outにはout['prob_emotion']を代入し、squeezeにより余分な要素を削除してきます。
上記の例ではhappyが確率が高いということがわかりますね。
            index_max = np.argmax(out)

            list_emotion = ['neutral', 'happy', 'sad', 'surprise', 'anger']
人の目で判断してもよいのですが、argmaxを使うと最大値がわかります。一番確率の高いものがわかるわけですね。
list_emotionというリストを作り、モデルの出力と同じ順番で感情の分類をリストに入れていきます。
argmaxによりリストのどの要素が最大値となるかがわかりますので、この場合ですとhappyが選択されることになります。
cv2.putText(frame, list_emotion[index_max], (xmin, ymin - 10), cv2.FONT_HERSHEY_SIMPLEX, 1, (xmin, ymin, 0), 2)
フォントを指定し、putTextメソッドを利用しテキストを画面内に書いていきます。場所は顔領域の上側10pixelとします。1, (xmin, ymin, 0), 2はそれぞれフォントの大きさ、色、フォントの太さを表しています。ここでは複数の人物が画面内にいたときにすべて同じ色にならないように座標により色を変えています。実際にコードで試してみてください。
cv2.imshow('image', frame)
imshowにより実際に画面に描画します。
    key = cv2.waitKey(1)
    if key != -1:
        break

cap.release()
cv2.destoryAllWindows()
waitKeyによりキー入力を待ち、何らかのキーが入力されたら画面を閉じます。
最後にコード全体を載せておきます。
import cv2
import numpy as np
import sys
sys.path.append
from openvino.inference_engine import IENetwork, IECore

ie = IECore()

# Face Detection Model
net = ie.read_network(model='intel/face-detection-retail-0004/FP16/face-detection-retail-0004.xml', weights='intel/face-detection-retail-0004/FP16/face-detection-retail-0004.bin')
exec_net = ie.load_network(network=net, device_name="CPU", num_requests=0)

# Emotion Detection Model
net_emotion = ie.read_network(model='intel/emotions-recognition-retail-0003/FP16/emotions-recognition-retail-0003.xml', weights='intel/emotions-recognition-retail-0003/FP16/emotions-recognition-retail-0003.bin')
exec_net_emotion = ie.load_network(network=net_emotion, device_name="CPU", num_requests=0)

cap = cv2.VideoCapture(3)

while True:
    ret, frame = cap.read()

    if ret == False:
        continue

    img = cv2.resize(frame, (300, 300))
    img = img.transpose((2, 0, 1))
    img = np.expand_dims(img, axis=0)

    out = exec_net.infer(inputs={'data': img})

    out = out['detection_out']
    out = np.squeeze(out)

    for detection in out:
        confidence = float(detection[2])

        xmin = int(detection[3] * frame.shape[1])
        ymin = int(detection[4] * frame.shape[0])
        xmax = int(detection[5] * frame.shape[1])
        ymax = int(detection[6] * frame.shape[0])

        if confidence > 0.5:
            cv2.rectangle(frame, (xmin, ymin), (xmax, ymax), color=(xmin, ymin, 0), thickness=3)

            frame_face = frame[ymin:ymax, xmin:xmax]

            img = cv2.resize(frame_face, (64, 64))
            img = img.transpose((2, 0, 1))
            img = np.expand_dims(img, axis=0)

            out = exec_net_emotion.infer(inputs={'data': img})

            out = out['prob_emotion']
            out = np.squeeze(out)

            index_max = np.argmax(out)

            list_emotion = ['neutral', 'happy', 'sad', 'surprise', 'anger']

            cv2.putText(frame, list_emotion[index_max], (xmin, ymin - 10), cv2.FONT_HERSHEY_SIMPLEX, 1, (xmin, ymin, 0), 2)

    cv2.imshow('image', frame)

    key = cv2.waitKey(1)
    if key != -1:
        break

cap.release()
cv2.destoryAllWindows()
おまけ
本記事では主にローカルでの開発方法について記載していますが、クラウド上でOpenVINOのプロトタイプ開発も可能です。
Intel DevCloud for the EdgeというIntelが提供しているクラウド開発サービスがあります。
OpenVINOが予めインストールされたクラウド上の環境を利用でき、様々なIntelハードウェア(CPU/GPU/FPGA/VPU)上でアプリケーションを実行させることが可能です。
プロトタイプの実験を簡単に無料で実施することが可能です。
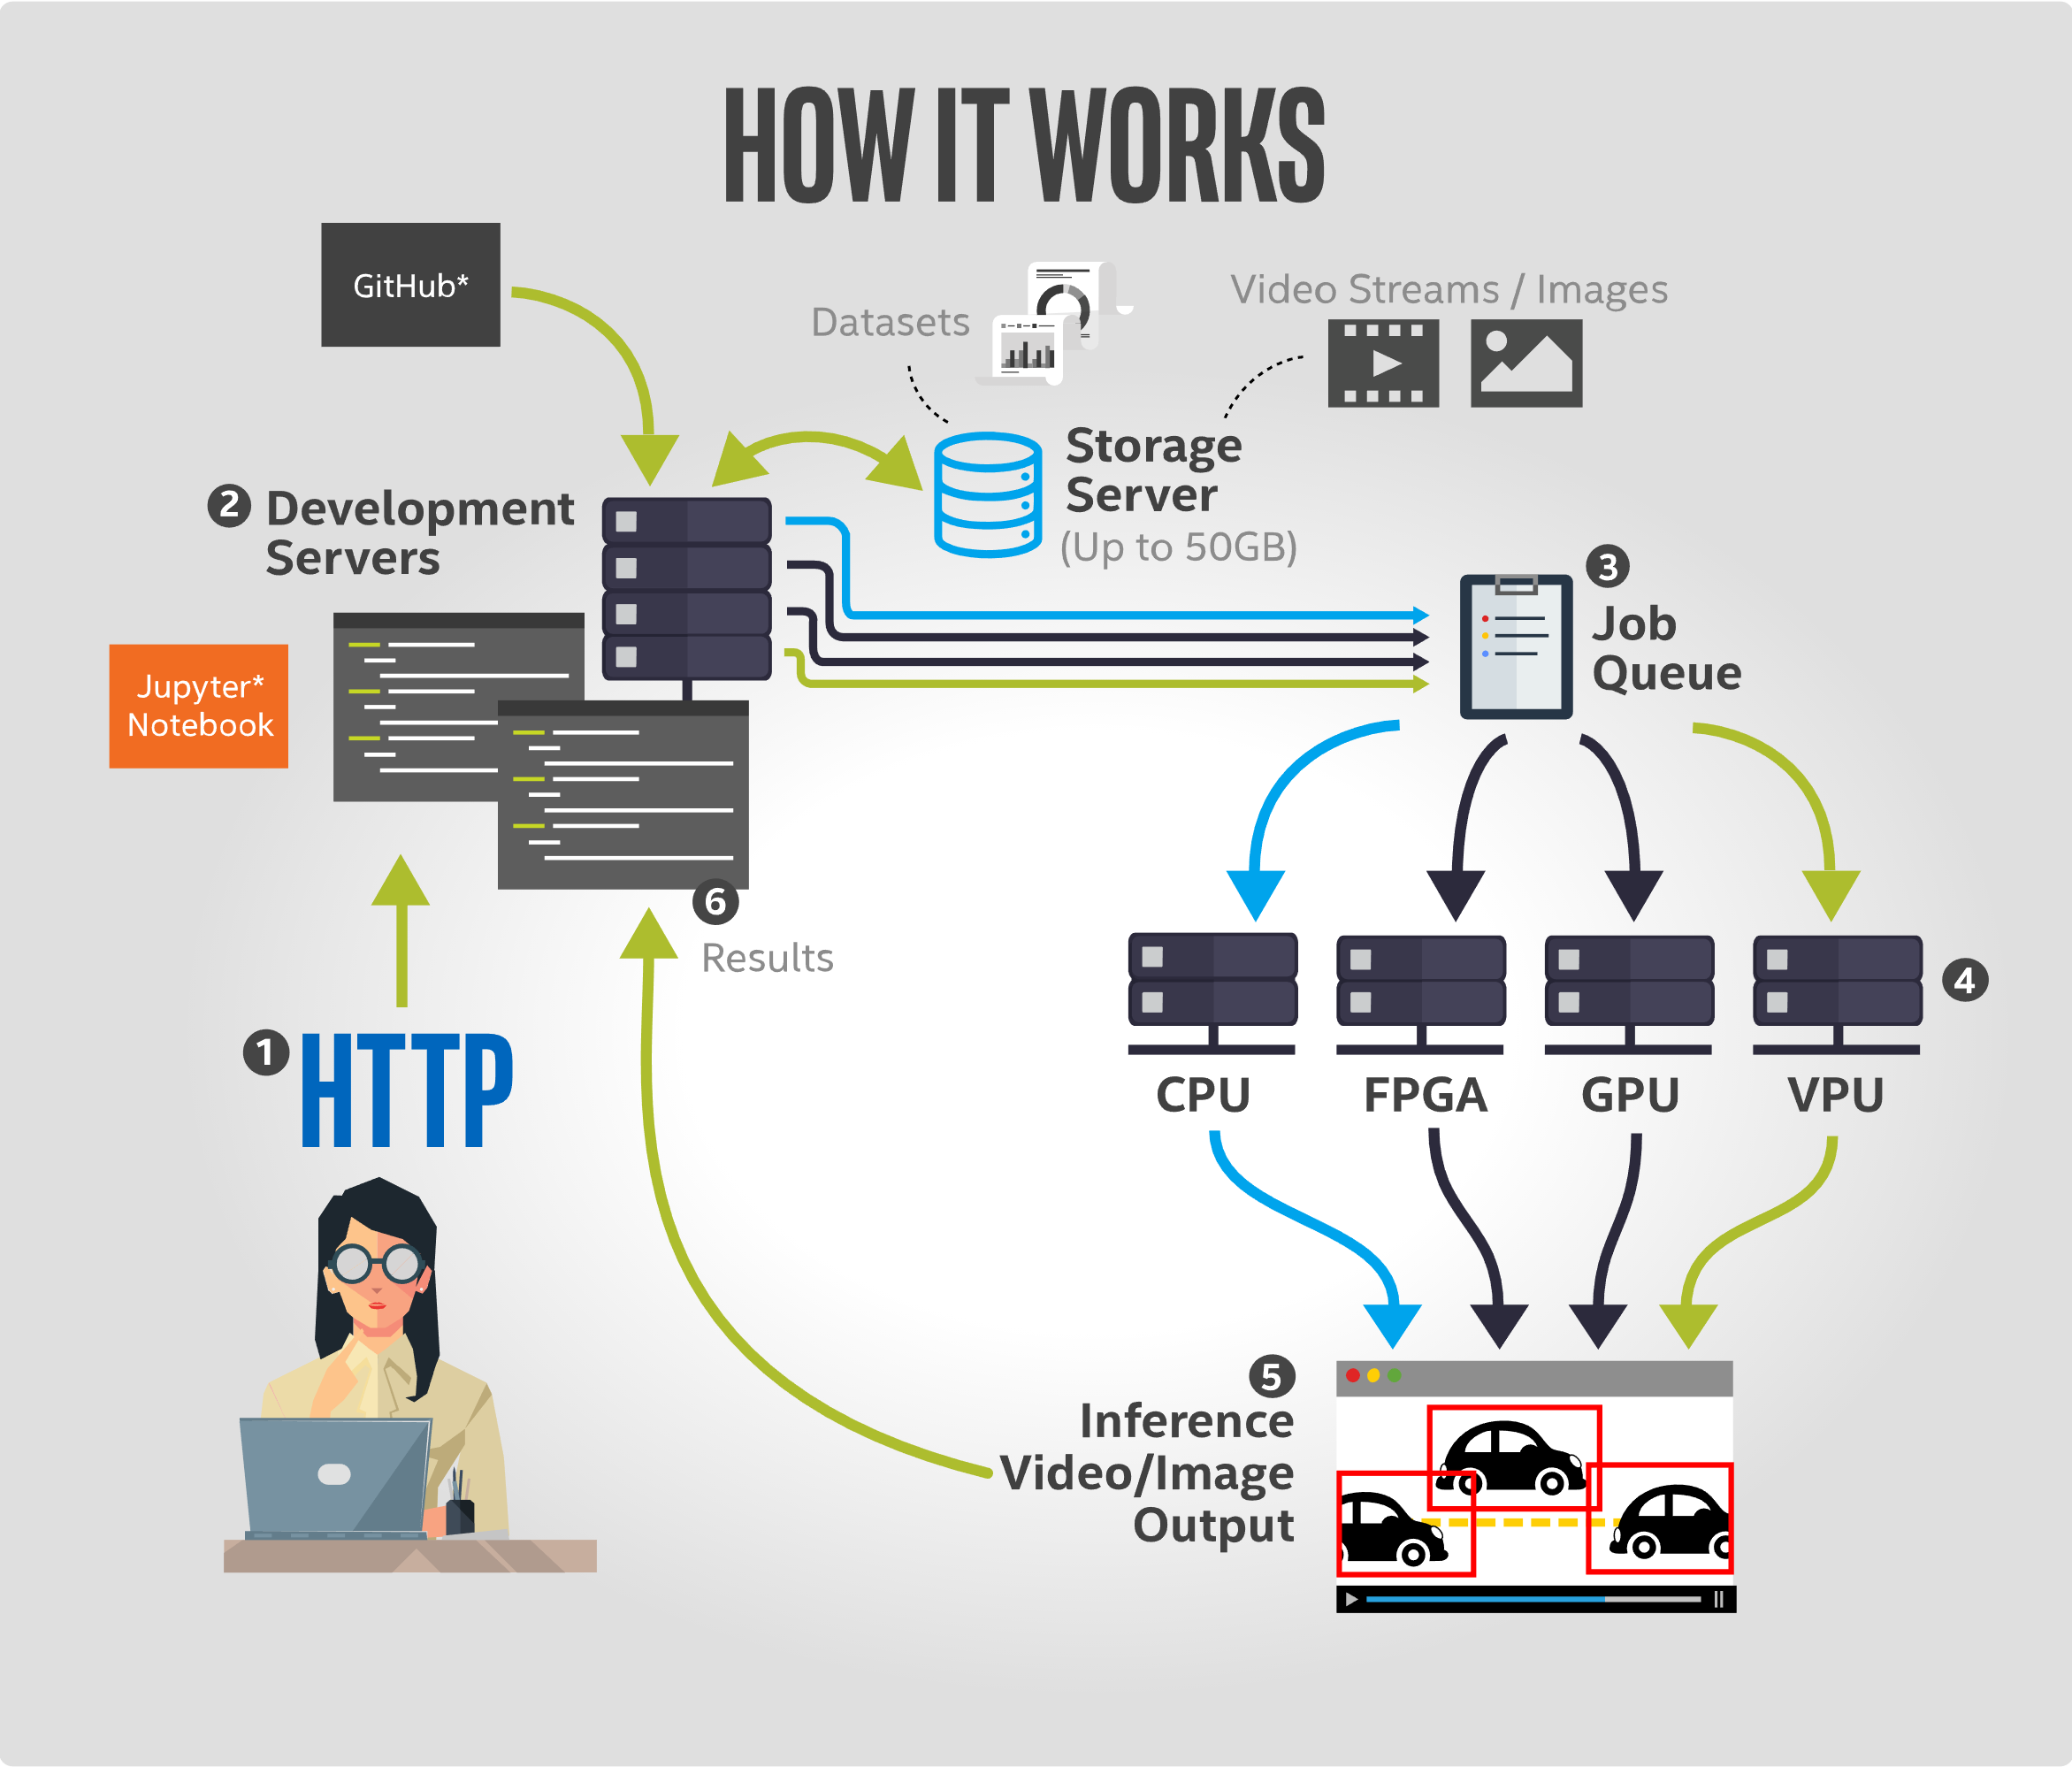
大きな特徴として、Jupyter-Notebookを利用した開発が可能ですが、簡単に①〜⑥について説明します。
①②:コード作成
- Jupyter-NotebookによりOpenVINOを使ったコードを記述
- OpenModelZooやModel Optimizerを利用してモデルを準備
- もし必要であればStorageServerから動画やイメージを推論させることも可能
③④:ジョブを実行
- CPU,FPGA,GPU,VPU等様々なハードウェアから実行環境を選択
- アプリケーションをジョブに登録し、単体もしくは並列処理でのEdge Inferenceを実施
⑤⑥:結果の出力
- Jupyter-Notebookで推論結果を画像やデータで表示
実際に使用するには登録が必要ですが、以下のReferenceから登録が可能ですので興味を持たれた方はぜひお試しください。
来年はWebアプリ開発とそのパフォーマンス分析でも書こうかな。。
Reference
-
OpenVINO Resource
- OpenVINOを使う上でもモデルの情報など各種情報が取り揃えてあります。
-
OpenVINO Documentation
- OpenVINOのインストール方法やpython以外の使用方法なども記載されております。
-
Intel DevCloud for the Edge
- クラウドでのプロトタイプ開発が可能。予めIntelのリソースを組み込んだものを利用可能。
免責事項
本サイトおよび対応するコメントにおいて表明される意見は、投稿者本人の個人的意見であり、シスコの意見ではありません。本サイトの内容は、情報の提供のみを目的として掲載されており、シスコや他の関係者による推奨や表明を目的としたものではありません。各利用者は、本 Web サイトへの掲載により、投稿、リンクその他の方法でアップロードした全ての情報の内容に対して全責任を負い、本 Web サイトの利用に関するあらゆる責任からシスコを免責することに同意したものとします。