はじめに
ライブ配信で利用するAWS MediaLiveの起動・停止は
通常、AWSコンソールやCLIから操作することが多いと思います。
ただ、開発者以外の人に操作してもらう場合は、それだとハードルが高いため、
Webページに配置したボタンから起動・停止を操作できるような仕組みを考えてみました。
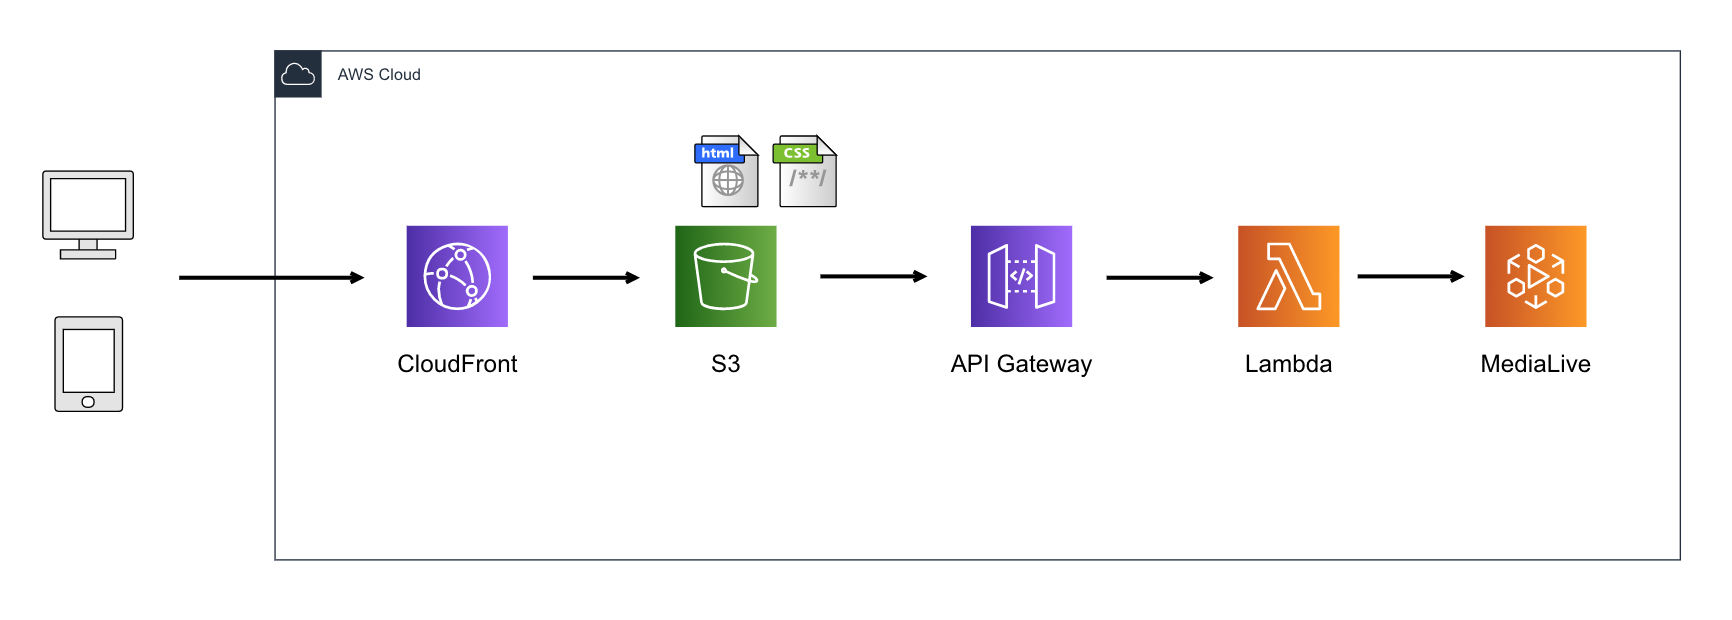
構成図
S3にHTMLを配置して、CloudFrontで配信します。
Web利用者はHTML上に配置されたボタンを押します。
すると、APIが実行され、Lambdaがキックされて、MediaLiveが起動・停止する仕組みになります。

MediaLive
今回、操作対象とするMediaLiveチャンネルは、1つとします。
IAM
Lambda用のIAM Roleを作成しておきます。
必要なポリシーは下記になります。
- AWSLambdaBasicExecutionRole
- AWSElementalMediaLiveFullAccess
Lambda
ランタイム:Python3.8
環境変数:**「channel_id」**で、MediaLiveのチャンネルIDを設定します。
- start関数
※すでにチャンネルが起動していた場合、strat処理を実行しないようにしています。
import boto3
import os

channelid = os.environ['channel_id']
medialive = boto3.client('medialive')

def lambda_handler(event, context):

    channels = medialive.describe_channel(ChannelId=channelid)

    if channels['State'] == 'RUNNING':
        ngmsg = ("チャンネルはすでに起動されています")
        return ngmsg
        pass

    else:
        medialive.start_channel(ChannelId=channelid)
        okmsg = ("チャンネルを起動しています")
        return okmsg
- stop関数
※start関数と同様、すでにチャンネルが停止していた場合、stop処理を実行しないようにしています。
import boto3
import os

channelid = os.environ['channel_id']
medialive = boto3.client('medialive')

def lambda_handler(event, context):

    channels = medialive.describe_channel(ChannelId=channelid)

    if channels['State'] == 'IDLE':
        ngmsg = ("チャンネルはすでに停止されています")
        return ngmsg
        pass

    else:
        medialive.stop_channel(ChannelId=channelid)
        okmsg = ("チャンネルを停止しています")
        return okmsg
API Gateway
-
- APIの作成
-
- リソースの作成:startとstopをそれぞれ作成します。
-
- メソッドの作成:POSTやPUTなど
-
- CORSの有効化
-
- メソッドレスポンス:実行結果を日本語で表示させるため、application/json;charset=UTF-8を追記します。
-
- APIのデプロイ
すると、下記ようなURLが発行されます。
(詳しい設定方法は、本ページ最下部の参考文献の記事が参考になりました)
HTML
次にHTMLを作成します。
私はHTMLに詳しくなく、もっといい書き方がある気がしますので、
参考程度に載せておきます。
「 url: 」には、先ほどのAPI Gatewayで発行したURLの最後に、
startやstopのリソース名を加えたURLを記入します。
例:
url:"https://xxxxxxxxxx.execute-api.ap-northeast-1.amazonaws.com/[stage]/start"
<?xml version="1.0" encoding="UTF-8"?>
<!DOCTYPE html PUBLIC "-//W3C//DTD XHTML 1.0 Transitional//EN" "http://www.w3.org/TR/xhtml1/DTD/xhtml1-transitional.dtd">
<html xmlns="http://www.w3.org/1999/xhtml" xml:lang="ja" lang="ja">
<head>
  <meta http-equiv="Content-Type" content="text/html; charset=utf-8" />
  <meta http-equiv="Content-Style-Type" content="text/css" />
  <meta http-equiv="Content-Script-Type" content="text/javascript" />
  <script type="text/javascript" src="https://code.jquery.com/jquery-3.5.1.min.js"></script>
  <title>MediaLive操作Web</title>
</head>
<script>
  $(function(){
    // ボタンを押すと処理を開始する
    $("#btn1").on("click", function() {
    $.ajax({
        type: "POST",
        url: "https://xxxxxxxxxx.execute-api.ap-northeast-1.amazonaws.com/[stage]/start",
        cache : false,
    })
        .done(function(result) {
            console.log(result);
    })
        .fail(function(result) {
            console.log(result);
    })
            console.log = function (log) {

        // API実行結果と実行日時を表示させる
        var date = new Date();
        document.getElementById('console_log1').innerHTML = log + "<br>" + "(" + date.toLocaleString() + ")" + "<br>";
        }
    })
})

   function stop(){
    // ボタンを押下すると確認ダイアログを表示する
    ret = confirm("本当にチャンネル停止してよろしいですか?");
    if (ret == true){
    $.ajax({
        type: "PUT",
        url: "https://xxxxxxxxxx.execute-api.ap-northeast-1.amazonaws.com/[stage]/stop",
        cache : false,
    })
        .done(function(result) {
            console.log(result);
    })
        .fail(function(result) {
            console.log(result);
    })
            console.log = function (log) {

        // API実行結果と実行日時を表示させる
        var date = new Date();
        document.getElementById('console_log2').innerHTML = log + "<br>" + "(" + date.toLocaleString() + ")" + "<br>";
        }
    }
}
</script>
<button type="button" id="btn1" style="width:150px;height:50px">チャンネル起動</button>
<div id="console_log1" div class="disp-area" style="width:400px;height:50px;padding:15px;background-color: #f0f18b2c;"></div>
<br>
<button type="button" onClick="stop()" style="width:150px;height:50px">チャンネル停止</button>
<div id="console_log2" div class="disp-area" style="width:400px;height:50px;padding:15px;background-color: #f0f18b2c;"></div>
</html>
S3とCloudFront
HTMLを置くだけなので、この部分は省略します。
動作確認
-
「チャンネル停止」ボタンも同様に動作確認します。


