はじめに
以前 Raspberry PiからGoogle Homeを喋らせる という記事を書きました。これはNode.jsのgoogle-home-notifierを使って喋らせるもので、Node.jsのインストールやライブラリコードの書き換えなどいろいろ手順が面倒でした。
今回はビジュアルプログラミングができるNode-REDを使って、ほぼノンコーディングでローカルLAN内のGoogleHomeをRaspberry Piから喋らせることができたのでその方法を紹介します。
環境
ハードウェア: Raspberry Pi 4 Model B (4GB)
OS: Raspbian Buster
Node-REDの準備
Raspberry PiへNode-REDのインストール
Node-REDの公式ページにRaspberry PiへのNode-REDのインストールコマンドがあるのでそれを実行します。
bash <(curl -sL https://raw.githubusercontent.com/node-red/linux-installers/master/deb/update-nodejs-and-nodered)
これで最新のNode-REDがインストールされます。
Node-REDの起動、停止、再起動、自動起動の設定
以下のコマンドでNode-REDの起動や停止を操作できます。
# 起動
node-red-start
# 停止
node-red-stop
# 再起動
node-red-restart
# Raspberry Pi起動時の自動起動を有効にする
sudo systemctl enable nodered.service
# Raspberry Pi起動時の自動起動を無効にする
sudo systemctl disable nodered.service
Node-REDが起動したら、RaspberryPiのブラウザで http://localhost:1880/ にアクセスするとNode-REDの管理画面が表示されます。RaspberryPiの外からでも、同じネットワーク内ならブラウザでhttp://[RaspberryPiのIPアドレス]:1880/ で見られます。
Google Homeを喋らせるフローの作成
必要なノードの追加
GoogleHomeを喋らせるために必要なサードパーティのノード(ライブラリ)を追加します。
node-red-contrib-cast
Google HomeやChrome CastなどGoogleのCast対応デバイスに喋らせたり音楽再生させたりするノードです。
Node-RED管理画面の右上のメニューから「パレットの設定」→「ノードを追加」に「node-red-contrib-cast」と入力して検索して出たものを「ノードを追加」します。
node-red-node-discovery
Google Homeに設定した「リビング」といった名前からIPアドレスを取得するために使います。
上記サイトにも記載がありますが、node-red-node-discoveryをインストールするためには事前に別途ライブラリをインストールしておく必要があります。以下のコマンドを入力します。
sudo apt-get install libavahi-compat-libdnssd-dev libudev-dev
あとはnode-red-contrib-castと同じく、「パレットの設定」→「ノードを追加」に「node-red-node-discovery」と入力して検索して出たものを「ノードを追加」すればOKです。
フローの作成
準備が終わったらNode-RED管理画面のフローエディタでフローの作成をします。
作成したフローは以下。
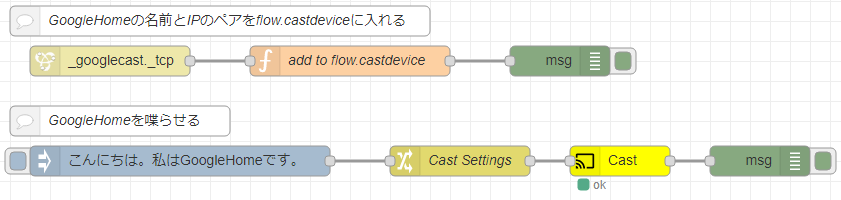
JSONは以下。Node-REDの管理画面の右上のメニューから「読み込み」を選択し、以下をコピーしたものをペーストするとインポートできます。
「Cast Settings」内に、喋らせるGoogleHomeの名前を設定するところ(「リビング」となっている)があるので各自変更してください。
[{"id":"957ec5cf.674c88","type":"discovery","z":"262844aa.ab715c","name":"","topic":"","service":"_googlecast._tcp","x":160,"y":80,"wires":[["29d546b2.f8918a"]]},{"id":"e5ba8849.f42718","type":"debug","z":"262844aa.ab715c","name":"","active":true,"tosidebar":true,"console":false,"tostatus":false,"complete":"true","targetType":"full","x":610,"y":80,"wires":[]},{"id":"29d546b2.f8918a","type":"function","z":"262844aa.ab715c","name":"add to flow.castdevice","func":"const name = msg.payload.txtRecord.fn;\nconst ip = msg.payload.addresses[0];\nmsg.name = name;\nmsg.ip = ip;\nvar castdevice = flow.get(\"castdevice\");\nif (castdevice === undefined) {\n castdevice = {};\n}\ncastdevice[name] = ip;\nflow.set(\"castdevice\", castdevice);\nreturn msg;","outputs":1,"noerr":0,"x":400,"y":80,"wires":[["e5ba8849.f42718"]]},{"id":"d132b23a.e9034","type":"comment","z":"262844aa.ab715c","name":"GoogleHomeの名前とIPのペアをflow.castdeviceに入れる","info":"","x":270,"y":40,"wires":[]},{"id":"4228f409.e79a2c","type":"debug","z":"262844aa.ab715c","name":"","active":true,"tosidebar":true,"console":false,"tostatus":false,"complete":"true","targetType":"full","x":810,"y":180,"wires":[]},{"id":"d3226c0d.35c9c","type":"cast-to-client","z":"262844aa.ab715c","name":"","url":"","contentType":"","message":"","language":"en","ip":"","port":"","volume":"","x":670,"y":180,"wires":[["4228f409.e79a2c"]]},{"id":"7cc927dc.0b25a8","type":"change","z":"262844aa.ab715c","name":"Cast Settings","rules":[{"t":"set","p":"ip","pt":"msg","to":"castdevice[\"リビング\"]","tot":"flow"},{"t":"set","p":"language","pt":"msg","to":"ja","tot":"str"}],"action":"","property":"","from":"","to":"","reg":false,"x":510,"y":180,"wires":[["d3226c0d.35c9c"]]},{"id":"89a2180a.5a7dd8","type":"inject","z":"262844aa.ab715c","name":"","topic":"","payload":"こんにちは。私はGoogleHomeです。","payloadType":"str","repeat":"","crontab":"","once":false,"onceDelay":0.1,"x":230,"y":180,"wires":[["7cc927dc.0b25a8"]]},{"id":"93f6a79d.732a08","type":"comment","z":"262844aa.ab715c","name":"GoogleHomeを喋らせる","info":"","x":170,"y":140,"wires":[]}]
フローの実行
Node-RED管理画面の右上の「デプロイ」を押してから「こんにちは。私はGoogleHomeです。」というinjectノードの左側の四角をクリックしてフローを実行すると、GoogleHomeがしゃべります。
フローの解説
1行目

ここでは、GoogleHomeから送られてくるMDNS discoveryのメッセージを受信してflow変数のcastdeviceにGoogleHomeの名前とIPのペアを格納しています。
2つ目のfunctionノードの中身は以下です。
const name = msg.payload.txtRecord.fn;
const ip = msg.payload.addresses[0];
msg.name = name;
msg.ip = ip;
var castdevice = flow.get("castdevice");
if (castdevice === undefined) {
   castdevice = {};
}
castdevice[name] = ip;
flow.set("castdevice", castdevice);
return msg;
flow.castdeviceの中身は以下のようになるはずです。
{
  "リビング": "192.168.XXX.XXX",
  "テレビ": "192.168.XXX.XXX"
}
2行目

ここでは、injectノードで指定した文字列をcastノードに送り、GoogleHomeに喋らせています。
2つ目のchangeノードで送信先の設定と言語の設定をしています。設定は以下です。
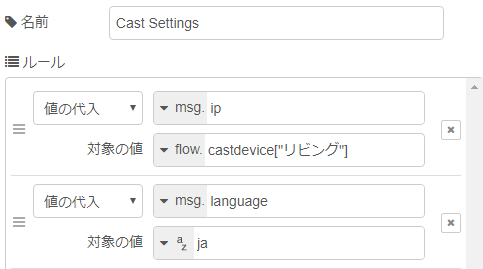
msg.ipにデバイスのIPアドレスを入れるのですが、1行目で入れておいたflow.castdeviceを使ってGoogleHomeの名前からIPアドレスを調べています。
おわりに
Node-REDはビジュアルプログラミングでほぼコードを書くことなくこのようなシステムを構築できる便利なツールですが、MDNSやCastなどそもそもの仕組みがわかっていないと難しいのかもと思いました。またfunctionノードを書いたりflow変数を使ったりするなどはJavascriptがある程度わかっていないと厳しいですね。
ちなみに現在自宅で保育園児を子守しながら在宅勤務をしているのですが、毎日一定時間にGoogleHomeがしゃべるようにして時間のメリハリをつけています(笑)
