作ったもの
職場の最寄駅の電車が本数少ないので,次の電車があと何分で来るか分かるガジェットをM5stackで作りました.#M5Stack https://t.co/o7w7MOcRWE pic.twitter.com/c9ICmC6J73
— Keisuke KAWAHARA (@ktansai) 2019年2月27日
全体の仕組み
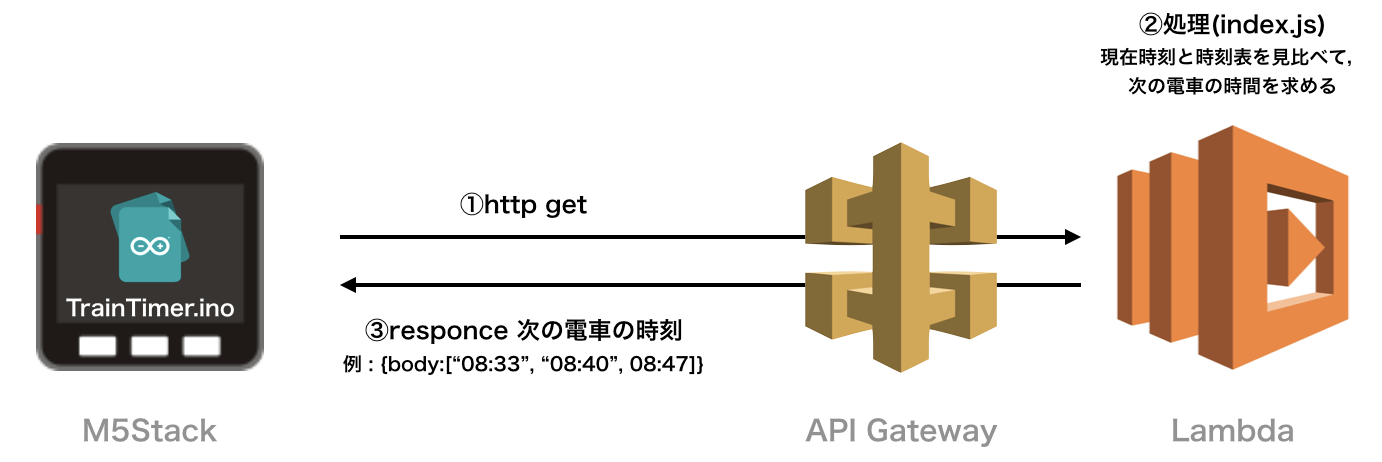
全体の流れとしては簡単で
- 起動時にLambdaにリクエストを送る。
- リクエストが来たら、Lambda上で時刻表から次の電車の時刻を返す。
- Lambdaからレスポンスが来たら、現在時刻と電車の時刻の差を表示する。
- 電車が出発したらもう一度リクエスト送る。
という流れです。
ソースコードはこちらで公開しています。
https://github.com/ktansai/TrainTimer/
(備考)
当初、M5Stack起動時に、時刻表.csvファイルを取得して、M5Stack側で次の電車の時刻を求めることを考えていたのですが、Arduino上で時刻の比較の処理を書くのが想像以上に面倒くさそうだったので、次の電車の時刻を求める処理をLambda上で行うように構成を変更しました。
Lambda側 コード
Lamda側は、CSVファイルを読込み、
現在時刻から最も近い電車の出発時刻を"08:33"のようなフォーマットに変換し、
Bodyの中の配列につめこんで、Responseとして返します。
ブラウザで以下のページを開くと、実際にResponseが返ってくるので、イメージが付きやすいかもしれません。
https://f568o9ukoc.execute-api.us-east-1.amazonaws.com/default/trainDiaLambda
なお、現在は土日か平日かで時刻表を切り替えていますが、祝日などの判別をしていないので、おかしくなる場合があります。
"use strict";
process.env.TZ = 'Asia/Tokyo';

let fs = require("fs");

const file_path_Weekend = "data/Tsurumiono_Weekend.csv";
const file_path_Weekday = "data/Tsurumiono_Weekday.csv";

exports.handler = async (event) => {

    let date_now = new Date();
    let file_path;
    if(date_now.getDay() == 0 || date_now.getDay() == 6){
        file_path = file_path_Weekend;
    }
    else{
        file_path = file_path_Weekday;
    }

    const file = fs.readFileSync(file_path , {encoding: "utf-8"});

    let train_array = [];

    //CSVを読み出して、配列に時間文字列を入れていく
    file.split('\n').forEach((line,index) => {
        line.split(',').forEach( (item) => {
            if(item == ''){
                return;
            }
            let trainDate = new Date();
            trainDate.setHours((index+1));
            trainDate.setMinutes(item);
            trainDate.setSeconds(0);
            console.log(trainDate.toString());
            train_array.push(trainDate.toString());
        })
    });

    let result_array = [];
    const train_count_limit = 3;

    console.log("---now---");
    console.log(new Date().toString());
    console.log("---now---");


    train_array.forEach( (item,index) => {
        if (result_array.length >= train_count_limit) {
            return;
        }

        if(new Date(item).getTime() > new Date().getTime()){
            // result_array.push(new Date(item).toString());
            let result_str = formatDate(new Date(item), 'hh:mm');
            result_array.push(result_str);
            // console.log(new Date(item).toString());
            console.log(result_str);
        }
    })

    let responceBody = {
        train: result_array
    }

    // let responceBodySample = {
    //     train:
    //     [
    //         "08:17",
    //         "08:20",
    //         "08:30"
    //     ]
    // }

    const response = {
        statusCode: 200,
        body: JSON.stringify(responceBody),
    };
    return response;
};

function formatDate(date , format) {
    format = format.replace(/YYYY/g, date.getFullYear());
    format = format.replace(/MM/g, ('0' + (date.getMonth() + 1)).slice(-2));
    format = format.replace(/DD/g, ('0' + date.getDate()).slice(-2));
    format = format.replace(/hh/g, ('0' + date.getHours()).slice(-2));
    format = format.replace(/mm/g, ('0' + date.getMinutes()).slice(-2));
    format = format.replace(/ss/g, ('0' + date.getSeconds()).slice(-2));
    return format;
}
M5Stack側コード
こちらもコードは公開していますので、要点だけ説明したいと思います。
M5Stackは起動後, 読込画面を表示するのとNTPの設定を行います。
WiFiの接続がタイムアウトするとESP32自体をrestartするようにしました。
void setup()
{
    Serial.begin(115200);
    delay(10);

    // We start by connecting to a WiFi network

    Serial.println();
    Serial.println();
    Serial.print("Connecting to ");
    Serial.println(ssid);

    M5.begin();
    WiFi.begin(ssid, password);
    M5.Lcd.drawJpgFile(SD, "/image_initializing.jpg");

    while (WiFi.status() != WL_CONNECTED) {
        if(millis() > 30 * 1000){
            ESP.restart();
        }
        delay(500);
        Serial.print(".");
    }

    Serial.println("");
    Serial.println("WiFi connected");
    Serial.println("IP address: ");
    Serial.println(WiFi.localIP());

    configTime(gmtOffset_sec, daylightOffset_sec, ntpServer);
}
ループの中では、
時刻表の取得をするべきかの判断をするshouldFetch()という関数があり、
- 次の電車の時刻を未取得の場合(初回起動時)
- 次の電車の時刻がすでに過ぎている
の場合にTrueが返ってきます。
その場合に、新しい電車の発車時刻をLambda側に取得しに行きます。
取得したResponseはJSONなのですが、ArduinoJSONというライブラリでParseしています。
httpのリクエストには、ESP32公式のArduino向けのHTTPClientというライブラリを使いました。
httpsのサンプルもあります。
後は
- isLast() : 次の電車が終電か? (表示部分は未実装)
- wasLast() : 終電は既に出発してしまったか?
に応じて表示内容を変更しています。
void loop()
{
    M5.update();

    if (WiFi.status() != WL_CONNECTED) {
        ESP.restart();
    }

    if(trainTimer.shouldFetch()){
        trainTimer.getNewDia();
    }

    if(M5.BtnC.isPressed()){
        mode++;
        mode %= 2;
    }

    if(mode == MODE_DEBUG){
        renderDebugConsole();
    }
    else if(trainTimer.isLast()){
        // renderLastTrain();
        renderRemainingTime();
    }
    else if(trainTimer.wasLast()){
        renderAfterLastTrain();
    }else{
        renderRemainingTime();
    }


    Serial.print("mode :");
    Serial.println(mode);
    delay(1000);
    printLocalTime();
}
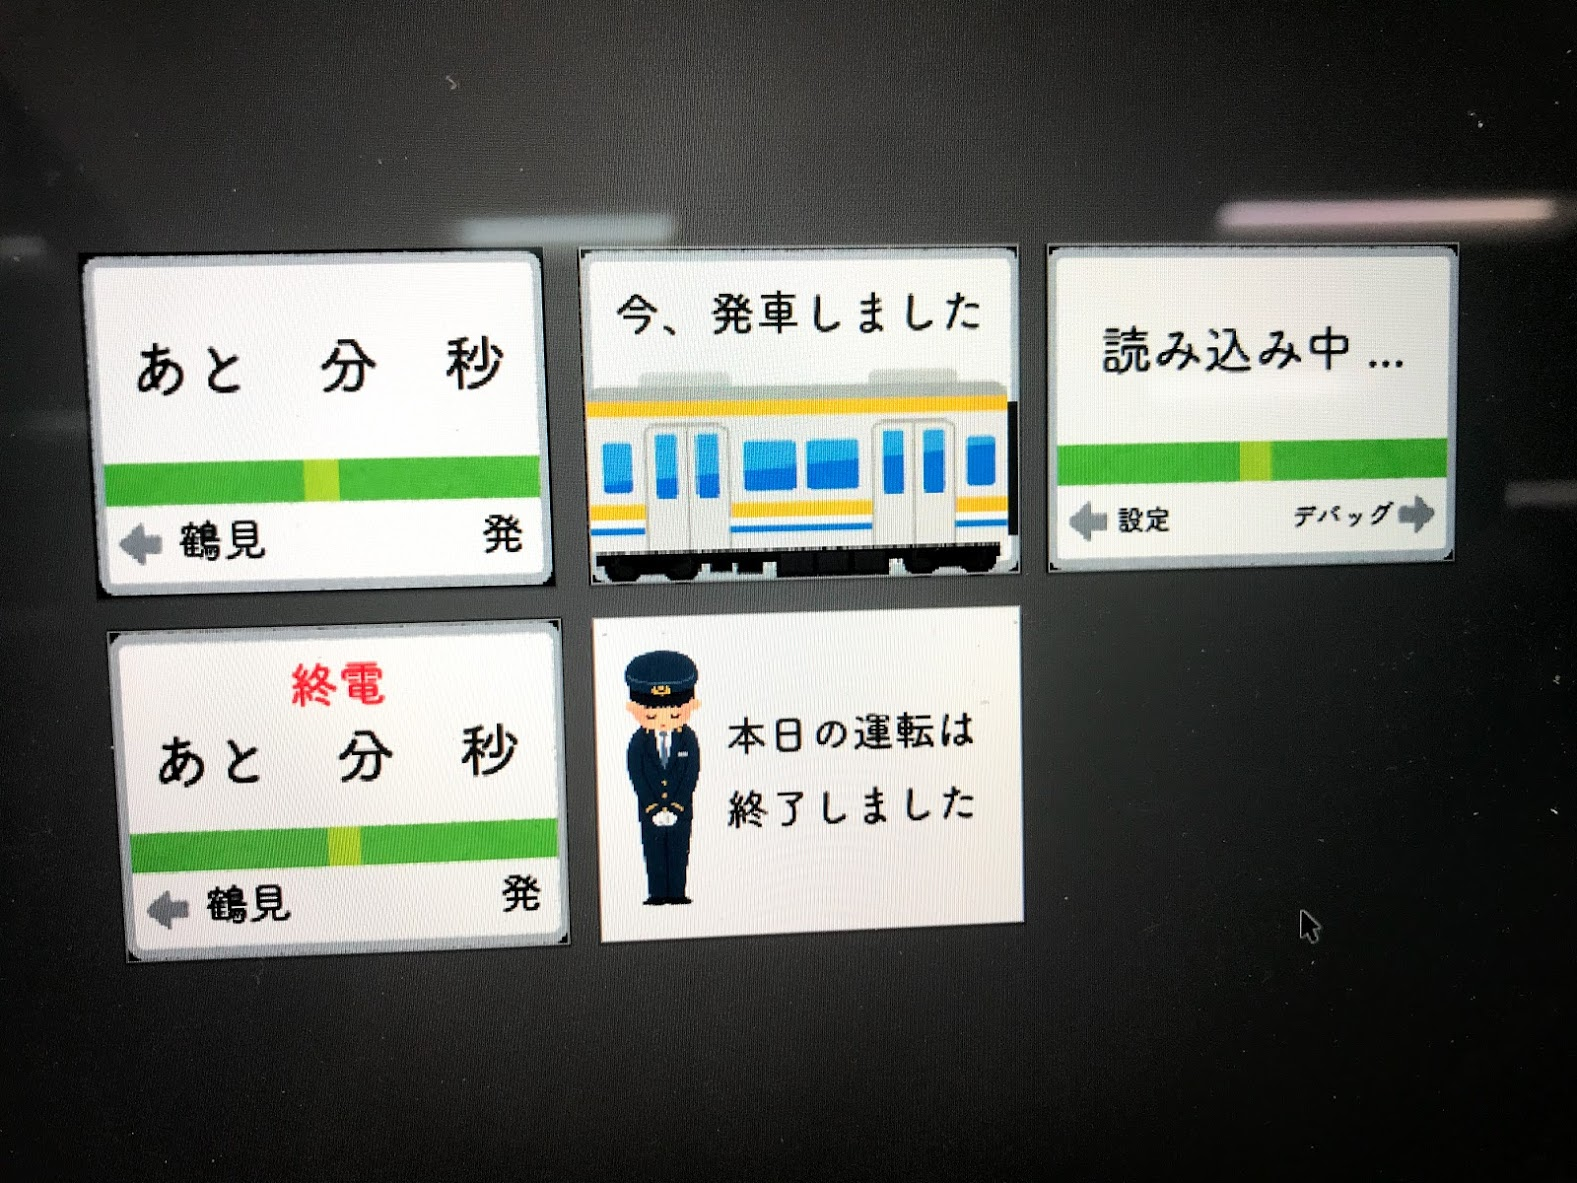
実際の残り時間表示部分はSDカードから画像を読込み、ちょうどよいところに文字をレンダリングしています。
void renderRemainingTime(){
         // 一部省略 //
    char str[20];
    M5.Lcd.drawJpgFile(SD, "/image_remaining_time.jpg");
    M5.Lcd.setTextColor(BLACK);

    M5.Lcd.setTextSize(4);
    M5.Lcd.setCursor(115,67);
    sprintf(str,"%02d", time_remaining.tm_min);
    M5.Lcd.print(str);

    M5.Lcd.setCursor(204,67);
    sprintf(str,"%02d", time_remaining.tm_sec);
    M5.Lcd.print(str);

    M5.Lcd.setCursor(140,188);
    sprintf(str,"%02d:%02d", trainTimer.timeinfo[0].tm_hour, trainDia.timeinfo[0].tm_min);
    M5.Lcd.print(str);
}
画像
SDカードの画像はこんな感じで、イラストレーターを使って、320x240でJPG形式で書き出しました。
基本的にいらすとやさんから使わせて頂いて、鶴見線の電車のイラストがなかったので、総武線の電車のイラストに青と白のラインを追加しました。
まとめ
今は職場の鶴見小野駅(鶴見線)しか対応していないのですが、もし自分で似たものを作ってみたいという方は、時刻表のCSVを書き換えて、画像ファイルなどを書き換えたら同じことができるので、試してみてください。
ではでは。

