Deno (ディノ) Advent Calendar 10日目の記事です。
今日はおうむ返し LINE ボットを Deno Deploy にデプロイする話です。
事前準備
まず事前準備として、LINE Developers に登録して、新規プロバイダーを作成して、Message API の新規チャンネルを作成して、新規 Bot アカウントを開設してください。
ここまでの具体的な手順は Node学園祭2017 1時間でLINE BOTを作るハンズオン の資料で詳しく解説されているので、是非こちらを参照しましょう。
Bot アカウントが作成出来たら、さらにそのボットと友達になりましょう。
さらに、Bot の Channel Secret と Channel Access Token を取得してメモしましょう。(こちらの手順も Node学園祭2017 1時間でLINE BOTを作るハンズオン で詳しく解説されているので、参考にしてください)
Channel Secret と Channel Access Token が揃って、Bot と友達になった状態になると、おうむ返しボットを作るための準備が完了です。
おうむ返しボットを Deno Deploy にデプロイ
いきなり最終形のコードを載せてしまいます。
import { serve } from "https://deno.land/std@0.117.0/http/server.ts";

const accessToken = Deno.env.get("ACCESS_TOKEN");
const channelSecret = Deno.env.get("CHANNEL_SECRET");

function indexPage() {
  return new Response(`This is an example LINE bot implementation
See https://github.com/kt3k/line-bot-deno-deploy for details`);
}

function notFoundPage() {
  return new Response("404 Not Found", { status: 404 });
}

const enc = new TextEncoder();
const algorithm = { name: "HMAC", hash: "SHA-256" };

async function hmac(secret: string, body: string) {
  const key = await crypto.subtle.importKey(
    "raw",
    enc.encode(secret),
    algorithm,
    false,
    ["sign", "verify"],
  );
  const signature = await crypto.subtle.sign(
    algorithm.name,
    key,
    enc.encode(body),
  );
  return btoa(String.fromCharCode(...new Uint8Array(signature)));
}

async function webhook(request: Request) {
  if (!accessToken) {
    throw new Error("ACCESS_TOKEN is not set");
  }
  if (!channelSecret) {
    throw new Error("CHANNEL_SECRET is not set");
  }

  const json = await request.text();
  const digest = await hmac(channelSecret, json);
  const signature = request.headers.get("x-line-signature");

  if (digest !== signature) {
    return new Response("Bad Request", { status: 400 });
  }

  const event = JSON.parse(json);
  console.log(event);
  if (event.events.length === 0) {
    return new Response("OK");
  }
  const res = await fetch("https://api.line.me/v2/bot/message/reply", {
    method: "POST",
    headers: {
      "content-type": "application/json",
      "authorization": `Bearer ${accessToken}`,
    },
    body: JSON.stringify({
      replyToken: event.events[0].replyToken,
      messages: [
        {
          type: "text",
          text: event.events[0].message.text,
        },
        {
          type: "text",
          text: "Reply from Deno Deploy beta3",
        },
      ],
    }),
  });
  await res.arrayBuffer();
  return new Response("OK");
}

serve((request) => {
  const { pathname } = new URL(request.url);

  switch (pathname) {
    case "/":
      return indexPage();
    case "/webhook":
      return webhook(request);
    default:
      return notFoundPage();
  }
});
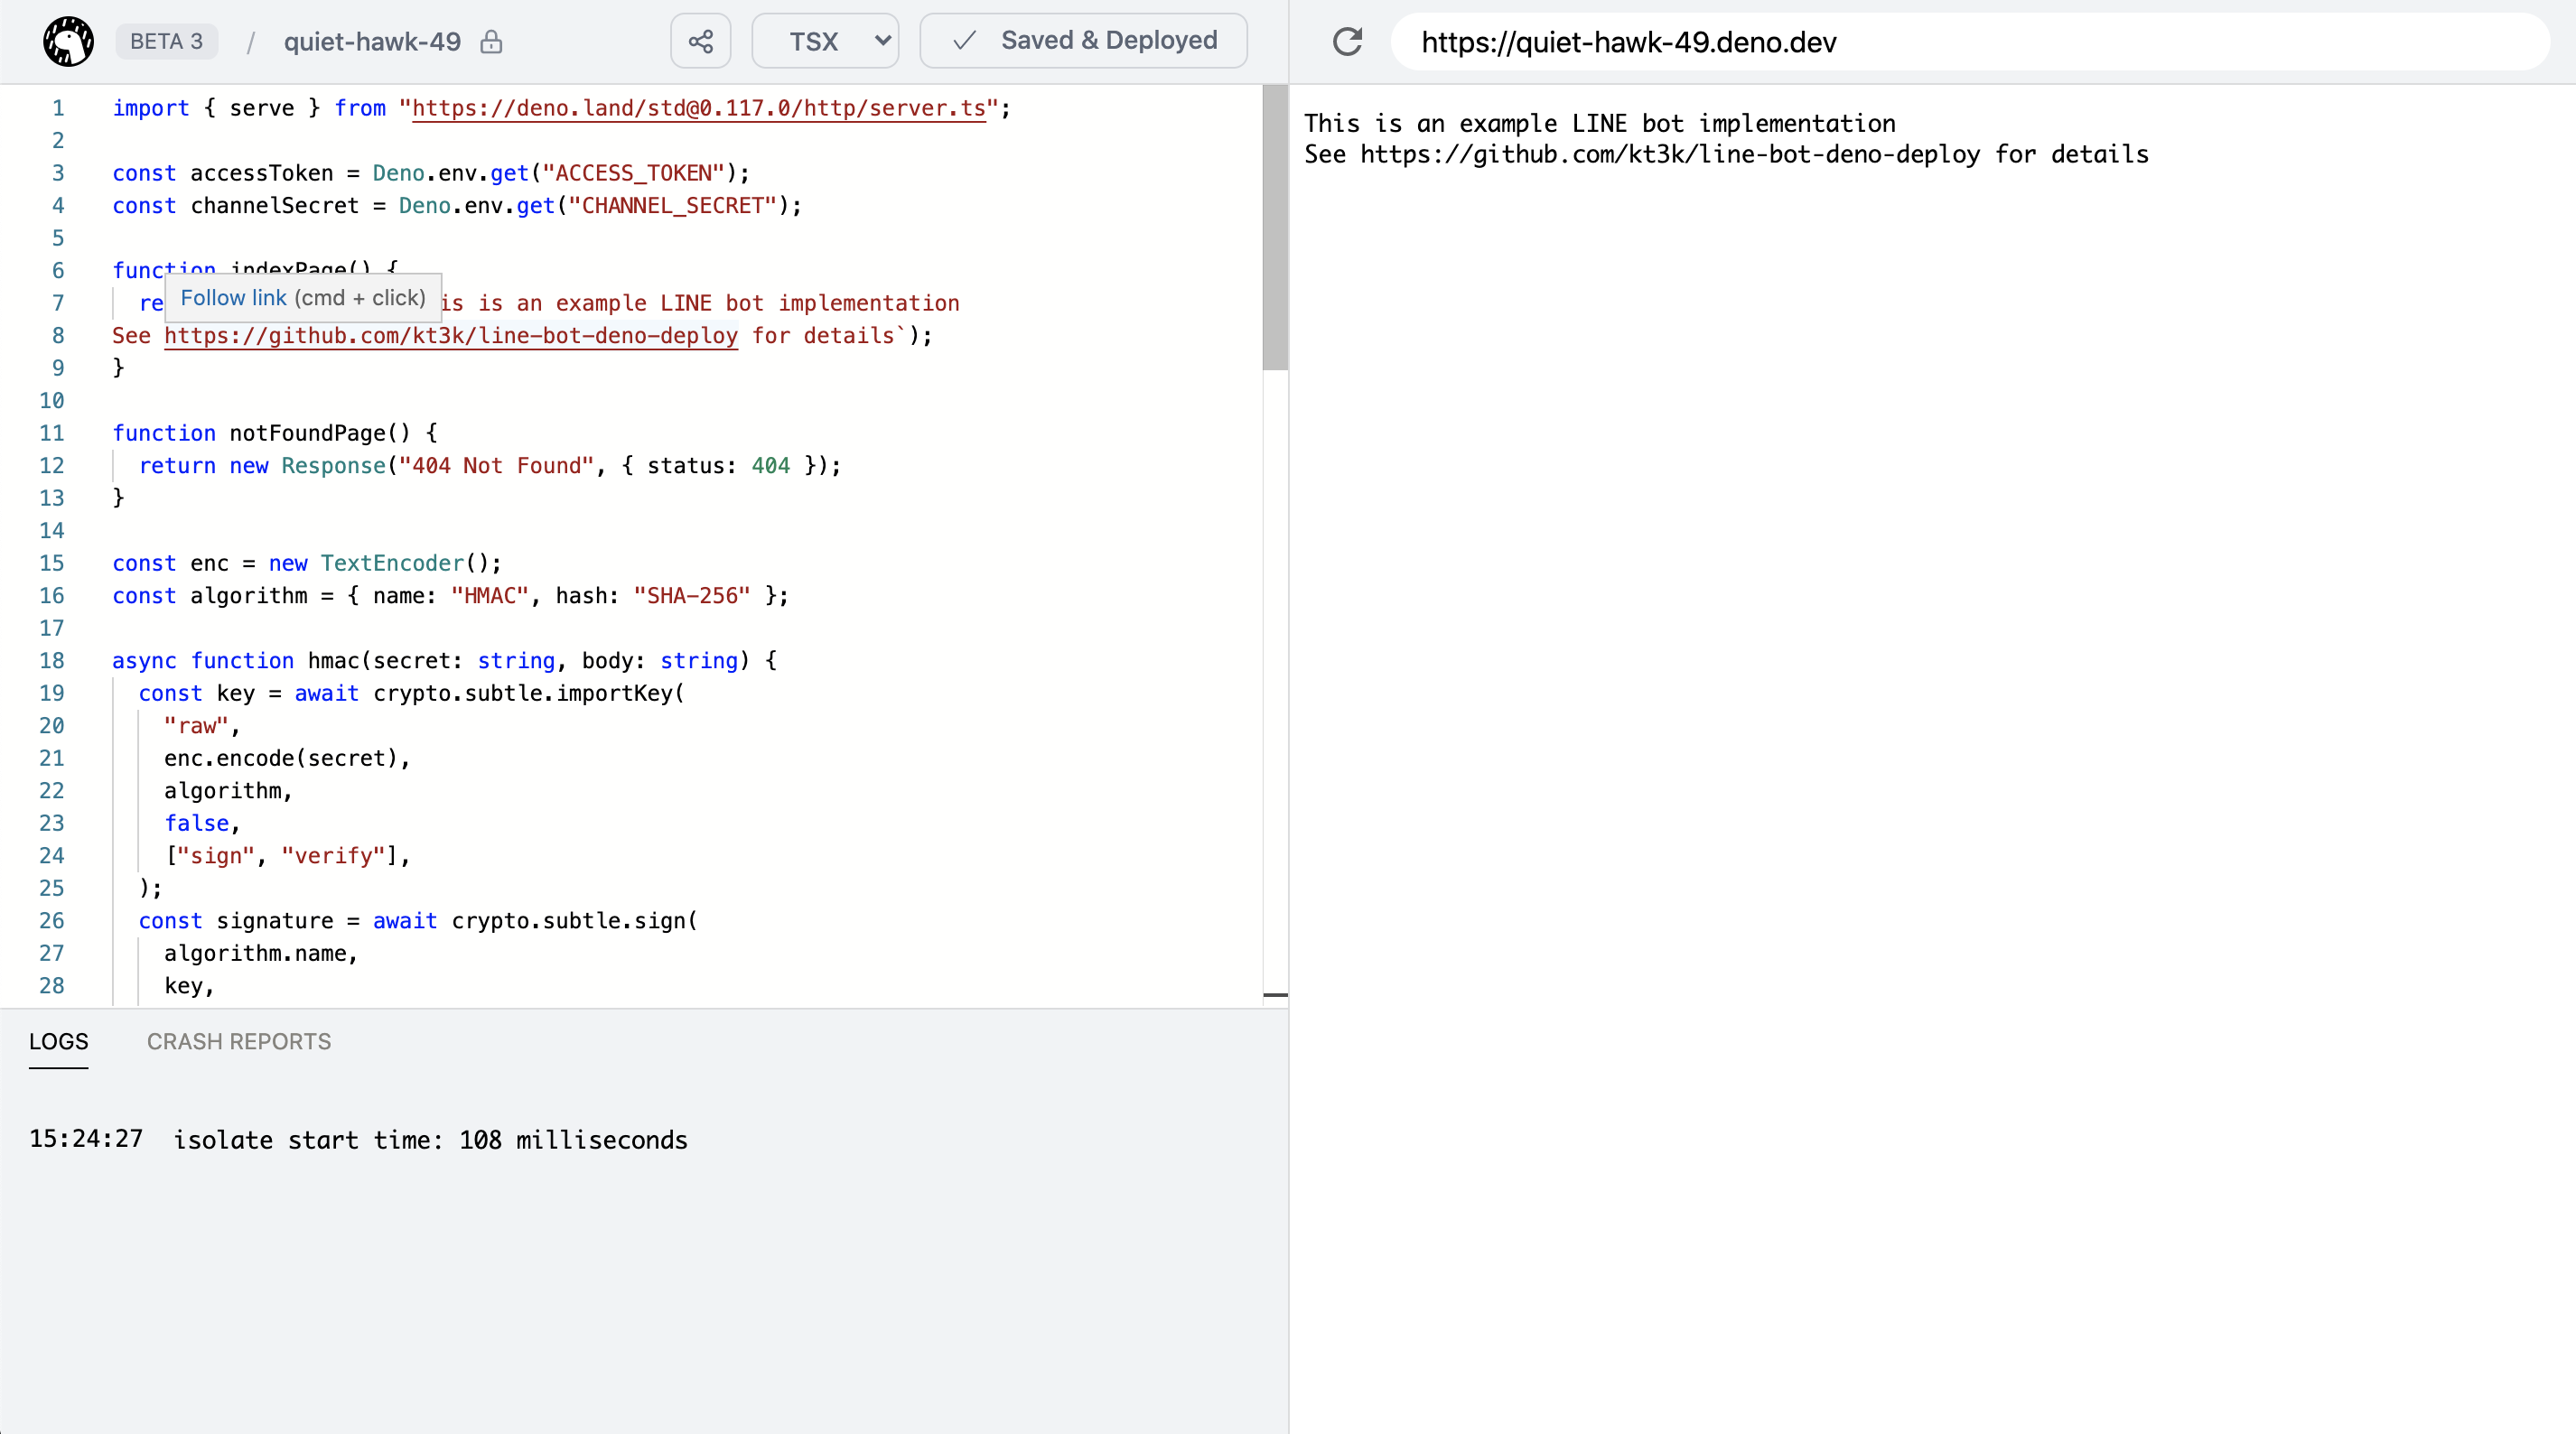
上記のコードをコピーして、Deno Deploy の Playground に貼り付けてください。
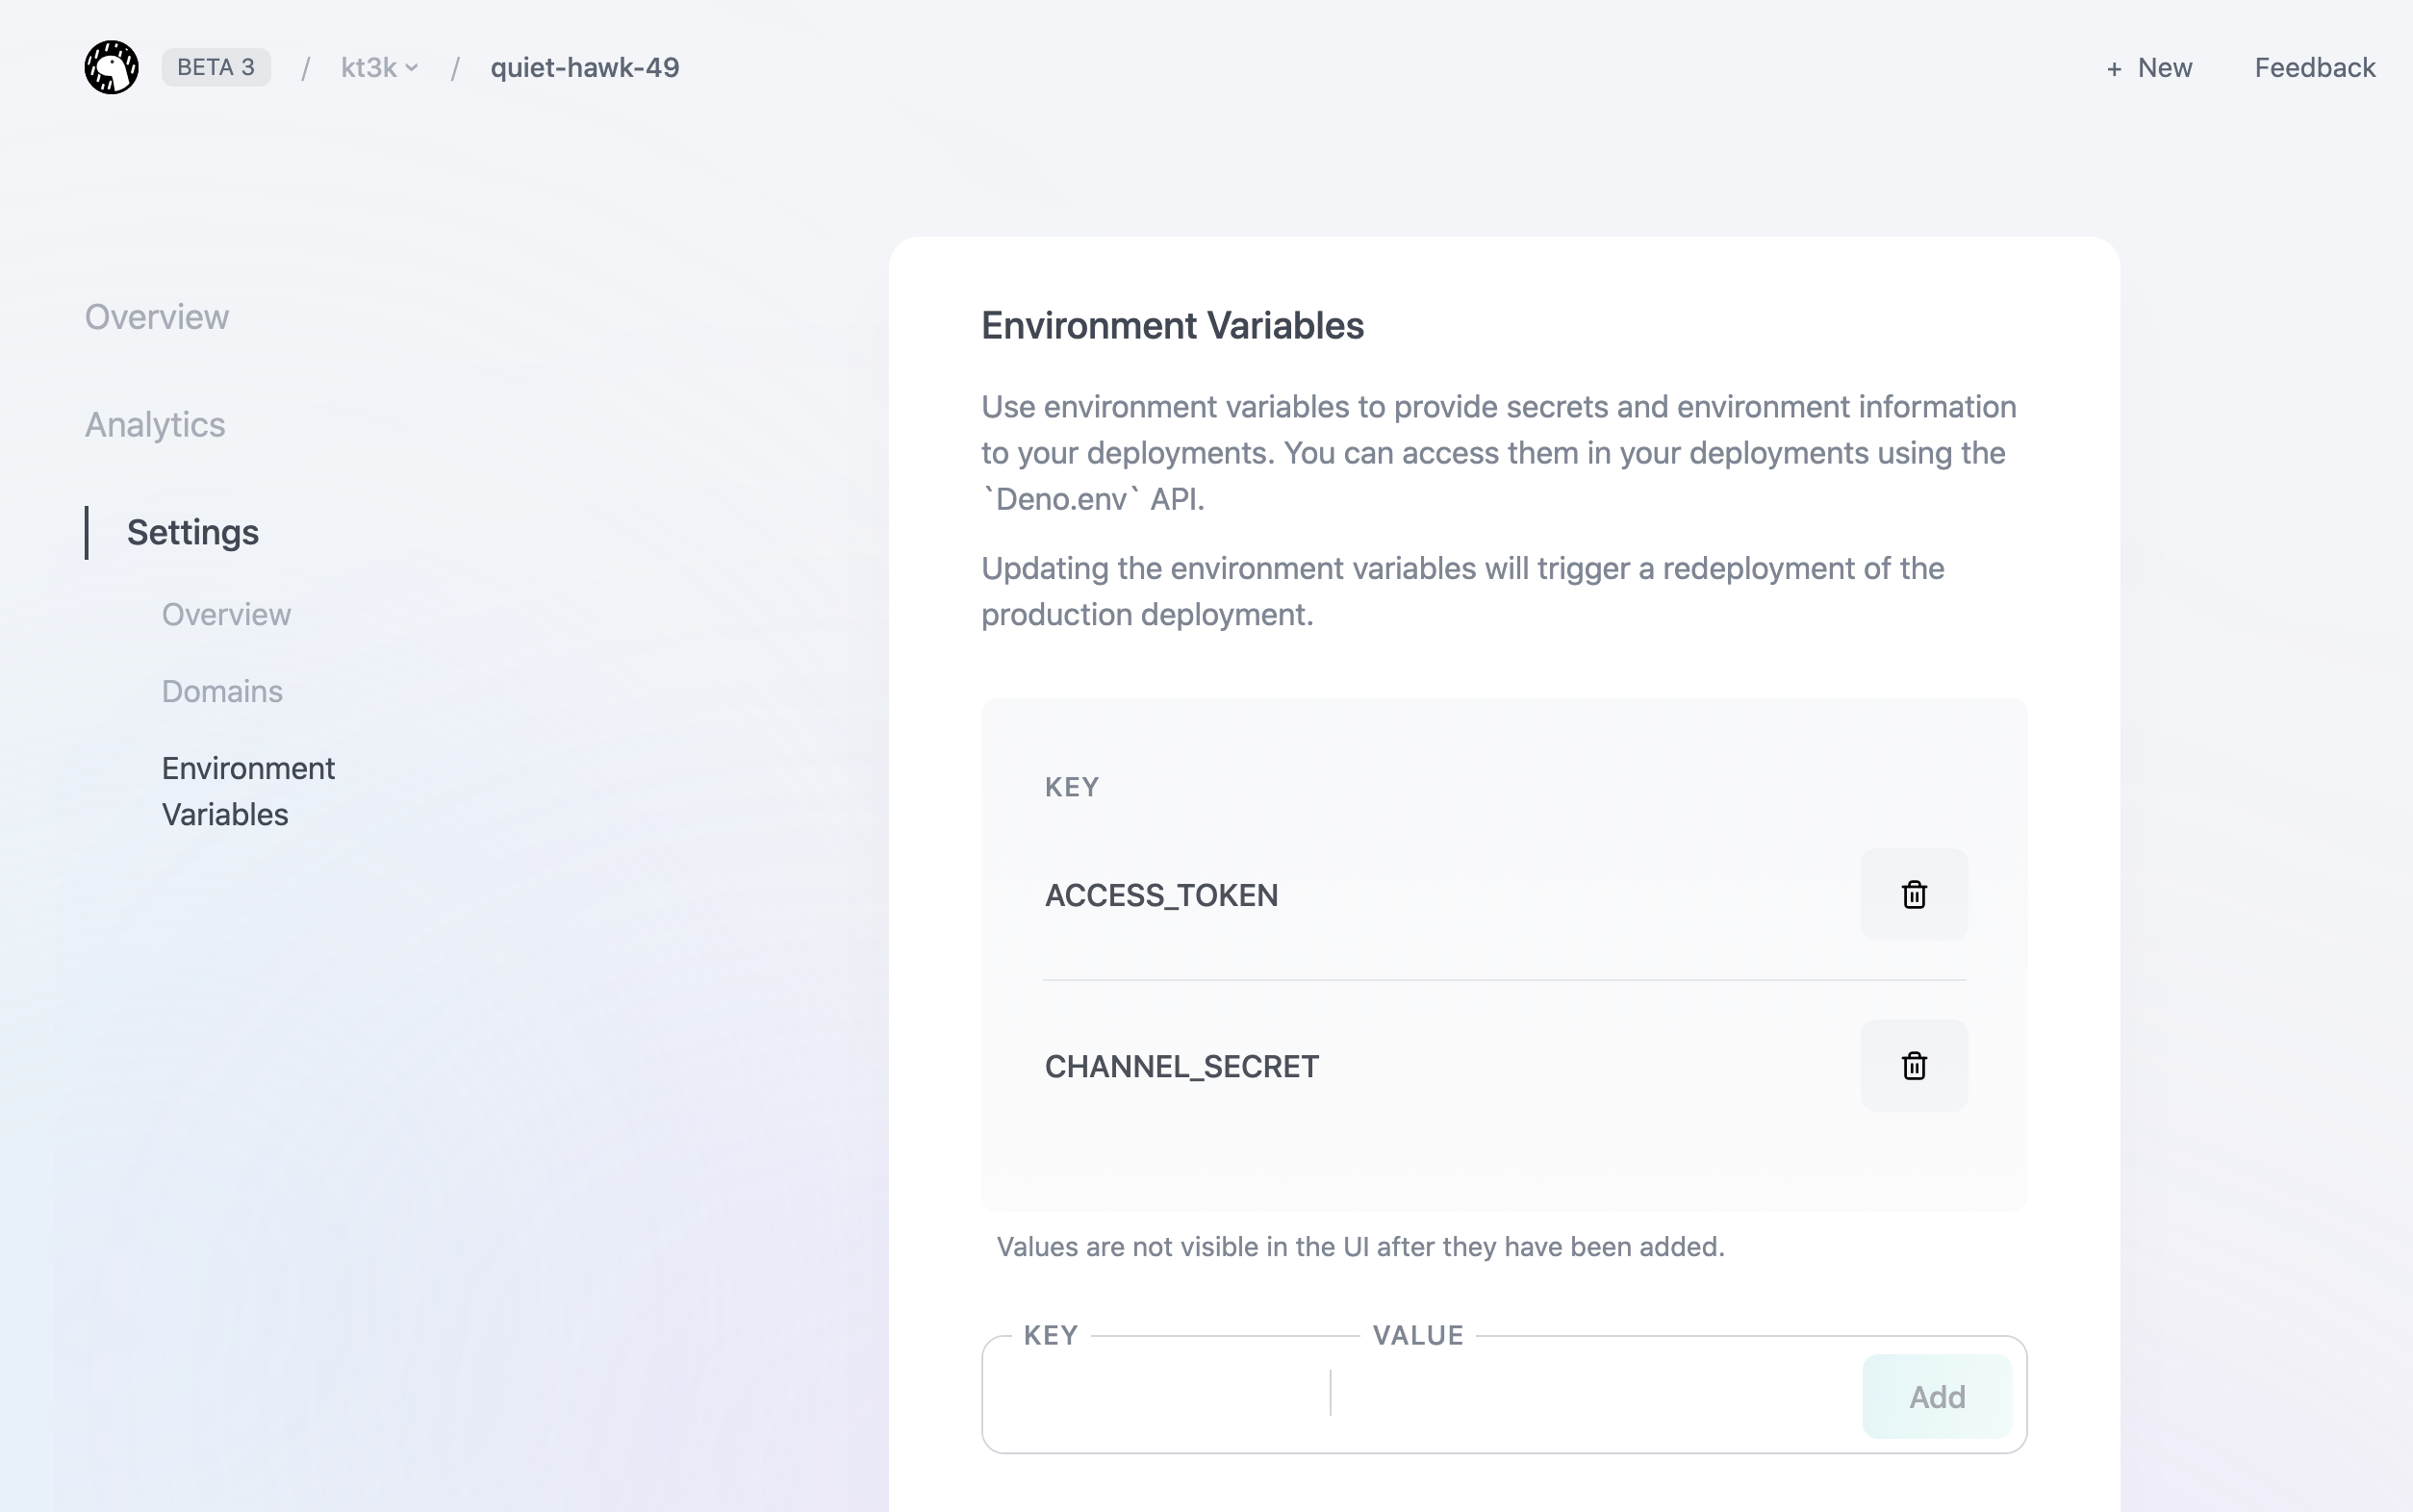
次にプロジェクト名 (上の画像の quiet-hawk-49 の部分) をクリックし、左メニューの Settings から環境変数設定画面に遷移し、CHANNEL_SECRET と ACCESS_TOKEN 環境変数をそれぞれセットしてください。
ここまで、出来たら左メニューの Overview から、プロジェクトメインページへ遷移したのち、Open Playground を選んでプレイグラウンドページに戻ってください。
ここで、右ペインに表示されているデプロイされた URL (この場合 https://quiet-hawk-49.deno.dev/ ) を控えてください。(この URL に Bot がデプロイされた状態になっています。)
この URL を LINE の Developer Console 上で Webhook として登録します。(先ほど控えた URL の後ろに /webhoook を追加してください。)
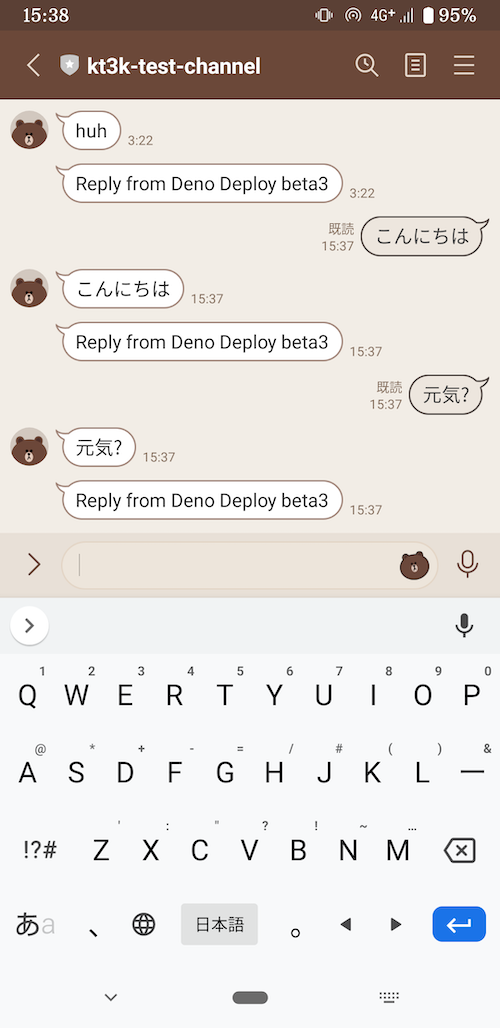
ここまで、設定した状態でボットに対して話しかけると、話しかけた内容をおうむ返ししてくるようになります。
以下ではこのコードの各部分を解説します。
serve 関数
標準モジュールから serve 関数を import して呼び出しています。serve を呼ぶ事で Web サーバーが立ち上がります。(なお、この serve は Deno と Deno Deploy で共通して使うことが可能です。)
import { serve } from "https://deno.land/std@0.117.0/http/server.ts";
// 中略
serve((request) => {
  const { pathname } = new URL(request.url);

  switch (pathname) {
    case "/":
      return indexPage();
    case "/webhook":
      return webhook(request);
    default:
      return notFoundPage();
  }
});
この呼び出しで Web サーバーが立ち上がってハンドラー関数に従ってレスポンスを返します。ハンドラー関数は const { pathname } = new URL(request.url); で、まずリクエストが来たパスを取得し、その値でスイッチして、挙動を変えています (つまり簡易的なルーティングをしています。)
リクエストが / にきた場合は案内ページ、/webhook にきた場合はボットとしての webhook 処理、それ以外の場合は 404 ページをレスポンスしてます。
/webhook がボットとしての挙動の本質なので、以下では webhook 関数を解説していきます。
webhook 処理の解説
async function webhook(request: Request) {
  if (!accessToken) {
    throw new Error("ACCESS_TOKEN is not set");
  }
  if (!channelSecret) {
    throw new Error("CHANNEL_SECRET is not set");
  }
  // ...
}
まず、webhook 処理の冒頭で、accessToken と channelSecret がない場合はエラーにしています。環境変数をセットしていない場合はここでエラーになります。なお Deno Deploy では Response を返さずに error を throw すると、ユーザーには 500 エラーが返るようになっています。
  const json = await request.text();
  const digest = await hmac(channelSecret, json);
  const signature = request.headers.get("x-line-signature");

  if (digest !== signature) {
    return new Response("Bad Request", { status: 400 });
  }
リクエストのボディーを JSON としてパースして、その HMAC ダイジェストを計算しています。HMAC の計算結果と、リクエストの x-line-signature ヘッダーの内容を比較して、本当に LINE プラットフォームからのリクエストかどうかを検証しています。
正しくないリクエストの場合は 400 エラーをレスポンスしています。
ちなみに hmac 関数は以下のように実装しています。
async function hmac(secret: string, body: string) {
  const key = await crypto.subtle.importKey(
    "raw",
    enc.encode(secret),
    algorithm,
    false,
    ["sign", "verify"],
  );
  const signature = await crypto.subtle.sign(
    algorithm.name,
    key,
    enc.encode(body),
  );
  return btoa(String.fromCharCode(...new Uint8Array(signature)));
}
SubtleCrypto API の importKey を使って、HMAC のキーを作成し、さらに sign を使って、署名値を計算しています。
このように Deno Deploy では、Web Crypto API を使って、暗号関連の処理を実装することができます。
  const event = JSON.parse(json);
  console.log(event);
  if (event.events.length === 0) {
    return new Response("OK");
  }
ここでは、LINE から来た JSON をパースして event を処理しています。events 配列が空の場合、これは最初の疎通確認 (console 上で verify を押した時にくるリクエスト) に対応しています。疎通確認ではとにかく成功レスポンスを返せば良いというルールになっているため、成功を返しています。
  const res = await fetch("https://api.line.me/v2/bot/message/reply", {
    method: "POST",
    headers: {
      "content-type": "application/json",
      "authorization": `Bearer ${accessToken}`,
    },
    body: JSON.stringify({
      replyToken: event.events[0].replyToken,
      messages: [
        {
          type: "text",
          text: event.events[0].message.text,
        },
        {
          type: "text",
          text: "Reply from Deno Deploy beta3",
        },
      ],
    }),
  });
  await res.arrayBuffer();
  return new Response("OK");
最後に、ボットが返信する処理です。ボットから相手に返信するためには、https://api.line.me/v2/bot/message/reply というエンドポイントに上記のようなペイロードを投げます。(上の例では2つのメッセージを同時に返信しています。1つ目で event.events[0].message.text つまり相手の発言内容をそのまま返しています。2つ目のメッセージでは、Reply from Deno Deploy beta3 という固定のメッセージを返しています。1つのメッセージに対して5つまでのメッセージを返信できるようです。)
最後に、await res.arrayBuffer(); で念のため LINE API からのレスポンスを消化してから、return new Response("OK"); で成功レスポンスを返して終了です。
この返信の仕方で、ユーザーには以下のような見え方になります。
まとめ
今日は Deno Deploy におうむ返しする LINE Bot をデプロイする手順を紹介しました。


