NeomuttでGmailにOAuth2.0する(2022版)
TL;DR
2020年に書いた内容が
古くなったから
更新した
まえがき
以前、NeomuttでGmailを利用するための手順を書き、Python2の環境では問題なく動きましたが、Pythonの利用環境整えるのが面倒なので、Golangで書き直しました。
NeomuttでのOAuth2.0利用手順
Google Cloud PlatformでOAuthクライアントIDを作成する
1. 以下のURLを開き、Google Cloud PlatformのAPIサービス設定を開きます。
2. [新しいプロジェクト]を作成から、mutt用のプロジェクトを作成します。
Google Cloud Platformのロゴの右側あたりの「▷hogehoge▽」の部分を押すと作れました。
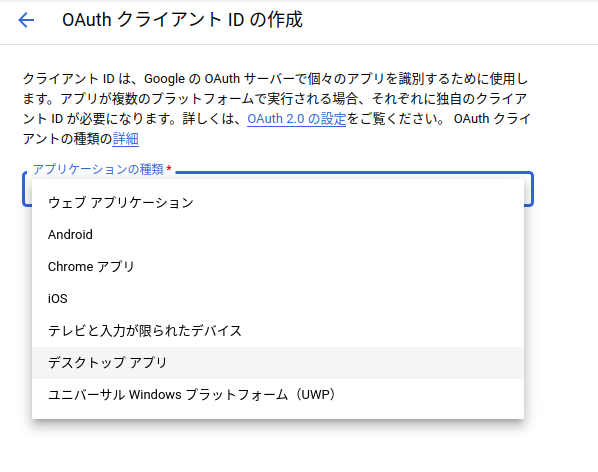
3. [認証情報を作成]から、「OAuth クライアント ID」を作成します
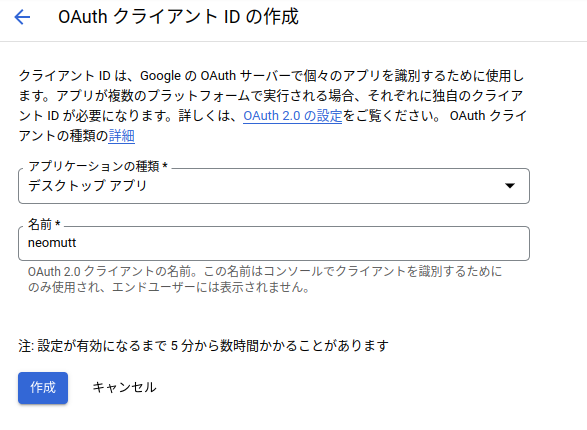
4. 適当な識別名を入力します。(管理上の問題だけなので何でも良いです)
今回は[デスクトップアプリ]-[neomutt]で作成しました。
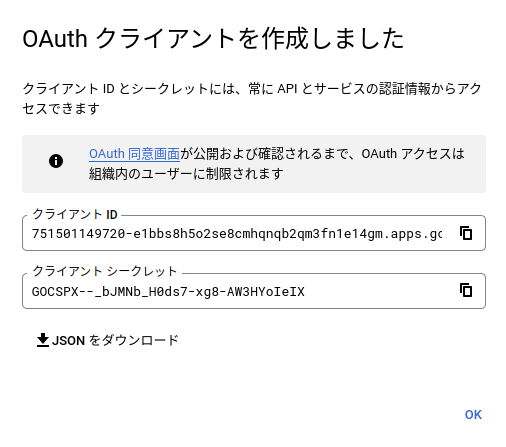
5. 作成が完了すると、以下のような画面が表示されます。
内容は後で使うので、JSONをダウンロードし、参照できるようにしておいてください。
以上でGoogle Cloud Platform 側の手順は終わりです。
実際にOAuthでの認可を行う
1. 以下のURLからプログラムをダウンロード
※ ダウンロード時に arm64 と amd64 を間違えないように気をつけてください
2.アーカイブを解凍し、適当な場所に配置
例では、ユーザーの.muttディレクトリに配置しています。
curl -L -O https://github.com/ksuzukiTVDn1/neomutt_oauth2_golang/releases/download/v1/neomutt_oauth2_golang_1_linux_amd64.tar.gz
tar zxf neomutt_oauth2_golang_1_linux_amd64.tar.gz
mv neomutt_oauth2_golang oauth
3. プログラムを実行し、OAuth2.0の認可コードフローを実行
~/.mutt/oauth \
--client_id=<「OAuthクライアントを作成しました」の画面のクライアントID> \
--client_secret=<「OAuthクライアントを作成しました」の画面のクライアントシークレット> \
--generate_oauth2_token
4. 以下のような遷移先のURLが表示されるので、ブラウザに入力する
To authorize token, visit this url and follow the directions:
  https://accounts.google.com/o/oauth2/auth?client_id=~~~
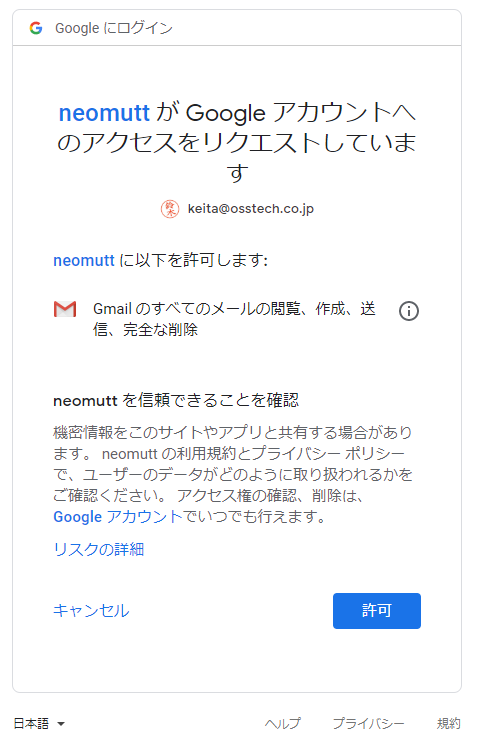
5. 認可を求められるので許可
6. codeの値を取得
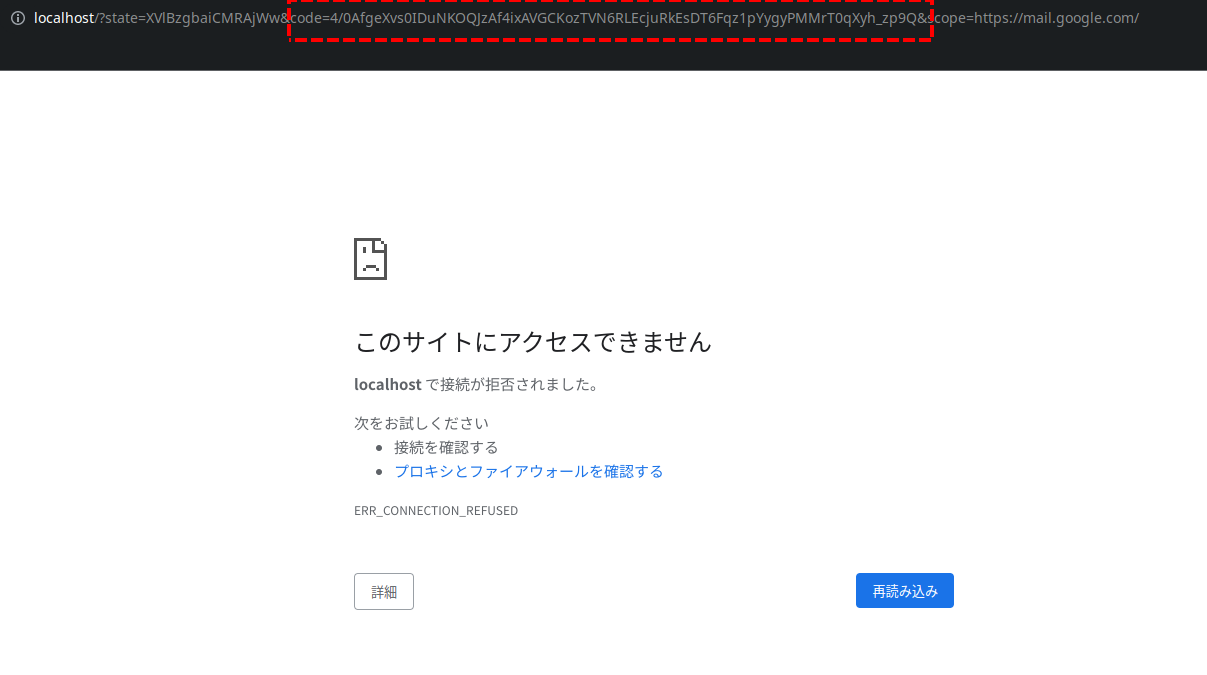
ダミーURLとして、http://localhostに転送されるため、ブラウザは転送エラーとなります。
エラーとなったURLを確認し、codeの値を取得します。
必要となる値は、「このサイトにアクセスできません」となった画面のURLの code= から &scope〜の間の値です。
7.取得したコードをコンソールに入力します
Enter verification code:
<出力された文字列を入力>
8. OAuthのリフレッシュトークン、アクセストークンが表示される
Refresh Token: xxxxxx
Access Token:  xxxxxxxxxx
Access Token Expiration Seconds: YYYY-MM-DD HH:MM:SS
muttrcでの設定
1. 以下のようにファイルを配置します。
┬ .mutt
├ muttrc
└ oauth
2. muttrcで接続設定を以下のように変更します。
set imap_authenticators="oauthbearer"
set imap_oauth_refresh_command="~/.mutt/oauth2 \
  --quiet \
  --user=<Gmailのアドレス> \
  --client_id=<「OAuthクライアントを作成しました」の画面のクライアントID> \
  --client_secret=<「OAuthクライアントを作成しました」の画面のクライアントシークレット> \
  --refresh_token=<コンソールでの操作で表示された、8.のリフレッシュトークン>"

set smtp_authenticators="oauthbearer"
set smtp_oauth_refresh_command="~/.mutt/oauth \
  --quiet \
  --user=<Gmailのアドレス> \
  --client_id=<「OAuthクライアントを作成しました」の画面のクライアントID> \
  --client_secret=<「OAuthクライアントを作成しました」の画面のクライアントシークレット> \
  --refresh_token=<コンソールでの操作で表示された、8.のリフレッシュトークン>"
3. おまけ
ClientID, ClientSecret, RefreshTokenについては、平文で保存されていると、情報を盗み出した人からOAuthでアクセスが自由に行えてしまいます。
そのため、GnuPGで暗号化するとなお安心です。
暗号化のやりかたは以下の通り。(GnuPGが設定済みの前提)
- 以下の内容で適当なファイルを作成します。
- 例では、
oauth_tokenで作成しています。
- 例では、
set imap_oauth_refresh_command=".mutt/oauth \
  --quiet \
  --user=<Gmailのアドレス> \
  --client_id=<「OAuthクライアントを作成しました」の画面のクライアントID> \
  --client_secret=<「OAuthクライアントを作成しました」の画面のクライアントシークレット> \
  --refresh_token=<コンソールでの操作で表示された、8.のリフレッシュトークン>"

set smtp_oauth_refresh_command="~/.mutt/oauth \
  --quiet \
  --user=<Gmailのアドレス> \
  --client_id=<「OAuthクライアントを作成しました」の画面のクライアントID> \
  --client_secret=<「OAuthクライアントを作成しました」の画面のクライアントシークレット> \
  --refresh_token=<コンソールでの操作で表示された、8.のリフレッシュトークン>"
- gpgで暗号化します
gpg -r <uid> -e oauth_token
- 平文のファイルを削除します
shred oauth_token
rm oauth_token
- muttrcから、平文の設定行を削除し、暗号化したファイルを読み込むよう設定
set imap_authenticators="oauthbearer"
set imap_oauth_refresh_command="~/.mutt/oauth2 \
  --quiet \
  --user=<Gmailのアドレス> \
  --client_id=<「OAuthクライアントを作成しました」の画面のクライアントID> \
  --client_secret=<「OAuthクライアントを作成しました」の画面のクライアントシークレット> \
  --refresh_token=<コンソールでの操作で表示された、8.のリフレッシュトークン>"

set smtp_authenticators="oauthbearer"
set smtp_oauth_refresh_command="~/.mutt/oauth \
  --quiet \
  --user=<Gmailのアドレス> \
  --client_id=<「OAuthクライアントを作成しました」の画面のクライアントID> \
  --client_secret=<「OAuthクライアントを作成しました」の画面のクライアントシークレット> \
  --refresh_token=<コンソールでの操作で表示された、8.のリフレッシュトークン>"
↓削除
set imap_authenticators="oauthbearer"
set smtp_authenticators="oauthbearer"
source "gpg -d ~/.mutt/oauth_token.gpg |"

