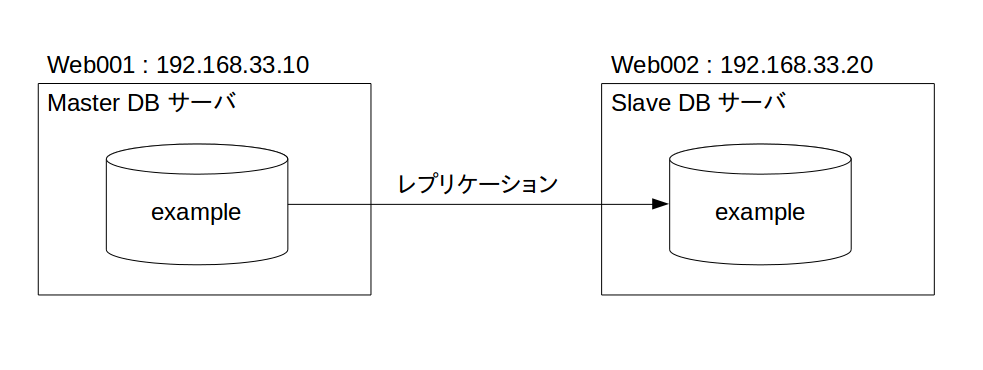
今回は、以下の構成図のようにMySQLでMaster-Slave構成のレプリケーション設定のやり方を説明していきます。
環境
| OS/ミドルウェア | バージョン |
|---|---|
| CentOS | 7.1 |
| MySQL | 5.7.12 |
| ホスト名 | IPアドレス | 役割 |
|---|---|---|
| web001 | 192.168.33.10 | Master DBサーバ |
| web002 | 192.168.33.20 | Slave DBサーバ |
Master DBサーバの設定
1. confファイルの設定
まず、mysqlでレプリケーションの処理が行えるようにMaster DBサーバのMySQLのconfファイルにサーバIDとバイナリログの取得設定を追記します。
バイナリログについては、MySQLのリファレンスやこのあたりのウェブページで詳しく説明しています。
手順は以下の通りです。
- my.cnfの編集
$ sudo vi /etc/my.cnf
- my.cnfにサーバIDとバイナリログの取得設定を追記
[mysqld]
・
・
・
log-bin
server-id=101
- 設定内容を反映させるためにMySQLを再起動
$ sudo systemctl restart mysqld.service
2. レプリケーション用のDBを作成
続いて、レプリケーションを行うDBを作成します。
- MySQLにログイン
$ mysql -u root -p  # 以後DBのログインについては省略して説明します。
Enter password:
- example DBを作成
mysql> create database example;
3. Slaveアカウントを作成
次に、レプリケーションを行うためのSlaveアカウントを作成します。
mysql> create user 'repl'@'192.168.33.20' identified by 'Slave-passw0rd';
mysql> grant replication slave on *.* to 'repl'@'192.168.33.20';
4. example DBをdump
Master DBサーバのexample DBの内容をSlave DBサーバにコピーするため example DBをdumpします。
- dump中にDBが更新されないようにテーブルの書き込みをロック
mysql> flush tables with read lock;
- 現在のバイナリログの状態を確認する
mysql> show master status;
*************************** 1. row ***************************
             File: web001-bin.000001
         Position: 619
     Binlog_Do_DB:
 Binlog_Ignore_DB:
Executed_Gtid_Set:
1 row in set (0.01 sec)
※補足
上記が以下のような出力になった場合、Fileは空白文字列 '' 、Positionは4となるので注意してください。
mysql> show master status;
Empty set (0.00 sec)
- example DBをdump
$ mysqldump --single-transaction -u root -p example > example.dump
Enter password:
$ scp example.dump 192.168.33.20:~  # scpでslave DBサーバに dumpデータを転送
example.dump                                                                                                                                           100% 1252     1.2KB/s   00:00
- テーブルのロックを解除する
mysql> unlock tables;
以上で、Master DBサーバの作業は完了です。
Slave DBサーバの設定
1. confファイルの設定
Master DBと同様にSlave DBサーバのMySQLのconfファイルにもサーバIDを追記します。このとき、Master DBサーバのサーバIDと重複しないようにする必要があります。
- my.cnfの編集
$ sudo vi /etc/my.cnf
- my.cnfにサーバIDを追記
[mysqld]
・
・
・
server-id=102
- 設定内容を反映させるためにMySQLを再起動
$ sudo systemctl restart mysqld.service
2. dumpデータをコピー
続いて、Master DBサーバからdumpしたexample DBの内容を Slave DBサーバにコピーします。
mysql> create database example;
mysql> use example;
mysql> source ~/example.dump;  # dumpデータをコピー
3. Slave DBの設定
- Slave DBで Master DBへ接続するためのパラメータを設定
mysql> change master to
    -> master_host='192.168.33.10',          # Master DBサーバのホスト名/IPアドレス
    -> master_user='repl',                   # Master DBサーバへ接続するユーザ名
    -> master_password='Slave-passw0rd',     # 接続するユーザ名のパスワード
    -> master_log_file='web001-bin.000001',  # バイナリログのファイル名
    -> master_log_pos=619;                   # バイナリログの現在位置
※補足
show master status で Empty set が出力された場合以下を入力
mysql> change master to
    -> master_host='192.168.33.10',          # Master DBサーバのホスト名/IPアドレス
    -> master_user='repl',                   # Master DBサーバへ接続するユーザ名
    -> master_password='Slave-passw0rd',     # 接続するユーザ名のパスワード
    -> master_log_file='',  # バイナリログのファイル名
    -> master_log_pos=4;                   # バイナリログの現在位置
- example DBをレプリケーション対象のDBとして設定
mysql> change replication filter replicate_do_db = (example);
- レプリケーションを開始する
mysql> start slave;
以下のコマンドでSlave DBのステータスを確認します。
このときに特にエラーが出力されていなければ問題なくレプリケーションの設定が行われています。
mysql> show slave status\G
*************************** 1. row ***************************
               Slave_IO_State: Waiting for master to send event
                  Master_Host: 192.168.33.10
                  Master_User: repl
                  Master_Port: 3306
                Connect_Retry: 60
              Master_Log_File: web001-bin.000001
          Read_Master_Log_Pos: 619
               Relay_Log_File: web002-relay-bin.000003
                Relay_Log_Pos: 321
        Relay_Master_Log_File: web001-bin.000001
             Slave_IO_Running: Yes
            Slave_SQL_Running: Yes
              Replicate_Do_DB: example
          Replicate_Ignore_DB:
           Replicate_Do_Table:
       Replicate_Ignore_Table:
      Replicate_Wild_Do_Table:
  Replicate_Wild_Ignore_Table:
                   Last_Errno: 0
                   Last_Error:
                 Skip_Counter: 0
          Exec_Master_Log_Pos: 619
              Relay_Log_Space: 696
              Until_Condition: None
               Until_Log_File:
                Until_Log_Pos: 0
           Master_SSL_Allowed: No
           Master_SSL_CA_File:
           Master_SSL_CA_Path:
              Master_SSL_Cert:
            Master_SSL_Cipher:
               Master_SSL_Key:
        Seconds_Behind_Master: 0
Master_SSL_Verify_Server_Cert: No
                Last_IO_Errno: 0
                Last_IO_Error:
               Last_SQL_Errno: 0
               Last_SQL_Error:
  Replicate_Ignore_Server_Ids:
             Master_Server_Id: 101
                  Master_UUID: 7ac6cdf0-07cb-11e6-9e7e-08002751d15e
             Master_Info_File: /var/lib/mysql/master.info
                    SQL_Delay: 0
          SQL_Remaining_Delay: NULL
      Slave_SQL_Running_State: Slave has read all relay log; waiting for more updates
           Master_Retry_Count: 86400
                  Master_Bind:
      Last_IO_Error_Timestamp:
     Last_SQL_Error_Timestamp:
               Master_SSL_Crl:
           Master_SSL_Crlpath:
           Retrieved_Gtid_Set:
            Executed_Gtid_Set:
                Auto_Position: 0
         Replicate_Rewrite_DB:
                 Channel_Name:
           Master_TLS_Version:
レプリケーションの動作確認
最後に、Master DBサーバのexample DBにhogeテーブルを追加したときに正常にレプリケーションが行われるか確認します。
- まず、Slave DBサーバのexample DBに hogeテーブルがないことを確認します。
mysql> use example;
mysql> show tables;
Empty set (0.00 sec)
- 続いてMaster DB サーバのexample DBにhogeテーブルを追加します。
mysql> use example;
mysql> create table hoge ( id INT not null );  # hogeテーブルを作成
mysql> show tables;
+-------------------+
| Tables_in_example |
+-------------------+
| hoge              |
+-------------------+
・再びSlave DB サーバのexample DBを確認し、hogeテーブルが追加されていれば、正常にレプリケーションが行われています。
mysql> show tables;
+-------------------+
| Tables_in_example |
+-------------------+
| hoge              |
+-------------------+
以上で、MySQLでのMaster-Slave構成のレプリケーション設定は完了です。
参考文献
- たった30分でWordPressを冗長化する方法 _ (っ´∀`)っ ゃー _ nullpopopo, http://nullpopopo.blogcube.info/2012/08/%E3%81%9F%E3%81%A3%E3%81%9F30%E5%88%86%E3%81%A7wordpress%E3%82%92%E5%86%97%E9%95%B7%E5%8C%96%E3%81%99%E3%82%8B%E6%96%B9%E6%B3%95.html, Online; accessed 23-Apirl-2016.
- MySQL レプリケーションの設定 - とみぞーノート, http://wiki.bit-hive.com/tomizoo/pg/MySQL%20%A5%EC%A5%D7%A5%EA%A5%B1%A1%BC%A5%B7%A5%E7%A5%F3%A4%CE%C0%DF%C4%EA, Online; accessed 23-Apirl-2016.
- mysqlでマルチマスター レプリケーションを設定してみる _ レンタルサーバー・自宅サーバー設定・構築のヒント, http://server-setting.info/centos/mysql-multi-master.html, Online; accessed 23-Apirl-2016.
- MySQL __ MySQL 5.6 リファレンスマニュアル __ 5.2.4 バイナリログ, https://dev.mysql.com/doc/refman/5.6/ja/binary-log.html, Online; accessed 23-April-2016.
- MySQLバイナリログの仕様 _ OpenGroove, http://open-groove.net/mysql/mysql-binlog/, 23-Apirl-2016.
- MySQL 5.7 _ レプリケーションフィルターをオンラインで変更する _ Yakst, https://yakst.com/ja/posts/3486, 23-April-2016.
- MySQL入門 レプリケーション編 - Qiita, http://qiita.com/Tocyuki/items/c224cef57493f536a941, 23-April-2016.
