RPiにはいろいろなHWインタフェースがあるわけですが
これだけの種類を押さえといたら使いこなせるだろう程度のHWインタフェース 7つ紹介
動作確認環境
Raspberry pi 3 type B+
nodejs v8.14.0
0. [前知識] Raspberry Pi のIO
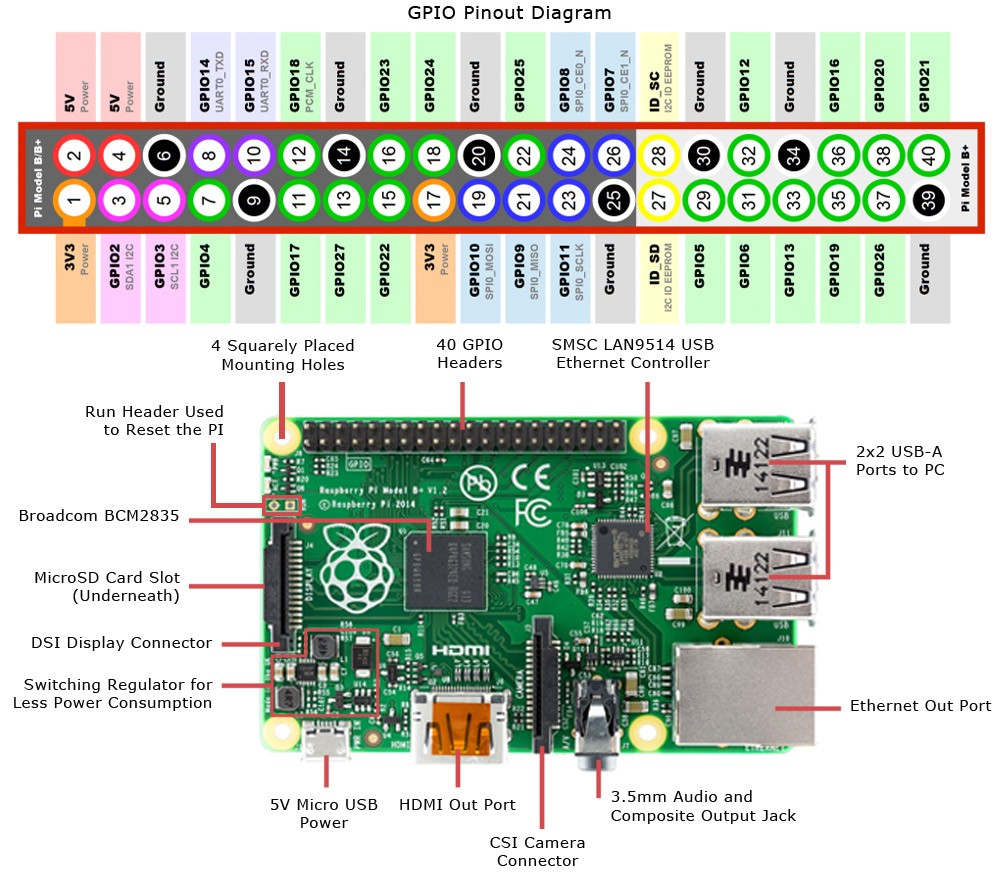
前知識としてIOのマップはこんな感じ
- GPIO
- GPIOxx のピン
- UART
- UART0_TXD : 8pin
- UART0_RXD : 10pin
- SPI
- SPI0_SCLK : 23pin
- SPI0_MOSI : 19pin
- SPI0_MISO : 21pin
- SPI0_CE0_N : 24pin
- SPI0_CE1_N : 26pin
- I2C
- I2C_SCL1 : 5pin
- I2C_SDA1 : 3pin

引用 : https://medium.com/a-swift-misadventure/using-swift-to-control-the-raspberry-pi-gpio-pins-and-turn-an-led-on-f31e33c3cb9a
1. GPIOを叩く
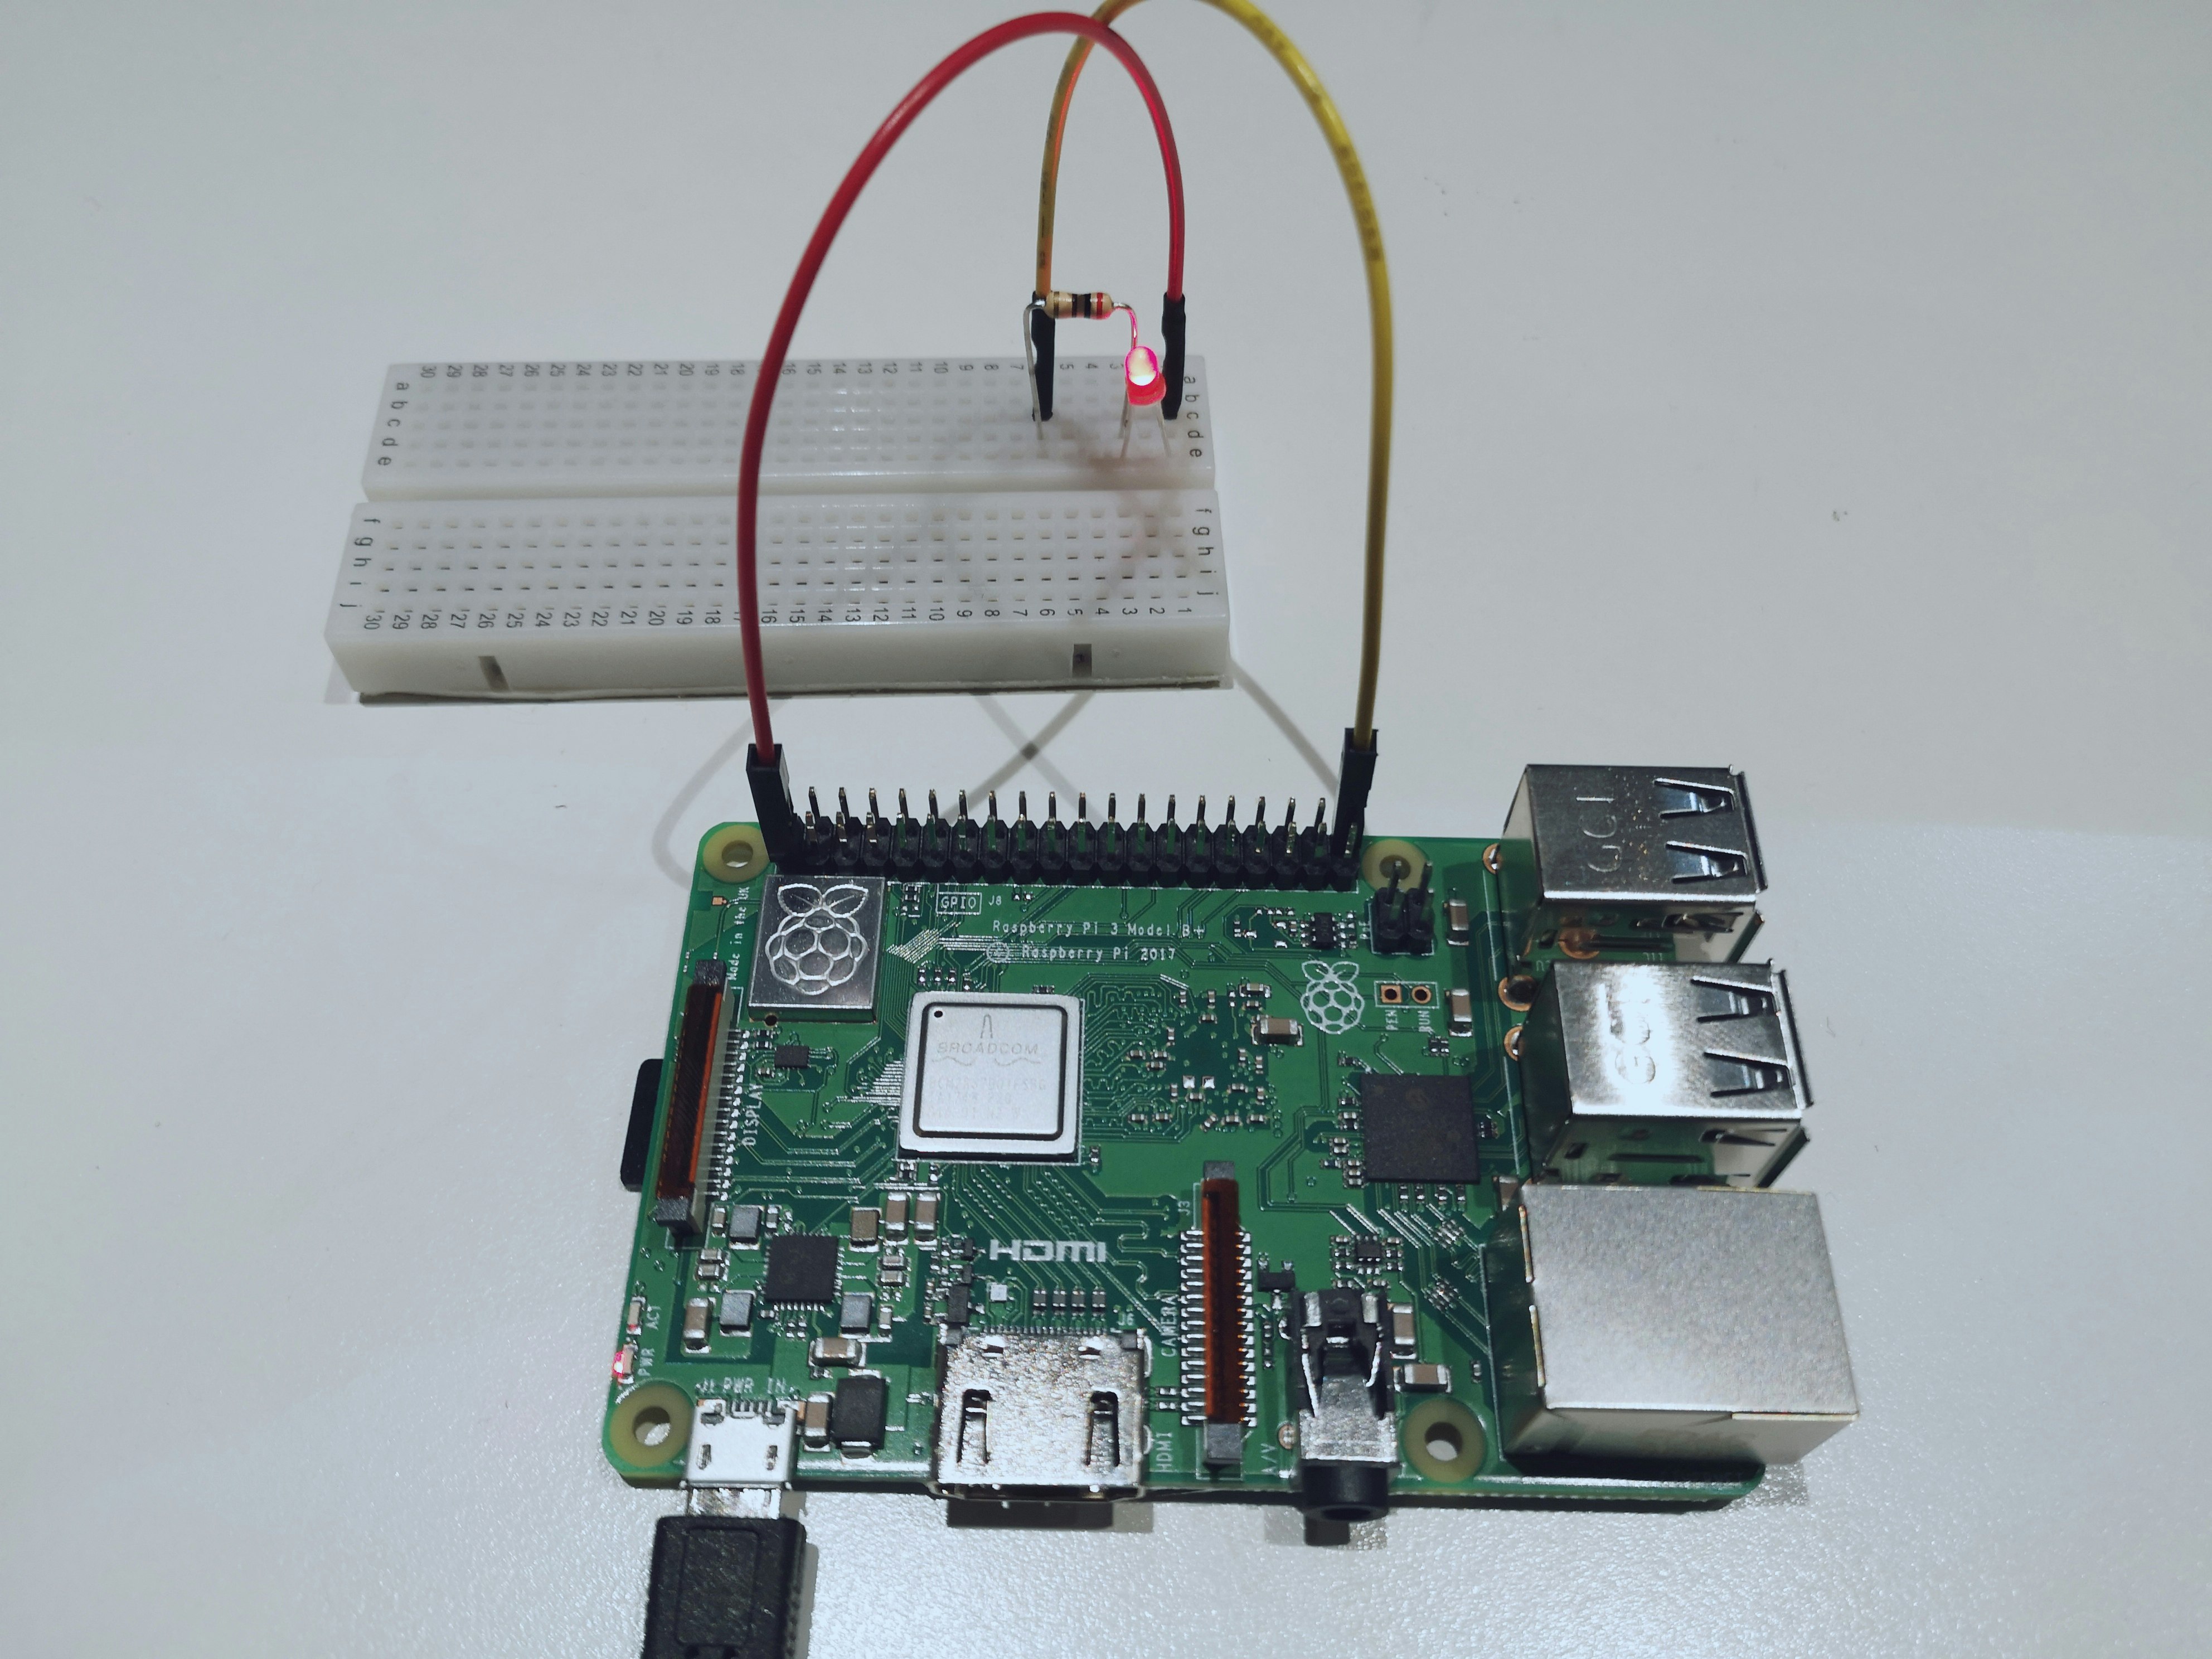
IOをON/OFFしてLチカ
$ npm i rpi-gpio -s
var gpio = require('rpi-gpio');

const LED_PIN = 40; // 40番ピン(GPIO40ではない、GPIO21)
const LED_BLINK_DELAY_MS = 1000;  // 1秒毎にLチカ

var ledOn = true;

// LED ピンをOUT方向に設定
gpio.setup(LED_PIN, gpio.DIR_OUT, () => {

  // LED_BLINK_DELAY_MS毎にLED ON/OFF
  setInterval(() => {
    if(ledOn) {
      // LED ピンをlowに設定
      gpio.write(LED_PIN, false);
      ledOn = false;
    } else {
      // LED ピンをhighに設定
      gpio.write(LED_PIN, true);
      ledOn = true;
    }
  },LED_BLINK_DELAY_MS);
});
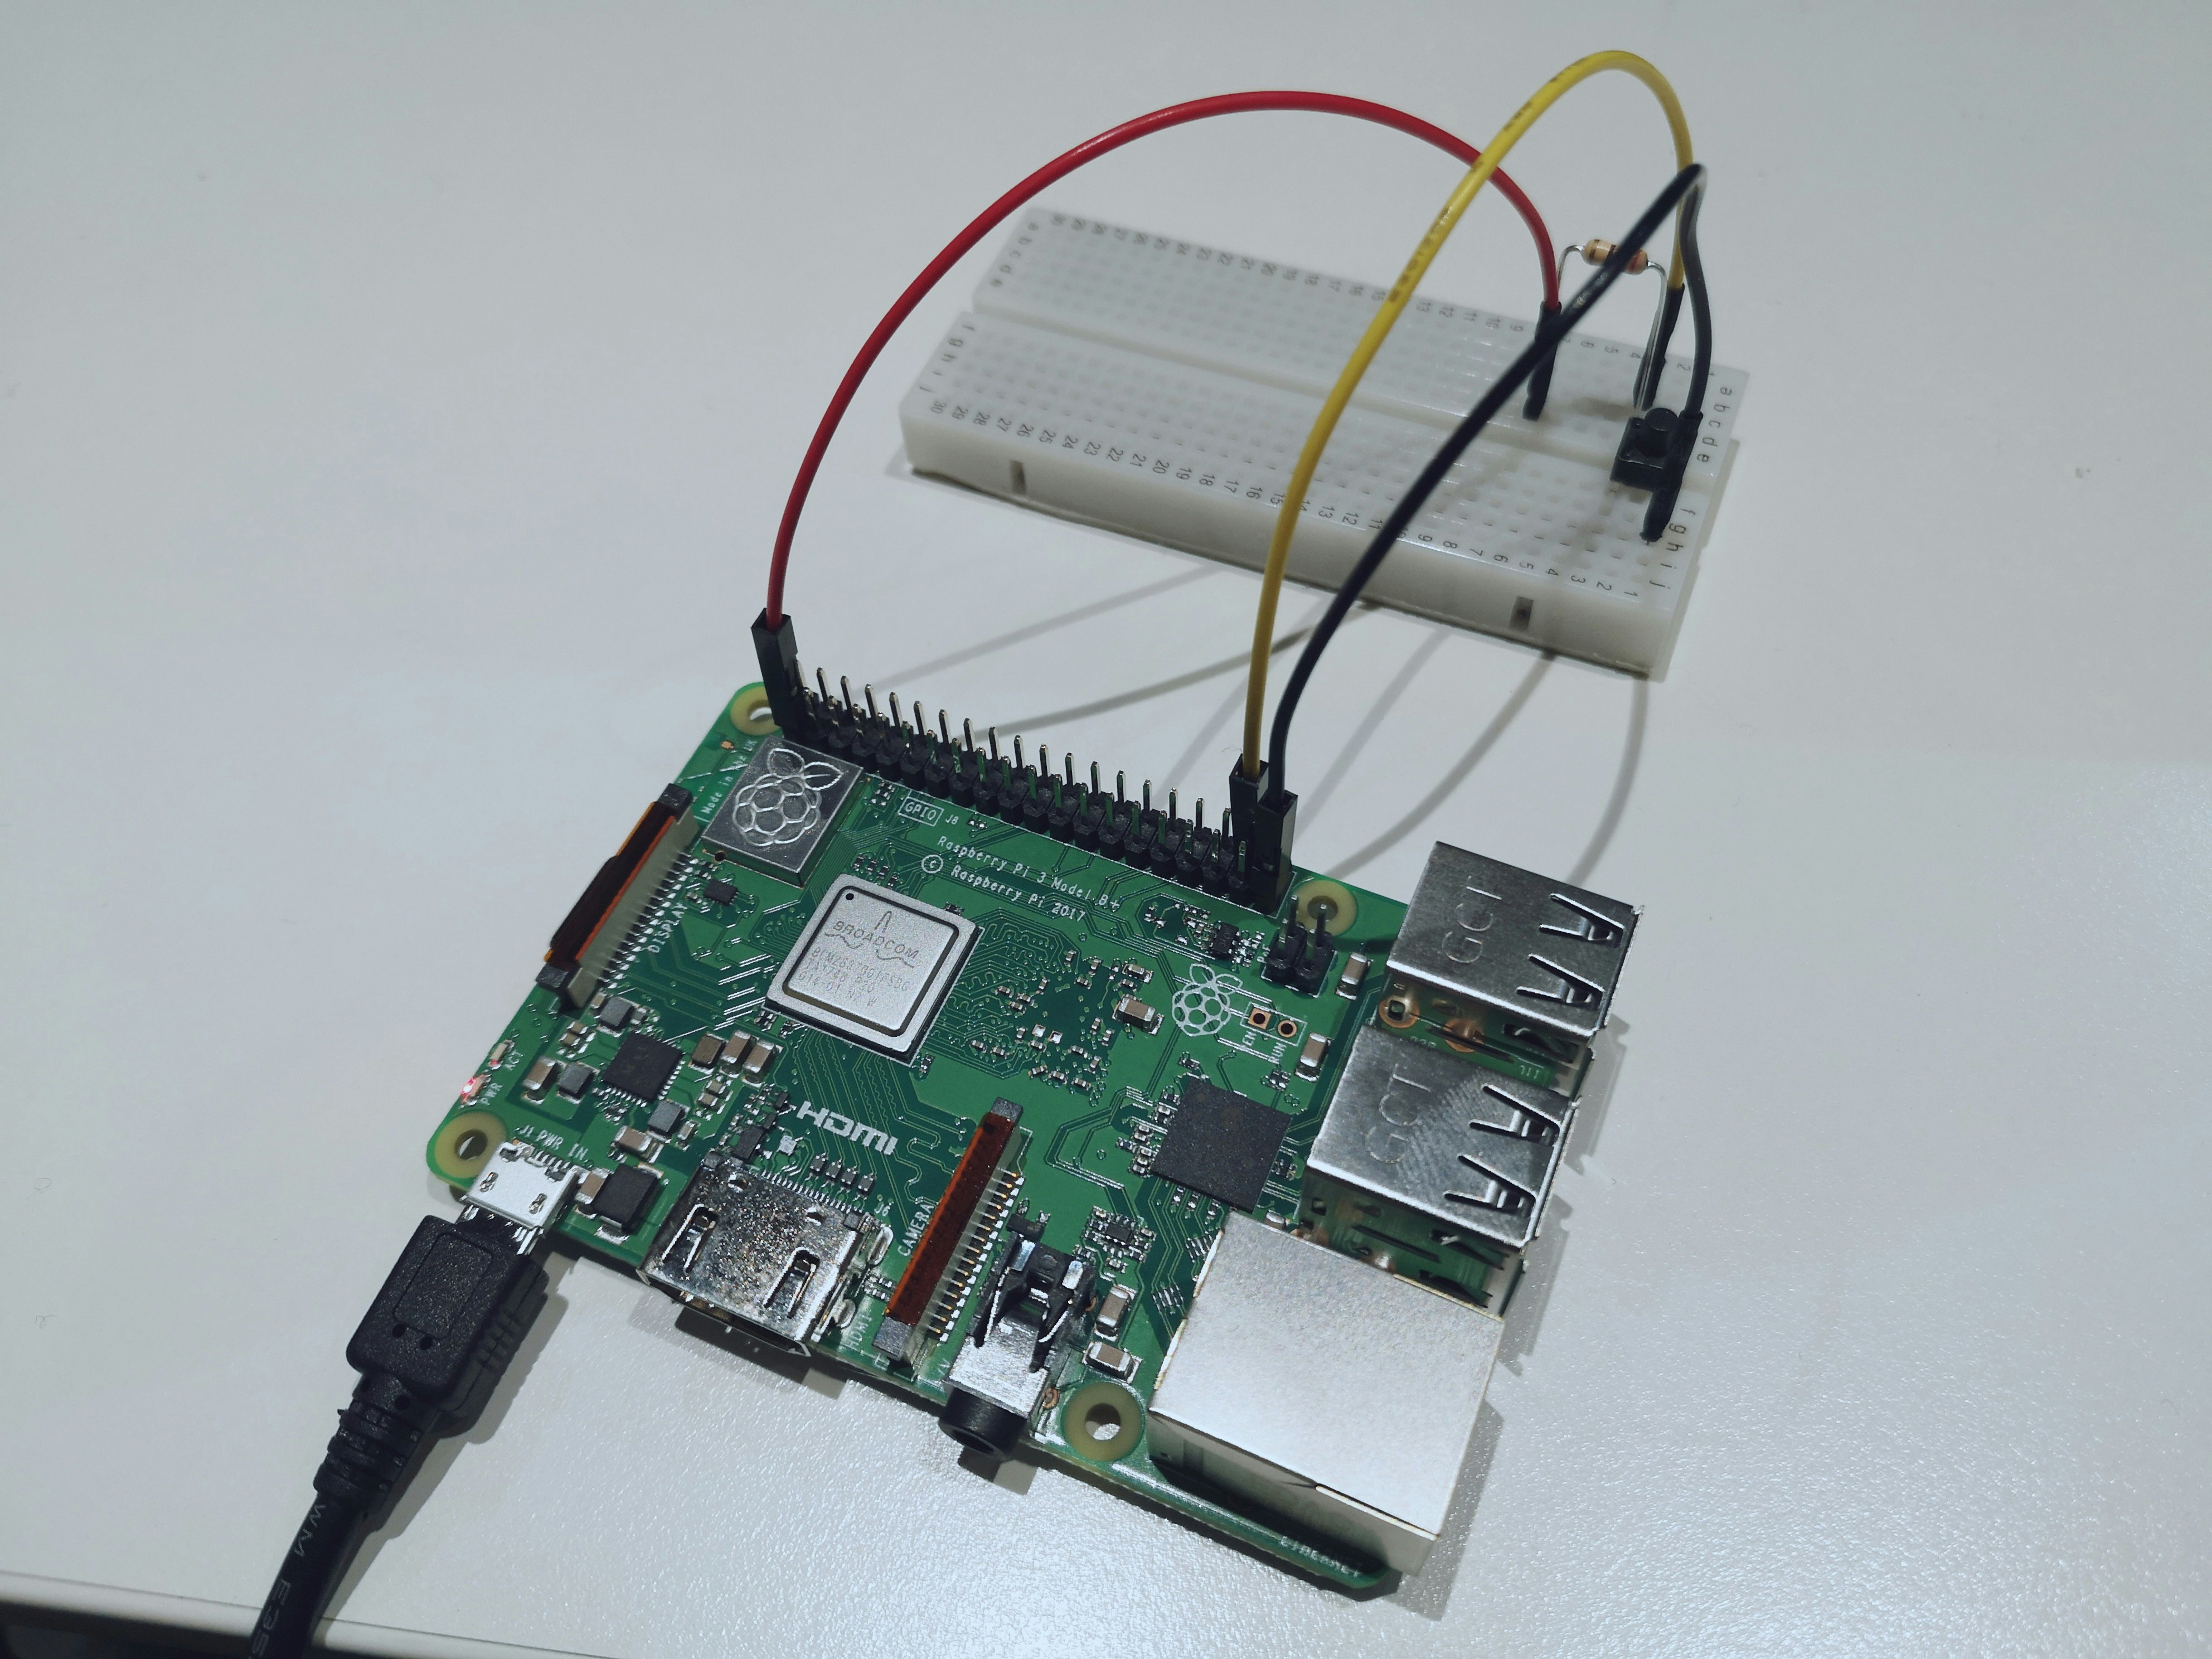
入力待ちしたいときはEventEmitterで待つこともできる
var gpio = require('rpi-gpio');

const BUTTON_PIN = 38;

// ボタンの値変化イベント
gpio.on('change', (ch, value) => {
  console.log('read channel : '+ch+', value : '+value);
});

// ボタンピンをIN方向かつON->OFF/OFF->ONの両エッジでイベント発生
gpio.setup(BUTTON_PIN, gpio.DIR_IN, gpio.EDGE_BOTH);
ボタン押す/離す度にvalueの値が変化
$ node button.js
read channel : 38, value : true
read channel : 38, value : false
read channel : 38, value : true
read channel : 38, value : false
read channel : 38, value : true
read channel : 38, value : false
read channel : 38, value : true
参考:
rpi-gpio
https://www.npmjs.com/package/rpi-gpio
2. UART通信する
マイコンとの通信はほぼこれ
RPiでUARTを使う場合は raspi-config でUARTを有効にする必要あり
$ sudo raspi-config

-> 5 Interfacing Option
-> P6 Serial
-> No : Would you like a login shell to accessible over serial?
-> Yes : Would you like the serial port hardware to be enabled?
-> OK
-> Finish
-> Reboot
リブート後デバイスファイル /dev/serial0 が出ていればOK
$ ls -la /dev/serial0
lrwxrwxrwx 1 root root 5 Dec 11 11:39 /dev/serial0 -> ttyS0
ちなみに、RPiのピンUARTじゃなくUSBシリアルを使ってもOK
FTDI系は /dev/ttyUSBx
Arduino系は /dev/ttyACMx
にデバイスファイルが現れる
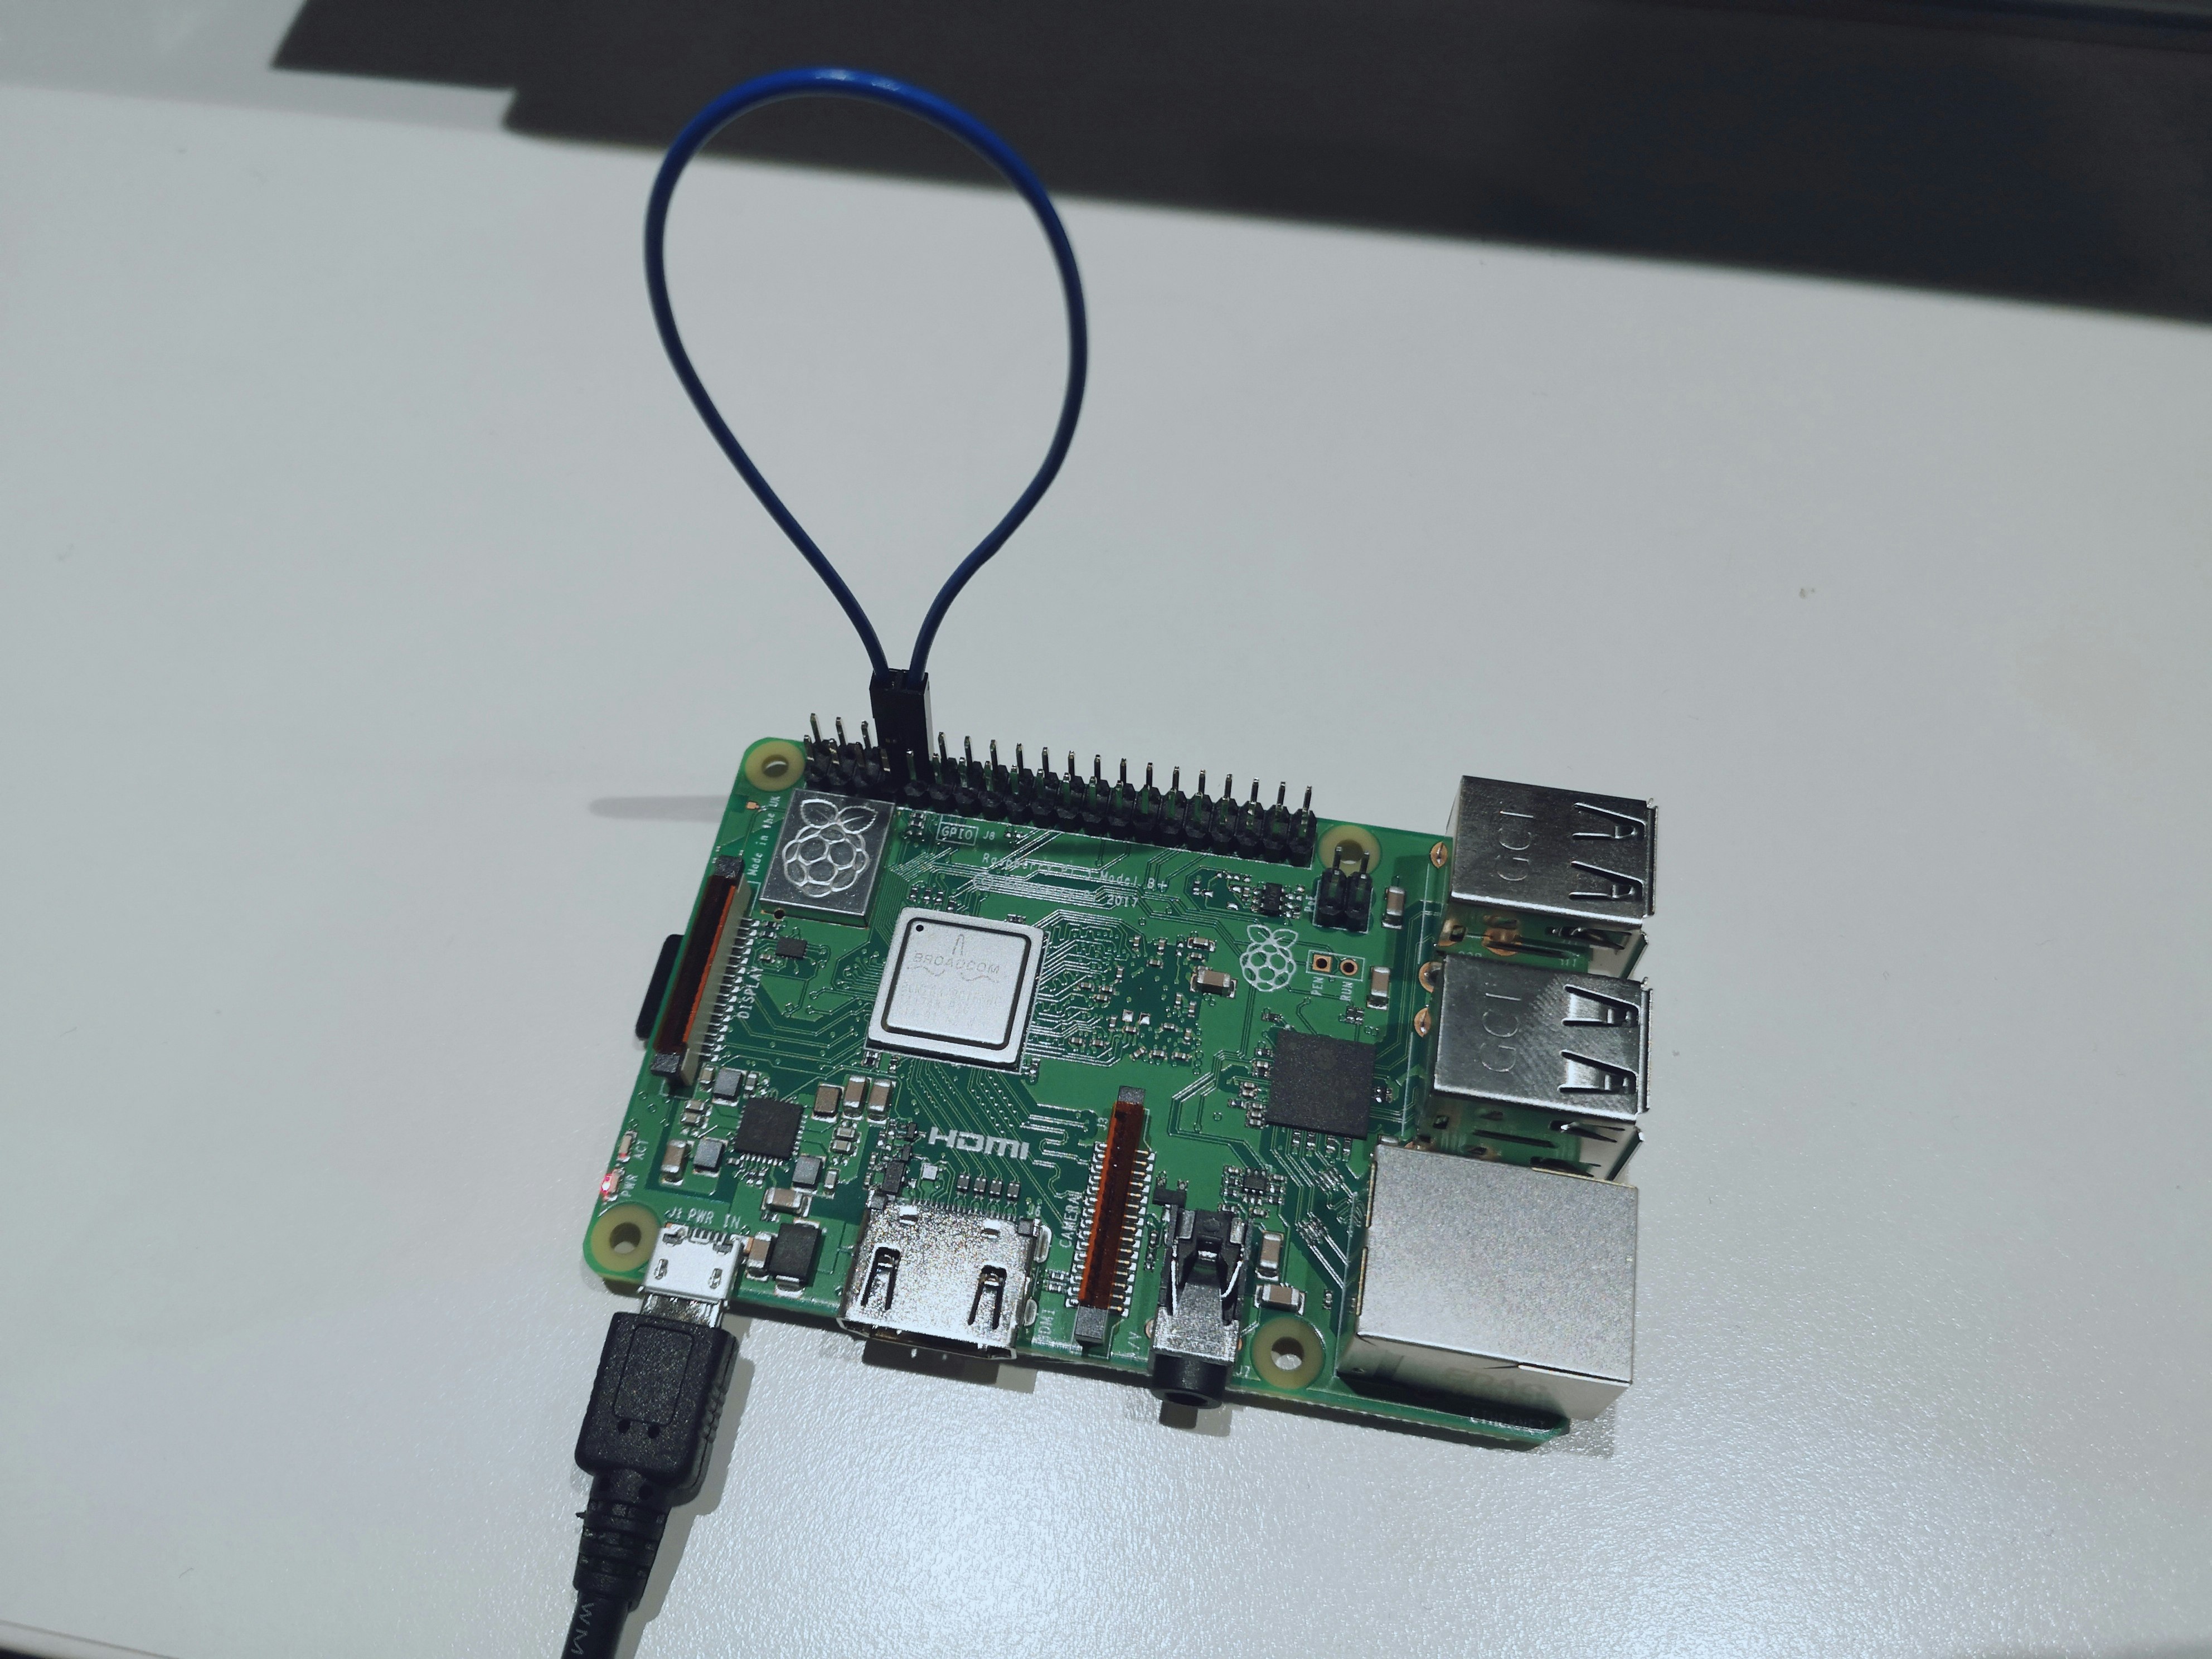
今回はRPi上のTx/Rxの2ピンを直接つないでエコーバック通信させる
- UART
- UART0_TXD : 8pin
- UART0_RXD : 10pin
コーディングする
$ npm i serialport -s
var SerialPort = require('serialport');

const DEVICE_FILE_PATH = '/dev/serial0';
const SERIAL_OPTION = { baudRate: 115200 };

var port = new SerialPort(DEVICE_FILE_PATH, SERIAL_OPTION);

port.on('data', (data) => {
  console.log('receive data : ', data.toString());
});

port.on('error', (err) => {
  console.log('ERROR ', err);
});

var num = 0;

setInterval( () => {
  var text = 'hoge';
  port.write(text+num, (err) => {
    console.log('send data : ', text+num);
    num++;
  });
}, 1000);
$ sudo node uart.js
send data :  hoge0
receive data :  hoge0
send data :  hoge1
receive data :  hoge1
send data :  hoge2
receive data :  hoge2
send data :  hoge3
receive data :  hoge3
send data :  hoge4
receive data :  hoge4
参考:
node-serialport
https://github.com/node-serialport/node-serialport
3. SPI通信する
ICのインタフェースがSPIの場合はこれ
RPiでSPIを使う場合は raspi-config でSPIを有効にする必要あり
$ sudo raspi-config

-> 5 Interfacing Option
-> P4 SPI
-> Yes : Would you like the SPI interface to be enabled?
-> OK
-> Finish
-> Reboot
リブートするとSPIデバイスファイルができる
/dev/spidev0.0 は SPI0_CE0_N : 24pin をアサート
/dev/spidev0.1 は SPI0_CE1_N : 26pin をアサート
$ ls -la /dev/spidev0.*
crw-rw---- 1 root spi 153, 0 Dec 11 11:39 /dev/spidev0.0
crw-rw---- 1 root spi 153, 1 Dec 11 11:39 /dev/spidev0.1
RPiのピンとICとつなげる(今回は何もつなげず空振りさせる)
- SPI
- SPI0_SCLK : 23pin
- SPI0_MOSI : 19pin
- SPI0_MISO : 21pin
- SPI0_CE0_N : 24pin
- SPI0_CE1_N : 26pin
コーディングする
$ npm i pi-spi -s
var SPI = require('pi-spi');

const DEVICE_FILE_PATH = '/dev/spi0';

var spi = SPI.initialize(DEVICE_FILE_PATH);

var buf = new Buffer.alloc(8);

spi.transfer(buf, buf.length, function(err, data) {
    console.log('transfer return : ', data);
});
今回は何もつなげていないが、SPI通信可能なICを繋げてICの仕様に従った値を送れば、値が返ってくる
$ node spi.js
transfer return :  <Buffer 00 00 00 00 00 00 00 00>
参考:
pi-spi
https://www.npmjs.com/package/pi-spi
4. I2C通信する
ICのインタフェースがI2Cの場合はこれ
RPiでI2Cを使う場合は raspi-config でI2Cを有効にする必要あり
$ sudo raspi-config

-> 5 Interfacing Option
-> P5 I2C
-> Yes : Would you like the ARM I2C interface to be enabled?
-> OK
-> Finish
-> Reboot
リブートするとI2Cデバイスファイルができる
$ ls -la /dev/i2c-1
crw-rw---- 1 root i2c 89, 1 Dec 11 11:39 /dev/i2c-1
RPiのピンとICとつなげる(今回は何もつなげず空振りさせる)
- I2C
- I2C_SCL1 : 5pin
- I2C_SDA1 : 3pin
コーディングする
$ npm i i2c-bus -s
var i2c = require('i2c-bus');

const DEVICE_NUMBER = 1;
const TARGET_IC_ADDR = 0x32;

var i2c1 = i2c.openSync(DEVICE_NUMBER);

var readBuf = new Buffer.alloc(0x10);
i2c1.i2cReadSync(TARGET_IC_ADDR, readBuf.length, readBuf);

console.log(readBuf);
適当にI2Cアドレスをあわせてつなぐと値を返してくれる
$ node i2c.js
<Buffer c0 12 58 12 02 11 12 18 00 7f 3f 7f 7f 3f 00 20>
ちなみに、I2Cアドレスが間違っていたり、ピンのつながりがよろしくないとエラーになる
$ node i2c.js
fs.js:675
  return binding.read(fd, buffer, offset, length, position);
                 ^

Error: EREMOTEIO: remote I/O error, read
    at Object.fs.readSync (fs.js:675:18)
    at Bus.i2cReadSync (/home/pi/Documents/akita3-expansion-driver/node_modules/i2c-bus/i2c-bus.js:536:15)
    at Object.<anonymous> (/home/pi/Documents/akita3-expansion-driver/test.js:10:6)
    at Module._compile (module.js:653:30)
    at Object.Module._extensions..js (module.js:664:10)
    at Module.load (module.js:566:32)
    at tryModuleLoad (module.js:506:12)
    at Function.Module._load (module.js:498:3)
    at Function.Module.runMain (module.js:694:10)
    at startup (bootstrap_node.js:204:16)
参考:
i2c-bus
https://www.npmjs.com/package/i2c-bus
5. USB HIDを使う
USBキーボード入力を待ち構えてキャッチできる
ピッと読み込むバーコードリーダーとかスワイプするタイプのカードリーダーとかにも使える
近場にあるUSBキーボード HHKB をひっぱりだしてきてつなげる
USBのVIDとPIDが必要になるので番号を控えておく
$ lsusb
Bus 001 Device 006: ID 04fe:0006 PFU, Ltd
Bus 001 Device 005: ID 04fe:0008 PFU, Ltd
Bus 001 Device 004: ID 0424:7800 Standard Microsystems Corp.
Bus 001 Device 003: ID 0424:2514 Standard Microsystems Corp. USB 2.0 Hub
Bus 001 Device 002: ID 0424:2514 Standard Microsystems Corp. USB 2.0 Hub
Bus 001 Device 001: ID 1d6b:0002 Linux Foundation 2.0 root hub
ID 04fe:0006 の部分に注目して VID:0x04fe, PID:0x0006 ということがわかる
※ HHKB挿すとどっちがHIDかわからん。。。
npm i するときにgypでコンパイルを通すためのパッケージを入れる
$ sudo apt-get install libusb-1.0-0-dev -y
コーディング
$ npm i node-hid-stream -s
var KeyboardCharacters = require('node-hid-stream').KeyboardCharacters;
var characters = new KeyboardCharacters({ vendorId: 0x04fe, productId: 0x0006 });

characters.on("data", function(data) {
  console.log(data);
});
実行には管理者権限が必要
適当に abcde と入力してみる
$ sudo node hid.js
a

b

c

d

e
参考:
node-hid-stream
https://www.npmjs.com/package/node-hid-stream
6. MQTTを使う
HW連携では時々使われる。RPi同士の通信でも便利。
とりあえずRPiを2台用意してお互いをネットにつなげておく
| RPi A (broker:192.168.1.10, publisher) | -- network -- | RPi B (subscriber) |
[RPi A] mqtt ブローカを用意
$ sudo apt install mosquitto -y
$ sudo systemctl start mosquitto
[RPi B] subscriber でメッセージを待ち受ける
RPi B上にmqtt subscriberを置く
$ npm i mqtt -s
var mqtt = require('mqtt');
var client = mqtt.connect('mqtt://192.168.1.10');

const TOPIC = 'hoge/foo/bar';

client.on('connect', function(){
  console.log('subscriber connected.');
});

client.subscribe(TOPIC, function(err, granted){
  console.log('subscriber subscribed.');
});

client.on('message', function(topic, message){
  console.log('subscriber received topic:', topic, 'message:', message.toString());
});
subscriber側で待ち状態にする
$ node sub.js
subscriber connected.
subscriber subscribed.
[RPi A] publisher でメッセージを送る
$ npm i mqtt -s
var mqtt = require('mqtt');
var client = mqtt.connect('mqtt://192.168.1.10');

var message = 'Hello MQTT!';
var topic = 'hoge/foo/bar'

client.on('connect', function(){
  console.log('publisher connected.');

  client.publish(topic, message);
  console.log('send topic:', topic, ', message:', message);
});
$ node pub.js
publisher connected.
send topic: hoge/foo/bar , message: Hello MQTT!
[RPi B] subscriber でメッセージを受信する
さっき待ち受けていた端末にメッセージが来ている
$ node sub.js
subscriber connected.
subscriber subscribed.
subscriber received topic: hoge/foo/bar message: Hello MQTT!
7. Bluetooth Low Energyを使う
Bluetooth Low Energy もサクッと叩ける
GATTの構造だけ前提知識として入れておけばなんとかなる
※ 動作確認間に合わなかったので参考URLだけ
[RPi A] セントラルになる
$ npm i noble -s
このあたりのコード参考
https://github.com/noble/noble/blob/master/examples/
実行にはroot権限必要
[RPi B] ペリフェラルになる
$ npm i bleno
このあたりのコード参考
https://github.com/noble/bleno/tree/master/examples/
実行にはroot権限必要
参考:
noble
https://github.com/noble/noble


