はじめに
タイトルのとおりです。
AWS Transcribe Streaming を使ったリアルタイムでの文字起こしを Angular で実装したサンプルになります。
「マイクの ON/OFF」、「音声ストリームの作り方」、「AWS SDK の使い方」等、色々調べつつ試行錯誤したので記事として残したいと思いました。
似たような案件でお困りの方の一助となれば幸いです。
またもっと良い方法や記事中の解釈、コードに誤りがあればご指摘頂けますと幸甚です。
環境
Angular v14 で確認
| 環境 | バージョン | 備考 |
|---|---|---|
| Angular CLI | v14.2.10 | $ ng version |
| Angular | v14.2.12 | 同上 |
| TypeScript | v4.7.4 | 同上 |
| Node.js | v16.19.0 | $ node --version |
| npm | v8.19.3 | $ npm --version |
| @aws-sdk/client-transcribe-streaming | v3.226.0 | package.json で確認 |
| microphone-stream | v6.0.1 | 同上 |
| process | v0.11.10 | 同上 |
| buffer | v6.0.3 | 同上 |
Angular のバージョン詳細( ng version の結果 )
$ ng version

     _                      _                 ____ _     ___
    / \   _ __   __ _ _   _| | __ _ _ __     / ___| |   |_ _|
   / △ \ | '_ \ / _` | | | | |/ _` | '__|   | |   | |    | |
  / ___ \| | | | (_| | |_| | | (_| | |      | |___| |___ | |
 /_/   \_\_| |_|\__, |\__,_|_|\__,_|_|       \____|_____|___|
                |___/


Angular CLI: 14.2.10
Node: 16.19.0
Package Manager: npm 8.19.3
OS: darwin x64

Angular: 14.2.12
... animations, common, compiler, compiler-cli, core, forms
... platform-browser, platform-browser-dynamic, router

Package                         Version
---------------------------------------------------------
@angular-devkit/architect       0.1402.10
@angular-devkit/build-angular   14.2.10
@angular-devkit/core            14.2.10
@angular-devkit/schematics      14.2.10
@angular/cdk                    14.2.7
@angular/cli                    14.2.10
@angular/material               14.2.7
@schematics/angular             14.2.10
rxjs                            6.6.7
typescript                      4.7.4
Angular v13 で確認
| 環境 | バージョン | 備考 |
|---|---|---|
| Angular CLI | v13.2.4 | $ ng --version |
| Angular | v13.2.3 | 同上 |
| TypeScript | v4.5.5 | 同上 |
| Node.js | v14.17.0 | $ node --version |
| npm | v6.14.13 | $ npm --version |
| @aws-sdk/client-transcribe-streaming | v3.95.0 | package.json で確認 |
| microphone-stream | v6.0.1 | 同上 |
| process | v0.11.10 | 同上 |
| buffer | v6.0.3 | 同上 |
Angular のバージョン詳細( ng version の結果 )
$ ng version

     _                      _                 ____ _     ___
    / \   _ __   __ _ _   _| | __ _ _ __     / ___| |   |_ _|
   / △ \ | '_ \ / _` | | | | |/ _` | '__|   | |   | |    | |
  / ___ \| | | | (_| | |_| | | (_| | |      | |___| |___ | |
 /_/   \_\_| |_|\__, |\__,_|_|\__,_|_|       \____|_____|___|
                |___/


Angular CLI: 13.2.4
Node: 14.17.0
Package Manager: npm 6.14.13
OS: darwin x64

Angular: 13.2.3
... animations, common, compiler, compiler-cli, core, forms
... platform-browser, platform-browser-dynamic, router

Package                         Version
---------------------------------------------------------
@angular-devkit/architect       0.1302.4
@angular-devkit/build-angular   13.2.4
@angular-devkit/core            13.2.4
@angular-devkit/schematics      13.2.4
@angular/cli                    13.2.4
@schematics/angular             13.2.4
rxjs                            6.6.0
typescript                      4.5.5
前提
AWS Transcribe Streaming を使って音声認識 ~ 文字起こしを行うにあたり、以下の SDK やライブラリを使用します。
-
@aws-sdk/client-transcribe-streaming
- npm は こちら
-
microphone-stream
- npm は こちら
-
process
- npm は こちら
-
buffer
- npm は こちら
事前準備
下記を事前に実施しておきます。
これは後述の Component の実装において必要になるためです。
-
@aws-sdk/client-transcribe-streaming のインストール
( npm のページからコピー & ペースト )$ npm i @aws-sdk/client-transcribe-streaming -
microphone-stream のインストール
( npm のページからコピー & ペースト )$ npm i microphone-stream -
process のインストール
( npm のページからコピー & ペースト )$ npm i process -
buffer のインストール
( npm のページからコピー & ペースト )$ npm i buffer -
polyfills.ts の編集
// "global is not defined"の対応
(window as any).global = window;

// https://stackoverflow.com/questions/50313745/angular-6-process-is-not-defined-when-trying-to-serve-application
// https://www.npmjs.com/package/process
import * as process from 'process';
window.process = process;

// https://github.com/isaacs/core-util-is/issues/27
// https://www.npmjs.com/package/buffer
import * as buffer from 'buffer';
(window as any).Buffer = buffer.Buffer;
実装
template
音声認識の開始、終了を制御し、文字起こしされた情報を出力するだけの単純な構成です。
<div>
  <div class="title">
    <h2 class="h2-style">{{title}}</h2>
  </div>
  <div>
    <button type="button" class="event-button event-button-w-100" (click)="startVoiceRecognition($event)">音声認識-開始</button>
    <button type="button" class="event-button event-button-w-100" (click)="stopVoiceRecognition($event)">音声認識-終了</button>
  </div>
  <div class="output-area">
    <textarea class="output-text" readonly placeholder="AWS Transcribe Streaming で文字変換された情報が出力されます."></textarea>
  </div>
</div>
Component
AWS SDK を使った音声認識~文字起こしのサンプルコードになります。
各処理の細かな説明はコード中のコメントをご参照ください。
/* eslint-disable @typescript-eslint/no-non-null-assertion */
/* eslint-disable prefer-arrow/prefer-arrow-functions */
/* eslint-disable @typescript-eslint/naming-convention */
import { Component, ElementRef, OnInit } from '@angular/core';

// AWS Transcribe Streaming を使った文字起こしに必要なライブラリ群
// https://github.com/aws/aws-sdk-js-v3/tree/d8475f8d972d28fbc15cd7e23abfe18f9eab0644/clients/client-transcribe-streaming
import {
  TranscribeStreamingClient,
  StartStreamTranscriptionCommand,
  StartStreamTranscriptionCommandInput,
  LanguageCode,
  MediaEncoding,
  StartStreamTranscriptionCommandOutput,
} from '@aws-sdk/client-transcribe-streaming';

// AWS Transcribe Streaming に流す audio データを作るのに必要
// https://github.com/microphone-stream/microphone-stream#readme
const MicrophoneStream = require('microphone-stream').default;
let micStream: any = null;

@Component({
  selector: 'app-use-aws-transcribe-streaming',
  templateUrl: './use-aws-transcribe-streaming.component.html',
  styleUrls: ['../../../style/common.css', './use-aws-transcribe-streaming.component.css'],
})
export class UseAwsTranscribeStreamingComponent implements OnInit {
  title = 'AWS Transcribe Streaming を使ったサンプル';

  private outputArea: any = null;

  // AWS Transcribe Streaming を使うための準備
  // この処理でクライアントインスタンスが生成される
  // ここで生成したインスタンスは後述の処理で AWS Transcribe Streaming にコマンドを送る際に使用する
  //
  // サンプルコードなので credentials をハードコーディングしているがセキュリティ推奨されない
  // Cognito 認証と絡める等、別の手段で認証を通すことを検討するべき
  private client = new TranscribeStreamingClient({
    region: 'ap-northeast-1',
    credentials: {
      accessKeyId: 'hogehoge',
      secretAccessKey: 'hogehoge',
      // sessionToken: 'hogehoge', // ここは必要に応じて設定する
    },
  });

  constructor(private elementRef: ElementRef) {}

  ngOnInit() {
    this.outputArea = this.elementRef.nativeElement.querySelector('.output-text');
  }

  /**
   * html テンプレートの「音声認識-開始」がクリックされたら実行されるメソッド
   * 音声認識処理の起点
   */
  async startVoiceRecognition(event: any) {
    // micStream は後で出てくる `stopVoiceRecognition` で `stop()` を実行して音声認識を停止する
    // このとき実際には AudioContext.close() が実行されているのだが、これを実行すると micStream の再利用ができなくなる
    // なので、一度停止した場合は micStream のインスタンスを新規に生成してやる必要がある
    //
    // AudioContext.close() については下記を参照
    // https://developer.mozilla.org/ja/docs/Web/API/AudioContext/close
    if (!micStream) {
      micStream = new MicrophoneStream();
    }

    await this.setStream();

    // AWS Transcribe Streaming に流す音声データのパラメータ
    // 肝は `AudioStream: this.audioStream()` の部分。ここで音声データを作っている
    const params: StartStreamTranscriptionCommandInput = {
      // https://docs.aws.amazon.com/ja_jp/transcribe/latest/dg/API_streaming_StartStreamTranscription.html#API_streaming_StartStreamTranscription_RequestSyntax
      LanguageCode: LanguageCode.JA_JP,
      MediaSampleRateHertz: 44_100, // 有効範囲: 最小値は 8,000. 最大値は 48,000
      MediaEncoding: MediaEncoding.PCM,
      AudioStream: this.audioStream(),
      // VocabularyName: 'custom_vocabulary' // カスタム語彙を指定する場合はここを設定する
    };

    // 音声自動文字起こし機能
    const command = new StartStreamTranscriptionCommand(params);
    let response: StartStreamTranscriptionCommandOutput;
    try {
      // ここまでの処理で作成したクライアントインスタンスと音声データのパラメータから AWS Transcribe Streaming を実行する
      // `handleResponse()` はレスポンスから文字起こしをするための処理
      response = await this.client.send(command);
      await this.handleResponse(response);
    } catch (error: any) {
      console.dir(error);
    }
  }

  /**
   * AWS Transcribe Streaming からのレスポンスを解析し文字起こしを行う
   *
   * 実装の大まかな部分は AWS Transcribe Streaming SDK のサンプルコードをコピーしたもの
   * -> https://github.com/aws/aws-sdk-js-v3/tree/d8475f8d972d28fbc15cd7e23abfe18f9eab0644/clients/client-transcribe-streaming#handling-text-stream
   *
   * レスポンスの構成については下記を参照
   * -> https://docs.aws.amazon.com/ja_jp/transcribe/latest/dg/API_streaming_StartStreamTranscription.html#API_streaming_StartStreamTranscription_ResponseSyntax
   * */
  async handleResponse(response: StartStreamTranscriptionCommandOutput) {
    for await (const event of response.TranscriptResultStream!) {
      if (event.TranscriptEvent) {
        const results = event.TranscriptEvent.Transcript!.Results;

        let transcript = '';
        results!
          .filter((result) => !result.IsPartial) // 変換途中 は処理対象外とする
          .map((result) => {
            (result.Alternatives || []).map((alternative) => {
              transcript = alternative.Items!.map((item) => item.Content).join(' ');

              // 変換したデータは html のテキストエリアに出力する
              this.outputArea.innerHTML += transcript;
            });
          });
      }
    }
  }

  /**
   * html テンプレートの「音声認識-終了」がクリックされたら実行されるメソッド
   *
   * 前掲の startVoiceRecognition() の説明でも触れたとおり、
   * micStream.stop() を実行することで実際には AudioContext.close() が実行される
   * これによって、これまで使用していた micStream のインスタンスは役目を終える
   * 新たにストリームを流すためにはインスタンスを作り直す必要があるので、これを明示的に示すために
   * micStream = null; を行い、startVoiceRecognition() では null 判定を行った上でインスタンスを生成している
   */
  stopVoiceRecognition(event: any) {
    micStream.stop();
    micStream = null;
  }

  /**
   * 前掲の startVoiceRecognition() で使用されているメソッド
   * getUserMedia() では音声データのみを使用する設定でメディアの使用を要求し、
   * マイクに入力された音声をストリームにセットしている
   */
  private async setStream() {
    micStream.setStream(
      await window.navigator.mediaDevices.getUserMedia({
        video: false,
        audio: true,
      })
    );
  }

  /**
   * こちらも前掲の startVoiceRecognition() で使用されているメソッド
   *
   * ストリームに流れてくる音声データを PCM にエンコードする処理で、
   * 実装は AWS Transcribe Streaming SDK の サンプルコード をコピーした
   * -> https://github.com/aws/aws-sdk-js-v3/tree/d8475f8d972d28fbc15cd7e23abfe18f9eab0644/clients/client-transcribe-streaming#acquire-from-browsers
   */
  private audioStream = async function* () {
    for await (const chunk of micStream) {
      yield {
        AudioEvent: { AudioChunk: pcmEncodeChunk(chunk) /* pcm Encoding is optional depending on the source */ },
      };
    }
  };
}

/**
 * PCM エンコード処理の実態
 *
 * 実装は AWS Transcribe Streaming SDK の サンプルコード をコピーしたもの
 * -> https://github.com/aws/aws-sdk-js-v3/tree/d8475f8d972d28fbc15cd7e23abfe18f9eab0644/clients/client-transcribe-streaming#pcm-encoding
 */
function pcmEncodeChunk(chunk: Buffer) {
  const input = MicrophoneStream.toRaw(chunk);
  let offset = 0;
  const buffer = new ArrayBuffer(input.length * 2);
  const view = new DataView(buffer);
  for (let i = 0; i < input.length; i++, offset += 2) {
    const s = Math.max(-1, Math.min(1, input[i]));
    view.setInt16(offset, s < 0 ? s * 0x8000 : s * 0x7fff, true);
  }
  return Buffer.from(buffer);
}
処理の流れ
以下の順に処理が実行され、音声認識 ~ 文字起こしが行われます。
1. setStream
2. pcmEncodeChunk
3. audioStream
4. handleResponse
それぞれの処理で行っていることは下記のとおりです。
1. setStream で audio から流れる音声を stream に流し続けるための設定を行う
2. 以降は延々と stream に音声が流れ続ける
3. 流れてくる stream は pcmEncodeChunk で解析して
4. auditoStream で AWS Transcribe Streaming にわたす
5. 返ってきた情報を handleResponse で html に出力する
コードについて補足
本記事ではサンプルコードであることから、処理の流れを見やすくすることを目的に Component で
- 「認証」
- 「音声ストリームの生成」
- 「SDKの実行」
- 「レスポンスの解析」
- 「HTMLへの出力」
を一括して行っておりますが、それぞれの処理には service に委譲した方が良いものもあります。
もし本コードをご参考いただく場合は必要に応じてご検討ください。
実運用では認証は別の仕組みを考えましょう
上記のコード例では sdk に渡す credentials をハードコードしていますが、セキュリティ上危険です。
別のやり方、例えば Cognito 認証と関連付けて sdk の認証をクリアする、といったことを検討するのが良いでしょう。
以下は Cognito 認証と関連づけた場合のドキュメント & チュートリアルです。
IAM ロールの権限
SDK で認証を通っても権限が設定されていないとエラー( AccessDeniedException )になります。
AccessDeniedException: {
  "Message":"User: ${user情報} is not authorized to perform: transcribe:StartStreamTranscriptionWebSocket because no identity-based policy allows the transcribe:StartStreamTranscriptionWebSocket action"
}
なので、アクセス権を付与しなければならないのですが、AWS が用意している Transcribe のポリシーは以下の2つしかありません。
( 2022/06/08 時点で確認 )
| ポリシー名 | 説明 |
|---|---|
| AmazonTranscribeFullAccess | フルアクセス |
| AmazonTranscribeReadOnlyAccess | 読み取りのみ |
(キャプチャ)
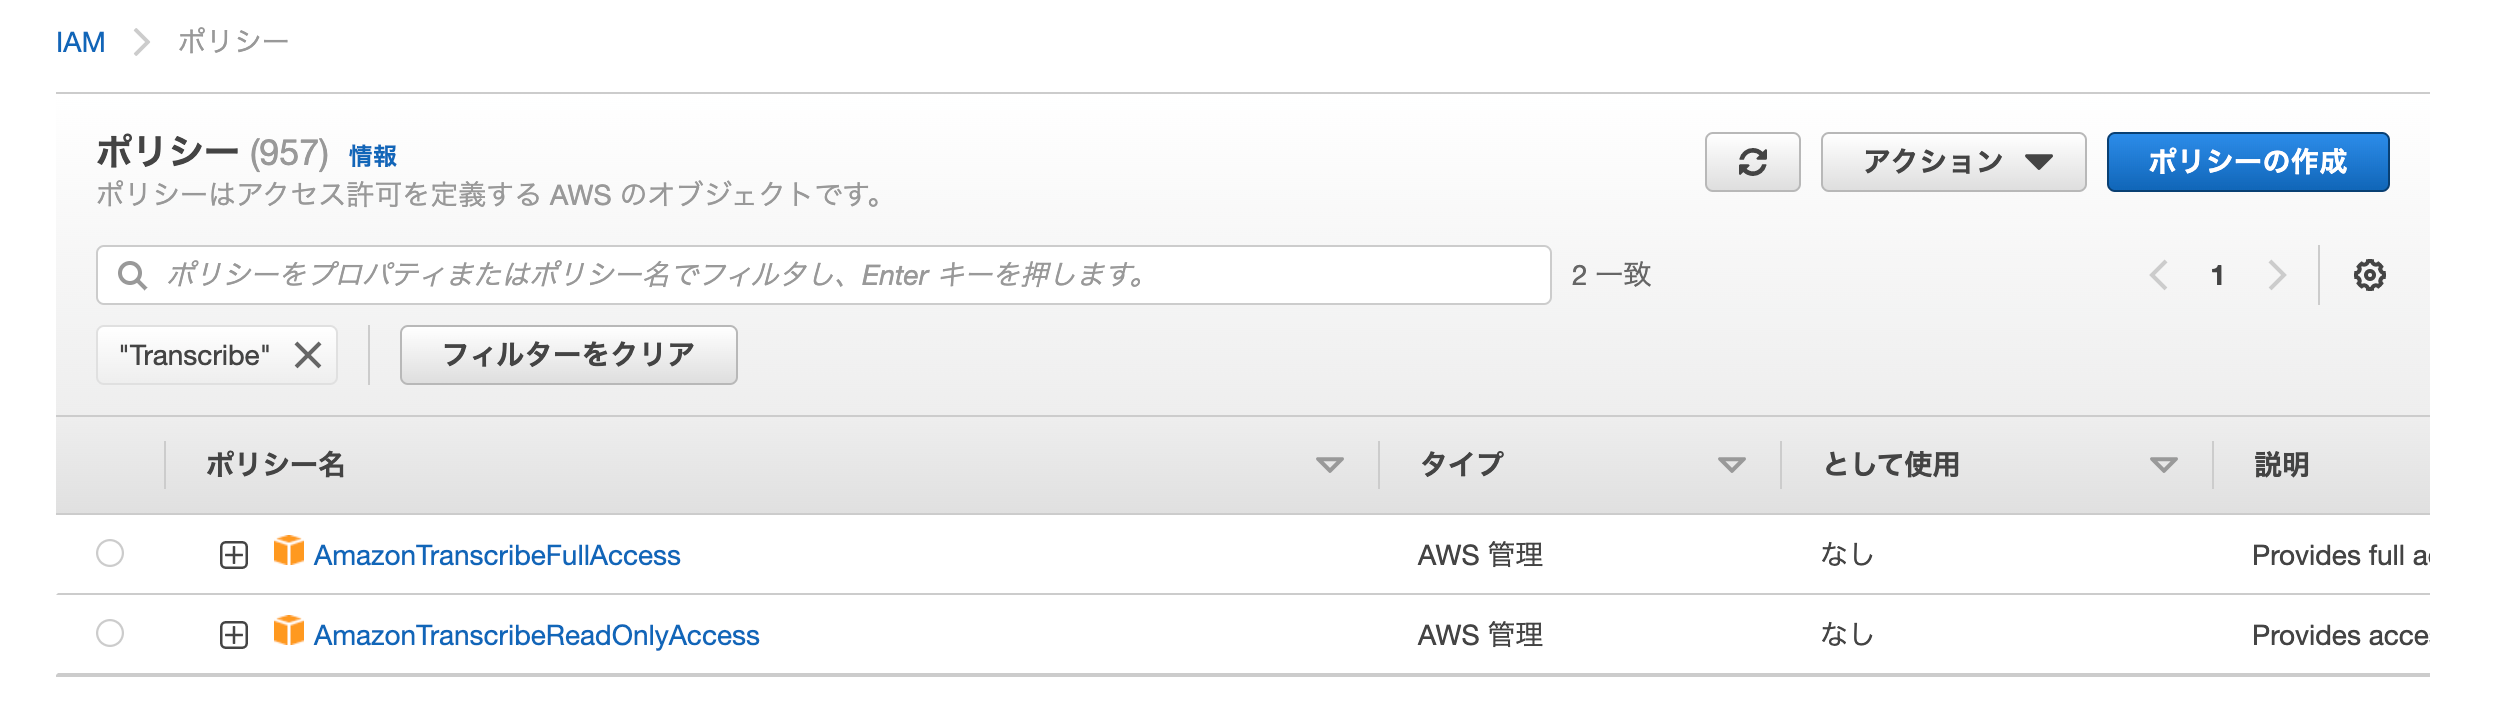
AmazonTranscribeFullAccess( フルアクセス ) は権限過多ですし、 AmazonTranscribeReadOnlyAccess( 読み取り専用 )では Transcribe Streaming のための権限がありません。
というわけで、ここでは専用のポリシーを作成しました。
( ポリシーの作成の手順は割愛します )
{
    "Version": "2012-10-17",
    "Statement": [
        {
            "Sid": "VisualEditor0",
            "Effect": "Allow",
            "Action": "transcribe:StartStreamTranscriptionWebSocket",
            "Resource": "*"
        }
    ]
}
このポリシーを SDK を使用する対象の IAM ロールにアタッチしてやることで、 Transcribe Streaming を実行するための権限が付与されます。
カスタム語彙
AWS Transcribe Streaming はリアルタイムで文字起こしをしてくれるとても便利なサービスですが、期待通りに認識してくれないケースも多々あります。
音声認識の精度をより高めたい場合は Custom vocabulary に予め語彙を登録しておくことで対応します。
前掲のコードから Custom vocabulary を指定する部分を抜粋します。
    // AWS Transcribe Streaming に流す音声データのパラメータ
    // 肝は `AudioStream: this.audioStream()` の部分。ここで音声データを作っている
    const params: StartStreamTranscriptionCommandInput = {
      // https://docs.aws.amazon.com/ja_jp/transcribe/latest/dg/API_streaming_StartStreamTranscription.html#API_streaming_StartStreamTranscription_RequestSyntax
      LanguageCode: LanguageCode.JA_JP,
      MediaSampleRateHertz: 44_100, // 有効範囲: 最小値は 8,000. 最大値は 48,000
      MediaEncoding: MediaEncoding.PCM,
      AudioStream: this.audioStream(),

      // ★★★↓このパラメータを指定します★★★
      VocabularyName: 'custom_vocabulary' // カスタム語彙を指定する場合はここを設定する
    };
カスタム語彙には Table フォーマット と List フォーマット がありますが、 こちら を読む限り AWS は Table フォーマット を推奨しているようです。
(抜粋)
Vocabulary tables versus lists
Tables are strongly preferred.
Custom vocabulary の登録手順については割愛させて頂きます。
下記をご参照ください。
なお、上記記事にも記載されていますが、 Table フォーマットのファイルをコンソールから登録するとエラー になるのでご注意ください。
Table フォーマットのファイルは S3 経由で登録する必要があります。
ソースコード
今回の記事で動作確認に使用したコードは こちら。
参考
- Amazon Transcribe が、日本語、韓国語、ブラジルポルトガル語のストリーミング機能に対応
- @aws-sdk/client-transcribe-streaming のブランチ README
- transcribe-streaming-app
- Angular 6 - process is not defined when trying to serve application
- Buffer is not defined #27
- AudioContext.close
- StartStreamTranscription
- Custom vocabularies
- Creating a custom vocabulary using a table
- Creating a custom vocabulary using a list