はじめに
この記事は①概要編 ②受付フロー編 ③更新フロー編 の3本立てのうち、②受付フロー編です。
今回は準備のための設定がほとんどになるので、あまり面白い内容はありません。
あしからず!
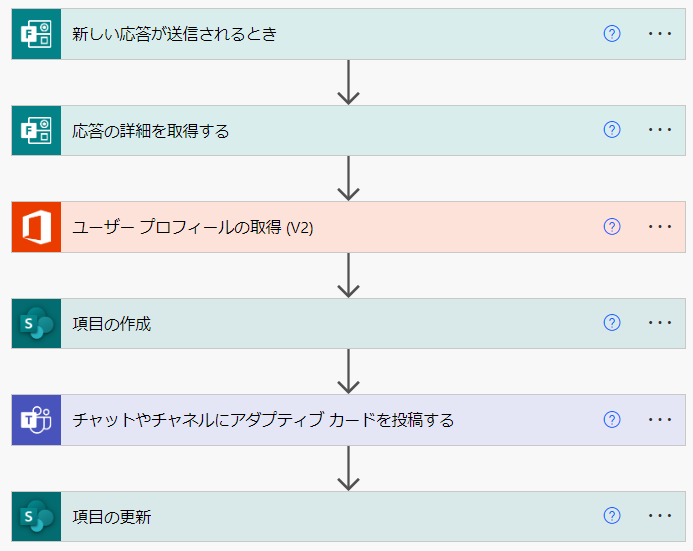
受付フローの全体像
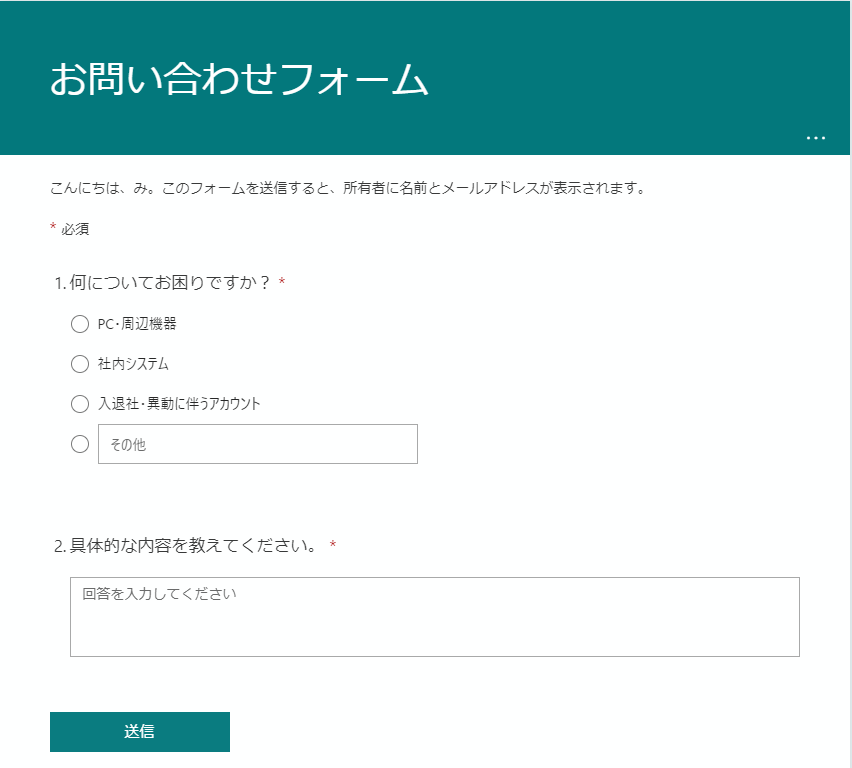
①Formsを用意する
まずは起点となるフォームを用意します。
今回はフローの説明に使うだけなので、簡単な内容にしています。
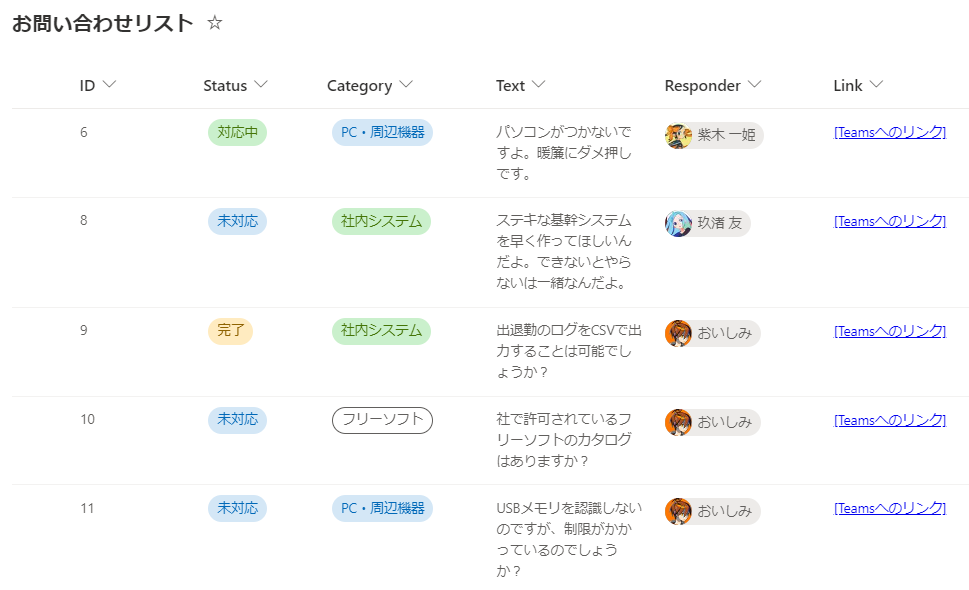
②転記先のSharePointリストを用意する
次に、フォームから投稿されたお問合せを転記するためのリストを作成します。
| 列 | 種類 | 説明 |
|---|---|---|
| Title | 1 行テキスト | 既定のタイトル。今回は使用しないため[必須]をオフにしています。 |
| Category | 選択肢 | Formsの質問1.を記載するための列 |
| Text | 複数行テキスト | Formsの質問2.を記載するための列 |
| Status | 選択肢 | 対応状況を記録する列。後ほどアダプティブカードから更新する列です。 |
| Responder | ユーザーまたはグループ | Formsの投稿者を記録する列。 |
| Link | 複数行テキスト | Teamsに投稿した通知メッセージへのリンクURLを記録する列。 |
チャネルのスレッドとリストをなるべく双方向に連携させたいので、リスト側にも通知メッセージへのリンクを保存するようにしています。
ハイパーリンクではなく複数行テキストの列にしているのは、メッセージへのリンクURLは長くなりがちなので、ハイパーリンク列の文字数制限を考慮したためです。
Link列には以下の書式を設定することでハイパーリンクを設定しています。
{
  "$schema": "https://developer.microsoft.com/json-schemas/sp/v2/column-formatting.schema.json",
  "elmType": "a",
  "txtContent": "[Teamsへのリンク]",
  "attributes": {
    "target": "_blank",
    "href": "= @currentField"
  }
}
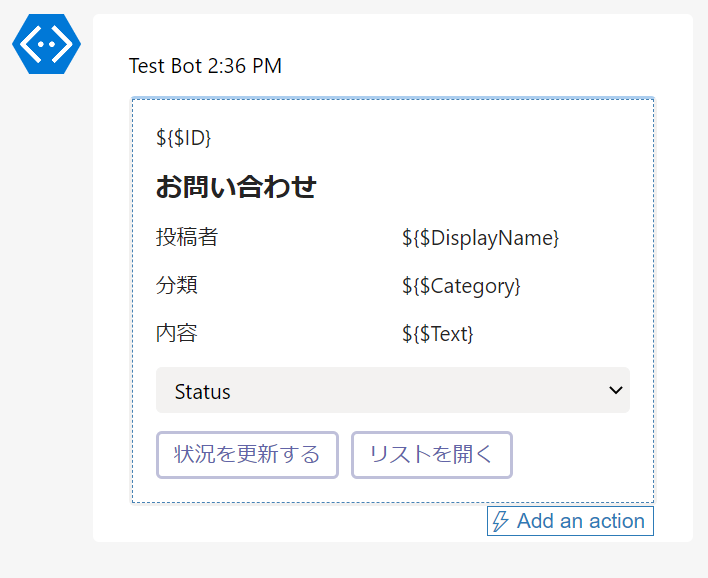
③アダプティブカードを用意する
Adaptive Cards Designerでアダプティブカードを作成します。
後からフローを作成する際に、問合せの内容などを入れ込むので、とりあえず形だけ作っていきます。
アダプティブカードのサンプルコード
{
    "type": "AdaptiveCard",
    "$schema": "http://adaptivecards.io/schemas/adaptive-card.json",
    "version": "1.4",
    "body": [
        {
            "type": "Container",
            "items": [
                {
                    "type": "TextBlock",
                    "text": "${$ID}",
                    "wrap": true
                }
            ]
        },
        {
            "type": "Container",
            "items": [
                {
                    "type": "TextBlock",
                    "text": "お問い合わせ",
                    "wrap": true,
                    "weight": "Bolder",
                    "size": "Large"
                }
            ]
        },
        {
            "type": "Container",
            "items": [
                {
                    "type": "ColumnSet",
                    "columns": [
                        {
                            "type": "Column",
                            "width": "stretch",
                            "items": [
                                {
                                    "type": "TextBlock",
                                    "text": "投稿者",
                                    "wrap": true
                                }
                            ]
                        },
                        {
                            "type": "Column",
                            "width": "stretch",
                            "items": [
                                {
                                    "type": "TextBlock",
                                    "text": "${$DisplayName}",
                                    "wrap": true
                                }
                            ]
                        }
                    ]
                }
            ]
        },
        {
            "type": "Container",
            "items": [
                {
                    "type": "ColumnSet",
                    "columns": [
                        {
                            "type": "Column",
                            "width": "stretch",
                            "items": [
                                {
                                    "type": "TextBlock",
                                    "text": "分類",
                                    "wrap": true
                                }
                            ]
                        },
                        {
                            "type": "Column",
                            "width": "stretch",
                            "items": [
                                {
                                    "type": "TextBlock",
                                    "text": "${$Category}",
                                    "wrap": true
                                }
                            ]
                        }
                    ]
                }
            ]
        },
        {
            "type": "ColumnSet",
            "columns": [
                {
                    "type": "Column",
                    "width": "stretch",
                    "items": [
                        {
                            "type": "TextBlock",
                            "text": "内容",
                            "wrap": true
                        }
                    ]
                },
                {
                    "type": "Column",
                    "width": "stretch",
                    "items": [
                        {
                            "type": "TextBlock",
                            "text": "${$Text}",
                            "wrap": true
                        }
                    ]
                }
            ]
        },
        {
            "type": "Input.ChoiceSet",
            "choices": [
                {
                    "title": "未対応",
                    "value": "未対応"
                },
                {
                    "title": "対応中",
                    "value": "対応中"
                },
                {
                    "title": "完了",
                    "value": "完了"
                }
            ],
            "placeholder": "Status",
            "id": "Choices"
        }
    ],
    "actions": [
        {
            "type": "Action.Submit",
            "title": "状況を更新する",
            "style": "positive",
            "id": "post"
        },
        {
            "type": "Action.OpenUrl",
            "title": "リストを開く",
            "url": "${$LinkURL}"
        }
    ]
}
今回最も重要なポイントはここです。
アダプティブカードから紐ついたリストアイテムを特定するために、カードのわかりやすい場所にリストアイテムのIDを記録します。
後続のフローでJSONを解析してこのリストアイテムのIDを取得する必要があるので、今回は最もわかりやすいようにカードの先頭に配置しています。

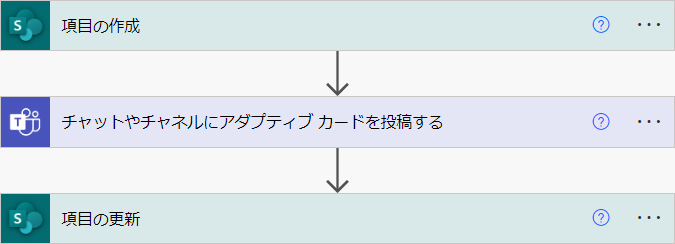
④受付フローの作成
準備が終わったのでいよいよフローを作成します。
カードにはリストIDの記載・リストへのリンクを作成、リストにはカード(投稿)へのリンクをそれぞれ作成するため、以下の順番でアクションを並べます。
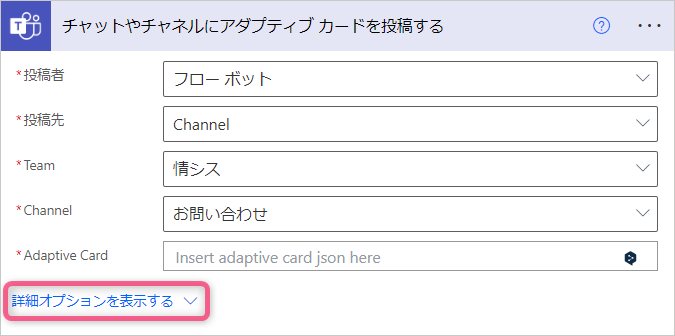
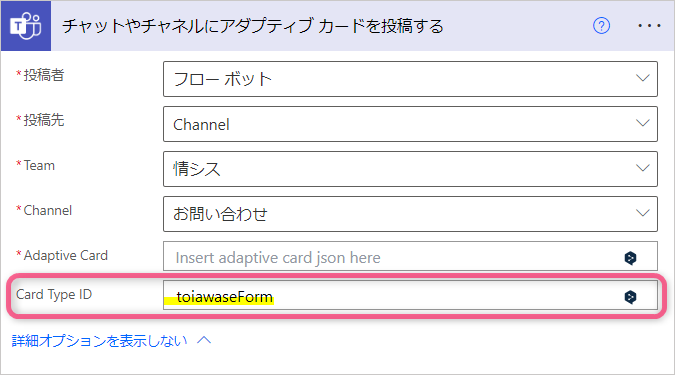
チャットやチャネルにアダプティブ カードを投稿するのアクションでは、[詳細オプションを表示する]をクリックするとCard Type IDの入力欄が表示されます。
Card Type IDに識別のための任意のIDを設定し、後のフローで使用するために控えておきます。
Card Type IDについては、以下の記事で詳しく解説されています。
最後に、先ほど作成したアダプティブカードのJSONを貼り付け、それぞれ動的な値に変更しておきます。

今回は以上です。