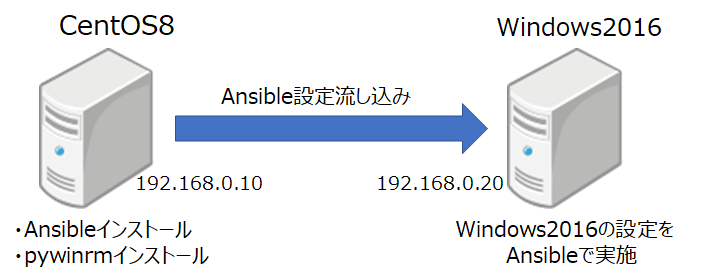
いまさら感たっぷりかもしれませんが、WindowsサーバをAnsibleで設定することにチャレンジしてみました。
AnsibleサーバはLinuxで構築します。
Ansibleインストール環境
以下の環境でAnsible実行環境を作成しました。
| バージョン | |
|---|---|
| OS | CentOS 8.1 |
| Ansible | 2.9.7 |
| pywinrm | 0.4.1 |
CentOS8にAnsibleをインストールします。
さらにWinRMを操作するpywinrmもCentOS8にインストールします。
WinRM(Windows Remote Management)とはWindowsをリモートで操作するサービスです。
Windows2016ではデフォルトでインストールされおり、さらに自動起動しています。
Windows2016のサービス一覧で確認すると以下のようになっています。
Windowsサーババージョン
Windows2016
Ansibleインストール
まずCentOS8のサーバにAnsibleをインストールします。ごく一般的な手順かと思いますが以下になります。
CentOS8のためdnfを使っておりますが、CentOS7の場合はyumに読み替えて実行します。
最後にansibleのバージョンを確認しています。
# dnf install epel-release.noarch
# dnf install ansible
# ansible --version
pywinrmインストール
Ansibleのインストールが終わったらWindowsサーバのWinRMを操作できるpywinrmをインストールします。
最後にpywinrmのバージョンを確認しています。
# pip3 install pywinrm
# pip3 list | grep pywinrm
pywinrm (0.4.1)
CentOS7だとpip(Pythonのパッケージ管理ツール)を別途インストールする必要がありますので、このあたりはCentOS8だと手間いらずです。
Windowsサーバ側準備
Windowsサーバ側でAnsibleサーバからのアクセスに応答するために以下の設定を投入します。
以下のコマンドをWindowsサーバの「PowerShell」を管理者モードで起動して実行します。
PS C:\Users\Administrator> $url = "https://raw.githubusercontent.com/ansible/ansible/devel/examples/scripts/ConfigureRemotingForAnsible.ps1"
PS C:\Users\Administrator> $file = "$env:temp\ConfigureRemotingForAnsible.ps1"
PS C:\Users\Administrator> (New-Object -TypeName System.Net.WebClient).DownloadFile($url, $file)
PS C:\Users\Administrator> powershell.exe -ExecutionPolicy ByPass -File $file
上記の4コマンドを実行したら確認します。
以下のように表示されることを確認します。
PS C:\Users\Administrator> winrm enumerate winrm/config/Listener
Listener
    Address = *
    Transport = HTTP
    Port = 5985
    Hostname
    Enabled = true
    URLPrefix = wsman
    CertificateThumbprint
    ListeningOn = 127.0.0.1, 192.168.0.20, ::1, 2001:0:348b:fb58:3cb0:35ed:8ed4:1d9d, fe80::5efe:172.18.254.60%8, fe80::3cb0:35ed:8ed4:1d9d%25

Listener
    Address = *
    Transport = HTTPS
    Port = 5986
    Hostname = WIN-DOHTBU19QH6
    Enabled = true
    URLPrefix = wsman
    CertificateThumbprint = 7DCCEC302FD098025C97F0092516C7469838471E
    ListeningOn = 127.0.0.1, 192.168.0.20, ::1, 2001:0:348b:fb58:3cb0:35ed:8ed4:1d9d, fe80::5efe:172.18.254.60%8, fe80::3cb0:35ed:8ed4:1d9d%25
WinRM用の5985と5986のポートが許可されていることが確認できます。
事前準備完了
ここまでで、事前準備完了です。
次からがAnsible実行ファイルを作成します。Ansibleの構文詳細などは割愛します。
Ansible設定
最初にAnsible用のディレクトリを作成し、Ansibleの実行対象となるWindowsサーバのhostsファイルを作成します。
以下の例ではviエディタを使用しhostsというファイルを作成していますが、お好みのAnsible実行できる環境であればファイル名は必ずしもhostsである必要はありません。
# mkdir ansible
# cd ansible
# vi hosts
[windows]
192.168.0.20

[windows:vars]
ansible_user=Administrator
ansible_password=xxxxxx
ansible_connection=winrm
ansible_port=5986
ansible_winrm_server_cert_validation=ignore
ansible_password=xxxxxxはWindowsサーバのログインパスワードを記載してください。
Playbookサンプル
次にPlaybookを作成します。test.ymlというファイルで作成します。
以下の3点を実行するPlaybookです
・ksawada1979というユーザ作成
・Themes無効
・WindowsUpdateでSecurityUpdates実施
# vi test.yml
- hosts: windows
  tasks:
    - win_user:
        name: ksawada1979
        password: xxxxxx
        state: present
        groups:
          - Administrators
          - Users

    - name: Themes disabled
      win_service:
        name: Themes
        start_mode: disabled

    - name: Install all security, critical, and rollup updates without a scheduled task
      win_updates:
        category_names:
          - SecurityUpdates
password: xxxxxxはユーザに対するパスワードを入力してください。
Ansible実行
# ansible-playbook -i ./hosts test.yml
Windowsモジュール一覧
今回の例ではユーザ作成とサービスの無効化を記載しましたが、Windowsモジュールは色々あるようです。
以下の公式ドキュメントに記載がありますので、引き続き試してみたいと思います。
https://docs.ansible.com/ansible/2.9/modules/list_of_windows_modules.html
参考サイト
https://goodbyegangster.hatenablog.com/entry/2019/04/09/073408
上記のサイトに大変お世話になりました。色々うまくいかずに上記サイトにたどり着きましたが、最初からこちらのサイトに沿っていればよかったというオチです。

