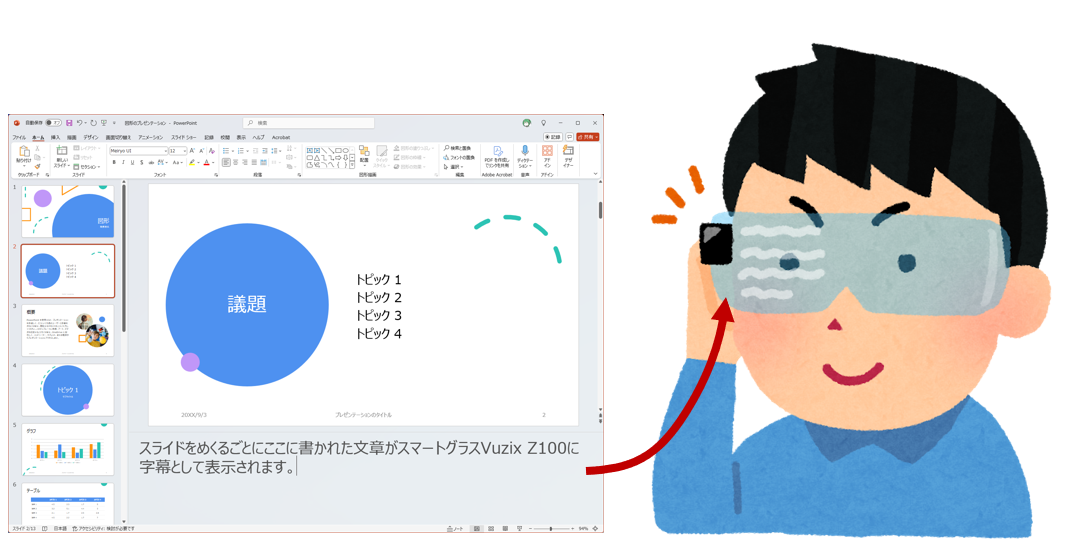
この記事では、PowerPoint のプレゼンに合わせてノート部分に記載した文字をスマートグラス(Vuzix Z100)にプロンプターのように表示するアプリケーションの作成方法を説明します。
Vuzix Z100 について
Vuzix Z100 は以下のような特徴を持つスマートグラスです。見た目が普通のメガネにかなり近いのが良いですね。
- 40g程度と軽量でバッテリー、プロセッサ、プロジェクター、タップ検知センサを内蔵する
- 右目のみのモノクロ表示(緑のみ, 640x480px)
- バッテリーが2日程度持つ
- Android/iPhoneからBLE経由でZ100に文字情報・画像情報・スクロール情報等を転送して表示する方式
- Android/iOS 向けのSDKが提供されている
標準アプリの仕様
スマートフォン向けにVuzix Connectというアプリケーションが提供されており、デモとしてテレプロンプターというアプリケーションも用意されています。表示するテキストは編集することができるので、単にプロンプターとして利用するだけの場合には、新たにアプリケーションを開発する必要はありません。
アプリケーションの開発
今回は、以下の2つのアプリケーションを作成しました。
- HTTPで文字列を受け取り Vuzix Z100 にその文字列を表示させる機能を持つ Android アプリ
- PowerPointでページをめくるとそのタイミングでAndroid アプリにPowerPointのノート部分に記載されている文字列をHTTPで転送する PowerPointプラグイン
1. Android アプリケーション
Ultralite SDK Sample for Androidには、Vuzix Z100 で提供されている機能に関するサンプルコードを提供されています。このコードをベースに修正を加えました。MainActivity.java の startDemoThread() には、各デモコードを順次実行するようなコードが記載されていますが、このうち、DemoScrollLiveText.runDemo() を使いたいので、その行以外をコメントアウトしました。
        private void startDemoThread() {
            new Thread(() -> {
                // Always be sure we have control before any drawing starts
                if(haveControlOfGlasses) {
                    running.postValue(true);
                    try {
                        //DemoCanvasLayout.runDemo(getApplication(), this, ultralite);
                        //DemoScrollAutoScroller.runDemo(getApplication(), this, ultralite);
                        DemoScrollLiveText.runDemo(getApplication(), this, ultralite);
                        //DemoScrollNative.runDemo(getApplication(), this, ultralite);
                        //DemoTapInput.runDemo(getApplication(), this, ultralite);

                        // Always release control when finished drawing to the glasses
                        ultralite.releaseControl();
                        ultralite.sendNotification("Demo Success", "The demo is over");
                                 :
                                 :
また、Android端末のIPアドレスが画面に表示されると便利なので、同じく MainActivity.java に以下のコードを追加しました。
    // 自分自身のIPアドレスを取得する
    private String getIPAddress(boolean useIPv4) {
        try {
            List<NetworkInterface> interfaces = Collections.list(NetworkInterface.getNetworkInterfaces());
            for (NetworkInterface iface : interfaces) {
                if(iface.getName().equalsIgnoreCase("wlan0")){ // WiFiのIPアドレスのみを利用
                    List<InetAddress> addresses = Collections.list(iface.getInetAddresses());
                    for (InetAddress addr : addresses) {
                        if (!addr.isLoopbackAddress()) {
                            String sAddr = addr.getHostAddress();
                            boolean isIPv4 = addr instanceof Inet4Address;
                            if (useIPv4) {
                                if (isIPv4) return sAddr;
                            } else {
                                if (!isIPv4) {
                                    int delim = sAddr.indexOf('%'); // drop ip6 port suffix
                                    return delim < 0 ? sAddr.toUpperCase() : sAddr.substring(0, delim).toUpperCase();
                                }
                            }
                        }
                    }
                }
            }
        } catch (Exception ex) {
            ex.printStackTrace();
        }
        return "none";
    }

         :
         :

    @Override
    protected void onCreate(@Nullable Bundle savedInstanceState) {
        super.onCreate(savedInstanceState);
        setContentView(R.layout.main_activity);
         :
         :
        ultralite.getControlledByMe().observe(this, controlled -> {
            // Always watch to see if you have lost control to another application. Our ViewModel
            // observes this in controlledObserver, so this observer is just for the sake of
            // our UI.
            controlledImageView.setImageResource(controlled ? R.drawable.ic_check_24 : R.drawable.ic_close_24);
            String ipAddress = " {"+getIPAddress(true)+"}";
            String info = ultralite.getName() + ipAddress;
            nameTextView.setText(info);
        });

         :
         :

        // Now set the click listeners to kick-off the two demos
        demoButton.setOnClickListener(v -> model.runDemo());
        notificationButton.setOnClickListener(v -> sendSampleNotification() );
    }
また、AndroidManifest.xml に android.permission.Internet と android.permission.ACCESS_NETWORK_STATE 権限を追加しておきます。
<?xml version="1.0" encoding="utf-8"?>
<manifest xmlns:android="http://schemas.android.com/apk/res/android">

    <uses-permission android:name="android.permission.INTERNET" />
    <uses-permission android:name="android.permission.ACCESS_NETWORK_STATE"/>
    <application
        android:allowBackup="true"
        android:dataExtractionRules="@xml/data_extraction_rules"
        android:fullBackupContent="@xml/backup_rules"
        android:icon="@mipmap/ic_launcher"
        android:label="@string/app_name"
        android:roundIcon="@mipmap/ic_launcher_round"
        android:supportsRtl="true"
        android:theme="@style/Theme.UltraliteSDKSample">

        <activity android:name=".MainActivity" android:exported="true">
            <intent-filter>
                <action android:name="android.intent.action.MAIN"/>
                <category android:name="android.intent.category.LAUNCHER"/>
            </intent-filter>
        </activity>
    </application>
</manifest>
HTTPの待ち受けには NanoHTTPD を利用しました。まず、settings.gradle.kts (Module app)のdependencies に nanohttpd を追加しておきます。
dependencies {
    implementation("androidx.appcompat:appcompat:1.6.1")
    implementation("com.google.android.material:material:1.11.0")
    implementation("com.vuzix:ultralite-sdk-android:1.7")
    implementation("org.nanohttpd:nanohttpd:2.3.1")
}
次に、DemoScrollLiveText.java のほうも修正していきます。runDemo() 内で待ち受けのクラスを定義しています。
package com.vuzix.ultralite.sample;

import android.content.Context;

import com.vuzix.ultralite.Layout;
import com.vuzix.ultralite.UltraliteSDK;
import com.vuzix.ultralite.utils.scroll.LiveText;

import java.io.IOException;
import java.util.Map;

import fi.iki.elonen.NanoHTTPD;

public class DemoScrollLiveText {
    private static void chunkStringsToEngine(MainActivity.DemoActivityViewModel demoActivityViewModel, LiveText liveTextSender, int intervalMs, String[] fullStrings) throws MainActivity.Stop {
        String fullTextToSend = "";
        for (String eachLine : fullStrings) {
            fullTextToSend += eachLine;
            liveTextSender.sendText(fullTextToSend);

            demoActivityViewModel.pause(intervalMs);
        }
    }

    public static void runDemo(Context context, MainActivity.DemoActivityViewModel demoActivityViewModel, UltraliteSDK ultralite) throws MainActivity.Stop  {
        // MyWebServer クラスの定義
        class MyWebServer extends NanoHTTPD {
            LiveText liveText;
            public MyWebServer(int port, LiveText liveTextSender) {
                super(port);
                liveText = liveTextSender;
            }

            @Override
            public Response serve(IHTTPSession session) {
                Map<String, String> parms = session.getParms();
                String text = parms.getOrDefault("text", "?text=文字列 で指定してください");

                try{
                    if(!text.startsWith("?")){
                        int length = 20;
                        int inputLength = text.length(); // 分割後の配列のサイズを計算
                        int arraySize = (int) Math.ceil((double) inputLength / length);
                        String[] parts = new String[arraySize]; // 文字列を指定の長さごとに分割して配列に格納
                        for (int i = 0; i < arraySize; i++) {
                            int start = i * length;
                            int end = Math.min(start + length, inputLength);
                            parts[i] = text.substring(start, end);
                        }
                        chunkStringsToEngine(demoActivityViewModel, liveText, 1900, parts);
                    }

                }catch (Exception e){
                    e.printStackTrace();
                }
                return newFixedLengthResponse(text);
            }
        }
        MyWebServer myWebServer;
        final int sliceHeightInPixels = 48;    // The lines will be 48 pixels high, so each line is 1/10th the screen height. This affects the
                                               // ranges for all other values below since this configuration now has a maximum of 10 lines.
        final int sliceWidthInPixels = UltraliteSDK.Canvas.WIDTH; // Use the full width
        final int startingScreenLocation = 1;  // The lines will appear at line 0, the lowest point on the screen.  (Since above we
                                               // configured a total of 10 lines on the screen, this can be (0-9) and we're choosing 1.
        final int numberLinesShowing = 5;      // Number of full lines when the text pauses. A fourth line shows during the transition.
                                               // (Since each line is set to be 48 pixels high above, we can have a max of 10 lines on
                                               // the screen, 1 up from the bottom, we can choose between 1 and 9, and we choose 3).

        ultralite.setLayout(Layout.SCROLL, 0, true, true, 0);
        LiveText liveTextSender = new LiveText(ultralite, sliceHeightInPixels, sliceWidthInPixels, startingScreenLocation, numberLinesShowing, null);
        try {
            myWebServer = new MyWebServer(8080,liveTextSender); // ポート番号を指定
            myWebServer.start();
        } catch (IOException e) {
            e.printStackTrace();
        }


        // Often the LiveText is used with a speech recognition engine that gives us results. We will
        // simulate that by sending some arrays.
        while(true){
            demoActivityViewModel.pause(1000);
        }

    }
}
これで、httpで文字列をAndroid端末に送るとVuzix Z100に文字が表示されるようになりました。
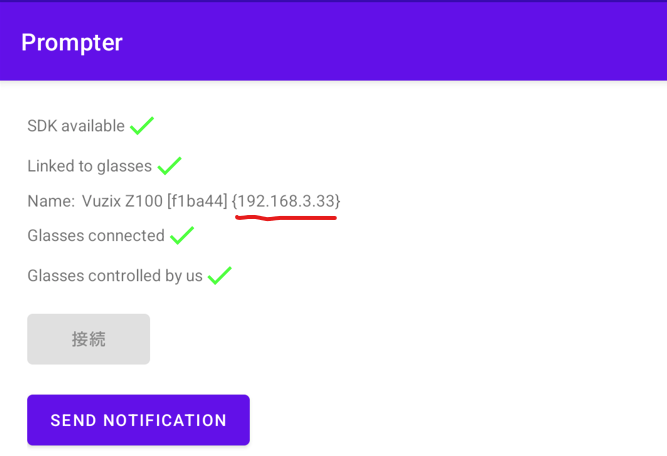
Android端末のIPアドレスはアプリを起動すると表示されます。
試しに、PC上のブラウザから下記のようなURLを入力して、スマートグラス上に こんにちは と表示されることを確認してください。
http://(Android端末のIPアドレス):8080/?text=こんにちは
2. PowerPoint プラグイン
Visual Studio 2022 でPowerPointプラグインを作成していきます。まず Visual Studio Installer を起動し、Office/SharePoint 開発にチェックを入れてOfficeの開発環境をインストールしてください。
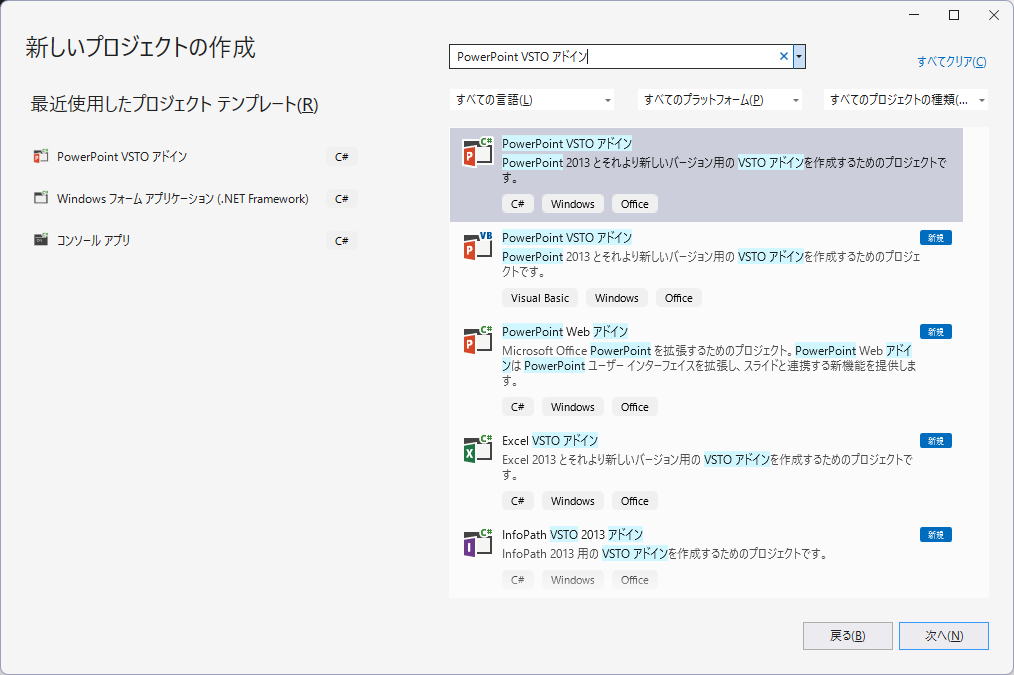
次に、Visual Studio 2022 を起動し、新しいプロジェクトの作成 をクリック、PowerPoint VSTO アドイン をクリックして新規作成します。
PowerPointでスライドをめくったときに処理を行うため、ThisAddin.csのコード中で _application.SlideShowNextSlide イベントに必要な処理を追加します。今回は、Android端末のIPアドレスを 環境変数 Z100_IP_ADDRESS から読み取るようにしました。別途、この環境変数に以下のような値を設定しておいてください。
(Android端末のIPアドレス):8080
using System;
using System.Collections.Generic;
using System.Linq;
using System.Text;
using System.Xml.Linq;
using PowerPoint = Microsoft.Office.Interop.PowerPoint;
using Office = Microsoft.Office.Core;
using Microsoft.Office.Interop.PowerPoint;
using System.Net.Http;
using System.Threading.Tasks;
using System.Windows.Forms;

namespace PrompterAddin
{
    public partial class ThisAddIn
    {
        private Microsoft.Office.Interop.PowerPoint.Application _application;
        private string _ipAddress;

        private void ThisAddIn_Startup(object sender, System.EventArgs e)
        {
            _ipAddress = GetIpAddressFromEnvironment();
            if (string.IsNullOrEmpty(_ipAddress))
            {
                MessageBox.Show("スマートグラスのIPアドレスが環境変数 Z100_IP_ADDRESS から設定されていません。");
                return;
            }
            _application = this.Application;
            _application.SlideShowNextSlide += new EApplication_SlideShowNextSlideEventHandler(Application_SlideShowNextSlide);

        }
        private string GetIpAddressFromEnvironment()
        {
            return Environment.GetEnvironmentVariable("Z100_IP_ADDRESS");
        }
        private void ThisAddIn_Shutdown(object sender, System.EventArgs e)
        {
        }
        private void Application_SlideShowNextSlide(SlideShowWindow window)
        {
            Slide slide = window.View.Slide;
            string notes = slide.NotesPage.Shapes.Placeholders[2].TextFrame.TextRange.Text;
            SendHttpRequest(notes);
        }
        private async void SendHttpRequest(string notes)
        {
            if (String.IsNullOrEmpty(_ipAddress))
            {
                return;
            }
            string url = "http://"+ _ipAddress+"/?text=" + Uri.EscapeDataString(notes);

            using (HttpClient client = new HttpClient())
            {
                try
                {
                    HttpResponseMessage response = await client.GetAsync(url);
                    response.EnsureSuccessStatusCode();
                    string responseBody = await response.Content.ReadAsStringAsync();
                    // レスポンスの処理が必要な場合はここで行います
                }
                catch (Exception ex)
                {
                    // エラーハンドリング
                    Console.WriteLine(ex.Message);
                }
            }
        }


        #region VSTO で生成されたコード

        /// <summary>
        /// デザイナーのサポートに必要なメソッドです。
        /// このメソッドの内容をコード エディターで変更しないでください。
        /// </summary>
        private void InternalStartup()
        {
            this.Startup += new System.EventHandler(ThisAddIn_Startup);
            this.Shutdown += new System.EventHandler(ThisAddIn_Shutdown);
        }

        #endregion
    }
}
これで、開始をクリックすると PowerPointが起動します。PowerPointファイルを新規作成し、ノート部分に文字列を記載してプレゼンを開始してください。正常に設定されていればスライドをめくるごとにノート部分の文字が表示されます。
プラグインを配布したい場合には、ソリューションエクスプローラーでプロジェクトを選択して右クリック > 発行 をクリックして、公開ウィザードで適切な公開場所を設定して 次へ を選択、CD-ROM まはた DVD-ROM からを選択して 次へ > 完了 を順にクリックします。
こうすると、setup.exe, アドイン名.vsto, Application Files フォルダの 3つが作成されるのでこれを配布してください。
プラグインをアンインストールしたい場合には、プログラムの追加と削除または 設定 > アプリ > インストールされたアプリ に作成したアドイン名(例えば PrompterAddin)がありますのでそれを削除してください。
制限事項など
- ページを早くめくると前の文字列が表示終えるまで表示がおかしくなります。
- Android端末とPCは同一のWiFiネットワーク上に存在する必要があります。モバイル回線には対応していません。
- Android端末とVuzix Z100の距離はあまり離さないでください。3~5mくらい離すとうまく通信できないことがあります。
- スリープからの復帰処理を記述していないため、動作がおかしくなる場合があります。その場合は、Androidアプリを再起動してください。
最後に
最小限のコード修正でプロンプターとして機能するアプリケーションを作成しました。ぜひ皆さんもいろいろ試してみてください。


