11 アカウント有効化
現時点のアプリケーションは、新規登録したユーザーは初めからすべての機能にアクセスできるようになっているためアカウントを有効化するステップを新規登録の途中に差し込むことで、本当にそのメールアドレスの持ち主なのかどうかを確認できるようにしてみる。
流れとしては
(1) 有効化トークンやダイジェストを関連付けておいた状態を作成
(2) 有効化トークンを含めたリンクをユーザーにメールで送信
(3) ユーザーがそのリンクをクリックすると有効化できるようにする
手順として
1、ユーザーの初期状態は「有効化されていない」(unactivated) にしておく。
2、ユーザー登録が行われたときに、有効化トークンと、それに対応する有効化ダイジェストを生成する。
3、有効化ダイジェストはデータベースに保存しておき、有効化トークンはメールアドレスと一緒に、ユーザーに送信する有効化用メールのリンクに仕込んでおく3。
4、ユーザーがメールのリンクをクリックしたら、アプリケーションはメールアドレスをキーにしてユーザーを探し、データベース内に保存しておいた有効化ダイジェストと比較することでトークンを認証する。
5、ユーザーを認証できたら、ユーザーのステータスを「有効化されていない」から「有効化済み」(activated) に変更する。
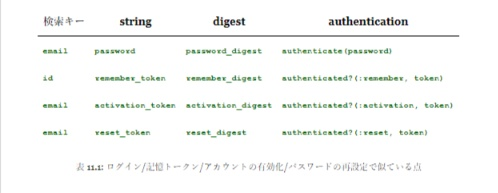
本章では前章までの多くのアイデアを使い回すことができます (具体的にはUser.digestやUser.new_token、改造版のuser.authenticated?メソッドなど)。
参考↓
11.1 AccountActivationsリソース
セッション機能を使って、アカウントの有効化という作業を「リソース」としてモデル化することにします。アカウントの有効化リソースはActive Recordのモデルとはこの際関係ないので、両者を関連付けることはしません。その代わりに、この作業に必要なデータ (有効化トークンや有効化ステータスなど) をUserモデルに追加することにします。
なお、アカウント有効化もリソースとして扱いたいのですが、いつもとは少し使い方が異なる点に注意しておいてください。例えば、有効化用のリンクにアクセスして有効化のステータスを変更する部分では、RESTのルールに従うとPATCHリクエストとupdateアクションになるべきです。
しかし、有効化リンクはメールでユーザーに送られることを思い出してください。ユーザーがこのリンクをクリックすれば、それはブラウザで普通にクリックしたときと同じであり、その場合ブラウザから発行されるのは (updateアクションで使うPATCHリクエストではなく) GETリクエストになってしまいます。このため、ユーザーからのGETリクエストを受けるために、(本来であればupdateのところを) editアクションに変更して使っていきます
11.1.1 AccountActivationsコントローラ
いつも通りブランチを切って作業していきます
$ rails generate controller AccountActivations
先に説明すると、有効化のメールには次のURLを含めることになります。
edit_account_activation_url(activation_token, ...)
いつものような**_pathではなくメールに添付して送るので_url**
これはeditアクションと紐づけが必要であると判断できるので名前付きルートが使用可能にできるためにルーティングにアカウント有効化用のresources行を追加します
 Rails.application.routes.draw do
  root   'static_pages#home'
  get    '/help',    to: 'static_pages#help'
  get    '/about',   to: 'static_pages#about'
  get    '/contact', to: 'static_pages#contact'
  get    '/signup',  to: 'users#new'
  get    '/login',   to: 'sessions#new'
  post   '/login',   to: 'sessions#create'
  delete '/logout',  to: 'sessions#destroy'
  resources :users
  resources :account_activations, only: [:edit] #onlyオプションでアクション指定
end
11.1.2 AccountActivationのデータモデル
有効化のメールには一意の有効化トークンが必要です。
これをパスワードの実装 (第6章) や記憶トークンの実装 (第9章) と同じように仮想的な属性を使ってハッシュ化した文字列をデータベースに保存するようにします。
具体的には、次のように仮想属性の有効化トークンにアクセスし、
user.activation_token
このようなコードでユーザーを認証できるようになります。
user.authenticated?(:activation, token)
(これを行うにはリスト 9.6のauthenticated?メソッドを改良する必要があります。)
続いて、activated属性を追加して論理値を取るようにします。これで、10.4.1で説明した自動生成の論理値メソッドと同じような感じで、ユーザーが有効であるかどうかをテストできるようになります。
if user.activated? ...
最後に、本チュートリアルで使うことはありませんが、ユーザーを有効にしたときの日時も念のために記録しておきます
それを踏まえたうえでUsersモデルにカラムを追加していきます
$ rails generate migration add_activation_to_users activation_digest:string activated:boolean activated_at:datetime
この時admin属性のときと同様に、activated属性のデフォルトの論理値をfalseにしておきます
 class AddActivationToUsers < ActiveRecord::Migration[5.0]
  def change
    add_column :users, :activation_digest, :string
    add_column :users, :activated, :boolean, default: false
    add_column :users, :activated_at, :datetime
  end
end
$ rails db:migrate
Activationトークンのコールバック (before_〇〇)
ユーザーが新しい登録を完了するためには必ずアカウントの有効化が必要になるのですから、有効化トークンや有効化ダイジェストはユーザーオブジェクトが作成される前に作成しておく必要があります。
同じような動きで、6章ではメールアドレスをデータベースに保存する前に、メールアドレスを全部小文字に変換する必要があったのでした。あのときは、before_saveコールバックにdowncaseメソッドをバインドしました
今回は、オブジェクトが作成されたときだけコールバックを呼び出したいのです。それ以外のときには呼び出したくないのです。そこでbefore_createコールバックが必要になります
 class User < ApplicationRecord
  attr_accessor :remember_token, :activation_token<--注目1
  before_save   :downcase_email<--注目2
  before_create :create_activation_digest
  validates :name,  presence: true, length: { maximum: 50 }
  .
  .
  .
  private <--注目3

    # メールアドレスをすべて小文字にする
    def downcase_email
      self.email = email.downcase
    end

    # 有効化トークンとダイジェストを作成および代入する
    def create_activation_digest
      self.activation_token  = User.new_token <--注目4
      self.activation_digest = User.digest(activation_token)
    end
end
注目1・・・有効化トークンは本質的に仮のものでなければならないので、このモデルのattr_accessorにもう1つ追加しました
注目2・・・文字通り保存前にメソッドを呼び出している。呼び出されたメソッドは外部に公にする必要がないのでprivateキーワード以下に記述されている
注目3・・・このキーワード以下に記述された情報は外部から参照不可になる
注目4・・・記憶トークン、ダイジェスト作成時に定義したのの使いまわしである
補足:注目4の部分に置いて記憶~~の部分とちがうのは
def remember
  self.remember_token = User.new_token
  update_attribute(:remember_digest, User.digest(remember_token))
end```

記憶~~が既に存在する属性の更新(update_attribute)であるのに対して、今回は新User作成時に行われるメソッドのため有効化~~は変数定義のみで記述がまとまるのである


### サンプルデータの更新
テスト用のサンプルデータとユーザの更新(有効化だからtrue)もわすれてはいけません!!

```rb:db/seeds.rb
 User.create!(name:  "Example User",
             email: "example@railstutorial.org",
             password:              "foobar",
             password_confirmation: "foobar",
             admin:     true,
             activated: true,
             activated_at: Time.zone.now)

99.times do |n|
  name  = Faker::Name.name
  email = "example-#{n+1}@railstutorial.org"
  password = "password"
  User.create!(name:  name,
              email: email,
              password:              password,
              password_confirmation: password,
              activated: true,
              activated_at: Time.zone.now)
end
 michael:
  name: Michael Example
  email: michael@example.com
  password_digest: <%= User.digest('password') %>
  admin: true
  activated: true
  activated_at: <%= Time.zone.now %>

archer:
  name: Sterling Archer
  email: duchess@example.gov
  password_digest: <%= User.digest('password') %>
  activated: true
  activated_at: <%= Time.zone.now %>

lana:
  name: Lana Kane
  email: hands@example.gov
  password_digest: <%= User.digest('password') %>
  activated: true
  activated_at: <%= Time.zone.now %>

malory:
  name: Malory Archer
  email: boss@example.gov
  password_digest: <%= User.digest('password') %>
  activated: true
  activated_at: <%= Time.zone.now %>

<% 30.times do |n| %>
user_<%= n %>:
  name:  <%= "User #{n}" %>
  email: <%= "user-#{n}@example.com" %>
  password_digest: <%= User.digest('password') %>
  activated: true
  activated_at: <%= Time.zone.now %>
<% end %>
Time.zone.nowはRailsの組み込みヘルパーであり、サーバーのタイムゾーンに応じたタイムスタンプを返します
いつものようにデータベースを初期化して、サンプルデータを再度生成し直し、リスト 11.4の変更を反映します。
$ rails db:migrate:reset
$ rails db:seed
11.2 アカウント有効化のメール送信
データのモデル化が終わったので、今度はアカウント有効化メールの送信に必要なコードを追加しましょう
Action Mailerライブラリを使ってUserのメイラーを追加します。このメイラーはUsersコントローラのcreateアクションで有効化リンクをメール送信するために使います。
メイラーの構成はコントローラのアクションとよく似ており、メールのテンプレートをビューと同じ要領で定義できます。このテンプレートの中に有効化トークンとメールアドレス (= 有効にするアカウントのアドレス) のリンクを含め、使っていきます。
11.2.1 送信メールのテンプレート
モデルやコントローラ同様コンソールでジェネレート
$ rails generate mailer UserMailer account_activation password_reset
※password_resetは次項。ついでに作成
まずは生成されたテンプレートメイラーの動作を簡単に追ってみていきます
 class ApplicationMailer < ActionMailer::Base
  default from: "from@example.com"
  layout 'mailer'
end
・デフォルトのfromアドレス (アプリケーション全体で共通) があります
・メールのフォーマットに対応するメイラーレイアウトも使われています(生成されるHTMLメイラーのレイアウトやテキストメイラーのレイアウトはapp/views/layoutsで確認できます)
 class UserMailer < ApplicationMailer

  # Subject can be set in your I18n file at config/locales/en.yml
  # with the following lookup:
  #
  #   en.user_mailer.account_activation.subject
  #
  def account_activation
    @greeting = "Hi"

    mail to: "to@example.org"
  end

  # Subject can be set in your I18n file at config/locales/en.yml
  # with the following lookup:
  #
  #   en.user_mailer.password_reset.subject
  #
  def password_reset
    @greeting = "Hi"

    mail to: "to@example.org"
  end
end
・各メソッドには宛先メールアドレスがあります
・インスタンス変数@greetingも含まれています。このインスタンス変数は、ちょうど普通のビューでコントローラのインスタンス変数を利用できるのと同じように、メイラービューで利用できます
このテンプレートをカスタマイズして有効化メールを作成してみる
 class ApplicationMailer < ActionMailer::Base
  default from: "noreply@example.com"
  layout 'mailer'
end
 class UserMailer < ApplicationMailer

  def account_activation(user)
    @user = user
    mail to: user.email, subject: "Account activation"
  end

  def password_reset
    @greeting = "Hi"

    mail to: "to@example.org"
  end
end
※①ユーザーを含むインスタンス変数を作成してビューで使えるようにし、②user.emailにメール送信します。mailにsubjectキーを引数として渡しています。この値は、メールの件名にあたります
続いて生成したメイラーごとに、ビューのテンプレートが2つずつ生成されてるのでこれらを通常のビューと同様ERBで自由にカスタマイズします。
1つはテキストメール用のテンプレート、1つはHTMLメール用のテンプレートです。
 UserMailer#account_activation

<%= @greeting %>, find me in app/views/user_mailer/account_activation.text.erb
 <h1>UserMailer#account_activation</h1>

<p>
  <%= @greeting %>, find me in app/views/user_mailer/account_activation.html.erb
</p>
ここでは
①挨拶文にユーザー名を含め、
②カスタムの有効化リンクを追加します。
この後、Railsサーバーでユーザーをメールアドレスで検索して有効化トークンを認証できるようにしたいので、
③リンクにはメールアドレスとトークンを両方含めておく必要があります。
AccountActivationsリソースで有効化をモデル化したので、トークン自体は定義した名前付きルートの引数で使われます。
Hi <%= @user.name %>,<--注目1

Welcome to the Sample App! Click on the link below to activate your account:

<%= edit_account_activation_url(@user.activation_token, email: @user.email) %><--注目2
 <h1>Sample App</h1>

<p>Hi <%= @user.name %>,</p>

<p>
Welcome to the Sample App! Click on the link below to activate your account:
</p>

<%= link_to "Activate", edit_account_activation_url(@user.activation_token,
                                                    email: @user.email) %><--注目3
注目1・・・インスタンス変数を定義してるためERBでひっぱってこれる
注目2・・・ベースURLはhttp://www.example.com/account_activations/q5lt38hQDc_959PVoo6b7A/edit
になる
注目3・・・HTMLテンプレートでは、正しいリンクを組立てるためにlink_toメソッドを使っている
クエリパラメータ(エスケープ手法)
クエリパラメータとは、URLの末尾で疑問符「?」に続けてキーと値のペアを記述したものです
補足:注目2にて、上述したとおりリンクにはメールアドレスとトークンを両方含めておく必要がある
有効化URLの「q5lt38hQDc_959PVoo6b7A」という部分はnew_tokenメソッドでBase64で生成されたトークンです。
※このトークンは、特にAccountActivationsコントローラのeditアクションではparamsハッシュでparams[:id]として参照できます
トークンはOK続いてメールアドレスをクエリパラメータで含ませます(edit_account_activation_urlに引数でキーと値をわたしています)
↓ ↓ ↓
account_activations/q5lt38hQDc_959PVoo6b7A/edit?email=foo%40example.com
エスケープ手法とは。
通常URLでは扱えない文字を扱えるようにするために変換すること。ここでは@が%40にmなってます。またコントローラでparams[:email]からメールアドレスを取り出すときには、自動的にエスケープを解除してくれます
11.2.2 送信メールのプレビュー
上で定義したテンプレートの実際の表示を簡単に確認するために、メールプレビューという裏技を使ってみましょう
Railsでは、特殊なURLにアクセスするとメールのメッセージをその場でプレビューすることができます。メールを実際に送信しなくてもよいので大変便利です。これを利用するには、アプリケーションのdevelopment環境の設定に手を加える必要があります 。
 Rails.application.configure do
  .
  .
  .
  config.action_mailer.raise_delivery_errors = true
  config.action_mailer.delivery_method = :test
  host = 'example.com' # ここをコピペすると失敗します。自分の環境に合わせてください。
  config.action_mailer.default_url_options = { host: host, protocol: 'https' }
  .
  .
  .
end
hostにはdevelopment環境に合わせて変更
例
config.action_mailer.default_url_options = { host: host, protocol: 'https' }```

developmentサーバーを再起動して上の設定を読み込んだら、次はリスト自動生成したUserメイラーのプレビューファイルの更新が必要です

```rb:test/mailers/previews/user_mailer_preview.rb
 # Preview all emails at http://localhost:3000/rails/mailers/user_mailer
class UserMailerPreview < ActionMailer::Preview

  # Preview this email at
  # http://localhost:3000/rails/mailers/user_mailer/account_activation
  def account_activation
    UserMailer.account_activation
  end

  # Preview this email at
  # http://localhost:3000/rails/mailers/user_mailer/password_reset
  def password_reset
    UserMailer.password_reset
  end
end
Mailerで定義したaccount_activationの引数には有効なUserオブジェクトを渡す必要があるため、このままでは動きません。
これを回避するために、
①user変数が開発用データベースの最初のユーザーになるように定義
②ビューテンプレートでアカウント有効化のトークンが必要なのでuser.activation_tokenの値にも代入
③それをUserMailer.account_activationの引数として渡します
なお、activation_tokenは仮の属性でしかないのでデータベースのユーザーはこの値を実際には持っていません。
これで指定のURLでアカウント有効化メールをプレビューできるようになります
11.2.3 送信メールのテスト
便利なテスト例がRailsによって自動生成されているのでこれを利用すればテストの作成は割と簡単です。
 require 'test_helper'

class UserMailerTest < ActionMailer::TestCase

  test "account_activation" do
    mail = UserMailer.account_activation
    assert_equal "Account activation", mail.subject
    assert_equal ["to@example.org"], mail.to
    assert_equal ["from@example.com"], mail.from
    assert_match "Hi", mail.body.encoded
  end

  test "password_reset" do
    mail = UserMailer.password_reset
    assert_equal "Password reset", mail.subject
    assert_equal ["to@example.org"], mail.to
    assert_equal ["from@example.com"], mail.from
    assert_match "Hi", mail.body.encoded
  end
end
テストでは、assert_matchメソッドを使って名前、有効化トークン、エスケープ済みメールアドレスがメール本文に含まれているかどうかをテストします。
CGI.escape(user.email)
上のコードでテスト用のユーザーのメールアドレスをエスケープすることもできます
書き換えて行くと
 require 'test_helper'

class UserMailerTest < ActionMailer::TestCase

  test "account_activation" do
    user = users(:michael)
    user.activation_token = User.new_token
    mail = UserMailer.account_activation(user)
    assert_equal "Account activation", mail.subject
    assert_equal [user.email], mail.to
    assert_equal ["noreply@example.com"], mail.from
    assert_match user.name,               mail.body.encoded
    assert_match user.activation_token,   mail.body.encoded
    assert_match CGI.escape(user.email),  mail.body.encoded
  end
end
password_resetはいまのところ削除
このテストがパスするには、テストファイル内のドメイン名を正しく設定する必要があります
 Rails.application.configure do
  .
  .
  .
  config.action_mailer.delivery_method = :test
  config.action_mailer.default_url_options = { host: 'example.com' }<--ここ
  .
  .
  .
end
assert_match
テストでつかわれたこのメソッド。
これを使えば、正規表現で文字列をテストできます。
assert_match 'foo', 'foobar'      # true
assert_match 'baz', 'foobar'      # false
assert_match /\w+/, 'foobar'      # true
assert_match /\w+/, '$#!*+@'      # false
11.2.4 ユーザーのcreateアクションを更新
今までのコードをアクションにおとしこんでいきます
 class UsersController < ApplicationController
  .
  .
  .
  def create
    @user = User.new(user_params)
    if @user.save
      UserMailer.account_activation(@user).deliver_now
      flash[:info] = "Please check your email to activate your account."
      redirect_to root_url
    else
      render 'new'
    end
  end
  .
  .
  .
end
リダイレクト先をプロフィールページからルートURLに変更し、かつユーザーは以前のようにログインしないようになっています。
したがって、アプリケーションの動作が仮に正しくても、現在のテストスイートは redになります。そこで、失敗が発生するテストの行をひとまずコメントアウトしておきます。コメントアウトした部分は後にアカウント有効化のテストをパスさせるときに元に戻します。
 require 'test_helper'

class UsersSignupTest < ActionDispatch::IntegrationTest

  test "invalid signup information" do
    get signup_path
    assert_no_difference 'User.count' do
      post users_path, params: { user: { name:  "",
                                         email: "user@invalid",
                                         password:              "foo",
                                         password_confirmation: "bar" } }
    end
    assert_template 'users/new'
    assert_select 'div#error_explanation'
    assert_select 'div.field_with_errors'
  end

  test "valid signup information" do
    get signup_path
    assert_difference 'User.count', 1 do
      post users_path, params: { user: { name:  "Example User",
                                         email: "user@example.com",
                                         password:              "password",
                                         password_confirmation: "password" } }
    end
    follow_redirect!
    # assert_template 'users/show' <--ここ二行
    # assert is_logged_in?
  end
end
この状態で実際に新規ユーザーとして登録してみると、ブラウザではリダイレクトされてフラッシュが表示されます。
アクション上ではメールが生成されます。ただし、実際にメールが生成されるわけではないので注意。サーバーログに出力されます。
またこの時点でコンソールを開き、データベース上にユーザーが作成されたことを確認してみましょう。
このユーザーはデータベース上にはいますが、有効化のステータスがfalseのままになっていることを確認してください。
11.3 アカウントを有効化する
今確認した有効化ステータスをtrueにしていく。
11.3.1 authenticated?メソッドの抽象化
ここで、有効化トークンとメールをそれぞれparams[:id]とparams[:email]で参照できる (11.2.1)ことを意識してみましょう
いままで実装させてきたコードを基に
if user && user.authenticated?(:activation, params[:id])
このコード作っていきたい
しかしauthenticated?メソッドは記憶トークン用なので今は正常に動作しません。
# トークンがダイジェストと一致したらtrueを返す
def authenticated?(remember_token)
  return false if remember_digest.nil?
  BCrypt::Password.new(remember_digest).is_password?(remember_token)
end
これから実装するauthenticated?メソッドでは、引数を持たせて適切なパラメータを受け取って、適切に呼び出すメソッドを切り替えられるようにしてみましょう。
メタプログラミング
メタプログラミングを一言で言うと**「プログラムでプログラムを作成する」**ことです。メタプログラミングはRubyが有するきわめて強力な機能であり、Railsの一見魔法のような機能 (「黒魔術」とも呼ばれます) の多くは、Rubyのメタプログラミングによって実現されています。
色々な手法があるので知っておくと役立つはず
https://qiita.com/issei126/items/6f7654ce43e40426cec0
sendメソッド
今回の場合メタプログラミングを実現させるためにつかうのがsendメソッド
説明が思い付かないのでtutorialから例を2つ引用しながら付け加える
1、Rubyのオブジェクトに対してsendメソッドを実行し、配列の長さを得るとします。
$ rails console
>> a = [1, 2, 3]
>> a.length
=> 3
>> a.send(:length)
=> 3
>> a.send("length")
=> 3
このときsendを通して渡したシンボル:lengthや文字列"length"は、いずれもlengthメソッドと同じ結果になりました。つまり、どちらもオブジェクトにlengthメソッドを渡しているため、等価なのです。
2、データベースの最初のユーザーが持つactivation_digest属性にアクセスする例です。
>> user = User.first
>> user.activation_digest
=> "$2a$10$4e6TFzEJAVNyjLv8Q5u22ensMt28qEkx0roaZvtRcp6UZKRM6N9Ae"
>> user.send(:activation_digest)
=> "$2a$10$4e6TFzEJAVNyjLv8Q5u22ensMt28qEkx0roaZvtRcp6UZKRM6N9Ae"
>> user.send("activation_digest")
=> "$2a$10$4e6TFzEJAVNyjLv8Q5u22ensMt28qEkx0roaZvtRcp6UZKRM6N9Ae"
>> attribute = :activation
>> user.send("#{attribute}_digest")
=> "$2a$10$4e6TFzEJAVNyjLv8Q5u22ensMt28qEkx0roaZvtRcp6UZKRM6N9Ae"
シンボル:activationと等しいattribute変数を定義し、文字列の式展開 (interpolation) を使って引数を正しく組み立ててから、sendに渡しています
シンボルと文字列どちらを使った場合でも、上のコードは次のように文字列に変換されます
"activation_digest"
感覚的には理解しているんだがことばにできないのでhttps://qiita.com/nsatohiro/items/583385b7c2c7dea41e87
このsendメソッドの動作原理を利用して
def authenticated?(attribute, token)
  digest = self.send("#{attribute}_digest")
  return false if digest.nil?
  BCrypt::Password.new(digest).is_password?(token)
end
digestに変数代入としてauthenticated?の第一引数(remember or activation)のダイジェスト
↓
値がnilではないので
↓
変数digestと、第二引数(remember_token or activatoin_token)は一致するか?を検証
している(難しい)
変更が完了したので(RED)従来まででつかっていたauthenticated?メソッドを探して引数を持たせてあげないといけない
 module SessionsHelper
  .
  .
  .
  # 現在ログイン中のユーザーを返す (いる場合)
  def current_user
    if (user_id = session[:user_id])
      @current_user ||= User.find_by(id: user_id)
    elsif (user_id = cookies.signed[:user_id])
      user = User.find_by(id: user_id)
      if user && user.authenticated?(:remember, cookies[:remember_token])
        log_in user
        @current_user = user
      end
    end
  end
  .
  .
  .
end
 require 'test_helper'

class UserTest < ActiveSupport::TestCase

  def setup
    @user = User.new(name: "Example User", email: "user@example.com",
                     password: "foobar", password_confirmation: "foobar")
  end
  .
  .
  .
  test "authenticated? should return false for a user with nil digest" do
    assert_not @user.authenticated?(:remember, '')
  end
end
GREEN
11.3.2 editアクションで有効化
ここからはeditアクションを実装していきます
 class AccountActivationsController < ApplicationController

  def edit
    user = User.find_by(email: params[:email])
    if user && !user.activated? && user.authenticated?(:activation, params[:id])<--注目1
      user.update_attribute(:activated,    true)
      user.update_attribute(:activated_at, Time.zone.now)<--注目2
      log_in user
      flash[:success] = "Account activated!"
      redirect_to user
    else #トークンが無効になるようなことは実際にはめったにありませんが、もしそうなった場合はルートURLにリダイレクトされる仕組みです。
      flash[:danger] = "Invalid activation link"
      redirect_to root_url
    end
  end
end
注目1・・・前節のauthenticated?(引数)に加えられた!user.activated?という記述にご注目ください
このコードは、既に有効になっているユーザーを誤って再度有効化しないために必要です。
注目2・・・上の論理値に基いてユーザーを認証するには、ユーザーを認証してからactivated_atタイムスタンプを更新する必要があります
この時点ではユーザーのログイン方法を変更していないので、ユーザーの有効化にはまだ何の意味もありません。ユーザーの有効化が役に立つためには、ユーザーが有効である場合にのみログインできるようにログイン方法を変更する必要があります。
 class SessionsController < ApplicationController

  def new
  end

  def create
    user = User.find_by(email: params[:session][:email].downcase)
    if user && user.authenticate(params[:session][:password])
      if user.activated?
        log_in user
        params[:session][:remember_me] == '1' ? remember(user) : forget(user)
        redirect_back_or user
      else<--有効でないユーザーがログインすることのないようにする
        message  = "Account not activated. "
        message += "Check your email for the activation link."
        flash[:warning] = message
        redirect_to root_url
      end
    else
      flash.now[:danger] = 'Invalid email/password combination'
      render 'new'
    end
  end

  def destroy
    log_out if logged_in?
    redirect_to root_url
  end
end
11.3.3 有効化のテストとリファクタリング
ユーザー登録のテストにアカウント有効化、無効な場合のいくつかのケースを追加する green
 require 'test_helper'

class UsersSignupTest < ActionDispatch::IntegrationTest

  def setup
    ActionMailer::Base.deliveries.clear
  end

  test "invalid signup information" do
    get signup_path
    assert_no_difference 'User.count' do
      post users_path, params: { user: { name:  "",
                                         email: "user@invalid",
                                         password:              "foo",
                                         password_confirmation: "bar" } }
    end
    assert_template 'users/new'
    assert_select 'div#error_explanation'
    assert_select 'div.field_with_errors'
  end

  test "valid signup information with account activation" do
    get signup_path
    assert_difference 'User.count', 1 do
      post users_path, params: { user: { name:  "Example User",
                                         email: "user@example.com",
                                         password:              "password",
                                         password_confirmation: "password" } }
    end
    assert_equal 1, ActionMailer::Base.deliveries.size<--注目1
    user = assigns(:user)<--注目2
    assert_not user.activated?
    # 有効化していない状態でログインしてみる
    log_in_as(user)
    assert_not is_logged_in?
    # 有効化トークンが不正な場合
    get edit_account_activation_path("invalid token", email: user.email)
    assert_not is_logged_in?
    # トークンは正しいがメールアドレスが無効な場合
    get edit_account_activation_path(user.activation_token, email: 'wrong')
    assert_not is_logged_in?
    # 有効化トークンが正しい場合
    get edit_account_activation_path(user.activation_token, email: user.email)
    assert user.reload.activated?
    follow_redirect!
    assert_template 'users/show'
    assert is_logged_in?<--注目3
  end
end
注目1・・・assert_equal 1, ActionMailer::Base.deliveries.size
上のコードは、配信されたメッセージがきっかり1つであるかどうかを確認します。配列deliveriesは変数なので、setupメソッドでこれを初期化しておかないと、並行して行われる他のテストでメールが配信されたときにエラーが発生してしまいます
注目2・・・assignsメソッドを使うと対応するアクション内のインスタンス変数にアクセスできるようになります。例えば、Usersコントローラのcreateアクションでは@userというインスタンス変数が定義されていますがテストでassigns(:user)と書くとこのインスタンス変数にアクセスできるようになる
注目3・・・コメントアウトを解除しています
GREEN
リファクタリング
ユーザー操作の一部をコントローラからモデルに移動するというささやかなリファクタリングを行う準備ができました。
ここでは特に、
1、activateメソッドを作成してユーザーの有効化属性を更新
2、send_activation_emailメソッドを作成して有効化メールを送信します。
Userモデルに有効化メソッドを定義
 class User < ApplicationRecord
  .
  .
  .
  # アカウントを有効にする
  def activate
    update_attribute(:activated,    true)
    update_attribute(:activated_at, Time.zone.now)
  end

  # 有効化用のメールを送信する
  def send_activation_email
    UserMailer.account_activation(self).deliver_now
  end

  private
    .
    .
    .
end
ユーザー新規作成時にメール送信
 class UsersController < ApplicationController
  .
  .
  .
  def create
    @user = User.new(user_params)
    if @user.save
      @user.send_activation_email
      flash[:info] = "Please check your email to activate your account."
      redirect_to root_url
    else
      render 'new'
    end
  end
  .
  .
  .
end
ユーザーモデルオブジェクト軽油で有効化
 class AccountActivationsController < ApplicationController

  def edit
    user = User.find_by(email: params[:email])
    if user && !user.activated? && user.authenticated?(:activation, params[:id])
      user.activate
      log_in user
      flash[:success] = "Account activated!"
      redirect_to user
    else
      flash[:danger] = "Invalid activation link"
      redirect_to root_url
    end
  end
end
update_columns
activateメソッドはupdate_attributeを2回呼び出していますが
 class User < ApplicationRecord
  .
  .
  .
  # アカウントを有効にする
  def activate
    update_attribute(:activated,    true)
    update_attribute(:activated_at, Time.zone.now)
  end
呼び出しを1回のupdate_columnsにまとましょう
 class User < ApplicationRecord
  attr_accessor :remember_token, :activation_token
  before_save   :downcase_email
  before_create :create_activation_digest
  .
  .
  .
  # アカウントを有効にする
  def activate
  update_columns(activated: true , activated_at: Time.zone.now)
  end
ActiveRecordsのwhereメソッド
現在は、/usersのユーザーindexページを開くとすべてのユーザーが表示され、/users/:idのようにIDを指定すると個別のユーザーを表示できます。しかし考えてみれば、有効でないユーザーは表示する意味がありません。
 class UsersController < ApplicationController
  .
  .
  .
  def index
    @users = User.where(activated: true).paginate(page: params[:page])
  end

  def show
    @user = User.find(params[:id])
    redirect_to root_url and return unless @user.activated?<--重要
  end

  .
  .
  .
end
くわしいことは13章で。。。
11.4 本番環境でのメール送信
、production環境で実際にメールを送信できるようにしてみましょう。具体的には、まずは無料のサービスを利用してメール送信の設定を行い、続いてアプリケーションの設定とデプロイを行います。
省略します。参照してくれ