はじめに
こんにちは。
今回は、iOSでいい感じのポップアップアニメーションを表示する 「FFPopup」 というライブラリを試してみたので、その紹介をさせていただきます。
至らぬ点など多々あると思いますが、コメントなど頂けたら幸いです。
FFPopup
GitHub: https://github.com/JonyFang/FFPopup

e.g.
| 上から下へ跳ねる | 中心イン&アウト | 下から下へスライド |
|---|---|---|
 |
 |
 |
1. 導入
今回は、cocoapodsで導入しました。
Podfileに pod 'FFPopup' を追加し、 $ pod install します。
2. 実装
まずは、StoryBoadrdに簡単なボタンを追加し、デフォルトの動作を確認してみます。
ボタンをタップしたらサンプルで作成したUIViewに対してポップアップ表示を適用させます。
import UIKit
// FFPopupのインポート追加
import FFPopup
class ViewController: UIViewController {

    override func viewDidLoad() {
        super.viewDidLoad()
    }

    @IBAction func tapButton(_ sender: Any) {

        // サンプルcontentViewの作成
        let contentView = UIView(frame: CGRect(x: 0, y: 0, width: 300, height: 300))
        contentView.backgroundColor = UIColor.white

        // FFPopupの初期化
        let popup = FFPopup(contentView: contentView)
        let layout = FFPopupLayout(horizontal: .center, vertical: .center)

        // popup表示
        popup.show(layout: layout)
    }
}
実行結果

デフォルトのパラメータを使用すると、
「上からポップアップが出現し、作成したcontentView以外をタップしたら
下にポップアップが消える」挙動を確認できました!
デフォルトのパラメータは以下のようです。
// FFPopupの初期化
let popup = FFPopup(contentView: contentView)

// ポップアップの表示アニメーションタイプ
popup.showType = .bounceInFromTop
// ポップアップを消すアニメーションタイプ
popup.dismissType = .bounceOutToBottom
// 背景マスク
popup.maskType = .dimmed
// マスクのアルファ値
popup.dimmedMaskAlpha = 0.5
// 表示の遷移時間
popup.showInDuration = 0.15
// 非表示への遷移時間
popup.dismissOutDuration = 0.15
// 背景タッチでポップアップを消す
popup.shouldDismissOnBackgroundTouch = true
// コンテンツビューのタッチでポップアップを消す
popup.shouldDismissOnContentTouch = false

let layout = FFPopupLayout(horizontal: .center, vertical: .center)

// popup表示
popup.show(layout: layout)
こちらのパラメータを変更・調整することによって、ポップアップをカスタマイズすることができます。
3. カスタムビューを用いた実装例
簡単なカスタムビューを用いて、どのような実装ができるか試してみようと思います。
カスタムビューの作成をし、カスタムビューのボタンをタップして、FFPopupのアニメーションを適用させます。
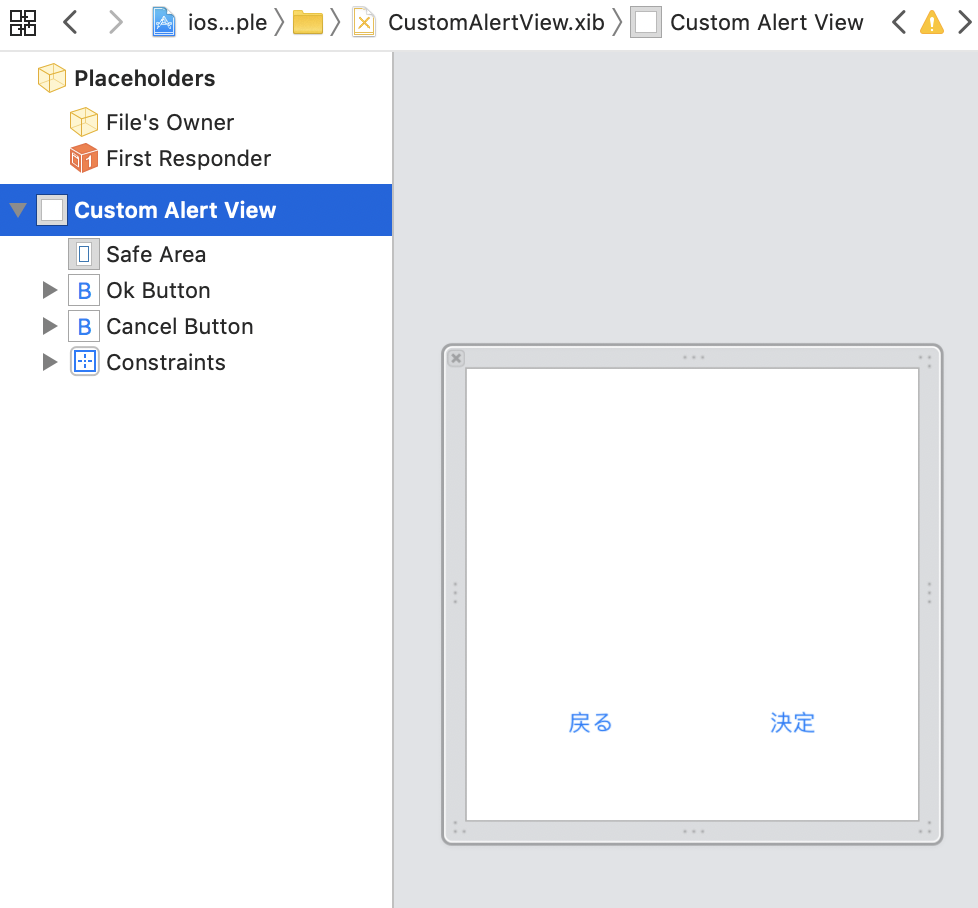
(1) CustomAlertView.xibの追加
戻るボタンと決定ボタンを備えたCustomAlertViewを作成します。

( 参考:https://dev.classmethod.jp/smartphone/xib/ )
(2) xibファイルとカスタムクラスの紐付けをした、CustomAlertView.swiftを作成する
IBOutletで2つのボタンをストーリーボードから紐付けます。
//
//  CustomAlertView.swift
//

import UIKit

class CustomAlertView: UIView {

    // StoryBoardで2つのボタンを追加
    @IBOutlet weak var okButton: UIButton!
    @IBOutlet weak var cancelButton: UIButton!

    override init(frame: CGRect){
        super.init(frame: frame)
        loadNib()
    }

    required init(coder aDecoder: NSCoder) {
        super.init(coder: aDecoder)!
    }

    func loadNib(){
        guard let view =  UINib(nibName: "CustomAlertView", bundle: nil).instantiate(withOwner: self, options: nil).first as? CustomAlertView else {
            return
        }
        view.frame = self.bounds
        self.addSubview(view)
    }
}
※ @Outlet や @IBAction を利用するため、
Placeholders → File's Ownerに紐付けを行います。

(3) ViewControllerの実装
- ボタンをタップしたら、CustomAlertViewを作成
- CustomAlertViewの2つのボタンのイベントを設定
- 背景タッチしてもポップアップが消えないようにする
- 2つのボタンをタップした際のアニメーションタイプを分ける
import UIKit
// 追加
import FFPopup
class ViewController: UIViewController {

    override func viewDidLoad() {
        super.viewDidLoad()
    }

    var contentView: CustomAlertView?
    var popup:FFPopup?

    @IBAction func tapButton(_ sender: Any) {

        // カスタムcontentViewの作成
        contentView = CustomAlertView()
        contentView?.frame = CGRect(x: 0, y: 0, width: 300, height: 300)

        // okButtonのイベント設定
        contentView?.okButton.addTarget(self, action: #selector(tappedOk(_:)), for: .touchUpInside)

        // cancelButtonのイベント設定
        contentView?.cancelButton.addTarget(self, action: #selector(tappedCancel(_:)), for: .touchUpInside)

        // FFPopupの初期化
        popup = FFPopup(contentView: contentView!)

        // 中心から出現するアニメーション
        popup?.showType = .bounceIn

        // 背景タッチしてもポップアップが消えないようにする
        popup?.shouldDismissOnBackgroundTouch = false

        let layout = FFPopupLayout(horizontal: .center, vertical: .center)

        // popup表示
        popup?.show(layout: layout)
    }


    @objc func tappedOk(_ sender:UIButton) {
        // 拡大して消えるアニメーション
        popup?.dismissType = .growOut
        popup?.dismiss(animated: true)
        print("ok")
    }

    // 下に消えるアニメーション
    @objc func tappedCancel(_ sender:UIButton) {
        popup?.dismissType = .bounceOutToBottom
        popup?.dismiss(animated: true)
        print("cancel")
    }
}
(4) 実行結果
ボタンを押したらアラートのポップアップが表示され、
選択したボタンによって異なるアニメーションを表現することが実現できました!

おわりに
今回は、FFPopupというライブラリを試してみました。
さまざまなshowTypeとdismissTypeを組み合わせることによって、
リッチなポップアップアニメーションを簡易的に実装することができそうです。
最後までご覧いただきありがとうございました。