まえがき
**CRNA(create-react-native-app)**で作成したアプリケーションで、Firebase AuthenticationのSNS認証を行う方法をまとめます。
→こちらで紹介しているGoogleの認証方法はExpo側で廃止予定なようです。。。
※GoogleアカウントとFacebookアカウントでのSNS認証を解説します。
準備
npm install create-react-native-app -g
create-react-native-app firebaseAuthSample
cd firebaseAuthSample
npm install firebase --save
Facebook認証
Facebook - Expo Documentationに実装の仕方が書かれています。
流れとして、Expo Client AppでFacebook認証を利用できるよう設定し、Expo APIで取得できるトークンでクレデンシャルを作成し、作成したクレデンシャルでログインを行います。
1. Facebook for DeveloperでIOSのBundle IDとAndroidのKey Hashesを登録する
Facebook for Developersでアプリを作成し、設定のベーシックからIOSのBundle IDとAndroidのKey Hashesを登録しましょう。

IOSのBundle IDはhost.exp.Exponent、AndroidのKey HashesはrRW++LUjmZZ+58EbN5DVhGAnkX4=です。
アプリIDはあとで使うので、メモしておきましょう。
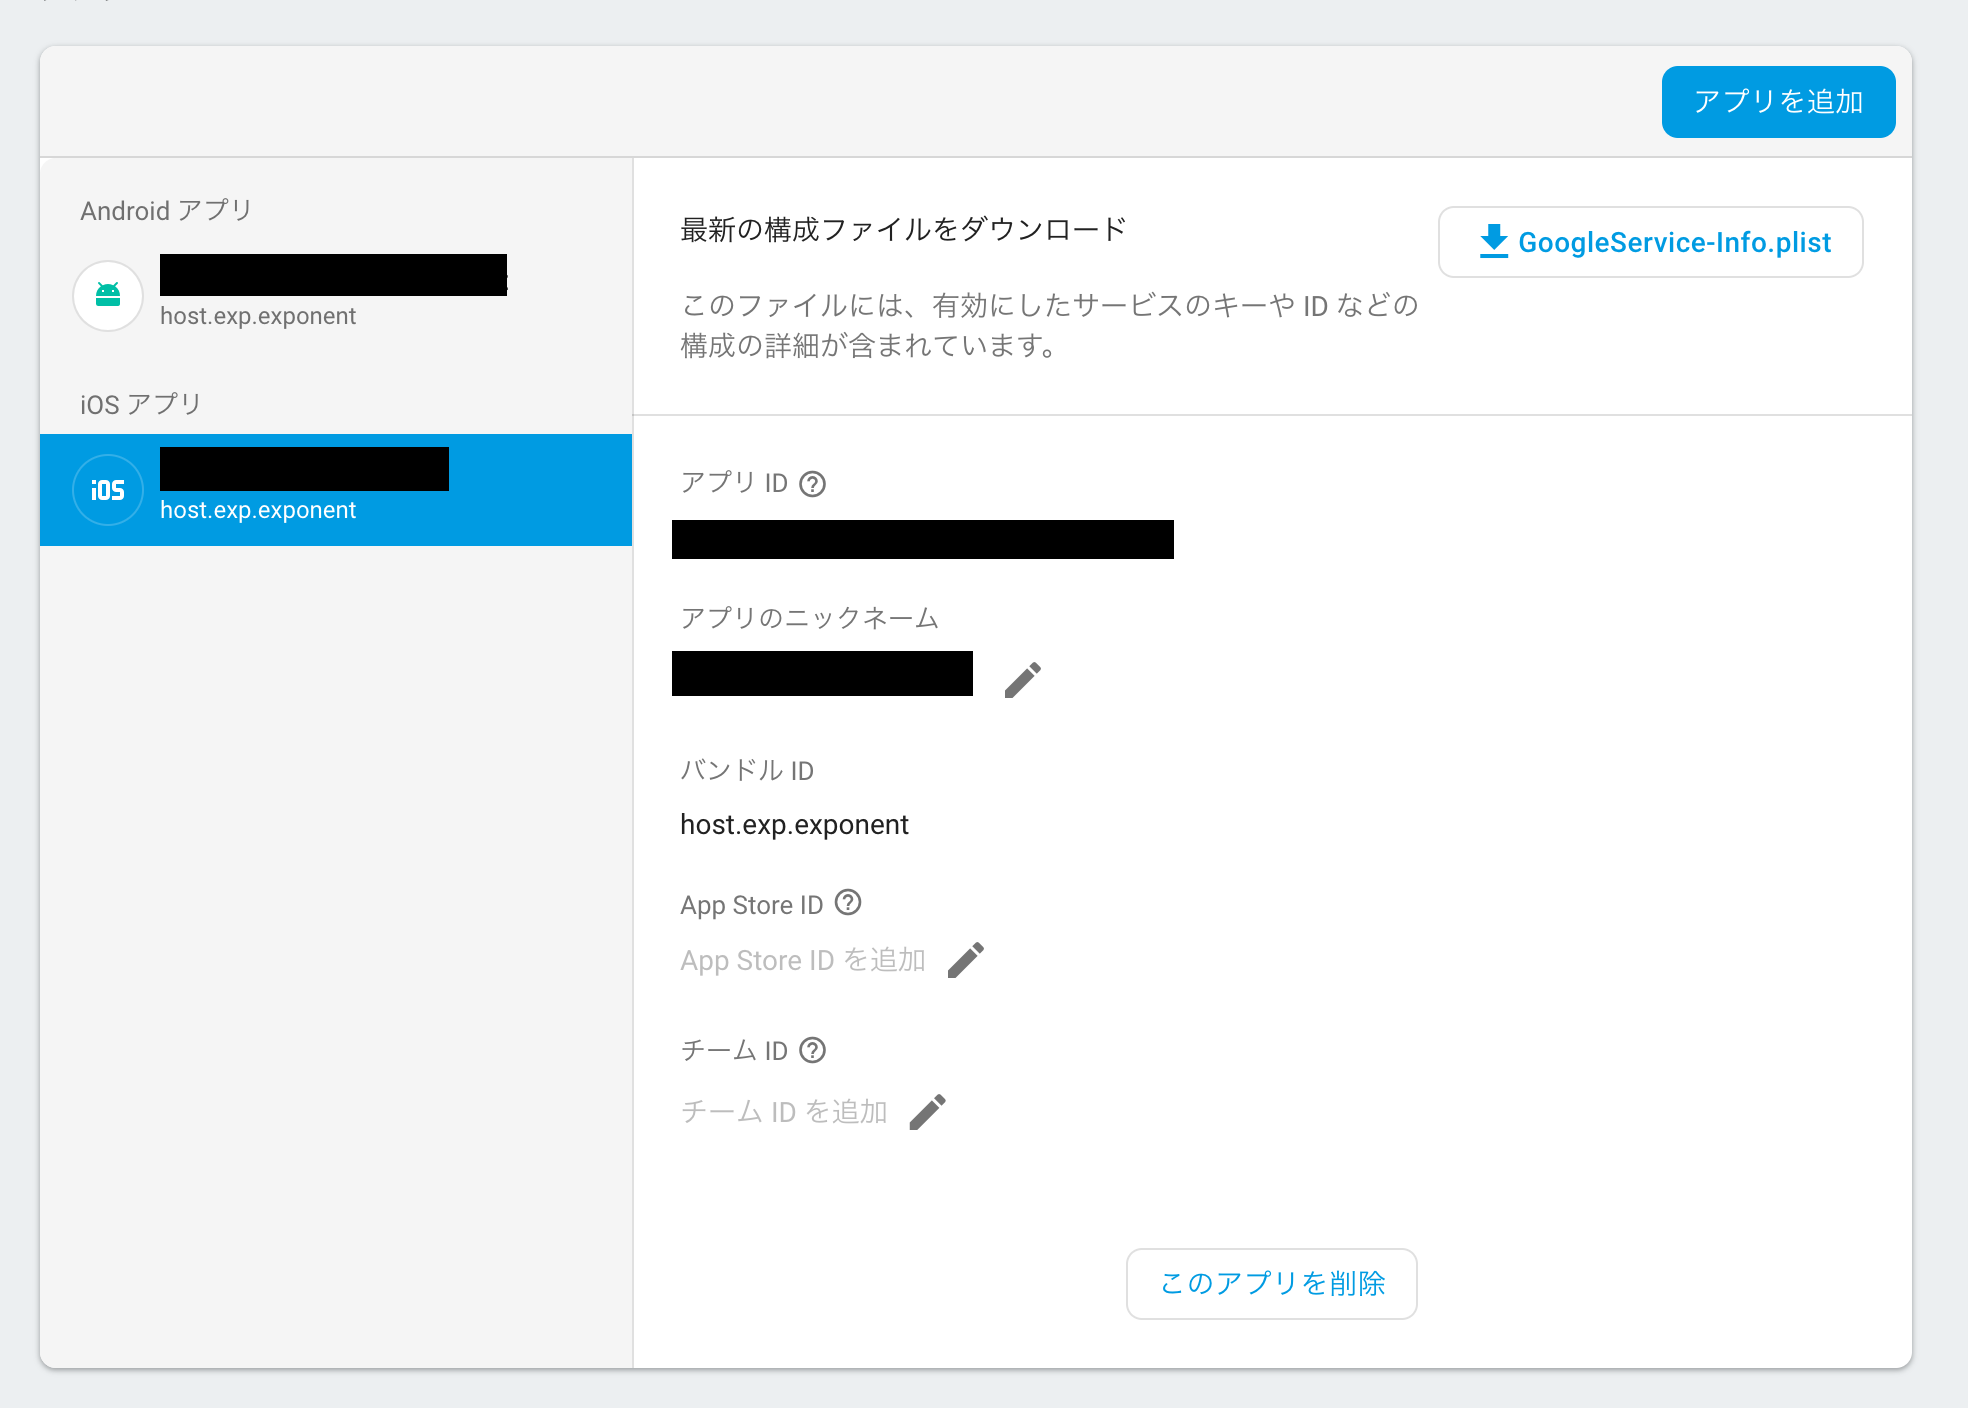
2. Firebase consoleでIOSアプリとAndroidアプリを登録する
Firebase console で「+アプリを追加」からIOSアプリとAndroidアプリを追加し、IOSアプリのバンドルIDとAndroidアプリのパッケージ名にhost.exp.exponentを登録しましょう。
3. Facebook認証を実装する
どこからでもすぐ呼び出せる用、認証処理を関数化して実装します。
Expo APIでトークンを取得、Firebase APIでトークンからクレデンシャルを取得、Firebase APIでクレデンシャルを利用してFacebook認証をさせます。
import * as firebase from 'firebase'
import * as Expo from 'expo'

const FACEBOOK_APPID = '<app id>'

const config = {
  apiKey: '<api key>',
  authDomain: '<domain>',
  databaseURL: '<database url>',
  projectId: '<project id>',
  storageBucket: '<sotarge bucket>',
  messagingSenderId: '<id>'
}

firebase.initializeApp(config)

export const authFacebook = async () => {
  try {
    const { type, token } = await Expo.Facebook.logInWithReadPermissionsAsync(
      FACEBOOK_APPID,
      { permissions: ['public_profile'] }
    )

    if (type === 'success') {
      const credential = firebase.auth.FacebookAuthProvider.credential(token)
      return firebase.auth().signInAndRetrieveDataWithCredential(credential).catch((error) => console.log(error))
    }
    else {
      return { cancelled: true }
    }
  }
  catch (e) {
    return { error: true }
  }
}
Expo APIの**Expo.Facebook.loginWithReadPermissionsAsync(appId, options)**で先ほどメモしたアプリIDを使用して、「token」と「type」を取得します。
※「type」には認証結果が入ります。
const { type, token } = await Expo.Facebook.logInWithReadPermissionsAsync(
  FACEBOOK_APPID,
  { permissions: ['public_profile'] }
)
「type」で認証結果をチェックして、Firebase APIの**firebase.auth.FacebookAuthProvider.credential(token)**で「token」を使用して、「credential」を取得します。
Firebase APIの**firebase.auth().signInAndRetrieveDataWithCredential(credential)**で「credential」を使用して、Facebook認証処理を走らせます。
if (type === 'success') {
  const credential = firebase.auth.FacebookAuthProvider.credential(token)
  return firebase.auth().signInAndRetrieveDataWithCredential(credential).catch((error) => console.log(error))
}
else {
  return { cancelled: true }
}
Google認証
Google - Expo Documentationに実装の仕方が書かれています。
流れとして、Expo Client AppでGoogle認証を利用できるよう設定し、Expo APIで取得できるトークンでクレデンシャルを作成し、作成したクレデンシャルでログインを行います。
※Facebook認証の時と同じ手順です。
1. Google Developer ConsoleでIOSのバンドルIDとAndroidのパッケージ名を登録する
Google Developer Consoleで「認証情報を作成」→「OAuth クライアント ID」にてIOSのバンドルIDとAndroidのパッケージ名を登録する。
※IOS用とAndroid用にOAuth クライアント IDを2つ作成してください。
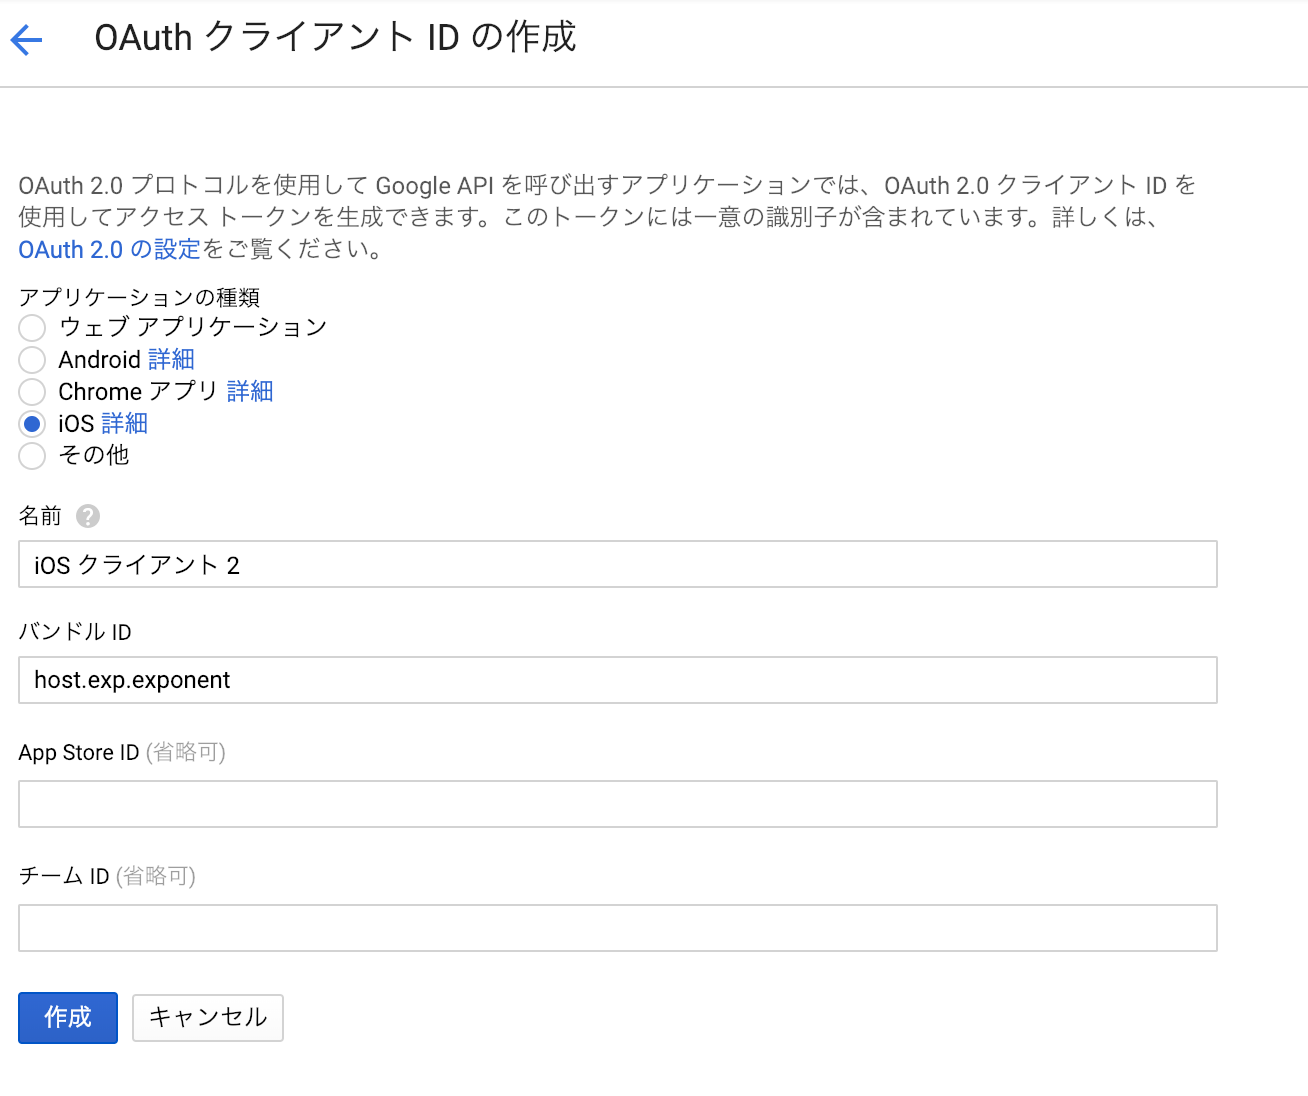
IOS(OAuth クライアント ID)のバンドルIDとAndroid(OAuth クライアント ID)のパッケージ名はhost.exp.exponentです。
また、Android(OAuth クライアント ID)には署名証明書フィンガープリントの項目があるので、ターミナルでopenssl rand -base64 32 | openssl sha1 -cを実行し、表示された文字を入力してください。
IOSとAndroidのクライアントIDはあとで使うので、メモしておきましょう。
※署名証明書フィンガープリントはA1:B2:C3...のような形式です。
2. Firebase consoleでIOSアプリとAndroidアプリを登録する
こちらはFacebook認証の2. Firebase consoleでIOSアプリとAndroidアプリを登録すると全く同じなので省略します。
※Facebook認証実装の際すでにアプリを登録しているのであれば、スキップして大丈夫です。
3. Google認証を実装する
どこからでもすぐ呼び出せる用、認証処理を関数化して実装します。
Expo APIでトークンを取得、Firebase APIでトークンからクレデンシャルを取得、Firebase APIでクレデンシャルを利用してGoogle認証をさせます。
※Facebook認証の時と仕組みは変わりません。
import * as firebase from 'firebase'
import * as Expo from 'expo'

const GOOGLE_IOS_CLIENTID = '<google ios client id>'
const GOOGLE_ANDROID_CLIENTID = '<google android client id>'

const config = {
  apiKey: '<api key>',
  authDomain: '<domain>',
  databaseURL: '<database url>',
  projectId: '<project id>',
  storageBucket: '<sotarge bucket>',
  messagingSenderId: '<id>'
}

firebase.initializeApp(config)

export const authGoogle = async () => {
  try {
    const { type, idToken, accessToken } = await Expo.Google.logInAsync({
      behavior: 'web',
      iosClientId: GOOGLE_IOS_CLIENTID,
      androidClientId: GOOGLE_ANDROID_CLIENTID,
      scopes: ['profile', 'email'],
    })

    if (type === "success") {
      const credential = firebase.auth.GoogleAuthProvider.credential(idToken, accessToken)
      return firebase.auth().signInAndRetrieveDataWithCredential(credential).catch((error) => console.log(error))
    }
    else {
      return { cancelled: true }
    }
  }
  catch (e) {
    return { error: true }
  }
}
Expo APIの**Expo.Google.logInAsync(options)**で先ほどメモしたIOSのクライアントIDとAndroidのクライアントIDを使用して、「idToken」と「accessToken」と「type」を取得します。
※「type」には認証結果が入ります。
const { type, idToken, accessToken } = await Expo.Google.logInAsync({
  behavior: 'web',
  iosClientId: GOOGLE_IOS_CLIENTID,
  androidClientId: GOOGLE_ANDROID_CLIENTID,
  scopes: ['profile', 'email'],
})
「type」で認証結果をチェックして、Firebase APIの**firebase.auth.GoogleAuthProvider.credential(idToken, accessToken)**で「idToken」と「accessToken」を使用して、「credential」を取得します。
Firebase APIの**firebase.auth().signInAndRetrieveDataWithCredential(credential)**で「credential」を使用して、Google認証処理を走らせます。
if (type === "success") {
  const credential = firebase.auth.GoogleAuthProvider.credential(idToken, accessToken)
  return firebase.auth().signInAndRetrieveDataWithCredential(credential).catch((error) => console.log(error))
}
else {
  return { cancelled: true }
}
まとめ
ExpoでFirebase AuthenticationのSNS認証を実装するときは、Expo APIで各プロバイダーのトークンを取得し、Firebase APIでトークンからクレデンシャルを取得して、クレデンシャルにて認証させれば実装できるみたいです。