背景
Reactを使ってWebアプリを開発していく中で、ある程度作り方が自分の中で固まってきたので、この記事を書くことにしました。
概要
ReactのComponentは、classを使用せず**関数化SFC(Stateless Function Component)化させることで、パフォーマンス向上、ロジックとビューの分離、可読性の向上を図ることができます。
またComponentを関数化SFC(Stateless Function Component)化してしまうと、ライフサイクルメソッドを使えなくなります。。
こちらはHoC(React Higher-order Component)という、Componentを引数に、機能を追加したComponentを返す関数を利用することでライフサイクルメソッドの問題は解決できます
→ReactのComponentは、classを使用せずHooksを利用してFC(Function Component)化させることでパフォーマンス向上、ロジックとビューの分離、可読性の向上を図ることができます。(2019/3/10 追記)
※HoCを利用する必要はなくなりました。
ActionとReducerはFSA(Flux Standard Action)のコーディング規則に沿って実装をします。ただし、FSAライブラリを使用することでコーディング量をできる限り削減し、可読性向上を図った書き方ができるのでそちらをご紹介します。
※加えて、タスクという概念を加えることで、Actionをビューで使用するActionとReducerで使用するActionに切り分けてメンテ性を向上させる手法が好きなのだが、ここでは割愛します。
対象者
reactとreduxを使ってReactアプリを作れる方
typescriptがわかる方
material-uiの使い方をある程度知っている方
環境構築
まずはcreate-react-appで、typescript用のReactアプリを作成します。
$ npm install create-react-app -g
$ create-react-app my-app --scripts-version=react-scripts-ts
my-appというフォルダが作成されているはずです。
my-appに移動してnpm startで、Reactアプリが起動するか確認します。
次に、必要なライブラリをインストールします。
| Library | version |
|---|---|
| redux | v4.0.1 |
| react-redux | v6.0.0 |
| recompose | v0.30.0 |
| typescript-fsa | v3.0.0-beta-2 |
| typescript-fsa-reducers | v1.1.0 |
| @material-ui/core | v3.6.1 |
| @material-ui/icons | v3.0.1 |
※本当はredux-sagaも導入したいが、好みが分かれると思うのでそちらは別の記事で説明します。
npm install redux --save
npm install react-redux --save
npm install recompose --save
npm install typescript-fsa --save
npm install typescript-fsa-reducers --save
npm install @material-ui/core --save
npm install @material-ui/icons --save
ライブラリがtypescriptで動くように、typescript用のライブラリもインストールします。
| Library | version |
|---|---|
| @types/redux | v3.6.0 |
| @types/react-redux | v6.0.10 |
| @types/recompose | v0.30.0 |
npm install @types/redux --save-dev
npm install @types/react-redux --save-dev
最後にtslint.jsonの設定を変えます。
my-app直下にtslint.jsonがあるので、以下のようにルールを設定してください。ルールに関してはわからない方はgoogleで検索するなりして、理解しておいてください。
{
  "extends": ["tslint:recommended", "tslint-react", "tslint-config-prettier"],
  "linterOptions": {
    "exclude": [
      "config/**/*.js",
      "node_modules/**/*.ts",
      "coverage/lcov-report/*.js"
    ]
  },
  "rules": {
    "variable-name": [
      true,
      "ban-keywords",
      "check-format",
      "allow-pascal-case",
      "allow-leading-underscore"
    ],
    "no-console": [false],
    "import-name": false,
    "ordered-imports": false,
    "interface-name": false,
    "no-empty-interface": false,
    "object-literal-sort-keys": false,
    "object-literal-shorthand": false,
    "jsx-no-lambda": false,
    "linebreak-style": false
  }
}
手順
フォルダの作成
まず「components」、「containers」、「actions」、「reducers」、「helpers」フォルダを作成します。
my-app\src
├── actions
├── App.css
├── App.test.tsx
├── App.tsx
├── components
├── containers
├── helpers
├── index.css
├── index.tsx
├── logo.svg
├── reducers
└── registerServiceWorker.ts
Componentの作成
まずは、components内にhome.tsxというComponentを作成します。
import * as React from 'react'
import { WithStyles, withStyles, createStyles } from '@material-ui/core'
import { Theme } from '@material-ui/core/styles/createMuiTheme'
import AppBar from '@material-ui/core/AppBar'
import Toolbar from '@material-ui/core/Toolbar'
import Typography from '@material-ui/core/Typography'
import Button from '@material-ui/core/Button'

interface OwnProps {}

const styles = (theme: Theme) => {
    return createStyles({
        layout: {
            marginTop: 100,
            padding: theme.spacing.unit * 2,
            maxWidth: 1200,
            [theme.breakpoints.up(1200)]: {
                marginLeft: 'auto',
                marginRight: 'auto',
            },
        },
  })
}

type Props = OwnProps & WithStyles<typeof styles>

const HomeComponent: React.SFC<Props> = (props: Props) => {
  const { classes } = props

  return (
    <div>
        <AppBar>
            <Toolbar>
                <Typography color='inherit'>Hello World</Typography>
            </Toolbar>
        </AppBar>
      <div className={classes.layout}>
        <Typography>this is home component</Typography>
        <Button>Open</Button>
      </div>
    </div>
  )
}

export default withStyles(styles)(HomeComponent)
いつも何も考えず使っているであろうpropsはtypescriptでは定義してあげないと使えません。なのでPropsという型を作成します。
またmaterial-uiのレイアウト変えるstylesはcreateStylesを使用して作成し、WithStylesを使用して型をPropsに渡します。
意外とtypescriptでmaterial-uiを使用する際、stylesの指定の仕方が書いてある記事がないです。詳しい記事があればリンクを張りたいので教えて下さい。
※withStylesではなく、ここで使用するのはWithStylesです。
interface OwnProps {}

const styles = (theme: Theme) => {
    return createStyles({
        layout: {
            marginTop: 100,
            padding: theme.spacing.unit * 2,
            maxWidth: 1200,
            [theme.breakpoints.up(1200)]: {
                marginLeft: 'auto',
                marginRight: 'auto',
            },
        },
  })
}

type Props = OwnProps & WithStyles<typeof styles>
今回はSFC(Stateless Function Component)のコンポーネントを作成するので、classは使用しません。
ReactはSFC(Stateless Function Component)を作成するAPIを用意してくれています。
先ほど定義したPropsを型に利用して、propsを引数にとるHomeComponentを書きます。
const HomeComponent: React.SFC<Props> = (props: Props) => {
    const { classes } = props

    return (
        // Componentの中身
    )
}
最後はいつも通り、material-uiお決まりのwithStylesを使用してdefault exportしておきます。
export default withStyles(styles)(HomeComponent)
HoC(React Higher-order Component)の作成
Componentのライフサイクルメソッドを利用できるようHoC(React Higher-order Component)を作成します。
HoC(React Higher-order Component)はComponentを引数にして、機能を追加したComponentを返す関数のことです。
helpers内にhocHello.tsというHoCを作成します。
recomposeのlifecycleを利用することで、classを使用せず、Componentのライフサイクルメソッドを使用できるようになります。
import * as React from 'react'
import { lifecycle } from 'recompose'

export const hocFactory = (component: React.SFC) => {
    const wrappedComponent = lifecycle({
        componentDidMount() {
            console.log('Hello')
        },
    })(component);

    return wrappedComponent
}
components内のhome.tsxをhocFactoryでHoCします。
import * as React from 'react'
import { WithStyles, withStyles, createStyles } from '@material-ui/core'
import { Theme } from '@material-ui/core/styles/createMuiTheme'
import AppBar from '@material-ui/core/AppBar'
import Toolbar from '@material-ui/core/Toolbar'
import Typography from '@material-ui/core/Typography'
import Button from '@material-ui/core/Button'

import { hocFactory } from '../helpers/hocHello' // 追加

interface OwnProps {}

const styles = (theme: Theme) => {
    return createStyles({
        layout: {
            marginTop: 100,
            padding: theme.spacing.unit * 2,
            maxWidth: 1200,
            [theme.breakpoints.up(1200)]: {
                marginLeft: 'auto',
                marginRight: 'auto',
            },
        },
  })
}

type Props = OwnProps & WithStyles<typeof styles>

const HomeComponent: React.SFC<Props> = (props: Props) => {
  const { classes } = props

  return (
    <div>
        <AppBar>
            <Toolbar>
                <Typography color='inherit'>Hello World</Typography>
            </Toolbar>
        </AppBar>
      <div className={classes.layout}>
        <Typography>this is home component</Typography>
        <Button>Open</Button>
      </div>
    </div>
  )
}

export default withStyles(styles)(hocFactory(HomeComponent)) // 修正
ActionとReducerの作成
typescript-fsaとtypescript-fsa-reducersを利用して、actionとreducerを作成していきます。
Actionについて
actions内にCardAction.tsというActionを作成します。
typescript-fsaのactionCreatorFactoryを利用することで、簡潔にFSA(Flux Standard Action)に準じたActionを作成できます。
※FSA(Flux Standard Action)について詳しくはこちら
import actionCreatorFactory from 'typescript-fsa'

const actionCreator = actionCreatorFactory()

export const CardActions = {
  open: actionCreator<void>('USER_OPEN_CLICK'),
  close: actionCreator<void>('USER_CLOSE_CLICK'),
}
Reducerについて
reducers内にcardReducer.tsというReducerを作成します。
typescript-fsa-reducersのreducerWithInitialStateを利用することで、簡単にtypescript-fsaで作成したActionに対応するReducerを作成できます**。
import { reducerWithInitialState } from 'typescript-fsa-reducers'
import { CardActions } from '../actions/CardAction'

export interface CardState {
  open: boolean
}

const initialState: CardState = {
  open: false,
}

export const CardReducer = reducerWithInitialState(initialState)
.case(CardActions.open, (state, payload) =>
  Object.assign({}, state, { open: true })
)
.case(CardActions.close, (state, payload) =>
  Object.assign({}, state, { open: false })
)
Storeの作成と結合
ActionとReducerができたのでStoreを作成します。
src直下にstore.tsというStoreを作成します。
import { createStore, combineReducers } from 'redux'
import { CardReducer, CardState } from './reducers/cardReducer'

export interface AppState {
  card: CardState
}

const configureStore = () => {
  const _store = createStore(
    combineReducers<AppState>({
      card: CardReducer,
    }),
    {},
  )

  return _store
}

const store = configureStore()

export default store
cardReducerで型を定義したCardState、を読み込み、AppStateの型定義に利用します。
※actionとreducerが増えれば、AppStateに型を追加していけばよいです。
export interface AppState {
  card: CardState
}
configureStoreという関数を作成し、reduxのcreateStoreとcombineReducersを使用して、_storeを返すように書きます。
※actionとreducerが増えれば、combineReducersにreducerを追加していけばよいです。
const configureStore = () => {
  const _store = createStore(
    combineReducers<AppState>({
      card: CardReducer,
    }),
    {},
  )

  return _store
}
最後に、configureStoreを実行させ、storeをexport defaultしておきます。
const store = configureStore()

export default store
次に、作成したstoreを結合します。
すでにあるindex.tsxを編集します。
storeを読み込み、react-reduxのProviderを使用して結合します。
import * as React from 'react'
import * as ReactDOM from 'react-dom'
import { Provider } from 'react-redux' // 追加
import App from './App'
import './index.css'
import registerServiceWorker from './registerServiceWorker'

import store from './store' // 追加


ReactDOM.render(
  <Provider store={store}>
    <App />
  </Provider>,
  document.getElementById('root') as HTMLElement
)
registerServiceWorker()
Containerの作成
containers内にhome.tsというContainerを作成します。
import { Action } from 'typescript-fsa'
import { Dispatch } from 'redux'
import { connect } from 'react-redux'
import { AppState } from '../store'
import { CardActions } from '../actions/CardAction'
import HomeComponent from '../components/home'

export interface HomeActions {
  handleOpen: () => Action<void>
  handleClose: () => Action<void>
}

const mapDispatchToProps = (dispatch: Dispatch) => {
  return {
    handleOpen: () => dispatch(CardActions.open()),
    handleClose: () => dispatch(CardActions.close()),
  }
}

const mapStateToProps = (appState: AppState) => {
  return Object.assign({}, appState)
}

export default connect(
  mapStateToProps,
  mapDispatchToProps
)(HomeComponent)
HomeComponentでhandleOpen、handleCloseという関数を扱えるようにするための型定義と、対応するdispatchをmapDispatchToPropsを書きます。
export interface HomeActions {
  handleOpen: () => Action<void>
  handleClose: () => Action<void>
}

const mapDispatchToProps = (dispatch: Dispatch) => {
  return {
    handleOpen: () => dispatch(CardActions.open()),
    handleClose: () => dispatch(CardActions.close()),
  }
}
AppStateの値をHomeComponentで読み込めるようにmapStateToPropsを書きます。
const mapStateToProps = (appState: AppState) => {
  return Object.assign({}, appState)
}
あとはお決まりのreact-reduxのconnectでmapDispatchToPropsとmapStateToPropsをHomeComponentとつなげます。
export default connect(
  mapStateToProps,
  mapDispatchToProps
)(HomeComponent)
Componentの修正
AppStateとContainerの関数を呼び出せるように、home.tsxを修正します。そして、AppStateによって表示が切り替わるCardを追加します。
import * as React from 'react'
import { WithStyles, withStyles, createStyles } from '@material-ui/core'
import { Theme } from '@material-ui/core/styles/createMuiTheme'
import AppBar from '@material-ui/core/AppBar'
import Toolbar from '@material-ui/core/Toolbar'
import Typography from '@material-ui/core/Typography'
import Button from '@material-ui/core/Button'
import Grow from '@material-ui/core/Grow' // 追加
import Card from '@material-ui/core/Card' // 追加
import CardContent from '@material-ui/core/CardContent' // 追加
import CardActions from '@material-ui/core/CardActions' // 追加

import { HomeActions } from '../containers/home' // 追加
import { AppState } from '../store' // 追加

import { hocFactory } from '../helpers/hocHello'

interface OwnProps {}

const styles = (theme: Theme) => {
    return createStyles({
        layout: {
            marginTop: 100,
            padding: theme.spacing.unit * 2,
            maxWidth: 1200,
            [theme.breakpoints.up(1200)]: {
                marginLeft: 'auto',
                marginRight: 'auto',
            },
        },
        // 追加
        card: {
            width: 275,
            height: 300,
        }
  })
}

// 修正
type Props = OwnProps & AppState & HomeActions & WithStyles<typeof styles>

const HomeComponent: React.SFC<Props> = (props: Props) => {
  const { classes } = props

  return (
    <div>
        <AppBar>
            <Toolbar>
                <Typography color='inherit'>Hello World</Typography>
            </Toolbar>
        </AppBar>
      <div className={classes.layout}>
        <Typography>this is home component</Typography>
        <Button onClick={props.handleOpen}>Open</Button> {/* 修正 */}

        {/* Card 追加 */}
        <Grow in={props.card.open}>
            <Card className={classes.card}>
                <CardContent>
                    <Typography>this is card.</Typography>
                </CardContent>
                <CardActions>
                    <Button onClick={props.handleClose}>Close</Button>
                </CardActions>
            </Card>
        </Grow>
      </div>
    </div>
  )
}

export default withStyles(styles)(hocFactory(HomeComponent))
Homeの表示
すでにあるApp.tsxを修正します。
import * as React from 'react'
import Home from './containers/home'

class App extends React.Component {
  public render() {
    return (
      <div className="App">
        <Home />
      </div>
    )
  }
}

export default App
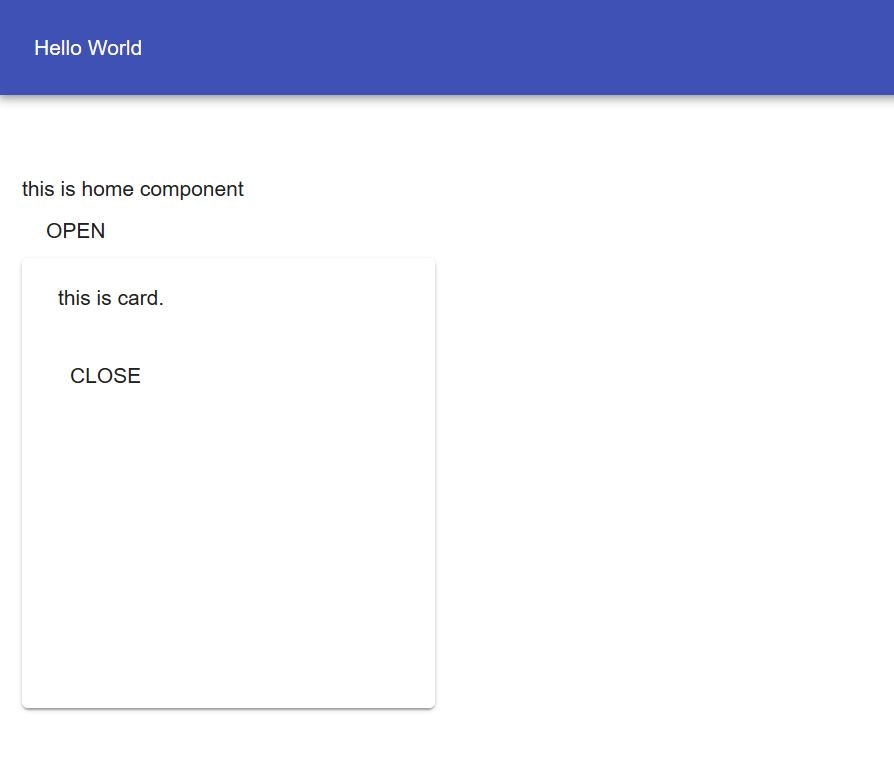
npm startでReactアプリを立ち上げてみましょう。下のような画面が出るはずです。
※typescriptのバリーデーションのエラーで弾かれると思いますが、いわれた通り修正しちゃいましょう。
最後に
typescriptは正直わかりませんが、ComponentのSFC(Stateless Function Component)化、FSA(Flux Standard Action)に準拠したActionは今後当たり前になってくると思いますので(もう当たり前かもしれない)、ぜひ使えるようにしておきましょう。
全体のソースコード公開しておきます。
https://github.com/kousaku-maron/react-sample-for-qiita