PHPでFIDO2(WebAuthn)認証を実装してみた
Yahoo Japan!のログインなどにも実装されだいぶ、目にする機会が増えたのでこの機会に実装してみました。
FIDO2認証とは
FIDO2認証とは、FIDOアライアンスが提供するパスワードレス認証の仕組みで、より安全な多要素認証を実現できます。
どんなものかは、Android7.0以上の端末で、Google Chromeを最新にして、Yahoo Japan!でログインするとわかると思います。アクセスすると、「指紋、顔認証などでログイン」と表示され、一度登録すると、次回以降は、パスワードの代わりに指紋や顔認証でログインすることができるようになります。
簡単に言うと、WEBサイトでも指紋認証 ができるようになりました。
さらに、良いのは指紋や顔の情報をWEB管理者が管理する必要はありません。その辺の詳しい仕組みは下記を見てください。
https://fidoalliance.org/fido%e3%81%ae%e4%bb%95%e7%b5%84%e3%81%bf/?lang=ja
準備
使用するライブラリ
今回はweb-auth/webauthn-lib を使いました。composerを使って、下記からインストールできます。
composer require web-auth/webauthn-lib
ドキュメントはこちら
https://webauthn-doc.spomky-labs.com/
ドキュメントを読み込むのに苦労したので、備忘録を兼ねて記事を残します。
準備するもの
ライブラリを使う上で準備するもの
- ユーザアカウント 既存のログインが実装されている場合それを利用します
- PHP ドキュメントはPHP7.2以上と記載されますが、7.3.14を使いました。(gmp_intval関数をライブラリが使っておりGMP関数をインストールするために、PHPバージョンをあげました)
- 公開鍵を保存するもの 今回はDB(MySQL)に保存しました。
- セッション機能もしくは、前のアクセス時に発行した情報を保存しておける機能
- (必要あれば)ブラウザ判定機能 対応ブラウザは、まだ限定的なので、要件によっては判定が必要だと思います。この記事では触れてません。
実装
大きく2つの機能を提供することになります。
- 公開鍵を登録する機能 マイページなどで、一度認証デバイスで認証して、作成した公開鍵をRPサーバに登録しておきます。
- ログイン機能 認証デバイスで認証して、署名したchallengeを公開鍵で検証して認証する機能です。
この2つの機能を実装するために、いかの流れで実装をしていきます。
- 公開鍵Repositoryの作成
- ユーザEntityの作成
- RpServerの作成
- 公開鍵を登録するために、認証デバイスで認証するときのオプション(json)を作成
- 認証デバイスからレスポンスされる公開鍵(json)を保管する
- ログインするためにオプション(json)を作成
- 認証デバイスからレスポンスされる署名されたchallengeを含むjsonを検証する
結構、実装すること多いです。だいたい動かすだけなら、1〜2人日ぐらいでできましたが、既存のログインやらマイページに組み込むのに、+2〜3人日ぐらいかかりました。
以下にソースコードを載せてますが、記事用に実際の実装から多少変えました。特にJavascript。そのままでは動かない可能性があります。
公開鍵Repositoryの作成
準備するものでも触れましたが、認証デバイスが発行する公開鍵を保存しておく必要があります。今回は、DB(MySQL)に保管しました。ドキュメントでは、ファイルに保存する方法も記載されてます。
テーブル定義
CREATE TABLE `webauthn_credentials` (
  `id` int(10) unsigned NOT NULL AUTO_INCREMENT COMMENT 'ID',
  `public_key_credential_source_id` varchar(256) NOT NULL COMMENT '認証ID',
  `use_flag` tinyint(3) unsigned NOT NULL DEFAULT '1' COMMENT '使用フラグ[0:無効 1:有効]',
  `user_handle` varchar(256) NOT NULL COMMENT 'ユーザハンドル(ログインID)',
  `credential` text COMMENT '認証情報(json)'
  PRIMARY KEY (`id`),
  UNIQUE KEY `uk_public_key_credential_source_id` (`public_key_credential_source_id`)
) ENGINE=InnoDB DEFAULT CHARSET=utf8mb4 COMMENT='Webauthn認証';
公開鍵Repository
ライブラリでは、具体的な実装が提供されていません。各システムの制約があると思うので自由に実装しろとのことですが、ドキュメントを見るとサンプルソースがあります。それを参考に実装しました。
唯一の制約は、Webauthn\PublicKeyCredentialSourceRepository をimplementsすること。
namespace Webauthn\Repository;

use Webauthn\PublicKeyCredentialSource;
use Webauthn\PublicKeyCredentialSourceRepository as PublicKeyCredentialSourceRepositoryInterface;
use Webauthn\PublicKeyCredentialUserEntity;
use Project\Model\WebauthnCredentialModel;
use Project\Entity\WebauthnCredential;

class PublicKeyCredentialSourceRepository extend WebauthnCredentialModel implements PublicKeyCredentialSourceRepositoryInterface
{

    /**
     * 公開鍵を保管します saveCredentialSourceは、登録時と検証後の更新時に呼ばれます。
     */
    public function saveCredentialSource(PublicKeyCredentialSource $publicKeyCredentialSource, bool $flush = true): void
    {
        $data['publicKeyCredentialSourceId'] = base64_encode($publicKeyCredentialSource->getPublicKeyCredentialId());
        $data['userHandle'] = $publicKeyCredentialSource->getUserHandle());
        $data['credential'] = json_encode($publicKeyCredentialSource);

        $WebauthnCredential = $this->repository->findOneBy(['publicKeyCredentialSourceId' => $data['publicKeyCredentialSourceId']]);

        if (!$WebauthnCredential) {
            $WebauthnCredential = new WebauthnCredential();
            $WebauthnCredential->fromArray($data);
            $this->entityManager->presist($WebauthnCredential);
        } else {
            $WebauthnCredential->fromArray($data);
            $this->entityManager->merge($WebauthnCredential);
        }
        if ($flush) {
            $this->entityManager->flush();
        }
    }

    /**
     * ユーザEntityが保有する公開鍵を全て取得します
     */
    public function findAllForUserEntity(PublicKeyCredentialUserEntity $publicKeyCredentialUserEntity): array
    {
        $WebauthnCredentials = $this->repository->findBy(['userHandle' => $publicKeyCredentialUserEntity->getId()]);
        return array_map(function ($WebauthnCredential) {
            $array = json_decode($WebauthnCredential->getCredential(), true);
            return PublicKeyCredentialSource::createFromArray($array);
        }, $WebauthnCredentials);
    }

    /**
     * CredentialIdで公開鍵を取得します
     */
    public function findOneByCredentialId(string $publicKeyCredentialId): ?PublicKeyCredentialSource
    {
        if ($WebauthnCredential = $this->repository->findOneBy(['publicKeyCredentialSourceId' => base64_encode($publicKeyCredentialId)])){
            $array = json_decode($WebauthnCredential->getCredential(), true);
            return PublicKeyCredentialSource::createFromArray($array);
        }
        return null;
    }
}
上記の実装からもわかる通り、検索に使う情報は、publicKeyCredentialSourceId とuserHandle のみです。他の情報は、特に意識する必要はなさそうなので、json形式にして一つのカラムに入れることにしました。そうすることで、今後ライブラリ側で情報が増えた場合にも、特に何もすることなくバージョンアップで対応可能だから(場合によるが)です。
saveCredentialSource()は、ライブラリ内部でも呼ばれています。その時は更新を期待されているので、注意が必要です。
ユーザEntityの作成
おそらくFIDO2認証を実装する場合、既存システムがあり、ユーザテーブルがあると思われます。なので、ライブラリ側でも実装されておらず、自由に実装しろとのことです。
実際、今回実装するときも既存ユーザEntityがあった上で実装しました。
制約は、
- IDがユニークかつstringであること
- Usernameがユニークであること
ドキュメントによると下記のようにして作成します。
use Webauthn\PublicKeyCredentialUserEntity;

$userEntity = new PublicKeyCredentialUserEntity(
    'john.doe',                             // Username
    'ea4e7b55-d8d0-4c7e-bbfa-78ca96ec574c', // ID
    'John Doe'                              // Display name
);
それぞれ既存のユーザテーブルのなにと紐付けるかは、迷いどころです。
今回は、
- ID -> 既存システムのユーザテーブルの主キー(Stringちゃうけど)
- Username -> ログインIDとしました。
実装はこんな感じ
use Webauthn\PublicKeyCredentialUserEntity;
use Project\Model\CustomerModel;

final class PublicKeyCredentialUserEntityRepository extends CustomerModel
{
    /**
     * usernameでユーザEntityを取得します
     */
    public function findWebauthnUserByUsername(string $username): ?PublicKeyCredentialUserEntity
    {
        $user = $this->repository->findOneBy(['login' => $username]);
        if (null === $user) {
            return null;
        }

        return $this->createUserEntity($user);
    }

    /**
     * userhandleでユーザEntityを取得します
     */
    public function findWebauthnUserByUserHandle(string $userHandle): ?PublicKeyCredentialUserEntity
    {
        $user = $this->findOneBy(['id' => $userHandle]);
        if (null === $user) {
            return null;
        }

        return $this->createUserEntity($user);
    }

    /**
     * 既存のユーザテーブルの情報からユーザEntityを取得します
     */
    public function createUserEntity($user): PublicKeyCredentialUserEntity
    {
        return new PublicKeyCredentialUserEntity(
            $user->login,
            (string)$user->id,
            $user->name
        );
    }
}
RpServerの作成
RpServerは、この後の工程で使うオブジェクトです。いろんなところで使うので、共通で実装しましょう。
use Webauthn\Server;
use Webauthn\PublicKeyCredentialRpEntity;
use Project\PublicKeyCredentialSourceRepository;

public function getServer()
{
    $rpEntity = new PublicKeyCredentialRpEntity(
        'Webauthn Server',  //  アプリケーションの名前
        'example.com'       //  アプリケーションID = domain
    );
    $publicKeyCredentialSourceRepository = new PublicKeyCredentialSourceRepository();

    $this->server = new Server(
        $rpEntity,
        $publicKeyCredentialSourceRepository
    );
}
アプリケーションID
アプリケーションIDは、オプションです。指定しない場合は、現在のドメインが使われるようです。
オプションではありますが、ライブラリのドキュメントでは、強く推奨されてます。しょっちゅうドメインが変わるテスト環境などでなければ、設定ファイルなどから取得して設定してもいいかもしれません。
なお、アプリケーションIDは、ポートやパスなどをのぞいたドメインである必要があります。
Allowed: www.sub.domain.com, sub.domain.com, domain.com
Not Allowed: www.sub.domain.com:1337, https://domain.com:443, sub.domain.com/index
公開鍵を登録するために、認証デバイスで認証するときのオプション(json)を作成
これまでで、下準備が終わりました。ここからは、実際に画面を実装していくことになります。
登録の流れは下図の通りです。
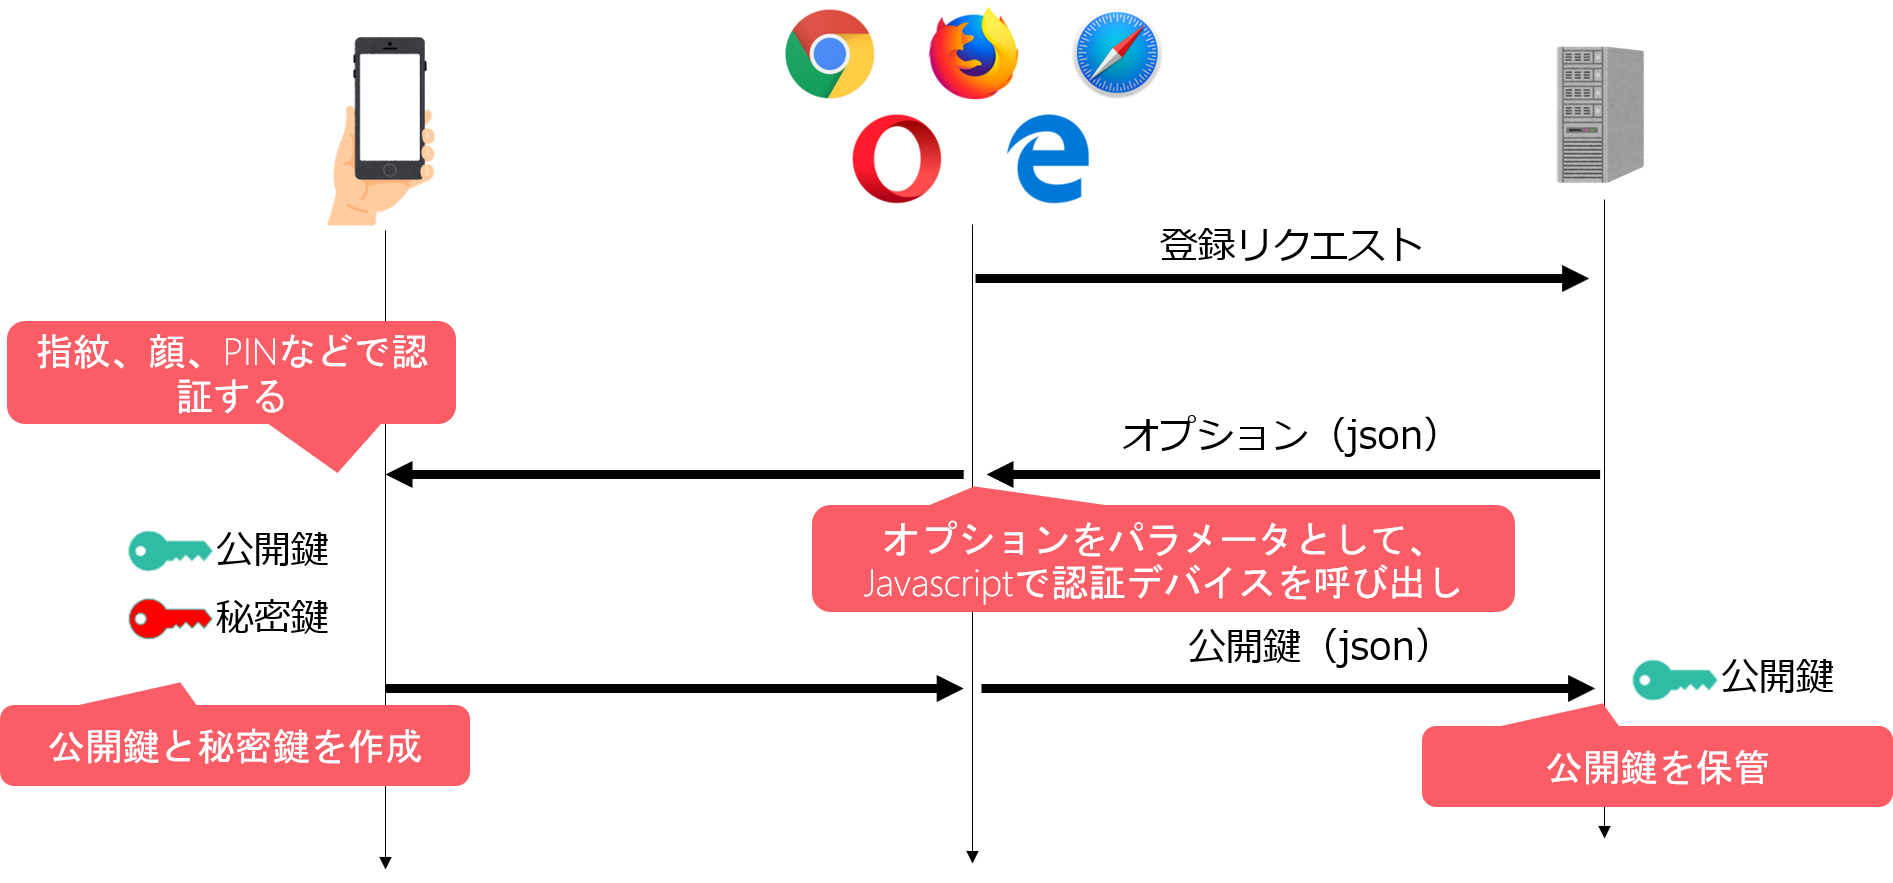
まずは、オプション(json)を作成します。
use Webauthn\PublicKeyCredentialUserEntity;
use Webauthn\PublicKeyCredentialCreationOptions;
use Project\PublicKeyCredentialSourceRepository;

$userEntity = new PublicKeyCredentialUserEntity(
    'john.doe',
    'ea4e7b55-d8d0-4c7e-bbfa-78ca96ec574c',
    'John Doe'
);

$credentialSourceRepository = new PublicKeyCredentialSourceRepository();
$credentialSources = $credentialSourceRepository->findAllForUserEntity($userEntity);

$excludeCredentials = array_map(function ($credential) {
    return $credential->getPublicKeyCredentialDescriptor();
}, $credentialSources);

$publicKeyCredentialCreationOptions = $this->getServer()->generatePublicKeyCredentialCreationOptions(
    $userEntity,                                                                // The user entity
    PublicKeyCredentialCreationOptions::ATTESTATION_CONVEYANCE_PREFERENCE_NONE, // We will see this option later
    $excludeCredentials                                                         // Excluded authenticators
);

$json = json_encode($publicKeyCredentialCreationOptions);
上の例では、userEntityはサンプルを書きましたが、おそらくこの機能を使うときは、認証済みのはずなので、認証済みユーザ情報を取得してセットするといいと思います。
その際には、PublicKeyCredentialUserEntityRepository のfindWebauthnUserByUserHandle() メソッドを使うといいと思います。
このとき、$publicKeyCredentialCreationOptionsの内容を保存しておき、公開鍵がリクエストされてきたときに取り出せるようにする必要があります。(記事に記載してませんが)今回の実装では、セッションに保存しました。
認証デバイスからレスポンスされる公開鍵(json)を保管する
次に、上記のオプション(json)をJavascriptに渡します。
ライブラリのドキュメントにあるJavascriptを、ほぼそのまま使ってます。
なお、このJavascriptについてもライブラリは提供してくれません。各システムでVueJSとかJqueryとか使われていると思うので、そちらに合わせて使ってください。
下記では、ボタンを押したら認証デバイスを呼び出すようにし、認証が成功したらsubmitしてます。(たぶん)
const publicKey = ここに上記の$jsonの中身を入れる;

function arrayToBase64String(a) {
    return btoa(String.fromCharCode(...a));
}

function base64url2base64(input) {
    input = input
        .replace(/=/g, "")
        .replace(/-/g, '+')
        .replace(/_/g, '/');

    const pad = input.length % 4;
    if(pad) {
        if(pad === 1) {
            throw new Error('InvalidLengthError: Input base64url string is the wrong length to determine padding');
        }
        input += new Array(5-pad).join('=');
    }

    return input;
}

publicKey.challenge = Uint8Array.from(window.atob(base64url2base64(publicKey.challenge)), function(c){return c.charCodeAt(0);});
publicKey.user.id = Uint8Array.from(window.atob(publicKey.user.id), function(c){return c.charCodeAt(0);});
if (publicKey.excludeCredentials) {
    publicKey.excludeCredentials = publicKey.excludeCredentials.map(function(data) {
        data.id = Uint8Array.from(window.atob(base64url2base64(data.id)), function(c){return c.charCodeAt(0);});
        return data;
    });
}

document.myform.btn.addEventListener('click', function() {
    navigator.credentials.create({ 'publicKey': publicKey })
        .then(function(data){
            const publicKeyCredential = {
                id: data.id,
                type: data.type,
                rawId: arrayToBase64String(new Uint8Array(data.rawId)),
                response: {
                    clientDataJSON: arrayToBase64String(new Uint8Array(data.response.clientDataJSON)),
                    attestationObject: arrayToBase64String(new Uint8Array(data.response.attestationObject))
                }
            };

            document.getElementById( "publicKeyCredential" ).value = JSON.stringify(publicKeyCredential);
            document.myform.submit();
        })
        .catch(function(error){
            alert('Open your browser console!');
            console.log('FAIL', error);
        });

});
このpublicKeyCredential を受け取りDBに保管します。
try {

    $publicKeyCredentialSource = $this->getServer()->loadAndCheckAttestationResponse(
        $publicKeyCredential, // 先ほどのpublicKeyCredentialをそのままセット
        $publicKeyCredentialCreationOptions, // セッションに保存していたオブジェクト
        $request  // PSR-7のHTTP Message
    );
    $credentialSourceRepository = new PublicKeyCredentialSourceRepository();
    $credentialSourceRepository->saveCredentialSource($publicKeyCredentialSource);
} catch (Throwable $exception){
}
$request には、PSRー7のHTTP Messageが必要らしいです。ライブラリのドキュメントにも記載されてますが、nyholm/psr7-server のライブラリを使うと取得できるようですが、今回は既存ライブラリにあったので、特に実装せず、そのまま既存ライブラリを使いました。本記事では、割愛してます。
loadAndCheckAttestationResponse関数でリクエストの中身をチェックしているのですが、リクエストにNGがあった場合、全て例外で処理されます。試してないですが、メッセージの内容をログに残すには、$this->getServer()->setLogger($Logger);でPsr\Log\LoggerInterfaceを実装したオブジェクトをセットすれば、ログに残すことができそうです。
実装中、「Invalid challenge.」に結構悩まされました。Javascriptに渡した$publicKeyCredentialCreationOptionsとセッションからとった内容が異なると出るメッセージです。
ログインするためにオプション(json)を作成
ログインの流れは下図の通りです。
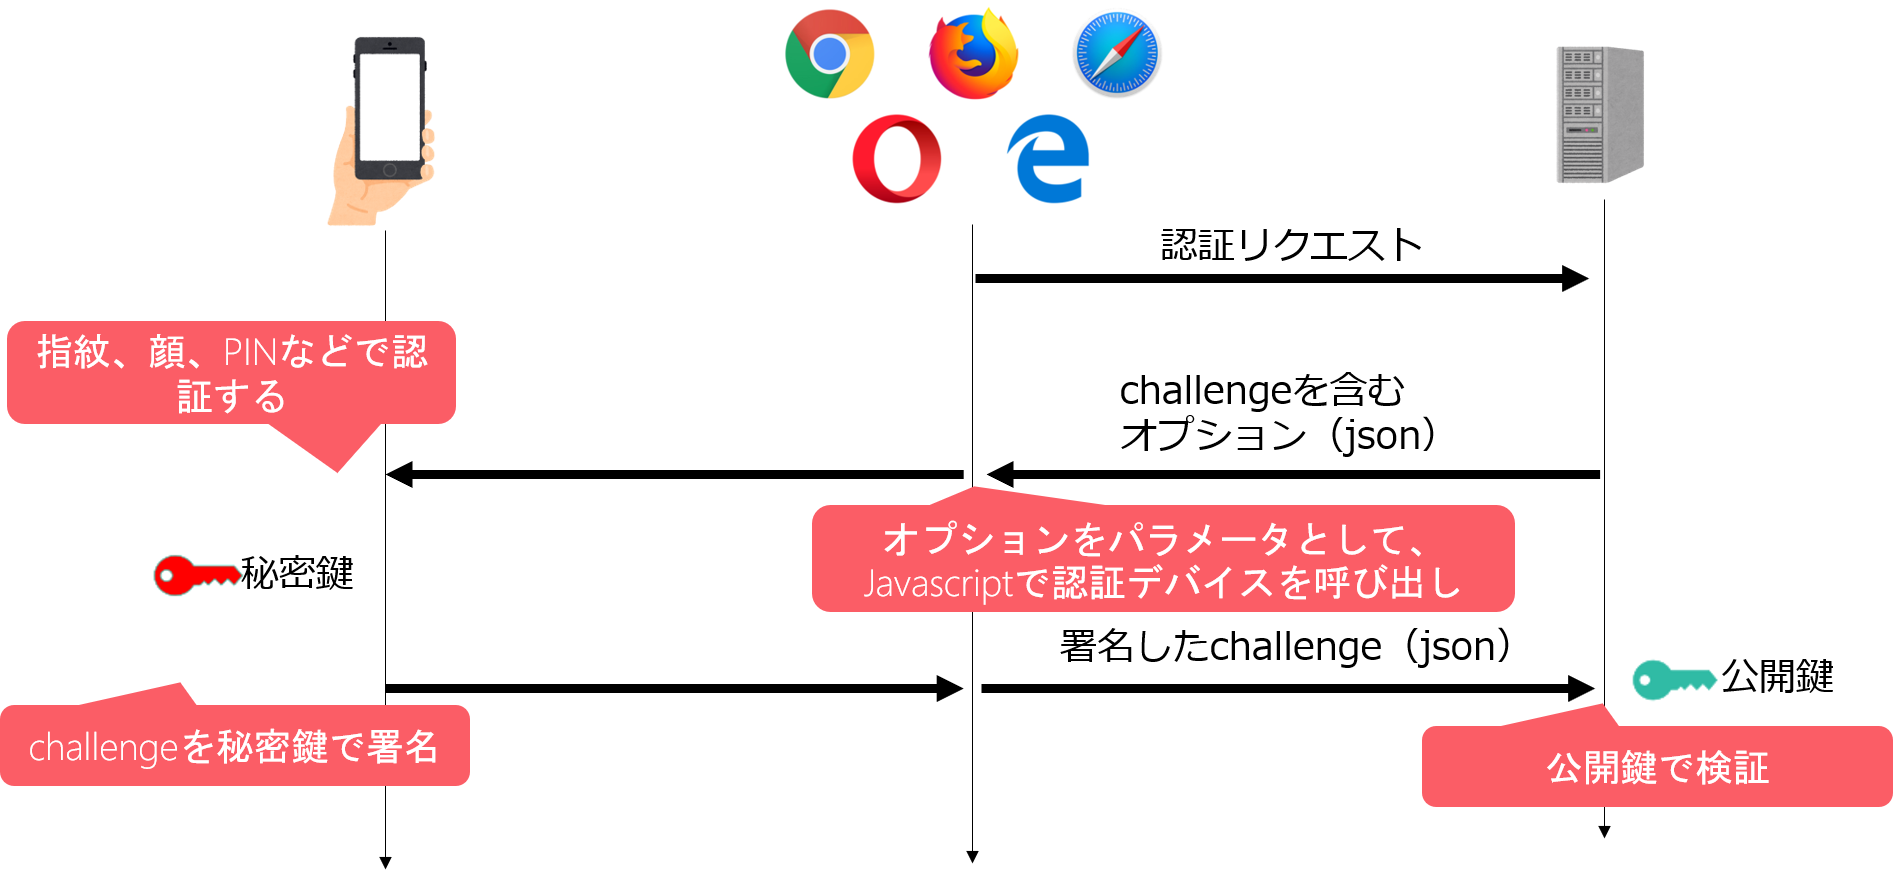
まずは、オプション(json)を作成します。
$UserEntityRepository = new PublicKeyCredentialUserEntityRepository();
$userEntity = $UserEntityRepository->findWebauthnUserByUsername($login);

$credentialSourceRepository = new PublicKeyCredentialSourceRepository();
$credentialSources = $credentialSourceRepository->findAllForUserEntity($userEntity);

$allowedCredentials = array_map(function ($credential) {
    return $credential->getPublicKeyCredentialDescriptor();
}, $credentialSources);

$publicKeyCredentialRequestOptions = $this->getServer()->generatePublicKeyCredentialRequestOptions(
    PublicKeyCredentialRequestOptions::USER_VERIFICATION_REQUIREMENT_PREFERRED, // Default value
    $allowedCredentials
);

$json = json_encode($publicKeyCredentialRequestOptions);
認証は、ログインIDを入力されているものとし、ログインIDからuserEntityを取得します。
この$publicKeyCredentialRequestOptionsを登録時と同様にセッションに保存しておきます。
認証デバイスからレスポンスされる署名されたchallengeを含むjsonを検証する
登録時と同様に、次に、上記のjsonをJavascriptに渡します。
例によって、ライブラリのドキュメントにあるJavascriptを、ほぼそのまま使ってます。
const publicKey = ここに上記の$jsonの中身を入れる;
function arrayToBase64String(a) {
    return btoa(String.fromCharCode(...a));
}
function base64url2base64(input) {
    input = input
        .replace(/-/g, '+')
        .replace(/_/g, '/');
    const pad = input.length % 4;
    if(pad) {
        if(pad === 1) {
            throw new Error('InvalidLengthError: Input base64url string is the wrong length to determine padding');
        }
        input += new Array(5-pad).join('=');
    }
    return input;
}
publicKey.challenge = Uint8Array.from(window.atob(base64url2base64(publicKey.challenge)), function(c){return c.charCodeAt(0);});
if (publicKey.allowCredentials) {
    publicKey.allowCredentials = publicKey.allowCredentials.map(function(data) {
        data.id = Uint8Array.from(window.atob(base64url2base64(data.id)), function(c){return c.charCodeAt(0);});
        return data;
    });
}

document.myform.btn.addEventListener('click', function() {
    navigator.credentials.get({ 'publicKey': publicKey })
        .then(function(data){
            const publicKeyCredential = {
                id: data.id,
                type: data.type,
                rawId: arrayToBase64String(new Uint8Array(data.rawId)),
                response: {
                    authenticatorData: arrayToBase64String(new Uint8Array(data.response.authenticatorData)),
                    clientDataJSON: arrayToBase64String(new Uint8Array(data.response.clientDataJSON)),
                    signature: arrayToBase64String(new Uint8Array(data.response.signature)),
                    userHandle: data.response.userHandle ? arrayToBase64String(new Uint8Array(data.response.userHandle)) : null
                }
            };

            document.getElementById( "publicKeyCredential" ).value = JSON.stringify(publicKeyCredential);
            document.myform.submit();
        })
        .catch(function(error){
            alert('Open your browser console!');
            console.log('FAIL', error);
        });
});
そして、上記のpublicKeyCredentialをサーバ側で検証します。
try {
    $UserEntityRepository = new PublicKeyCredentialUserEntityRepository();
    $userEntity = $UserEntityRepository->findWebauthnUserByUsername($login);

    $publicKeyCredentialSource = $this->getServer()->loadAndCheckAssertionResponse(
        $publicKeyCredential, // 先ほどのpublicKeyCredentialをそのままセット
        $publicKeyCredentialRequestOptions, // セッションに保存していたオブジェクト
        $userEntity,  // ログインIDから取得したuserEntity
        $request      // PSR-7のHTTP Message
    );
} catch(Throwable $exception) {
}
ここで例外エラーがなければ、検証完了です。
残りは、各システムごとの認証処理を実行し認証完了です。
まとめ
ライブラリを使うことで簡単に実装ができます。
対応するブラウザも増えてきているので、今後色々なサイトで実装が増えてくると思います。
早くパスワードがなくなると良いですね。