この速習会の目標
Developer がさくっと kubernetes を理解して、実際にリリース出来る
- kubectl が叩ける用になる
- Kubernetes の manifest ファイルの書き方
- Kubernetes への Release / Deploy 方法
- Kubernetes 上にあるApplication の maintenance
- Kubernetes に上げたApplicationのMonitoring
kubectl を install
kubectl の install してなかった場合は、こちらの実行ファイルを直接ダウンロードして叩けるようにしましょう
The linux kubectl binary can be fetched with a command like:
curl -O https://storage.googleapis.com/kubernetes-release/release/v1.3.4/bin/linux/amd64/kubectl
On an OS X workstation, replace linux in the URL above with darwin:
curl -O https://storage.googleapis.com/kubernetes-release/release/v1.3.4/bin/darwin/amd64/kubectl
chmod +x kubectl
mv kubectl /usr/local/bin/kubectl
ref. https://coreos.com/kubernetes/docs/latest/configure-kubectl.html
config ファイルを設定する
期限付きURL から設定ファイルをダウンロード(リンクは削除してあります)してみよう
- 既に k8s を使っている方
既存の config と混ざってしまうと大変のため、kubectl command の引数に --kubeconfig= を付けて絶対他のcluster に実行させないようにしましょう
ex:
kubectl get po --kubeconfig=k8s-sokusyu.yaml
- 初めて使う方
いちいち --kubeconfig=k8s-sokusyu.yaml 打つのが面倒なので、 ~/.kube/config にリネームしておきましょう。
kubectl は default で ~/.kube/config の読み込んで実行してくれます。
mkdir ~/.kube
cp ~/Downloads/k8s-sokusyu.yaml ~/.kube/config
kubectl を実行してみよう
kubectl get pod
kubectl get po --kubeconfig=k8s-sokusyu.yaml
一覧が見えましたでしょうか?
$ kubectl get pod
NAME                          READY     STATUS    RESTARTS   AGE
hello-world-855027487-25n7g   1/1       Running   0          49m
このような画面が返ってきたら設定は完了です!
hello world
hello world を git clone して下さい。
ここでは、シンプルな sinatra で作ったアプリケーションを例に進めて行きます。
まずは自分のスペースを作ってみよう
Kubernetes では、たくさんのサーバーに対して、一つのクラスタリングを作り、一つの大きなリソース(サーバー)に見せます。
そのため、複数のチームやたくさんの web application を実行する際にそのまま default で上げ続けるとすべてのアプリケーションが同じところに表示されて、すごく使いづらくなります。
namespace について
ref. https://github.com/kubernetes/kubernetes/blob/master/docs/design/namespaces.md
Motivation
A single cluster should be able to satisfy the needs of multiple user communities.
Each user community wants to be able to work in isolation from other communities.
複数のコミュニティ毎に分けて利用することで
- すべてのresource (pod rc rs deployment secret etc...)を分けて利用できる
- 他のapplication を誤って操作出来てしまうのを防ぐ
- namespace を default のまま利用した場合、自分の見たいものが探しにくくなる(常にcommandでlabel を指定する必要がある)
- namespace は初期値として、既に
defaultとkube-systemでわけられており、kubernetes の service が誤って操作されないようにわけられている
そこで、速習会では、個々人で namespace を作って自分のスペースで kubernetes に取り組んで行こうと思います。
名前は自由ですが、githubアカウント名を使うと周りも理解しやすいのでオススメです。
それぞれの namespace を作ってみよう
まずは、ファイルを編集します。
diff --git a/kubernetes/namespace.yaml b/kubernetes/namespace.yaml
index 5a96da9..57c89f7 100644
--- a/kubernetes/namespace.yaml
+++ b/kubernetes/namespace.yaml
@@ -1,4 +1,4 @@
 apiVersion: v1
 kind: Namespace
 metadata:
-  name: #GitHub Account Name
+  name: koudaiii
その後、実行してみましょう
$ kubectl create -f kubernetes/namespace.yaml
namespace "koudaiii" created
無事作成できました。実際に出来たか確認しみよう!
すべての namespace の一覧を表示させてみます。
$ kubectl get namespace
NAME          STATUS    AGE
default       Active    86d
koudaiii      Active    5m
kube-system   Active    86d
- 他の人の namespace を見てみよう
--namespace= で指定すると、その namespace で作られた pod が見れます。
ここでは kubernetes 上で作られる pod の一覧を表示しています。
$ kubectl get po --namespace=kube-system
NAME                                                                    READY     STATUS    RESTARTS   AGE
elasticsearch-logging-v1-0nyp4                                          1/1       Running   0          69d
elasticsearch-logging-v1-ixfyy                                          1/1       Running   0          58d
・・・・・・・・・・・・・・・
※複数のクラスタがあってめんどくさい人への設定があります。デフォルトでは、 namespace=default が指定されて表示されますが、変更することが出来ます。
実際に叩いてみよう
- 自分の space で実際に動かしてみよう
kubectl create -f kubernetes/production.yaml --namespace=koudaiii
大まかな manifest file の理解
- kind
- Pod
- Deployment
- Service
- meta data
- label
- name
$ cat kubernetes/pod.yaml
apiVersion: v1
kind: Service
metadata:
  labels:
    name: hello-world
    role: web
  name: hello-world
spec:
  ports:
  - port: 80
    protocol: TCP
    targetPort: 8080
  selector:
    name: hello-world
    role: web
  type: LoadBalancer
---
apiVersion: v1
kind: Pod
metadata:
  name: "hello-world"
  labels:
    name: hello-world
    role: web
spec:
  containers:
    - image: koudaiii/hello-world:latest
      name: hello-world
      ports:
        - containerPort: 8080
      env:
        - name: MESSAGE
          value: Hello Wantedly
apiVersion: extensions/v1beta1
kind: Deployment
metadata:
  name: hello-world
  labels:
    name: hello-world
    role: web
spec:
  minReadySeconds: 30
  strategy:
    type: RollingUpdate
  replicas: 1
  template:
    metadata:
      name: hello-world
      labels:
        name: hello-world
        role: web
    spec:
      containers:
      - image: koudaiii/hello-world:latest
        name: hello-world
        ports:
          - containerPort: 8080
        env:
          - name: MESSAGE
            value: Hello Wantedly
golang を出してみよう
https://github.com/koudaiii/go_server を git clone して実行してこう
golang の application を立てる
kubectl create -f kubernetes/blue.yaml --namespace=koudaiii
kubectl create -f kubernetes/green.yaml --namespace=koudaiii
kubectl create -f kubernetes/service-go.yaml --namespace=koudaiii
front になる nginx を立てる
kubectl get po -w --namespace=koudaiii
kubectl create -f kubernetes/deployment-nginx.yaml --namespace=koudaiii
kubectl create -f kubernetes/service-nginx.yaml --namespace=koudaiii
確認してみよう
kubectl get svc --namespace=koudaiii
kubectl get deployment --namespace=koudaiii
kubectl describe svc --namespace=koudaiii
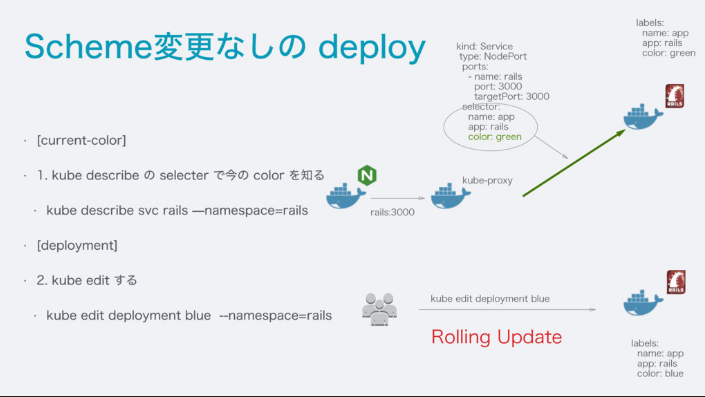
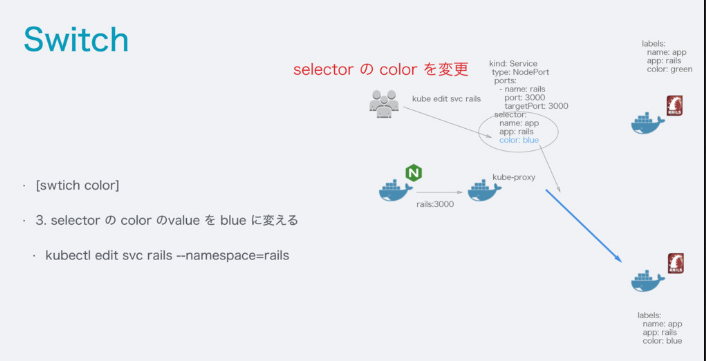
blue-green deployent
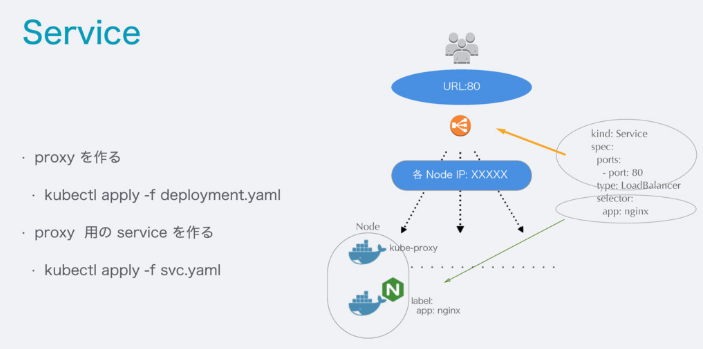
ref. https://speakerdeck.com/koudaiii/kubernetes-woshi-tutesabisuwojia-su-saseruqu-rizu-mi
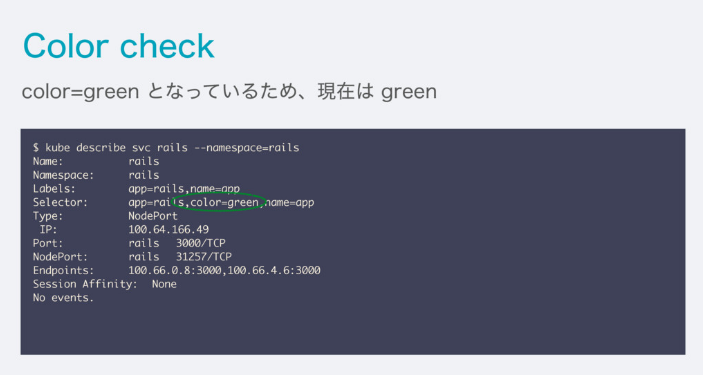
- Color を知ろう!
$ kubectl describe svc go --namespace=koudaiii
Name:			go
Namespace:		koudaiii
Labels:			app=go,name=app
Selector:		app=go,color=blue,name=app
Type:			NodePort
IP:			172.16.174.98
Port:			go	8080/TCP
NodePort:		go	32067/TCP
Endpoints:		172.18.2.5:8080
Session Affinity:	None
No events.
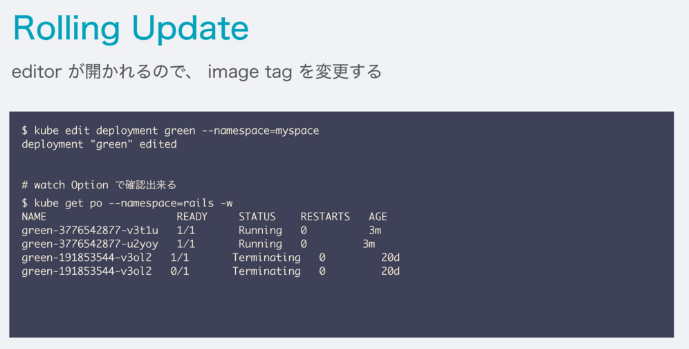
- Rolling Update してみよう!
$ kubectl edit deployment green --namespace=koudaiii
 21 spec:
 22   minReadySeconds: 30
 23   replicas: 10  # ここを10にしてみました
 24   selector:
 25     matchLabels:
 26       app: go

deployment "green" edited
- Switch してみよう!
$ kubectl edit svc go --namespace=koudaiii

 25   selector:
 26     app: go
 27     color: green       ## blue -> green  へ変更
 28     name: app
 29   sessionAffinity: None
service "go" edited
- Endpoint が増えたか確認してみよう
$ kubectl describe svc go --namespace=koudaiii
Name:			go
Namespace:		koudaiii
Labels:			app=go,name=app
Selector:		app=go,color=green,name=app
Type:			NodePort
IP:			172.16.174.98
Port:			go	8080/TCP
NodePort:		go	32067/TCP
Endpoints:		172.18.0.5:8080,172.18.1.6:8080,172.18.10.6:8080 + 7 more...
Session Affinity:	None
No events.
もう少し踏み込んだ manifest file の理解
ref. https://speakerdeck.com/koudaiii/kubernetes-woshi-tutesabisuwojia-su-saseruqu-rizu-mi
- healthcheck
http://kubernetes.io/docs/user-guide/production-pods/
http://kubernetes.io/docs/user-guide/pod-states/#container-probes
- readinessProbe
初回起動時に data や config をたくさん読むこむような大きいアプリケーションの場合、readinessProbe を使う。
Success になった後、 実際に traffic を受付ける。
- livenessProbe
コンテナが生きているどうか見るもの。
LivenessProbe が Failure の場合、 RestartPolicy の対象となり kubelet から コンテナを kill する。
Process Health Checking
kubernetes 上では default でコンテナのプロセスをチェックしており、もし失敗していれば restart するようになっている。
Application Health Checking
- httpGet を使ったヘルスチェック
apiVersion: extensions/v1beta1
kind: Deployment
metadata:
  name: nginx
spec:
  template:
    metadata:
      labels:
        app: nginx
    spec:
      containers:
      - name: nginx
        image: nginx
        ports:
        - containerPort: 80
        livenessProbe:
          httpGet:
            # Path to probe; should be cheap, but representative of typical behavior
            path: /index.html
            port: 80
          initialDelaySeconds: 30
          timeoutSeconds: 1
- exec を使ったヘルスチェック
apiVersion: v1
kind: Pod
metadata:
  labels:
    test: liveness
  name: liveness-exec
spec:
  containers:
  - args:
    - /bin/sh
    - -c
    - echo ok > /tmp/health; sleep 10; rm -rf /tmp/health; sleep 600
    image: gcr.io/google_containers/busybox
    livenessProbe:
      exec:
        command:
        - cat
        - /tmp/health
      initialDelaySeconds: 15
      timeoutSeconds: 1
    name: liveness
- 確認
Unhealthyで何度も restart されているのがわかる
$ kubectl describe pods liveness-exec
・・・・・・・・・・・・・・
Events:
  FirstSeen	LastSeen	Count	From								SubobjectPath			Type		Reason		Message
  ---------	--------	-----	----								-------------			--------	------		-------
  4m		4m		1	{default-scheduler }										Normal		Scheduled	Successfully assigned liveness-exec to ip-172-20-0-171.ap-northeast-1.compute.internal
  4m		4m		1	{kubelet ip-172-20-0-171.ap-northeast-1.compute.internal}	spec.containers{liveness}	Normal		Created		Created container with docker id 027dc93671c0
  4m		4m		1	{kubelet ip-172-20-0-171.ap-northeast-1.compute.internal}	spec.containers{liveness}	Normal		Started		Started container with docker id 027dc93671c0
  3m		3m		1	{kubelet ip-172-20-0-171.ap-northeast-1.compute.internal}	spec.containers{liveness}	Normal		Killing		Killing container with docker id 027dc93671c0: pod "liveness-exec_default(af352909-1d93-11e6-9d4c-06164e6ae803)" container "liveness" is unhealthy, it will be killed and re-created.
  3m		3m		1	{kubelet ip-172-20-0-171.ap-northeast-1.compute.internal}	spec.containers{liveness}	Normal		Started		Started container with docker id 6c79b57f8d03
  3m		3m		1	{kubelet ip-172-20-0-171.ap-northeast-1.compute.internal}	spec.containers{liveness}	Normal		Created		Created container with docker id 6c79b57f8d03
  2m		2m		1	{kubelet ip-172-20-0-171.ap-northeast-1.compute.internal}	spec.containers{liveness}	Normal		Killing		Killing container with docker id 6c79b57f8d03: pod "liveness-exec_default(af352909-1d93-11e6-9d4c-06164e6ae803)" container "liveness" is unhealthy, it will be killed and re-created.
  2m		2m		1	{kubelet ip-172-20-0-171.ap-northeast-1.compute.internal}	spec.containers{liveness}	Normal		Created		Created container with docker id 6037f2406959
  2m		2m		1	{kubelet ip-172-20-0-171.ap-northeast-1.compute.internal}	spec.containers{liveness}	Normal		Started		Started container with docker id 6037f2406959
  1m		1m		1	{kubelet ip-172-20-0-171.ap-northeast-1.compute.internal}	spec.containers{liveness}	Normal		Killing		Killing container with docker id 6037f2406959: pod "liveness-exec_default(af352909-1d93-11e6-9d4c-06164e6ae803)" container "liveness" is unhealthy, it will be killed and re-created.
  1m		1m		1	{kubelet ip-172-20-0-171.ap-northeast-1.compute.internal}	spec.containers{liveness}	Normal		Started		Started container with docker id 3eb2af8cfef1
  1m		1m		1	{kubelet ip-172-20-0-171.ap-northeast-1.compute.internal}	spec.containers{liveness}	Normal		Created		Created container with docker id 3eb2af8cfef1
  48s		48s		1	{kubelet ip-172-20-0-171.ap-northeast-1.compute.internal}	spec.containers{liveness}	Normal		Killing		Killing container with docker id 3eb2af8cfef1: pod "liveness-exec_default(af352909-1d93-11e6-9d4c-06164e6ae803)" container "liveness" is unhealthy, it will be killed and re-created.
  4m		48s		5	{kubelet ip-172-20-0-171.ap-northeast-1.compute.internal}	spec.containers{liveness}	Normal		Pulling		pulling image "gcr.io/google_containers/busybox"
  46s		46s		1	{kubelet ip-172-20-0-171.ap-northeast-1.compute.internal}	spec.containers{liveness}	Normal		Started		Started container with docker id 862d07529857
  4m		46s		5	{kubelet ip-172-20-0-171.ap-northeast-1.compute.internal}	spec.containers{liveness}	Normal		Pulled		Successfully pulled image "gcr.io/google_containers/busybox"
  46s		46s		1	{kubelet ip-172-20-0-171.ap-northeast-1.compute.internal}	spec.containers{liveness}	Normal		Created		Created container with docker id 862d07529857
  4m		28s		7	{kubelet ip-172-20-0-171.ap-northeast-1.compute.internal}	spec.containers{liveness}	Warning		Unhealthy	Liveness probe failed: cat: can't open '/tmp/health': No such file or directory
lifecycle
Kubernetes では delete した際に、 SIGTERM が送られる。
terminationGracePeriodSeconds(default 30s)より長い場合は、 SIGKILL が送られる。
apiVersion: extensions/v1beta1
kind: Deployment
metadata:
  name: nginx
spec:
  template:
    metadata:
      labels:
        app: nginx
    spec:
      containers:
      - name: nginx
        image: nginx
        ports:
        - containerPort: 80
        lifecycle:
          preStop:
            exec:
              # SIGTERM triggers a quick exit; gracefully terminate instead
              command: ["/usr/sbin/nginx","-s","quit"]
- termination message
deploy や debugger 目的で terminate されたかどうかを Message を設定することで確認できる。
また log に吐き出されるため、 logentries などで確認することも可能である。
apiVersion: v1
kind: Pod
metadata:
  name: pod-w-message
spec:
  containers:
  - name: messager
    image: "ubuntu:14.04"
    command: ["/bin/sh","-c"]
    args: ["sleep 60 && /bin/echo Sleep expired > /dev/termination-log"]
- メッセージとStatusを確認する
$ kubectl create -f examples/lifecycle/termination-message.yaml

$ kubectl get pods/pod-w-message -o go-template="{{range .status.containerStatuses}}{{.lastState.terminated.message}}{{end}}"
Sleep expired
$ kubectl get pods/pod-w-message -o go-template="{{range .status.containerStatuses}}{{.lastState.terminated.exitCode}}{{end}}"
環境変数
Kubernetes - kubectl create secret generic
# Create a new secret named my-secret with key1=supersecret and key2=topsecret
$ kubectl create secret generic my-secret --from-literal=key1=supersecret --from-literal=key2=topsecret
changelog: https://github.com/kubernetes/kubernetes/blob/master/CHANGELOG.md#changes-since-v111
     env:
        - name: SECRET_USERNAME
          valueFrom:
            secretKeyRef:
              name: my-secret
              key: key1
        - name: SECRET_PASSWORD
          valueFrom:
            secretKeyRef:
              name: my-secret
              key: key2
namespace を越えての通信と名前解決について
ref. https://github.com/kubernetes/kubernetes/blob/master/build/kube-dns/README.md
namespace で区切ったとしても kubernetes では同じ cluster にいる場合は、ネットワーク的にはつながっています。
また、 skydns という kubernetes の addon が用意されており、名前解決も出来ます。
- service
my-svc.my-namespace.svc.cluster.local
$ kubectl run -i --tty --rm busybox --image=busybox --restart=Never -- sh
/ # nslookup nginx.koudaiii.svc.cluster.local
Server:    100.64.0.10
Address 1: 100.64.0.10

Name:      nginx.koudaiii.svc.cluster.local
Address 1: 100.64.17.97
- pod
pod-ip-address.my-namespace.pod.cluster.local
describe pod で ip を確認して、- で繋いで上げると名前解決できます。
$ kubectl describe po/blue-534540973-9svyj --namespace=koudaiii
Name:		blue-534540973-9svyj
Namespace:	koudaiii
Node:		ip-172-20-0-54.ap-northeast-1.compute.internal/172.20.0.54
Start Time:	Mon, 22 Aug 2016 11:29:56 +0900
Labels:		app=go,color=blue,name=app,pod-template-hash=534540973
Status:		Running
IP:		100.66.0.12 # ip を確認
・・・・・
$ kubectl run -i --tty --rm busybox --image=busybox --restart=Never -- sh
/ # nslookup 100-66-0-12.koudaiii.pod.cluster.local
Server:    100.64.0.10
Address 1: 100.64.0.10

Name:      100-66-0-12.koudaiii.pod.cluster.local
Address 1: 100.66.0.12
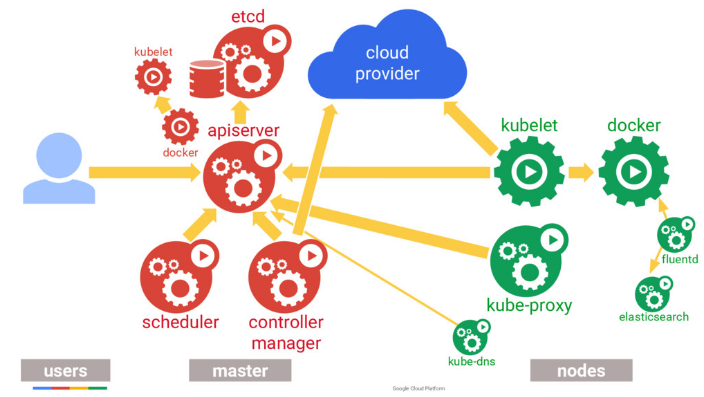
Kubernetes の裏側を知る
ref. https://speakerdeck.com/thockin/kubernetes-extensibility
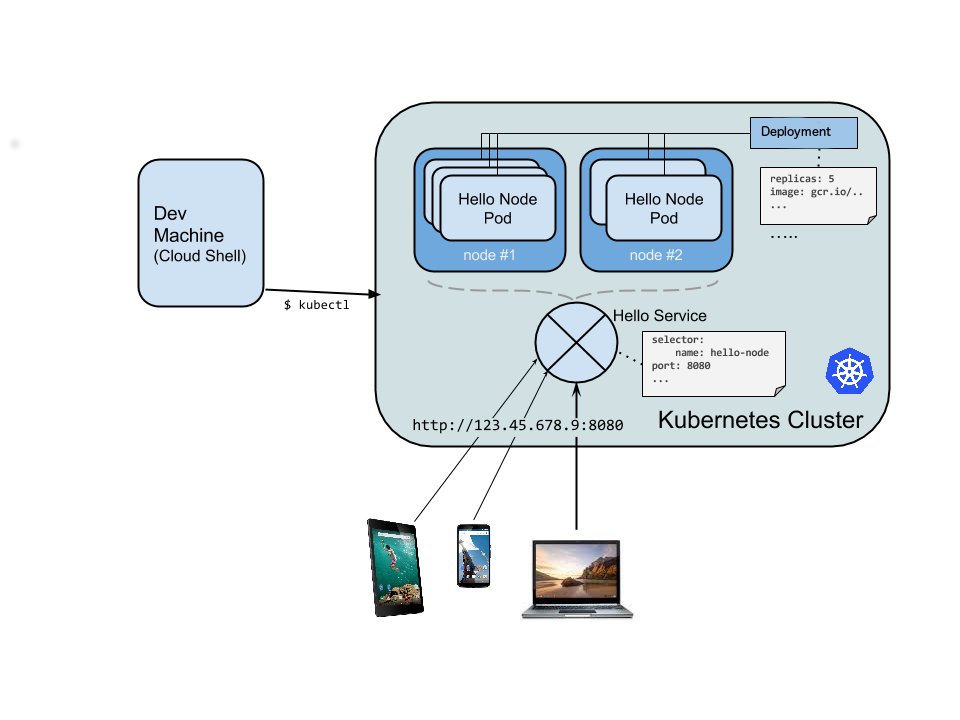
ref. http://kubernetes.io/docs/hellonode/
- Google では10年以上前からコンテナを動かしている
- kubernetes がどうなっているのか
- ReplicationController と Deployment
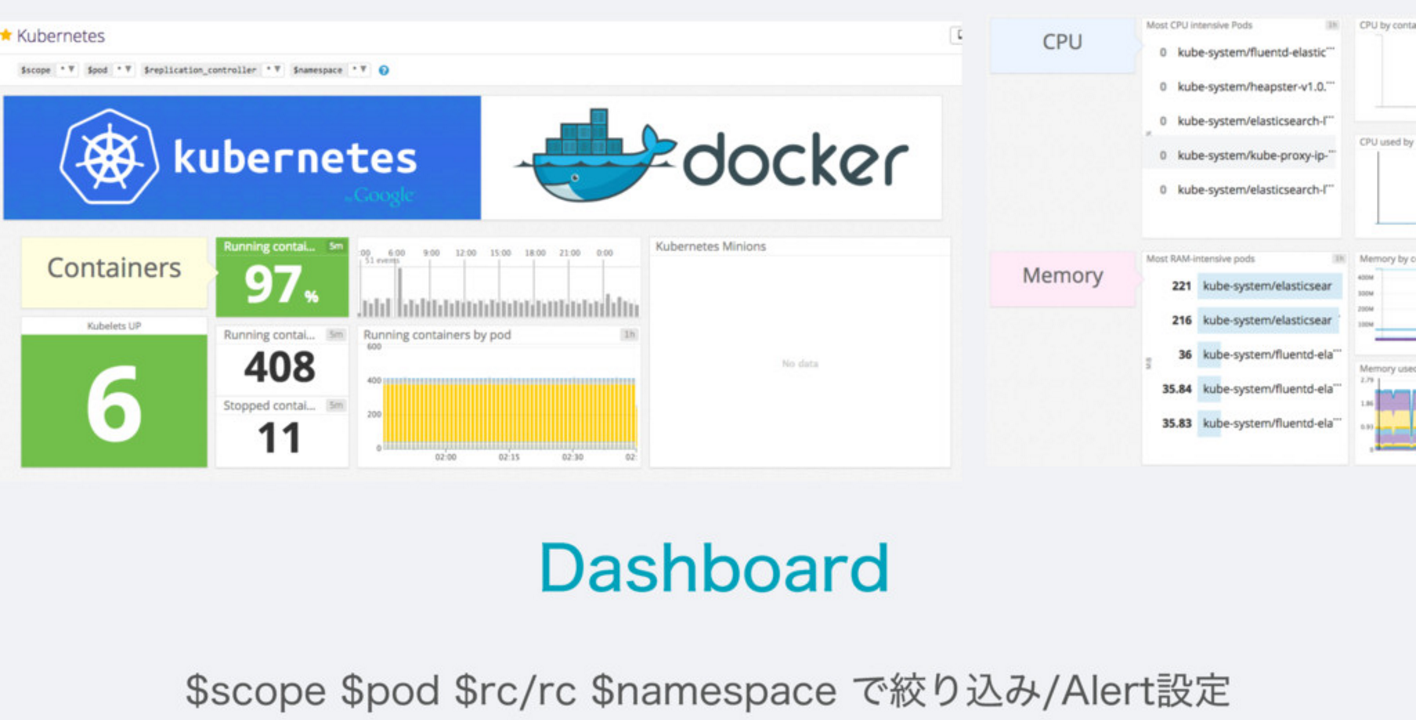
今回立てたやつを Datadog で見てみる
- Datadog
Monitoring Service です。
Wantedlyでどのように使われてるかは、こちらの記事に書かれています。
- Dashboardを見てみる
- kubernetes に dd-agent を立てるには??
git に管理したくない api key をcommandから kubernetes 上に登録させる
$ kubectl create secret generic dd-agent --from-literal=api-key=your api key
secret "dd-agent" created
datadog 公式が用意している manifestfile
apiVersion: extensions/v1beta1
kind: DaemonSet
metadata:
  name: dd-agent
spec:
  template:
    metadata:
      labels:
        app: dd-agent
      name: dd-agent
    spec:
      containers:
        - image: datadog/docker-dd-agent:kubernetes
          imagePullPolicy: Always
          name: dd-agent
          ports:
            - containerPort: 8125
              name: dogstatsdport
          env:
            - name: API_KEY
              valueFrom:
                secretKeyRef:
                  name: dd-agent
                  key: api-key
          volumeMounts:
            - name: dockersocket
              mountPath: /var/run/docker.sock
            - name: procdir
              mountPath: /host/proc
              readOnly: true
            - name: cgroups
              mountPath: /host/sys/fs/cgroup
              readOnly: true
      volumes:
        - hostPath:
            path: /var/run/docker.sock
          name: dockersocket
        - hostPath:
            path: /proc
          name: procdir
        - hostPath:
            path: /sys/fs/cgroup
          name: cgroups
ここでの kind: DaemonSet と呼ばれるものは、すべての Node にこの pod を配置するという記述になります。
この方法で、log 収集系の pod を合わせて配置すると便利になります。
$ kubectl create -f kubernetes/dd-agent.yaml
daemonset "dd-agent" created
(演習課題)綺麗なAPI速習会で使ったgo-api をkubernetes に出してみよう
https://github.com/shimastripe/go-api-sokushukai から fork して manifest file を書いてkubernetes に出してよう!!
image は以下の方法で取得できます。
docker pull quay.io/shimastripe/go-api-sokushukai
元に kubernetes 立ててみよう
manifest を書く時にやっていること
-
kubectl create -f fileで validate check させる - 他の人を見てみる
-
kubectl runでネットワークがつながっているか見てみる
$ kubectl run -i --tty --rm busybox --image=busybox --restart=Never --namespace=koudaiii -- sh
Waiting for pod sync/busybox to be running, status is Pending, pod ready: false


Hit enter for command prompt

/ # nslookup go
Server:    100.64.0.10
Address 1: 100.64.0.10

Name:      go
Address 1: 100.64.166.49
/ # exit
pod "busybox" deleted
-
kubectl exec pod nameで実際に中で何が起こっているか見てみる -
kubectl logs pod nameでコンテナのログをみる -
kubectl describe pod nameでEventのログを見てみる
参考回答: https://github.com/dtan4/go-api-sokushukai/tree/master/kubernetes
