この記事では、 ALB Ingress Controller について書きます。
※ zalando-incubator/kube-ingress-aws-controller については、 Kubernetes2 Advent Calendar 2017 7日目 @mumoshu 先生の記事で、 書かれていますので、そちらを参照して下さい ![]()
WHY
Kubernetes on AWS で運用している場合、 Kubernetes の Service を作成すると、 AWS の Classic Load Balancer が作成されます。 Classic Load Balancer 以外に Application Load Balancer を利用したい場合が以下のような時にあります。
-
http2を利用したい -
/blogなどリソース毎に向き先を区切る
Kubernetes on AWS を利用する方は既に AWS を使いだおしている方が大半だと思います。既存のアプリケーションを Kubernetes へ移行しようとした際に、 既に ALB(Application Load Balancer) を利用していたのが、 Kubernetes へ移行したら ELB (Classic Load Balancer) になって http2 無くなりましたというのはパフォーマンスにも影響を与えます。
そこで ALB Ingress Controller を利用することで、 ALB が使えます。
ALB Ingress Controller
The ALB Ingress Controller satisfies Kubernetes ingress resources by provisioning Application Load Balancers.
ALB Ingress Controller は、 Kubernetes の ingress を作成したタイミングで、 Application Load Balancer を作成します。
Design
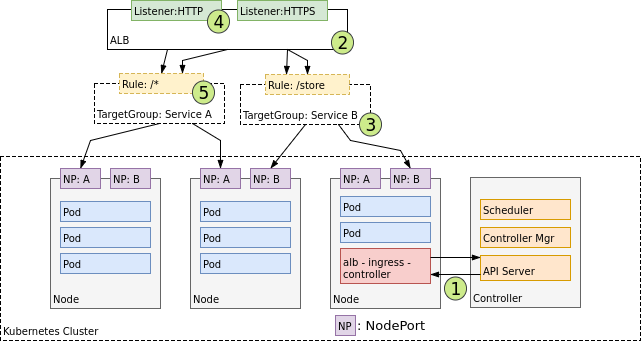
The following diagram details the AWS components this controller creates. It also demonstrates the route ingress traffic takes from the ALB to the Kubernetes cluster.
Design に ALB が作られるまでの流れと、トラフィックの流れが書かれています。
Ingress Creation
Kubernetes 上に ingress を一つ作った時の流れ
[1]: The controller watches for ingress events from the API server. When it finds ingress resources that satisfy its requirements, it begins the creation of AWS resources.
[1] ALB Ingress Controller は、 Kubernetes の API Server からの Event を監視し、該当の Event を検知したら AWS のリソースを作成し始める。
[2]: An ALB (ELBv2) is created in AWS for the new ingress resource. This ALB can be internet-facing or internal. You can also specify the subnets its created in using annotations.
[2] ALB を作成する。 annotation を指定することで、サブネットやインターネット向けか内部向けかも決めることができる。
[3]: Target Groups are created in AWS for each unique Kubernetes service described in the ingress resource.
[3] ALB の向き先となるターゲットグループは、 ingress に記述された Service ごとに AWS で作成。
[4]: Listeners are created for every port detailed in your ingress resource annotations. When no port is specified, sensible defaults (
80or443) are used. Certificates may also be attached via annotations.
[4] リスナは、 ingress の annotation で指定したポート用に作成されます。ポートが指定されていない場合、80または443を使用。 ACM も使用することもできる。
[5]: Rules are created for each path specified in your ingress resource. This ensures traffic to a specific path is routed to the correct Kubernetes Service.
[5] 入力リソースで指定された各パスに対してルールが作成され、特定のパスへのトラフィックが正しい Kubernetes の Service にルーティングされる。
Ingress Traffic
This section details how traffic reaches the cluster.
As seen above, the ingress traffic for controller-managed resources starts at the ALB and reaches the Kubernetes nodes through each service's NodePort. This means that services referenced from ingress resource must be exposed on a node port in order to be reached by the ALB.
ALB から始まり、各サービスの NodePort を通じて Kubernetes ノードに到達するようになっている。 ALB を使ったサービスを公開するためには、 ingress と NodePort を使った Service の二つが必要になる。
How it Works
- alb-ingress-controller 用の IAM を作成
- ALB 作る際に、 sg と subnet を自動でアサインされるように、 subnet にタグの設定
- AWS の IAM 情報と CLUSTER_NAME を secrets に入れる
- default サーバーという一旦 target group アサインできるテンポラリのサービスを建てる
- alb-ingress-controller を deploy する
alb-ingress-controller 用の IAM を作成
AWS を操作するため、専用の IAM が必要になります。必要になるリソースは例と以下に記載されています。
{
  "Version": "2012-10-17",
  "Statement": [
    {
      "Effect": "Allow",
      "Action": [
        "acm:DescribeCertificate",
        "acm:ListCertificates",
        "acm:GetCertificate"
      ],
      "Resource": "*"
    },
    {
      "Effect": "Allow",
      "Action": [
        "ec2:AuthorizeSecurityGroupIngress",
        "ec2:CreateSecurityGroup",
        "ec2:CreateTags",
        "ec2:DeleteTags",
        "ec2:DeleteSecurityGroup",
        "ec2:DescribeAccountAttributes",
        "ec2:DescribeAddresses",
        "ec2:DescribeInstances",
        "ec2:DescribeInstanceStatus",
        "ec2:DescribeInternetGateways",
        "ec2:DescribeNetworkInterfaces",
        "ec2:DescribeSecurityGroups",
        "ec2:DescribeSubnets",
        "ec2:DescribeTags",
        "ec2:DescribeVpcs",
        "ec2:ModifyInstanceAttribute",
        "ec2:ModifyNetworkInterfaceAttribute",
        "ec2:RevokeSecurityGroupIngress"
      ],
      "Resource": "*"
    },
    {
      "Effect": "Allow",
      "Action": [
        "elasticloadbalancing:AddListenerCertificates",
        "elasticloadbalancing:AddTags",
        "elasticloadbalancing:CreateListener",
        "elasticloadbalancing:CreateLoadBalancer",
        "elasticloadbalancing:CreateRule",
        "elasticloadbalancing:CreateTargetGroup",
        "elasticloadbalancing:DeleteListener",
        "elasticloadbalancing:DeleteLoadBalancer",
        "elasticloadbalancing:DeleteRule",
        "elasticloadbalancing:DeleteTargetGroup",
        "elasticloadbalancing:DeregisterTargets",
        "elasticloadbalancing:DescribeListenerCertificates",
        "elasticloadbalancing:DescribeListeners",
        "elasticloadbalancing:DescribeLoadBalancers",
        "elasticloadbalancing:DescribeLoadBalancerAttributes",
        "elasticloadbalancing:DescribeRules",
        "elasticloadbalancing:DescribeSSLPolicies",
        "elasticloadbalancing:DescribeTags",
        "elasticloadbalancing:DescribeTargetGroups",
        "elasticloadbalancing:DescribeTargetGroupAttributes",
        "elasticloadbalancing:DescribeTargetHealth",
        "elasticloadbalancing:ModifyListener",
        "elasticloadbalancing:ModifyLoadBalancerAttributes",
        "elasticloadbalancing:ModifyRule",
        "elasticloadbalancing:ModifyTargetGroup",
        "elasticloadbalancing:ModifyTargetGroupAttributes",
        "elasticloadbalancing:RegisterTargets",
        "elasticloadbalancing:RemoveListenerCertificates",
        "elasticloadbalancing:RemoveTags",
        "elasticloadbalancing:SetIpAddressType",
        "elasticloadbalancing:SetSecurityGroups",
        "elasticloadbalancing:SetSubnets",
        "elasticloadbalancing:SetWebACL"
      ],
      "Resource": "*"
    },
    {
      "Effect": "Allow",
      "Action": [
        "iam:CreateServiceLinkedRole",
        "iam:GetServerCertificate",
        "iam:ListServerCertificates"
      ],
      "Resource": "*"
    },
    {
      "Effect": "Allow",
      "Action": [
        "waf-regional:GetWebACLForResource",
        "waf-regional:GetWebACL",
        "waf-regional:AssociateWebACL",
        "waf-regional:DisassociateWebACL"
      ],
      "Resource": "*"
    },
    {
      "Effect": "Allow",
      "Action": [
        "tag:GetResources",
        "tag:TagResources"
      ],
      "Resource": "*"
    },
    {
      "Effect": "Allow",
      "Action": [
        "waf:GetWebACL"
      ],
      "Resource": "*"
    }
  ]
}
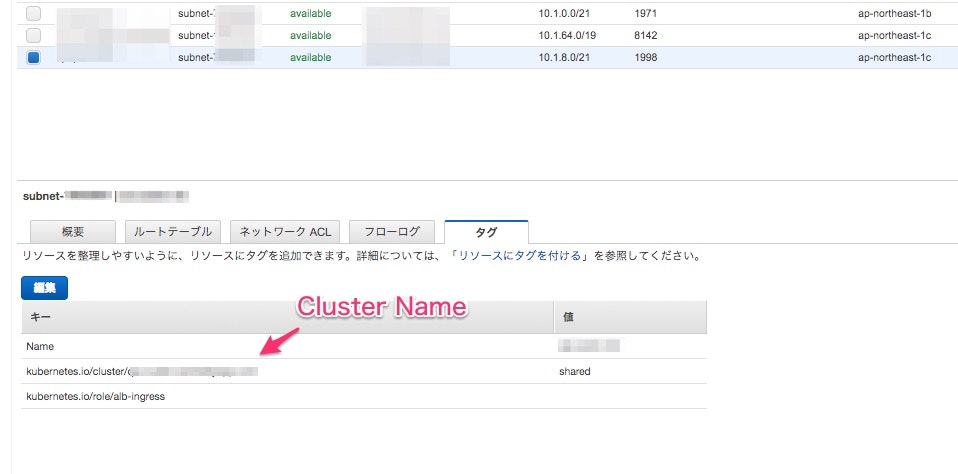
ALB 作る際に、 sg と subnet を自動でアサインされるように、 subnet にタグの設定
ingress の annotation か auto-detection で、 各ALBを作成するサブネットを決定。
-
annotation:
alb.ingress.kubernetes.io/subnetsに、 subnet ID または NAME タグを使用して指定 - auto-detection: annotation の指定はなく、自動検出で ALB を作成
auto-detection を有効にするためには、以下の tag を追加します。 ALB を作る際に subnet が二つ必要なため、二つ tag をつける。
kubernetes.io/role/alb-ingress=-
kubernetes.io/cluster/$CLUSTER_NAME=shared-
$CLUSTER_NAMEはalb-ingress-controller.yamlのCLUSTER_NAME環境変数と一致させる必要がある
-
設定例
AWS の IAM 情報と CLUSTER_NAME を Secrets に入れる
| namespace | name | key | description |
|---|---|---|---|
kube-system |
alb-ingress-controller |
AWS_ACCESS_KEY_ID |
credentials of IAM user for alb-ingress-controller
|
kube-system |
alb-ingress-controller |
AWS_SECRET_ACCESS_KEY |
credentials of IAM user for alb-ingress-controller
|
kube-system |
alb-ingress-controller |
CLUSTER_NAME |
cluster name |
- 登録方法
k8sec を使って Sercrets に登録します。
$ k8sec set alb-ingress-controller KEY=VALUE -n kube-system
- 確認
$ k8sec list alb-ingress-controller -n kube-system
NAME			TYPE	KEY			VALUE
alb-ingress-controller	Opaque	AWS_ACCESS_KEY_ID	"hoge"
alb-ingress-controller	Opaque	AWS_SECRET_ACCESS_KEY	"fuga"
alb-ingress-controller	Opaque	CLUSTER_NAME		"Ooops"
ingress に必要になる Default backend サービスを建てる
alb-ingress-controller を使うために必要になる Default backend サービスを建てる。 alb-ingress-controller を利用する ingress は、全て Default backend を指す。
$ kubectl create -f https://raw.githubusercontent.com/coreos/alb-ingress-controller/master/examples/default-backend.yaml
alb-ingress-controller を deploy する
- alb-ingress-controller manifest ファイルをダウンロードする
$ wget https://raw.githubusercontent.com/coreos/alb-ingress-controller/master/examples/alb-ingress-controller.yaml
- Secrets に追加したものを manifest file に反映する
        envFrom:
        - secretRef:
            name: alb-ingress-controller
-
AWS_REGIONを設定する
- name: AWS_REGION
  value: ap-northeast-1
- Deploy alb-ingress-controller
$ kubectl apply -f alb-ingress-controller.yaml
- log で起動できているか確認できる。
$ kubectl logs -n kube-system \
    $(kubectl get po -n kube-system | \
    egrep -o alb-ingress[a-zA-Z0-9-]+) | \
    egrep -o '\[ALB-INGRESS.*$'
[ALB-INGRESS] [controller] [INFO]: Log level read as "", defaulting to INFO. To change, set LOG_LEVEL environment variable to WARN, ERROR, or DEBUG.
[ALB-INGRESS] [controller] [INFO]: Ingress class set to alb
[ALB-INGRESS] [ingresses] [INFO]: Build up list of existing ingresses
[ALB-INGRESS] [ingresses] [INFO]: Assembled 0 ingresses from existing AWS resources
上手く動かない場合ははここを true にすると良い。 AWS の制限で止められている可能性もありえる。
        - name: AWS_DEBUG
          value: "false"
これで ALB Ingress Controller の準備は完了
実際に ALB 作成してみる
alb-ingress-controller にある echo server を元にやってみる。基本的に以下、二点を抑えるだけで ALB
を利用できる。
- ingress と NodePort を使った Service
- ingress の annotation の設定
echoservice
alb-ingress-controller にある sample を元に echoserver を建ててみる。
$ kubectl apply -f https://raw.githubusercontent.com/coreos/alb-ingress-controller/master/examples/echoservice/echoserver-namespace.yaml &&\
kubectl apply -f https://raw.githubusercontent.com/coreos/alb-ingress-controller/master/examples/echoservice/echoserver-service.yaml &&\
kubectl apply -f https://raw.githubusercontent.com/coreos/alb-ingress-controller/master/examples/echoservice/echoserver-deployment.yaml
Namespace を切って、 NodePort で開放する Service と Deployment が作られる。
$ kubectl get all -n echoserver
NAME                             READY     STATUS    RESTARTS   AGE
po/echoserver-2241665424-xm1rt   1/1       Running   0          10m

NAME             TYPE       CLUSTER-IP     EXTERNAL-IP   PORT(S)        AGE
svc/echoserver   NodePort   100.65.13.23   <none>        80:31509/TCP   10m

NAME                DESIRED   CURRENT   UP-TO-DATE   AVAILABLE   AGE
deploy/echoserver   1         1         1            1           10m

NAME                       DESIRED   CURRENT   READY     AGE
rs/echoserver-2241665424   1         1         1         10m
- ingress file を取得する
wget https://raw.githubusercontent.com/coreos/alb-ingress-controller/master/examples/echoservice/echoserver-ingress.yaml
- annotation の設定(オプション)
Annotations に全部使える ALB の option が書いてある。
alb.ingress.kubernetes.io/scheme: internet-facing # or 'internal'
alb.ingress.kubernetes.io/connection-idle-timeout: # Defauflt 60
alb.ingress.kubernetes.io/subnets: # subnet ID か Name
alb.ingress.kubernetes.io/security-groups: # sg ID か Name (Default 適当な名前で 0.0.0.0/0 inboundで作られる)
alb.ingress.kubernetes.io/listen-ports: '[{"HTTP":80,"HTTPS": 443}]' # Default 80
alb.ingress.kubernetes.io/certificate-arn: arn:aws:acm:ap-northeast-1:hoge:certificate/UUID # ACM 利用する場合
alb.ingress.kubernetes.io/healthcheck-path: # Default "/"
alb.ingress.kubernetes.io/healthcheck-port: # Default Traffic port
alb.ingress.kubernetes.io/healthcheck-interval-seconds: # Default 15
alb.ingress.kubernetes.io/healthcheck-protocol: # Default HTTP
alb.ingress.kubernetes.io/healthcheck-timeout-seconds: # Default 5
alb.ingress.kubernetes.io/healthy-threshold-count: # Default 2
alb.ingress.kubernetes.io/unhealthy-threshold-count: # Default 2
alb.ingress.kubernetes.io/successCodes: # Default 200
alb.ingress.kubernetes.io/tags:  # Tag を入れる
- ingress を建てる
$ kubectl apply -f echoserver-ingress.yaml
とりあえず default のままでいい場合は下記のコマンド
$ kubectl apply -f https://raw.githubusercontent.com/coreos/alb-ingress-controller/master/examples/echoservice/echoserver-ingress.yaml
- ALB が作成された log を確認して見る
$ kubectl logs -n kube-system \
  $(kubectl get po -n kube-system | \
  egrep -o alb-ingress[a-zA-Z0-9-]+) | \
  egrep -o '\[ALB-INGRESS.*$' | \
  grep 'echoserver\/echoserver'
[ALB-INGRESS] [echoserver/echoserver] [INFO]: Start ELBV2 (ALB) creation.
[ALB-INGRESS] [echoserver/echoserver] [INFO]: Completed ELBV2 (ALB) creation. Name: hogefuga-echoserver-ech-2ad7 | ARN: arn:aws:elasticloadbalancing:ap-northeast-1:0000:loadbalancer/app/hogefuga-echoserver-ech-2ad7/17fd1481cb40fcc2
[ALB-INGRESS] [echoserver/echoserver] [INFO]: Start TargetGroup creation.
[ALB-INGRESS] [echoserver/echoserver] [INFO]: Succeeded TargetGroup creation. ARN: arn:aws:elasticloadbalancing:ap-northeast-1:0000:targetgroup/hogefuga-31509-HTTP-c3a0606/9914a217042c4006 | Name: hogefuga-31509-HTTP-c3a0606.
[ALB-INGRESS] [echoserver/echoserver] [INFO]: Start Listener creation.
[ALB-INGRESS] [echoserver/echoserver] [INFO]: Completed Listener creation. ARN: arn:aws:elasticloadbalancing:ap-northeast-1:0000:listener/app/hogefuga-echoserver-ech-2ad7/17fd1481cb40fcc2/0fe42e9436e45013 | Port: 80 | Proto: HTTP.
[ALB-INGRESS] [echoserver/echoserver] [INFO]: Start Rule creation.
[ALB-INGRESS] [echoserver/echoserver] [INFO]: Completed Rule creation. Rule Priority: "1" | Condition: [{    Field: "host-header",    Values: ["echoserver.example.com"]  },{    Field: "path-pattern",    Values: ["/"]  }]
[ALB-INGRESS] [echoserver/echoserver] [INFO]: Fetching Targets for Target Group arn:aws:elasticloadbalancing:ap-northeast-1:0000:targetgroup/hogefuga-31509-HTTP-c3a0606/9914a217042c4006
[ALB-INGRESS] [echoserver/echoserver] [INFO]: Fetching Rules for Listener arn:aws:elasticloadbalancing:ap-northeast-1:0000:listener/app/hogefuga-echoserver-ech-2ad7/17fd1481cb40fcc2/0fe42e9436e45013
[ALB-INGRESS] [echoserver/echoserver] [INFO]: Ingress rebuilt from existing ALB in AWS
- URL を確認
$ kubectl describe ing -n echoserver echoserver
Name:             echoserver
Namespace:        echoserver
Address:          hogefuga-echoserver-ech-2ad7-126540505.ap-northeast-1.elb.amazonaws.com
Default backend:  default-http-backend:80 (100.96.27.7:8080)
Rules:
  Host                    Path  Backends
  ----                    ----  --------
  echoserver.example.com
                          /   echoserver:80 (<none>)
Annotations:
Events:
  Type    Reason  Age   From                Message
  ----    ------  ----  ----                -------
  Normal  CREATE  2m    ingress-controller  Ingress echoserver/echoserver
  Normal  CREATE  2m    ingress-controller  hogefuga-echoserver-ech-2ad7 created
  Normal  CREATE  2m    ingress-controller  hogefuga-31509-HTTP-c3a0606 target group created
  Normal  CREATE  2m    ingress-controller  80 listener created
  Normal  CREATE  2m    ingress-controller  1 rule created
  Normal  UPDATE  2m    ingress-controller  Ingress echoserver/echoserver
ここからさらに踏み込んで external DNS の設定がありますが今回は、ALB までで閉じます。
最後に cURL で確認して終了です。
$ curl hogefuga-echoserver-ech-2ad7-126540505.ap-northeast-1.elb.amazonaws.com
CLIENT VALUES:
client_address=10.1.93.88
command=GET
real path=/
query=nil
request_version=1.1
request_uri=http://hogefuga-echoserver-ech-2ad7-126540505.ap-northeast-1.elb.amazonaws.com:8080/

SERVER VALUES:
server_version=nginx: 1.10.0 - lua: 10001

HEADERS RECEIVED:
accept=*/*
host=hogefuga-echoserver-ech-2ad7-126540505.ap-northeast-1.elb.amazonaws.com
user-agent=curl/7.43.0
x-amzn-trace-id=Root=1-5a2d4e2f-5545b75b74003cd80e5134bb
x-forwarded-for=192.168.100.10
x-forwarded-port=80
x-forwarded-proto=http
BODY:
-no body in request-
- 最後は、削除
$ kubectl delete ns echoserver
namespace "echoserver" deleted
ALB も削除される。
$ curl hogefuga-echoserver-ech-2ad7-126540505.ap-northeast-1.elb.amazonaws.com
curl: (6) Could not resolve host: hogefuga-echoserver-ech-2ad7-126540505.ap-northeast-1.elb.amazonaws.com