概要
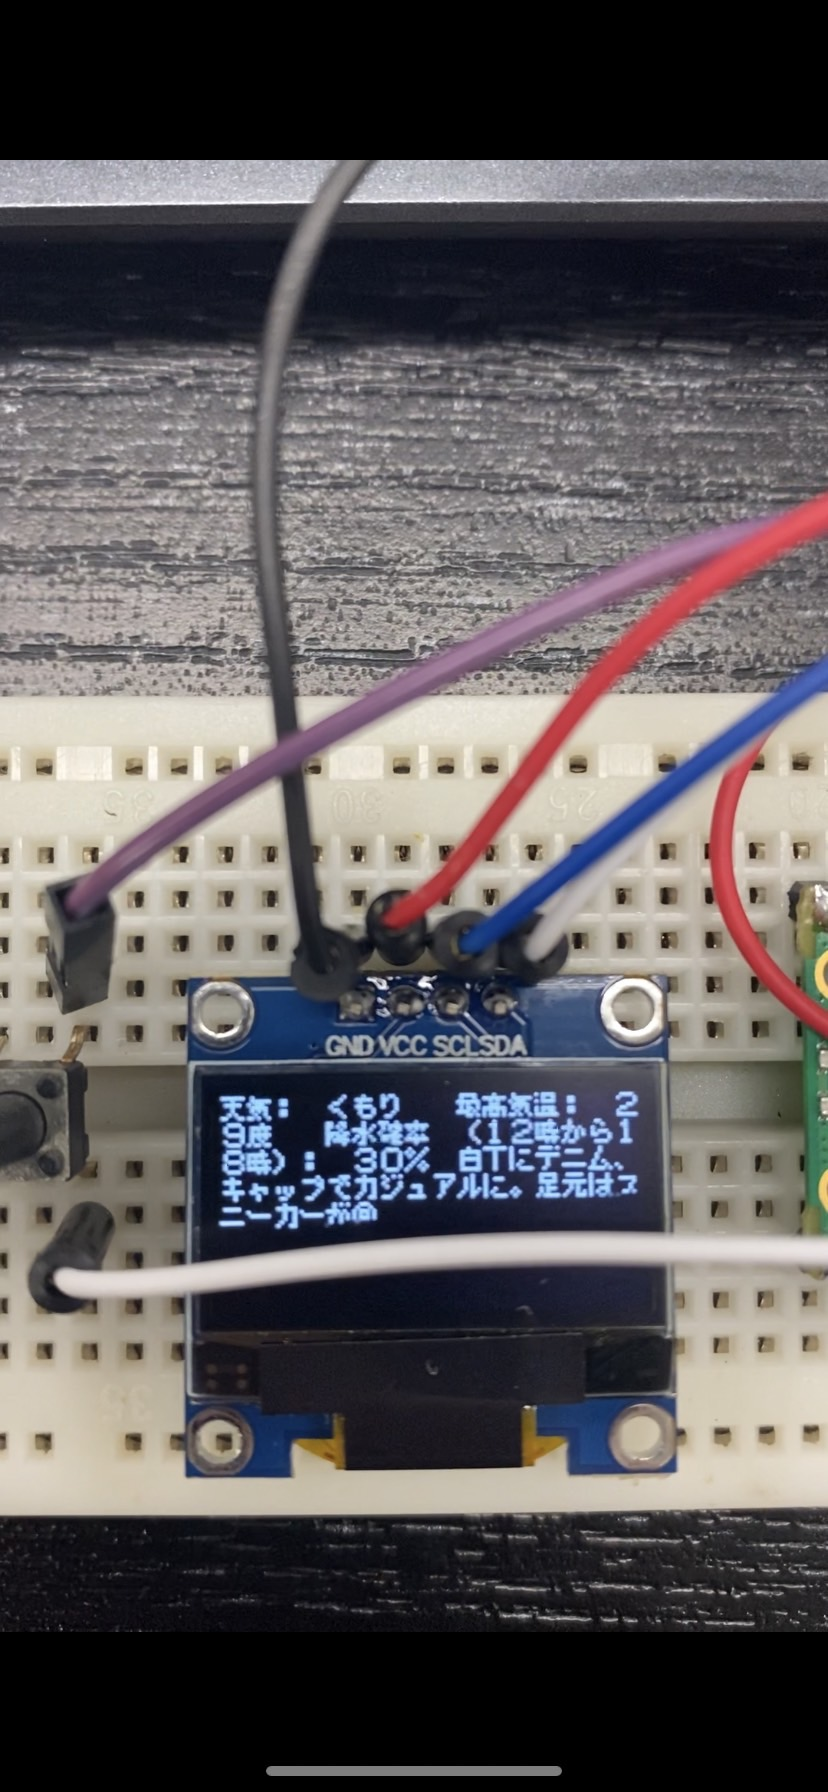
chatGPTを用いてリアルタイムの天気に応じたコーディネートをしてくれるハードウェアを製作しました。
目次(任意)
使用したもの
ハードウェア
・ブレッドボード
・Raspberry pi pico W
・OLED
・ジャンパ線(オス―オス)×6
・USBケーブル
・タクトスイッチ
ソフトウェア
・thonny(IDE)
・micropython
API
・openai
・天気予報API
成果物
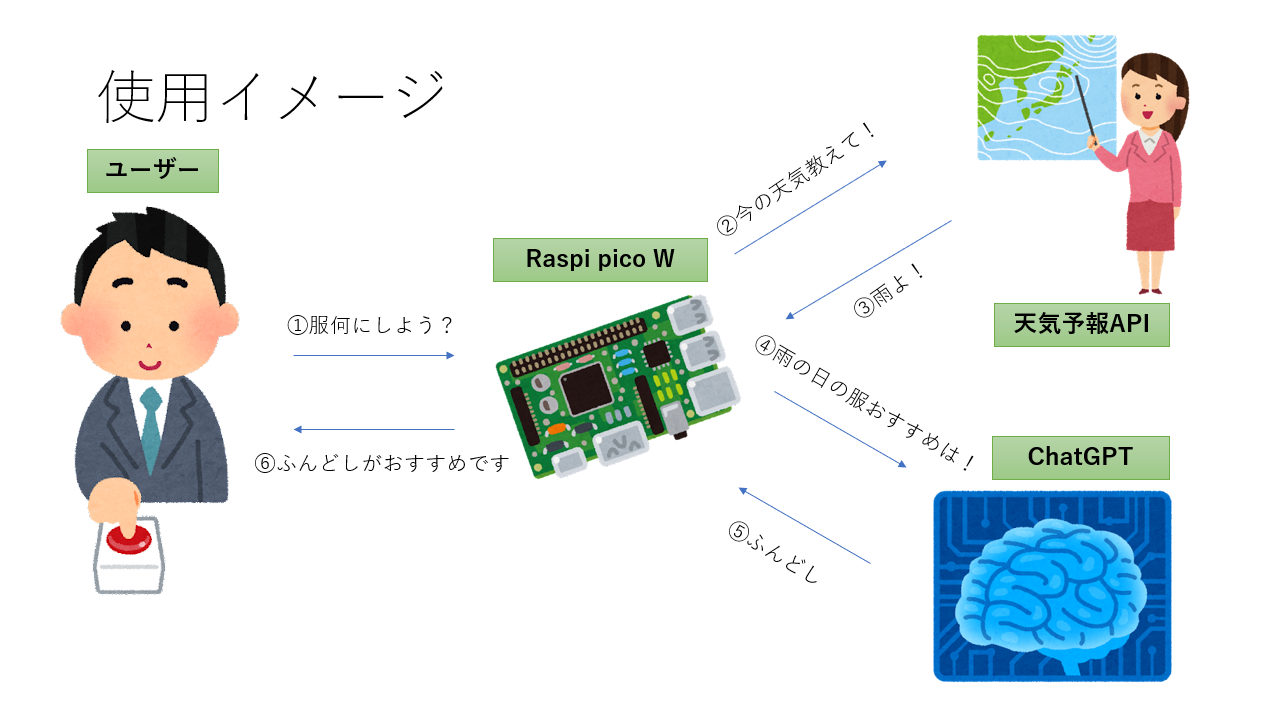
使用イメージ
朝の準備をしている時間に天気を知りたいときや、コーディネートに困ったときに使用する

使用方法
Raspiを電源につないでおく
使用したいときにタクトスイッチを押す
今回学んだこと
APIの使用方法について
・APIを初めて使用したので理解するのに苦労した。APIによって使用方法が違うので、公式サイトをしっかり読むことが大切だと学んだ。
・APIキーは他人に悪用される可能性があるので公開しない
・APIキーをソースコードに書き込む際は危険が伴うので、環境変数として設定しておく
USBケーブルについて
・USBケーブルには通信用、充電用、両用のタイプがある
・充電用のケーブルではマイコンが認識されないことに注意
Raspberry pi pico Wについて
・Raspi上にmain.pyというファイルを書き込んでおくと電源に接続された際にmain.pyが自動で実行される
・PCとの接続時はbootselボタンを押しながらケーブルを挿す
ディスプレイについて
・ディスプレイの通信方式にはSPIとI2Cがある。
・SPIは高速通信と直結接続が必要な場合に適している
・I²Cは信号線の少なさや、複数のデバイスを制御する際や配線が制約される場合に適している
使用したコード
import urequests
import ujson
import network
import time
import utime
import json
import machine
import ssd1306
from misakifont import MisakiFont

# JSONデータのURL
url = "https://weather.tsukumijima.net/api/forecast/city/270000"

# Wi-Fiネットワークに接続
#自宅Wi-FiのSSIDとパスワードを入力
ssid = '自宅wi-fiのSSIDを入力してください'
password = 'パスワードを入力してください'
wlan = network.WLAN(network.STA_IF)
wlan.active(True)
wlan.connect(ssid, password)

max_wait = 10
while max_wait > 0:
    if wlan.status() < 0 or wlan.status() >= 3:
        break
    max_wait -= 1
    print('waiting for connection...')
    utime.sleep(1)

# Define blinking function for onboard LED to indicate error codes
def blink_onboard_led(num_blinks):
    led = machine.Pin('LED', machine.Pin.OUT)
    for i in range(num_blinks):
        led.on()
        utime.sleep(.2)
        led.off()
        utime.sleep(.2)

wlan_status = wlan.status()
blink_onboard_led(wlan_status)

if wlan_status != 3:
    raise RuntimeError('Wi-Fi connection failed')
else:
    print('Connected')
    status = wlan.ifconfig()
    #print('ip = ' + status[0])

# URLにGETリクエストを送信する
response = urequests.get(url)

# リクエストが成功したかどうかを確認する
if response.status_code == 200:
    # JSONデータを解析する
    json_data = ujson.loads(response.text)

    # データにアクセスする
    forecasts = json_data["forecasts"]
    today_forecast = forecasts[0]

    telop = today_forecast["telop"]

    max_temperature = today_forecast["temperature"]["max"]["celsius"]

    chance_of_rain = today_forecast["chanceOfRain"]["T12_18"]
    if telop == "曇り":
        telop = "くもり"

response.close()

today_weathr = telop
max_temp = max_temperature
# min_temp =
cor = chance_of_rain

"""
 美咲フォントのビットマップ表示
"""
def show_bitmap(oled, fd, x, y, color, size):
    for row in range(0, 7):
        for col in range(0, 7):
            if (0x80 >> col) & fd[row]:
                oled.fill_rect(int(x + col * size), int(y + row * size), size, size, color)
    oled.show()

sda = machine.Pin(0)
scl = machine.Pin(1)
i2c = machine.I2C(0, sda=sda, scl=scl, freq=400000)
oled = ssd1306.SSD1306_I2C(128, 64, i2c)
oled.fill(0)
mf = MisakiFont()

# OpenAI API key
openai_api_key = "openaiのAPIキーを入力してください"  # 前述で発行したAPIを入力

# OpenAI Chat Completion APIエンドポイントを設定
ENDPOINT = 'https://api.openai.com/v1/chat/completions'

# Chatbotの応答を取得する関数
def get_chat_response(prompt):
    # APIリクエストヘッダーを設定
    headers = {
        'Content-Type': 'application/json; charset=utf-8',
        'Authorization': 'Bearer ' + openai_api_key
    }

    # APIリクエストデータを設定
    data = {
        'model': 'gpt-3.5-turbo',
        'messages': [{'role': 'user', 'content': prompt }]
    }

    # APIリクエストを送信
    json_data = json.dumps(data)
    encoded_data = bytes(json_data, 'utf-8')
    response = urequests.post(ENDPOINT, headers=headers, data=encoded_data)

    # API応答を解析
    response_json = json.loads(response.text)

    message = response_json['choices'][0]['message']['content'].strip()
    #print(message)
    return message

btn_pin = machine.Pin(2, machine.Pin.IN, machine.Pin.PULL_DOWN)
prev_button_state = False

def check_button():
    global prev_button_state,today_weathr,max_temp,cor
#最低気温はサイトの構造上不可、最高気温も17時以降不可
    curr_button_state = btn_pin.value()
    if curr_button_state == 1 and not prev_button_state:
        # Chatbotに挨拶する
        prompt = "あなたは一流のスタイリストです。天気:"+today_weathr+"最高気温:"+max_temp+"降水確率:"+cor+"の天気に適した、20代男性におすすめのコーディネートを30字以内で教えて。気温や天気は不要です。漢字を使わず、ひらがなやカタカナで答えて"
        print('User: ' + prompt)

        # Chatbotの応答を取得
        chat_response = get_chat_response(prompt)
        print('Chatbot:'+chat_response)

        oled.fill(0)

        # データを組み合わせて表示する文字列を作成
        display_text = "天気: " + today_weathr + "  最高気温: " + max_temp + "度  降水確率 (12時から18時): " + cor +" "+ chat_response

        # 文字列を表示
        x = 0
        y = 0
        color = 1
        size = 1

        for char in display_text:
            font_data = mf.font(ord(char))
            show_bitmap(oled, font_data, x, y, color, size)
            x += 8 * size
            if x >= 128:
                x = 0
                y += 8 * size
            if y >= 64:
                y = 0
            time.sleep(0.02)

        flag = True
        prev_button_state = curr_button_state

while True:
    check_button()
    time.sleep(1)
感想
今回の製作を通して成長を実感することができました。無線ラン通信やAPI、マイコンや電気回路など簡単なものを作るだけでもIoTは様々な知識が必要だと痛感しました。
またchatGPTの登場によって今までは頭の中で想像するしかできなかったことが、chatGPTを利用することで枠組みを簡単に制作できるようになりました。
今後の目標
現状ではIoTデバイスとしては不十分なので電源につなげるだけで使えるように改良していきたいです。

