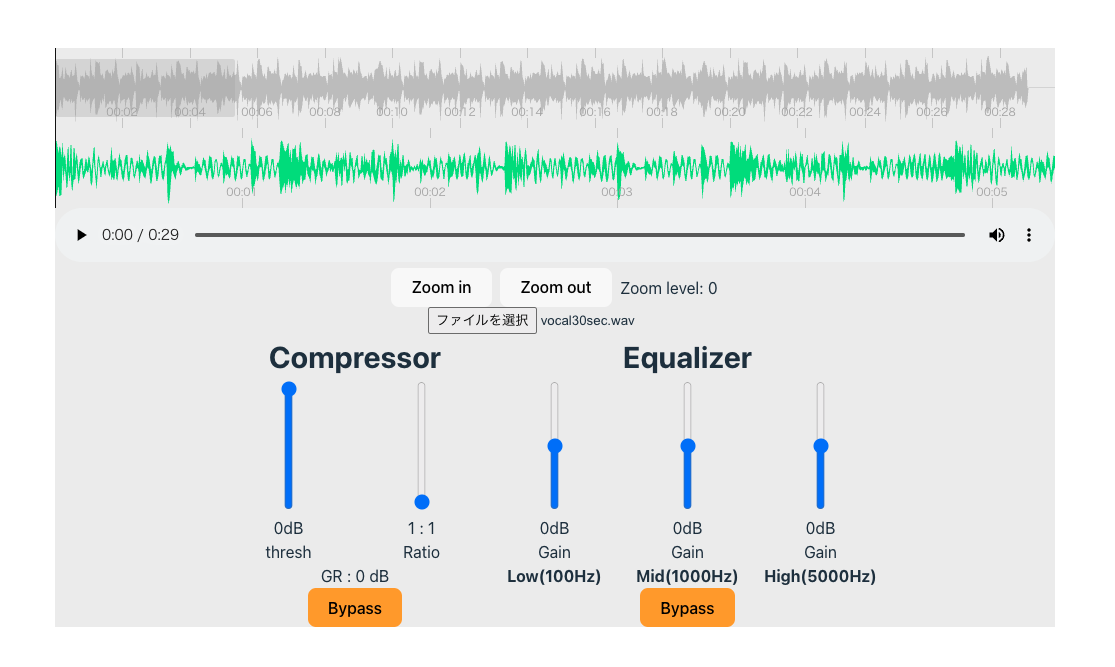
概要
こんにちは。Wano株式会社でエンジニアをしている@kotobuki5991 です。
この記事はWano Group Advent Calendar20223 13日目の記事です。
今回は、11月に実施された弊社の開発合宿で開発した課題についてまとめます。
成果物
タイトルの通り、DTMのような音楽制作のミックスやマスタリングという工程で最もよく使われているエフェクターである
- Equalizer
- Compressor
をWeb Audio APIを用いて実装しました。
ミックスとは、別々に録音した各楽器(ボーカル、ギター、ベース、ドラムなど)を1つの音声ファイルにまとめるため、
各楽器の音量や音質を調節して聴きやすい状態にする工程です。
また、マスタリングとは、主にミックスした各楽曲の音源を、アルバムを通して一貫した音質・音量感に揃える工程のことです。
Equalizerとは?
音源の、特定の帯域(音の高さ)のみの音量を上げ下げできるエフェクターです。
よく見る「迫力の重低音!」のようなイヤホンでは、低音域の音量がブーストされています。
各楽器には、低音域から高音域が含まれており、楽器ごとに重要となる音域が違います。
ざっくり以下のようなものです。
低域(100Hz)
- ベースやバスドラム
中域(1000Hz)
- ボーカル、ギター、スネアドラム
高域(5000Hz)
- シンバル、ハイハットのような金物
また、高音がカットされるとその楽器が遠くにあるように聴こえたり、1000Hzあたりをブーストすると近くにあるように聴こえたりと楽器の配置を変えるような使い方もできます。
下の画像では、低音域がカット、中音域がブーストされています。
Compressorとは?
小さい音はそのままに、ある特定の音量を超えた場合、音量を圧縮して小さくするもの。
楽曲や楽器の音量を均一化するために使います。
例えば、伴奏を担当するギターやベースの音量が曲を通してある程度一定でなければ、楽曲に安定感がないように聴こえます。
コンプレッサーにより楽曲に安定感を与えることができます。
また、全てのパートに対してほんの少しだけコンプレッサーを使うことで、別々に録音された楽器に一体感を生み出します。
イコライザーと同様に楽器の距離感を作ることもでき、コンプレッサーを強くかけることで楽器が遠くにあるように聴こえたり、
弱くかけることで近くにあるように聴こえるようにできます。
環境
- Vite
- Typescript
- Vue.js3
- vue-peaks(音声波形の表示)
実装する機能
メインのコンポーネント
- 音声ファイルの読み込み
- 音声波形の表示
ここではAudioContextおよびMediaElementAudioSourceNodeを生成し、CompressorとEqualizerに渡します。
<template>
  <div>
    <AudioPlayer
      :audioSrc="audioSrc"
    />
    <input
      type="file"
      id="fileInput"
      accept="audio/*"
      @click="resetFile"
      @change="changeFile"
    />
    <div class="effects">
      <Compressor
        v-if="audioElementTag && source"
        :audioCtx="audioContext"
        :source="source"
        :audioSampleData="audioSampleData"
        :audioElementTag="audioElementTag"
      />
      <Equalizer
        v-if="audioElementTag && source"
        :audioCtx="audioContext"
        :source="source"
        :audioElementTag="audioElementTag"
      />
    </div>
  </div>
</template>

<style scoped lang="scss">
.effects {
  display: flex;
  justify-content: center;
}
</style>

<script setup lang="ts">
import AudioPlayer from './organisms/AudioPlayer.vue'
import Compressor from './organisms/Compressor.vue'
import { AudioAnalyser } from '../models/audio_analyser'
import { onMounted, ref } from 'vue';
import { AudioSampleData } from '../models/audio_analyser';
import Equalizer from './organisms/Equalizer.vue';

const audioFile = ref<File>();
const audioSrc = ref<string>();
const audioSampleData = ref<AudioSampleData[]>();
const audioContext = ref<AudioContext>(new AudioContext());
const audioAnaliser = ref<AudioAnalyser>(new AudioAnalyser(audioContext.value));
const source = ref<MediaElementAudioSourceNode>();

onMounted(() => {
  initAudioContext();
});

const initAudioContext = () => {
  if (!audioElementTag.value) {
    console.log('audioElementTagが設定されていません。');
    return;
  };
  console.log('initeAudioContext');
  audioContext.value = new AudioContext();
  audioAnaliser.value = new AudioAnalyser(audioContext.value);
  source.value = new MediaElementAudioSourceNode(audioContext.value, {
    mediaElement: audioElementTag.value,
  });
};

const changeFile = async () => {
  if (!resetFile()) return ;
  const inputElement = document.getElementById('fileInput') as HTMLInputElement;
  const newFile = inputElement.files?.item(0);
  if (!newFile) {
    console.error(`ファイルが正しく選択されていません。 file: ${newFile}`)
    return;
  }
  audioFile.value = newFile;
  audioSrc.value = URL.createObjectURL(newFile);
  // 音声を解析
  await analyzeAudioBuffer(newFile);
  setAudioElement();
  initAudioContext();
};

const resetFile = (): boolean => {
  if (audioSrc.value && !confirm('ファイルを再設定しますか?')) {
    return false;
  }
  audioFile.value = undefined;
  audioSrc.value = undefined;
  return true;
};

const analyzeAudioBuffer = async (file: File) => {
  await audioAnaliser.value.loadAudioFile(file);
  audioSampleData.value = audioAnaliser.value.analyzeAudioBuffer();
};

const audioElementTag = ref<HTMLAudioElement | null>(null);
const setAudioElement = () => {
  const audioElement = document.querySelector('.peaks-audio') as HTMLAudioElement;
  if (!audioElement) return false;
  audioElementTag.value = audioElement
  return true;
};

</script>
Equalizer
今回実装する機能は以下のとおり。
- gain(どれくらい音量を増減するか)
frequency(どの帯域にかけるか)は固定とする
イコライザーでは、下のように
低域、中域、高域それぞれ1つずつBiquadFilterNode(インスタンスを生成し、
MediaElementAudioSourceNodeからの出力を低域→中域→高域に繋いで、イコライジングを行います。
処理の流れ
<template>
  <div
    class="equalizer"
    :class="isBypassed ? 'disabled' : ''"
  >
    <div class="effect-title">Equalizer</div>
    <div class="setting">
      <div class="band">
        <TfFader
          :name="'Gain'"
          :min="-40"
          :max="40"
          :unit="'dB'"
          :defaultValue="0"
          v-model="lowBoost"
          @change="(newVal: number) => lowBoost = newVal"
        />
        <div class="title">Low(100Hz)</div>
      </div>
      <div class="band">
        <TfFader
          :name="'Gain'"
          :min="-40"
          :max="40"
          :unit="'dB'"
          :defaultValue="0"
          v-model="midBoost"
          @change="(newVal: number) => midBoost = newVal"
        />
        <div class="title">Mid(1000Hz)</div>
      </div>
      <div class="band">
        <TfFader
          :name="'Gain'"
          :min="-40"
          :max="40"
          :unit="'dB'"
          :defaultValue="0"
          v-model="highBoost"
          @change="(newVal: number) => highBoost = newVal"
        />
        <div class="title">High(5000Hz)</div>
      </div>
    </div>
    <div class="eq-button">
      <button
        class="eq-button-item"
        :class="isBypassed ? 'baypassed' : 'active'"
        @click="bypass"
      >
        {{ isBypassed ? "Active" : "Bypass" }}
      </button>
    </div>
  </div>
</template>
<style scoped lang="scss">
.disabled {
  background-color: rgb(88, 88, 88);
}
.equalizer {
  display: flex;
  flex-flow: column;
  .effect-title {
    font-size: 30px;
    font-weight: bold;
  }
  .setting {
    display: flex;
    .band{
      flex-flow: column;
      align-items: center;
      .title {
        font-weight: bold;
      }
    }
  }
}
.active {
  background-color: orange;
}
.bypassed {
  background-color: gray;
}
</style>
<script setup lang="ts">
import { onMounted, ref, watch } from 'vue';
import TfFader from '../atom/TfFader.vue';

const props = defineProps<{
  audioCtx: AudioContext;
  source: MediaElementAudioSourceNode;
  audioElementTag: HTMLAudioElement;
}>();

const lowBoost = ref<number>(0);
const midBoost = ref<number>(0);
const highBoost = ref<number>(0);

const lowPeak = ref<BiquadFilterNode>();
const midPeak = ref<BiquadFilterNode>();
const highPeak = ref<BiquadFilterNode>();

const isBypassed = ref<boolean>(false);

onMounted(() => {
  initEqualizer();
});
const initEqualizer = () => {
  lowPeak.value = new BiquadFilterNode(props.audioCtx, {
    type: "peaking",
    frequency: 100,
    gain: lowBoost.value,
    Q: 1,
  });

  props.source.connect(lowPeak.value);
  midPeak.value = new BiquadFilterNode(props.audioCtx, {
    type: "peaking",
    frequency: 1000,
    gain: lowBoost.value,
    Q: 1,
  });
  lowPeak.value.connect(midPeak.value);
  highPeak.value = new BiquadFilterNode(props.audioCtx, {
    type: "peaking",
    frequency: 5000,
    gain: lowBoost.value,
    Q: 1,
  });
  midPeak.value.connect(highPeak.value);
  highPeak.value.connect(props.audioCtx.destination);
};

watch([lowBoost, midBoost, highBoost], () => {
  if (lowPeak.value) {
    lowPeak.value.gain.setValueAtTime(lowBoost.value, props.audioCtx.currentTime);
  }
  if (midPeak.value) {
    midPeak.value.gain.setValueAtTime(midBoost.value, props.audioCtx.currentTime)
  }
  if (highPeak.value) {
    highPeak.value.gain.setValueAtTime(highBoost.value, props.audioCtx.currentTime)
  }
});

const bypass = () => {
  if(!lowPeak.value || !midPeak.value || !highPeak.value) return;

  if (isBypassed.value) {
    isBypassed.value = false;
    lowPeak.value.connect(midPeak.value);
    midPeak.value.connect(highPeak.value);
    highPeak.value.connect(props.audioCtx.destination);
  } else {
    isBypassed.value = true;
    lowPeak.value.disconnect();
    midPeak.value.disconnect();
    highPeak.value.disconnect();
  }
};
</script>
Compressor
今回実装する機能は以下のとおり。
- threshold(これ以上の音量なら圧縮します)
- ratio(thresholdを超えた音をどれくらい圧縮するか)
- gain reduction(どれくらい圧縮されたかをリアルタイムで表示)
例えば、thresholdが-10db、ratioが1/4だった場合、-10dbを超えた場合に、超えた分を1/4に圧縮します。
コンプレッサーでは、下のように
MediaElementAudioSourceNodeからの出力をDynamicsCompressorNodeに繋いで、コンプレッションを行います。
処理の流れ
<template>
  <div
    class="compressor"
    :class="isBypassed ? 'disabled' : ''"
  >
    <div class="effect-title">Compressor</div>
    <div class="setting">
      <Fader
        :name="'thresh'"
        :min="-100"
        :max="0"
        :defaultValue="0"
        :unit="'dB'"
        v-model="thresh"
        @change="(newVal: number) => thresh = newVal"
      />
      <Fader
        :name="'Ratio'"
        :min="1"
        :max="10"
        :defaultValue="1"
        :useDisplayValueFraction="true"
        v-model="ratio"
        @change="(newVal: number) => ratio = newVal"
      />
    </div>
    <div>
      <div>{{ `GR : ${gainReduction} dB` }}</div>
      <button
        :class="isBypassed ? 'baypassed' : 'active'"
        @click="bypass"
      >
        {{ isBypassed ? "Active" : "Bypass" }}
      </button>
    </div>
  </div>
</template>

<style scoped lang="scss">
.disabled {
  background-color: rgb(88, 88, 88);
}
.compressor {
  display:flex;
  flex-flow: column;
  .effect-title {
    font-size: 30px;
    font-weight: bold;
  }
  .setting {
    display: flex;
    justify-content: center;
  }
  .active {
    background-color: orange;
  }
  .bypassed {
    background-color: gray;
  }
}
</style>

<script setup lang="ts">
import { onMounted, ref, watch } from 'vue';
import Fader from '../atom/Fader.vue';
import { roundToTwoDecimalPlaces } from '../../utils/number';

const props = defineProps<{
  audioCtx: AudioContext;
  source: MediaElementAudioSourceNode;
  audioElementTag: HTMLAudioElement | null;
}>();

const thresh = ref(0);
const ratio = ref(1);
const gainReduction = ref(0.00);
const isBypassed = ref(false);
const compressor = ref<DynamicsCompressorNode>();

onMounted(() => {
  initCompressor();
});

const initCompressor = () => {
  if (!props.audioElementTag) return;
  compressor.value = new DynamicsCompressorNode(props.audioCtx, {
    threshold: thresh.value,
    ratio: ratio.value,
    knee: 40,
    attack: 0,
    release: 0.25,
  });

  props.source.connect(compressor.value);
  compressor.value.connect(props.audioCtx.destination);
  intervalId.value = setInterval(getReduction, 100);
};

// thresh と ratio の変更を監視し、変更があればコンプレッサーのプロパティを更新
watch([thresh, ratio], () => {
  if (compressor.value) {
    compressor.value.threshold.setValueAtTime(thresh.value, props.audioCtx.currentTime);
    compressor.value.ratio.setValueAtTime(ratio.value, props.audioCtx.currentTime);
  }
});

const getReduction = () => {
    if (!compressor.value) return;
    gainReduction.value = roundToTwoDecimalPlaces(compressor.value.reduction);
};

const intervalId = ref(0);
const bypass = () => {
  if (!compressor.value) return;

  if (isBypassed.value) {
    isBypassed.value = false;
    intervalId.value = setInterval(getReduction, 100);
    props.source.disconnect(props.audioCtx.destination);
    props.source.connect(compressor.value);
    compressor.value.connect(props.audioCtx.destination);
  } else {
    isBypassed.value = true;
    clearInterval(intervalId.value);
    gainReduction.value = 0.00;
    props.source.disconnect(compressor.value);
    compressor.value.disconnect(props.audioCtx.destination);
    props.source.connect(props.audioCtx.destination);
  }
};
</script>
まとめ
Web Audio APIはほぼ初めて触りましたが、探せば大抵の機能はありそうです。
シンセサイザーのようなものを作ったりもできるようなので、また触ってみたいですね。
現在、Wanoグループでは人材募集をしています。興味のある方は下記を参照してください。
wano


