はじめに
~こんな人には読んでほしい~
- ディストリビューションをインストールしたものの、付属のコンソールが増えてどれ使えばいいかわかんない。
- Windows PowerShellからAnaconda環境にアクセスしたい。
背景
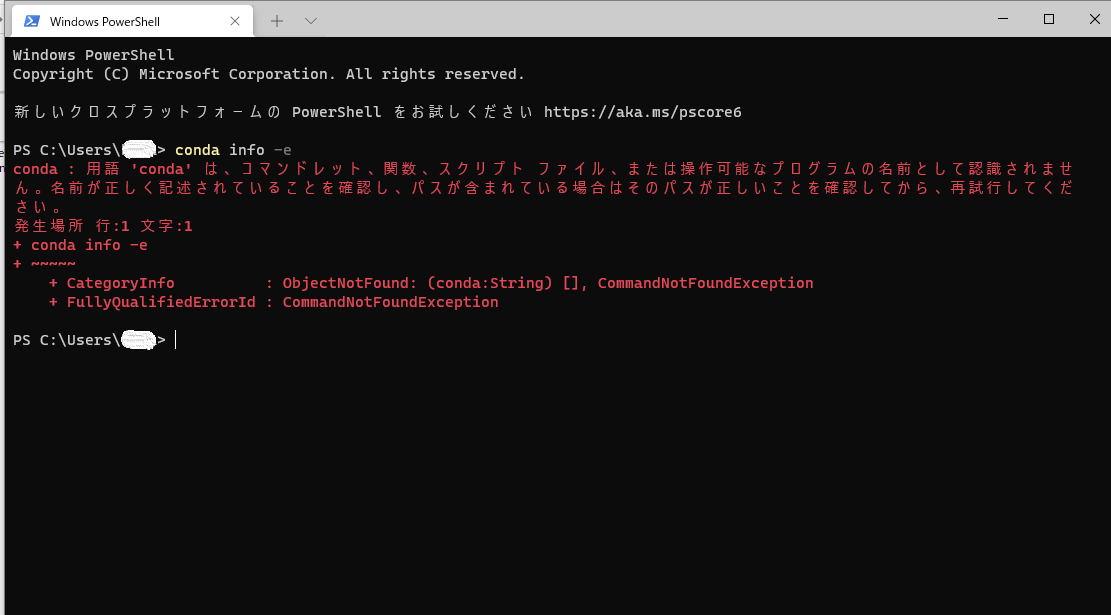
「Windows PowerShell」を開いてAnacondaの仮想環境にアクセスしたとき…

「あぁぁぁぁ!もうっ!」
↑ こんな経験したことありませんか。
僕は毎日のように遭遇するので、いい加減解消しようと思い
この記事を執筆しました。
おおまかな流れ
Windows PowerShellには、setting.jsonという設定ファイルが存在します。
ここにはアクセスできるコンソールの一覧が書いてあります。
なので、ここに「Anaconda Prompt」のパスを追記してあげれば
Windows PowerShellからAnaconda Promptにアクセスできることになります。
なので、工程としては…
- Windows PowerShellのsetting.jsonを開く
- Anaconda Promptの設定を追記する
以上の__2ステップ__です。
言葉にしてみると、そんなに難しくないですね…。
実際にやってみよう
(1) Windows PowerShellからsetting.jsonを開く
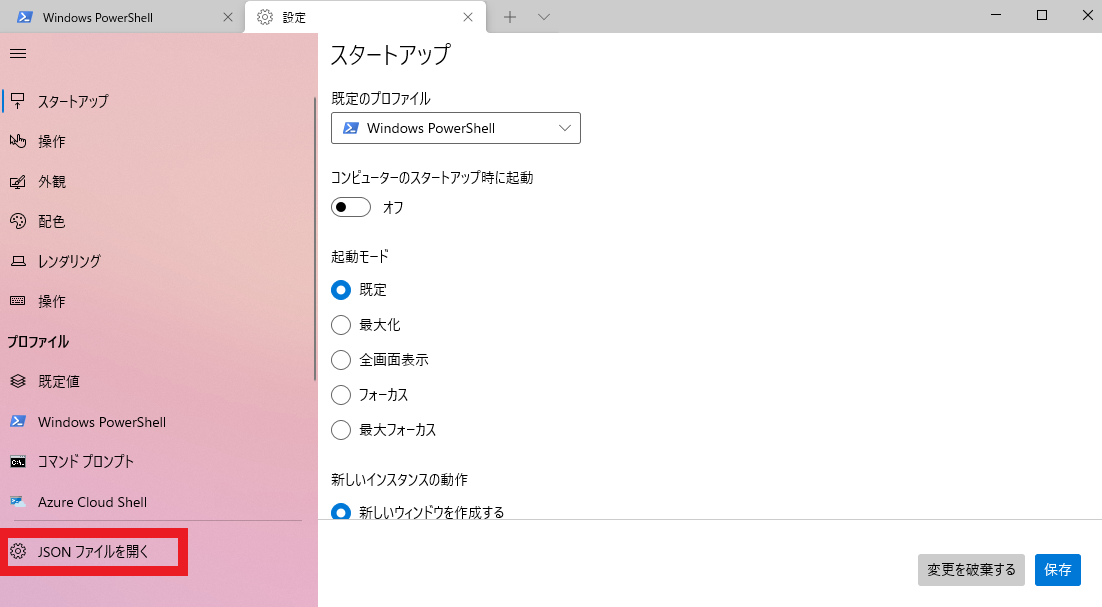
Windows PowerShellの「V」から「設定 or setting」を開きます。

次に「JSONファイルを開く」をクリック。
(2) setting.jsonの中身を確認する
まずは、setteing.jsonの中身です。
お持ちのPCによって中身は違うので、あしからず。
以下、ベタ書きで失礼します。
// This file was initially generated by Windows Terminal Preview 1.7.572.0
// It should still be usable in newer versions, but newer versions might have additional
// settings, help text, or changes that you will not see unless you clear this file
// and let us generate a new one for you.

// To view the default settings, hold "alt" while clicking on the "Settings" button.
// For documentation on these settings, see: https://aka.ms/terminal-documentation
{
    "$schema": "https://aka.ms/terminal-profiles-schema",

    "defaultProfile": "{61c54bbd-c2c6-5271-96e7-009a87ff44bf}",

    // You can add more global application settings here.
    // To learn more about global settings, visit https://aka.ms/terminal-global-settings

    // If enabled, selections are automatically copied to your clipboard.
    "copyOnSelect": false,

    // If enabled, formatted data is also copied to your clipboard
    "copyFormatting": false,

    // A profile specifies a command to execute paired with information about how it should look and feel.
    // Each one of them will appear in the 'New Tab' dropdown,
    //   and can be invoked from the commandline with `wt.exe -p xxx`
    // To learn more about profiles, visit https://aka.ms/terminal-profile-settings
    "profiles":
    {
        "defaults":
        {
            // Put settings here that you want to apply to all profiles.
        },
        "list":
        [
            {
                // Make changes here to the powershell.exe profile.
                "guid": "{61c54bbd-c2c6-5271-96e7-009a87ff44bf}",
                "name": "Windows PowerShell",
                "commandline": "powershell.exe",
                "hidden": false
            },
            {
                // Make changes here to the cmd.exe profile.
                "guid": "{0caa0dad-35be-5f56-a8ff-afceeeaa6101}",
                "name": "コマンド プロンプト",
                "commandline": "cmd.exe",
                "hidden": false
            },
            {
                "guid": "{b453ae62-4e3d-5e58-b989-0a998ec441b8}",
                "hidden": false,
                "name": "Azure Cloud Shell",
                "source": "Windows.Terminal.Azure"
            },
            {
                "guid": "{c6eaf9f4-32a7-5fdc-b5cf-066e8a4b1e40}",
                "hidden": false,
                "name": "Ubuntu-18.04",
                "source": "Windows.Terminal.Wsl"
            },
            {
                "guid": "{2c4de342-38b7-51cf-b940-2309a097f518}",
                "hidden": false,
                "name": "Ubuntu",
                "source": "Windows.Terminal.Wsl"
            },
            {
                "guid": "{07b52e3e-de2c-5db4-bd2d-ba144ed6c273}",
                "hidden": false,
                "name": "Ubuntu-20.04",
                "source": "Windows.Terminal.Wsl"
            }
        ]
    },

    // Add custom color schemes to this array.
    // To learn more about color schemes, visit https://aka.ms/terminal-color-schemes
    "schemes": [],

    // Add custom actions and keybindings to this array.
    // To unbind a key combination from your defaults.json, set the command to "unbound".
    // To learn more about actions and keybindings, visit https://aka.ms/terminal-keybindings
    "actions":
    [
        // Copy and paste are bound to Ctrl+Shift+C and Ctrl+Shift+V in your defaults.json.
        // These two lines additionally bind them to Ctrl+C and Ctrl+V.
        // To learn more about selection, visit https://aka.ms/terminal-selection
        { "command": {"action": "copy", "singleLine": false }, "keys": "ctrl+c" },
        { "command": "paste", "keys": "ctrl+v" },

        // Press Ctrl+Shift+F to open the search box
        { "command": "find", "keys": "ctrl+shift+f" },

        // Press Alt+Shift+D to open a new pane.
        // - "split": "auto" makes this pane open in the direction that provides the most surface area.
        // - "splitMode": "duplicate" makes the new pane use the focused pane's profile.
        // To learn more about panes, visit https://aka.ms/terminal-panes
        { "command": { "action": "splitPane", "split": "auto", "splitMode": "duplicate" }, "keys": "alt+shift+d" }
    ]
}
…ここでお気づきいただけましたか?
setting.jsonの中身にある「profiles」の「list」に着目してみますと…「name」は「Windows PowerShell」「コマンド プロンプト」「Azure Cloud Shell」…となっていますね。
この赤枠で囲っている設定は、最初にお見せしたWindows PowerShellの「v」で開いたとコンソール一覧と一致します。
なので、この並びに新しく「Anaconda Prompt」分の設定を追記すれば、ミッション・コンプリートです。
(3) setting.jsonに追記する
上図の並びに新しく以下のコードを追記し、保存しましょう。
{
    // Make changes here to the cmd.exe profile. Anaconda Prompt
    "guid": "{61c54bbd-c2c6-5271-96e7-009a87ff44be}",
    "name": "Anaconda Prompt",
    "commandline": "cmd.exe /K C:\\Users\\xxxx\\anaconda3\\Scripts\\activate.bat",
    "hidden": false
}
- 「guid」: プロファイルのGUID…これは他のIDと被っていなければ、任意でいいみたいです。
- 「name」: プロファイルの名前…表示したい名前なので「Anaconda Prompt」にしましょう。
- 「commandline」: 起動するシェルプログラム…プログラム先のPathを指定しましょう。xxxxにはお持ちのPCのアカウント名が入ります。
- 「hidden」: メニューに表示するかどうか…なのでFalseでok
※各パラメータの詳細はコチラ
(4) 確認する
Windows PowerShellに戻り、「V」をクリック。
上手くいってれば、以下のように「Anaconda Prompt」の文字が現れているはず。
(5) もしうまく動かない場合は…
もし以上で動かない場合には、「commandline」のPathが違う可能性があります。
以下の工程を経て、確認しにいきましょう。
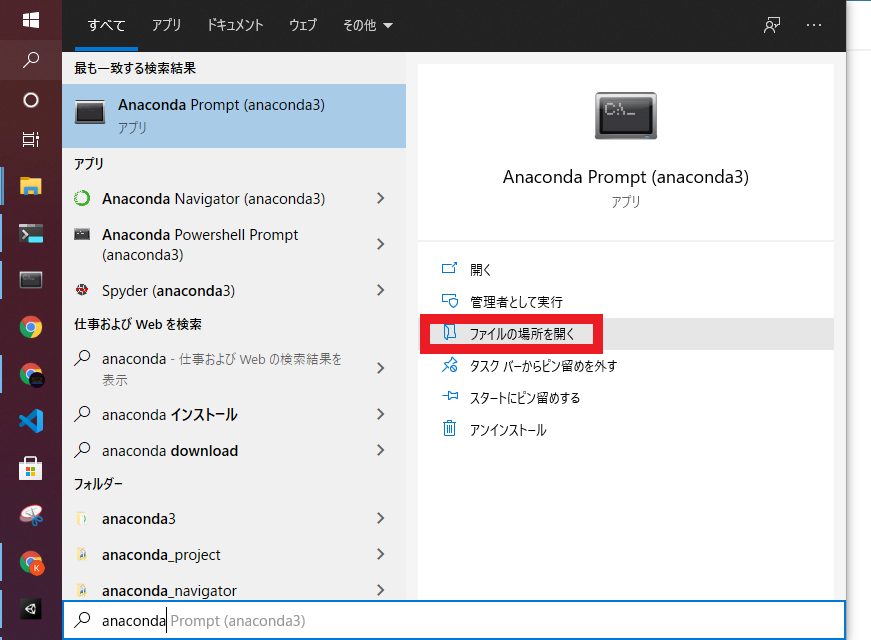
検索欄から「Anaconda Prompt」の「ファイルの場所を開く」をクリック。
新しくウィンドウが開くので、「Anaconda Prompt」にカーソルを合わせて、右クリック。
次に「プロパティ」をクリック。
タブ「ショートカット」からリンク先をコピーします。
私の場合は、以下の通り。
%windir%\System32\cmd.exe "/K" C:\Users\xxxx\anaconda3\Scripts\activate.bat C:\Users\xxxx\anaconda3
なので、いらない箇所を修正して…
"cmd.exe /K C:\\Users\\xxxx\\anaconda3\\Scripts\\activate.bat"
これを、もう一度「commandline」に書き込んで、保存してください。
上手くいっていれば、「Windows PowerShell」の「V」に「Anaconda Prompt」の文字が出現しているはず。
おわりに
今回はWindows PowerShellからAnaconda Promptを使えるようにする方法をまとめました。
いつもの通り、私の備忘録なので、もっと詳しく知りたい方は他のサイトも閲覧してみてください。
それでは~(^^)/


