Augularでのルーティングで以下の事が困ったのでまとめ
- 複数のルーティング基点を作りたい (今回)
- LazyLoadと認証ありなしでルーティングを分ける方法 (次回)
どんな事をしたいのか?


ソースコード(Github)とDemo(準備中)
※cssのgridを使用しています。ChromeかFirefoxで確認お願いします。
routerの設定
全ての親となるルーター
import { NgModule } from '@angular/core';
import { Routes, RouterModule } from '@angular/router';
import { HelloComponent } from './hello/hello.component'

const routes: Routes = [
    { path:'', component:HelloComponent},
    { path:'shape', loadChildren:'./shapes/shapes.module#ShapesModule' }
];

@NgModule({
  imports: [RouterModule.forRoot(routes)],
  exports: [RouterModule]
})
export class AppRoutingModule { }
LazyLoadで読み込みたいモジュールは、
{ path:'shape', loadChildren:'./shapes/shapes.module#ShapesModule' }
と指定する。
※注意1: LazyLoad対象のComponentとModuleはimportしない。するとバンドルされてします。
※注意2: Moduleのパスはapp/からはじめているチュートリアルもあり、実際何がベスト・プラクティスなのか分からない。今回はこれで動いた。
子供となるルーター
import { NgModule } from '@angular/core';
import { Routes, RouterModule } from '@angular/router';

import { ShapeComponent } from '../shape/shape.component'
import { RectangleComponent } from '../rectangle/rectangle.component'
import { CircleComponent } from '../circle/circle.component'


const routes: Routes = [
    { path:'', component:ShapeComponent,
        children:[
            { path:'rectangle', component:RectangleComponent },
            { path:'circle', component:CircleComponent }
        ]
    }
];

@NgModule({
  imports: [RouterModule.forChild(routes)],
  exports: [RouterModule]
})
export class ShapesRoutingModule { }
forRoot関数ではなく、forChild関数を使用する。しかし、AngularCliを使ってmoduleを生成すればこの用に表記してあるので、そんなに心配しなくても大丈夫です。
imports: [RouterModule.forChild(routes)],
router-outletについて
今回の場合、router-outletはapp.component.htmlとshape.component.htmlに記述します。
<nav class="commonHeaderNavigation">
    <div class="navItem logo">
        RoutingDemo
    </div>
    <div class="navItemContainer">
        <a class="navItem" routerLink="/">
            to top
        </a>
        <a routerLink="shape" class="navItem">to shape</a>
    </div>
</nav>


<router-outlet></router-outlet>


<footer class="commonFooter">
    <div class="footerItem">
        demo by kota0
    </div>
</footer>
<div class="container">
    <div class="sideMenu">
        <a routerLink="./rectangle" class="linkItem">to rectangle</a>
        <a routerLink="./circle" class="linkItem">to circle</a>
    </div>
    <div class="routerContainer">


        <router-outlet></router-outlet>


    </div>
</div>
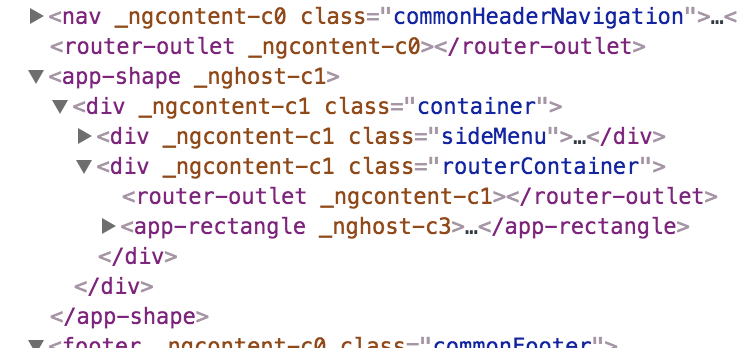
router-outletタグの中にcomponentが読み込まれ描画されるのかと思っていたのですが、そうではなく、router-outletタグの直下に展開されます。ですので、表示領域を限られた範囲にしておきたい場合は、下記のようにrouter-outletをラッピングすると便利でした。
<div class="routerContainer">
    <router-outlet></router-outlet>
</div>
展開されたHTMLを見てみると、router-outletの兄弟要素としてapp-shapeや、app-rectangleが配置されています。

LazyLoadについて
親ルーター(app-routing.module.ts)で、下記のように指定しているとビルドされるJSファイルが別に生成され、リクエストが発生するまではクライアント側にソースが渡されません。
{ path:'shape', loadChildren:'./shapes/shapes.module#ShapesModule' }
認証系のとの組み合わせについて
認証が通らないとページを描画しないなどの処理もAngularに存在します。
こちらから(準備中)