1.はじめに
OpenCVとdlibで顔認識を実験してみました。
2. Face Detector()
まず、顔を検出します。
顔の検出というのは、「画像の中から、人の顔を認識し、その位置を特定する」ことを意味します。
dlibのget_frontal_face_detector()を利用します。
import dlib

# dlibのget_frontal_face_detectorのインスタンスを立てる。
detector = dlib.get_frontal_face_detector()
# imagesで顔を検出し、それをfacesに保存する。
faces = detector(images)
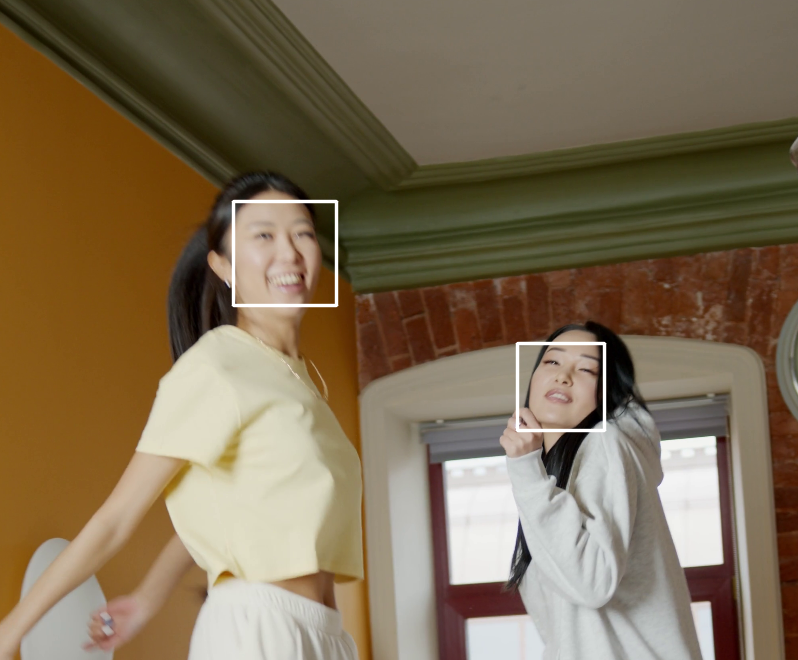
上記のコードのfacesに保存された情報を元に、検出された顔に四角い枠を表示します。
実行結果を示します。二人の女性を顔を検出し、白い枠で表示されていることが分かります。
3. Facial Landmark Detection
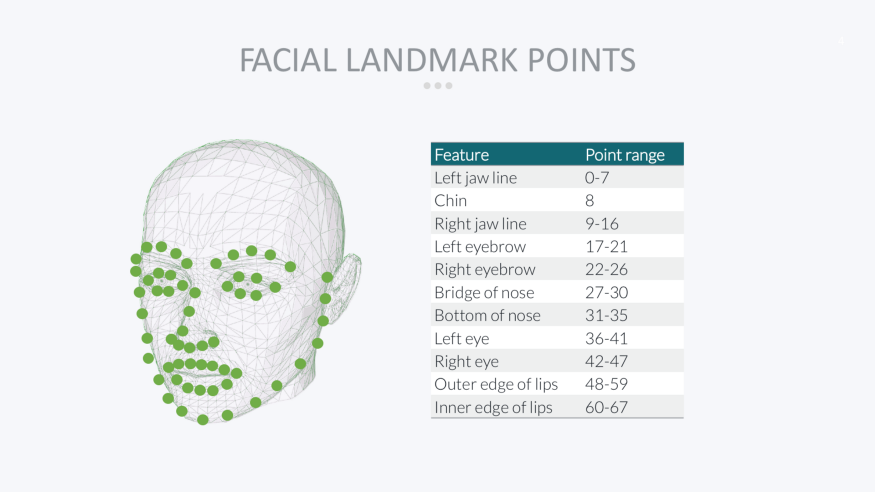
顔の中の各パーツの位置関係、寸法を元に、識別可能な情報の抽出を行います。
この情報をFacial Landmarkといいます。
dlibでは、顔から68個のポイントの情報を取得します。
実際の顔の識別には、Landmark pointのユークリッド距離が使われます。基準となる顔のLandmark pointと新しく認識された顔のLandmark pointとのユークリッド距離を計算し、その値が閾値より小さいと同じ顔であると認識します。Google Photosやスマホの写真フォルダー、このような顔認識のアルゴリズムが採用されています。
先ほどの女性の顔よりLandmark pointを取得します。2段階に分けて行われます。
import dlib

# ---------------------------
# Step 1. Faceを認識する。
# ---------------------------
# dlibのget_frontal_face_detectorのインスタンスを立てる。
detector = dlib.get_frontal_face_detector()
# imagesで顔を検出し、それをfacesに保存する。
faces = detector(images)

# --------------------------
# Step 2. FaceよりLandmark pointを抽出する。
# ---------------------------
for face in faces:
    dlib_shape = landmark_predictor(imgage,face)
    shape_2d = np.array([[p.x, p.y] for p in dlib_shape.parts()])
取得されたshape_2dのshapeを確認するとtupleとして(68,2)となっています。(68=landmark point 68 points, 2= x,y 座標)
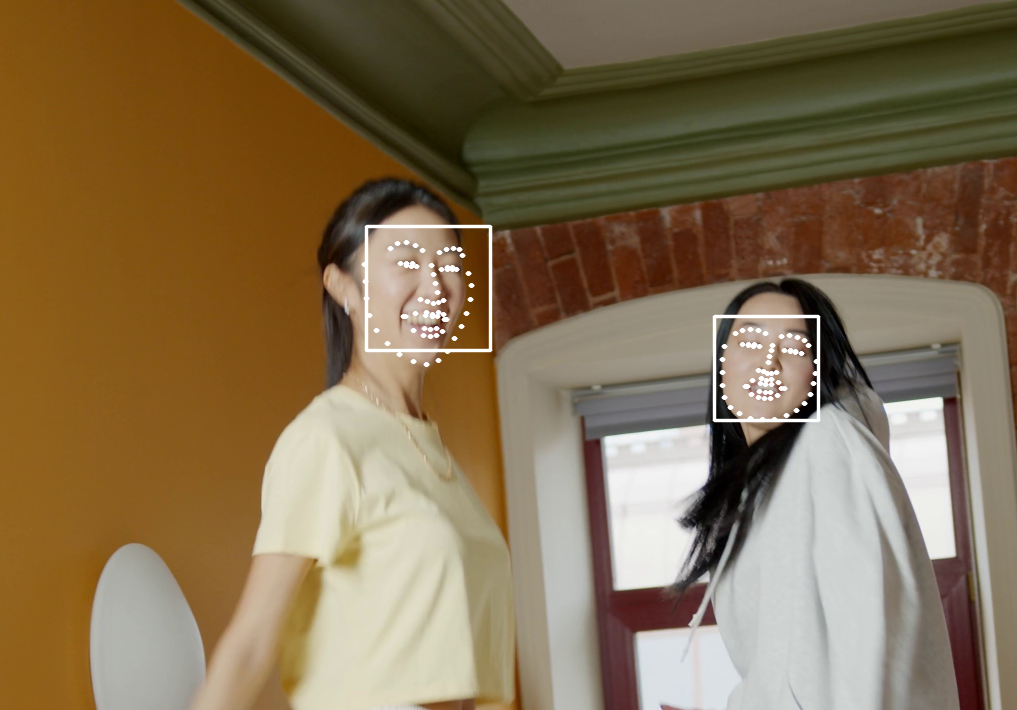
この情報を元に、顔の周辺にLandmark pointsを描画します。
for s in shape_2d:
    cv2.circle(image, center=tuple(s), radius=1, color=(255, 255, 255), thickness=2, lineType=cv2.LINE_AA)
まとめ
- dlibライブラリのFace DetectionとLandmark Points取得の機能を利用し、顔認識の実効性を確認しました。
参考資料
1.Dlib Main Page
2.Github Davis King's Page
実行コード
1.7行目の'model/shape_predictor_68_face_landmarks.dat'は、ここのリンクでダウンロードしてください
2. 9行目のload videoは、動画のmp4ファイル、あるいはWebCAMを使用してください。自分の顔でやるとなかなか面白いです。
import cv2
import dlib
import sys
import numpy as np

scaler = 0.5

# Initialize face detector and shape predictor
detector = dlib.get_frontal_face_detector()
landmark_predictor = dlib.shape_predictor('model/shape_predictor_68_face_landmarks.dat')

# load video
cap = cv2.VideoCapture('samples/girls3.mp4')
# cap = cv2.VideoCapture(0) #内臓カメラ
# cap = cv2.VideoCapture(1) #USBカメラ


# Face recognition


while True:
    # read frame buffer from video
    ret, img = cap.read()
    if not ret:
        cap.set(cv2.CAP_PROP_POS_FRAMES,0)
        continue


    # resize frame
    img = cv2.resize(img, (int(img.shape[1] * scaler), int(img.shape[0] * scaler)))
    ori = img.copy()

    # detect faces
    faces = detector(img)

    #例外処理 顔が検出されなかった時

    if len(faces) == 0:
        print('no faces')
        img_rec = img

    for face in faces:

        # rectangle visualize
        img_rec = cv2.rectangle(img, pt1=(face.left(), face.top()), pt2=(face.right(), face.bottom()),
                            color=(255, 255, 255), lineType=cv2.LINE_AA, thickness=2)

        # landmark
        dlib_shape = landmark_predictor(img,face)
        shape_2d = np.array([[p.x, p.y] for p in dlib_shape.parts()])

        print(shape_2d.shape)

        for s in shape_2d:
            cv2.circle(img, center=tuple(s), radius=1, color=(255, 255, 255), thickness=2, lineType=cv2.LINE_AA)


    cv2.imshow('original', ori)
    cv2.imshow('img_rec', img_rec)


    if cv2.waitKey(1) == ord('q'):
        sys.exit(1)