OpenCVを利用したカメラキャリブレーション方法
カメラキャリブレーションは、コンピュータビジョン分野において非常に重要なプロセスです。カメラによって撮影された画像には、レンズの特性により必ず歪みが含まれています。カメラキャリブレーションは、この歪みを補正し、正確な3D空間の情報を取り出すために使われます。本記事では、OpenCVを利用したカメラキャリブレーション方法について解説し、カメラキャリブレーションがどのように行われるのか、その背景、そして実際のコードを紹介します。

カメラキャリブレーションの目的と理由
カメラキャリブレーションの主な目的は、カメラ内部のパラメータ(焦点距離、主点、レンズの歪み係数など)を求め、これらを使って画像の歪みを補正することです。カメラの内部パラメータを求めることで、現実世界の3D座標と画像上の2D座標の関係を正確にモデル化することができます。

カメラキャリブレーションが必要な理由
-
レンズの歪み補正: レンズによる歪みは、特に広角レンズで顕著に現れ、画像の周辺が引き伸ばされる「樽型歪み」が生じます。この歪みを補正することで、現実世界の正確な形を保った画像を得ることができます。
-
3D再構築: 複数のカメラ画像から3D構造を再構築する場合、カメラキャリブレーションによって正確なカメラパラメータを得ることが不可欠です。
-
拡張現実感 (AR): 仮想オブジェクトを現実の映像に正確に配置するためには、カメラの内部パラメータが必要です。
カメラキャリブレーションが必要なアプリケーションの事例
- ロボットビジョン: ロボットがカメラを用いて物体を認識し、正確に移動したり操作したりする際に、カメラキャリブレーションが必要です。
- 拡張現実感 (AR): 仮想オブジェクトを正確に現実空間に配置するには、カメラの内部パラメータが必須です。
- 医療用イメージング: 内視鏡や顕微鏡カメラで撮影された画像を補正する際にもカメラキャリブレーションが使われます。
- 3Dスキャン: 3Dスキャンを行うためには、カメラのレンズ歪みを補正し、正確な位置関係を再現することが求められます。

カメラキャリブレーションの数学とアルゴリズム
1. ピンホールカメラモデル
カメラは、一般的にピンホールカメラモデルで表現されます。

このモデルでは、3Dの世界座標系の点 $ P(X, Y, Z) $ が、カメラの内部パラメータと外部パラメータに基づいて2Dの画像平面上に投影されます。この変換は次のように表現されます。
$$
s \cdot \begin{bmatrix} u \ v \ 1 \end{bmatrix} = K \cdot [R | t] \cdot \begin{bmatrix} X \ Y \ Z \ 1 \end{bmatrix}
$$
- $ (u, v) $ は画像座標系のピクセル座標
- $ K $ はカメラ行列(内部パラメータを含む行列)
- $ [R | t] $ は回転行列と並進ベクトル(外部パラメータ)
2. 歪み補正
カメラレンズによる歪みは、主に2種類に分類されます。
- 放射歪み: 画像中心からの距離が大きくなるにつれて直線が曲がります(樽型歪み)。
- 切断歪み: カメラレンズが完全に平行でない場合に生じ、斜め方向に引き伸ばされるような歪みです。
歪み補正には、次のような数式が用いられます。
$$
x_{corrected} = x_{distorted} \cdot (1 + k_1r^2 + k_2r^4 + k_3r^6)
$$
ここで、$ k_1, k_2, k_3 $ は歪み係数、$ r $ は画像の中心からの距離です。
3. カメラキャリブレーションのアルゴリズム
OpenCVでは、チェスボードパターンなどの既知の物理的な点を用いて、カメラの内部パラメータと歪み係数を推定します。具体的には、次のステップを踏みます。
-
チェスボード画像を撮影し、コーナーの座標を検出します。
-
物理空間でのコーナー位置と画像平面でのコーナー位置の対応を取ります。
-
カメラ行列(内部パラメータ)と歪み係数を推定します。

カメラキャリブレーションプロセスの順番
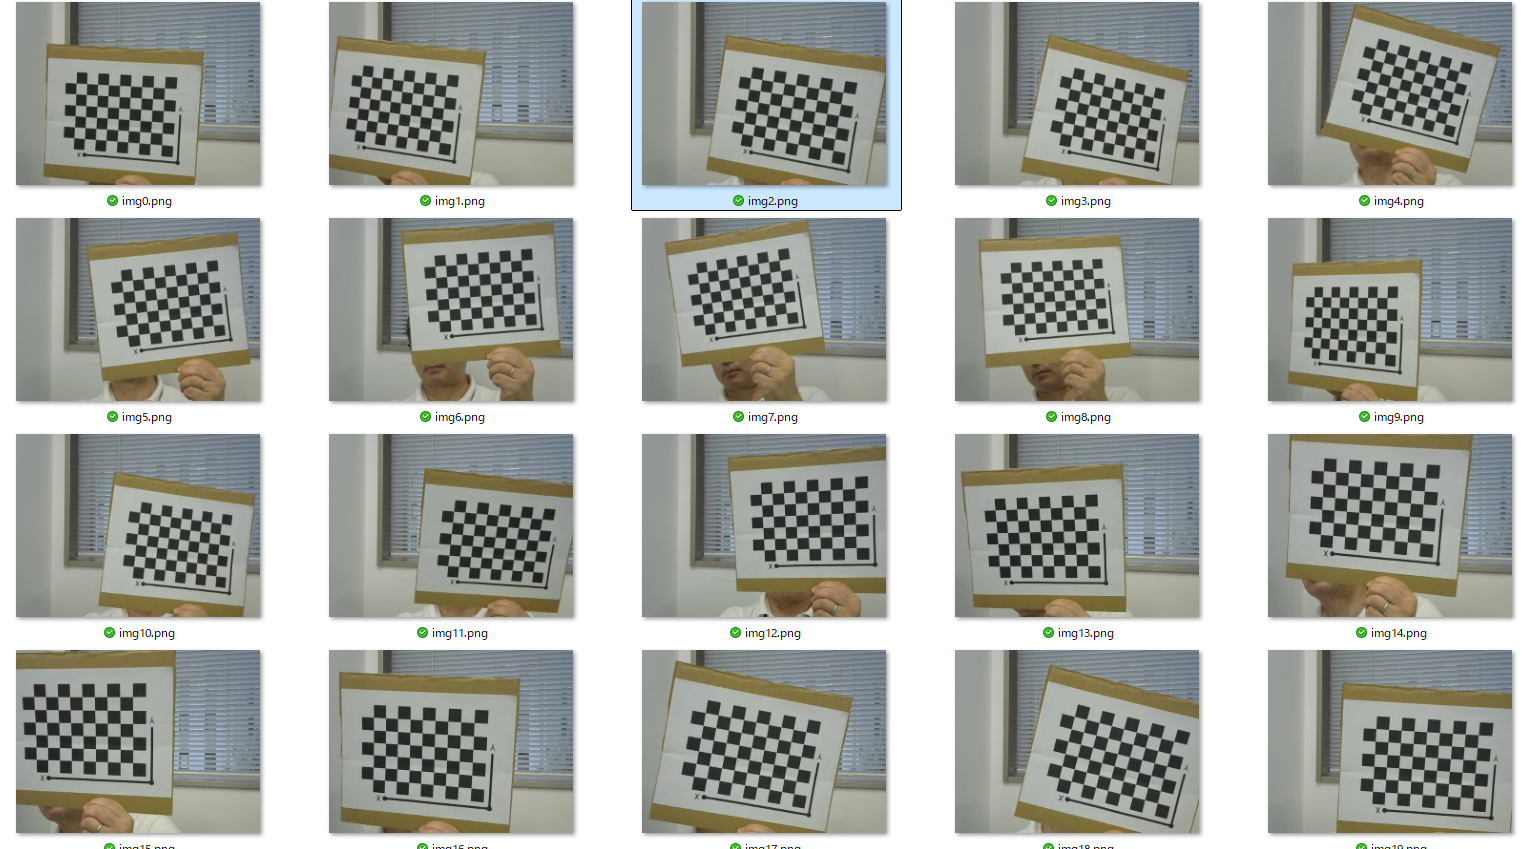
- 画像の取得: チェスボードパターンの画像を複数枚撮影します。カメラキャリブレーションには異なる角度から撮影された複数の画像が必要です。
-
チェスボードコーナーの検出: OpenCVの
cv.findChessboardCorners()を使い、チェスボードの交点を検出します。 -
コーナーの微調整: 検出されたコーナーの位置をサブピクセル精度で微調整します(
cv.cornerSubPix())。 -
キャリブレーション実行: 物理空間のコーナー位置と画像座標系のコーナー位置を使い、
cv.calibrateCamera()でカメラ行列と歪み係数を推定します。 -
歪み補正の適用: キャリブレーション結果を使い、画像に対して歪み補正を適用します(
cv.undistort())。
カメラキャリブレーションコードの説明
以下は、具体的なカメラキャリブレーションのPythonコードです。すべてのステップをOpenCVを利用して実行しています。
1. 画像の取得(00.getimages.py)
import cv2
import pickle

def main():
    cap = cv2.VideoCapture(0)

    # Get frame size (width and height)
    width = int(cap.get(cv2.CAP_PROP_FRAME_WIDTH))
    height = int(cap.get(cv2.CAP_PROP_FRAME_HEIGHT))
    frameSize = (width, height)

    # Save frame size to a file
    with open('./calib_files/frameSize.pkl', 'wb') as f:
        pickle.dump(frameSize, f)

    num = 0
    while cap.isOpened():
        success, img = cap.read()
        k = cv2.waitKey(5)
        if k == 27 or  k == ord('q'):
            break
        elif k == ord('s'):
            cv2.imwrite('./images/img' + str(num) + '.png', img)
            num += 1
        cv2.imshow("Press S to Capture images", img)

    cap.release()
    cv2.destroyAllWindows()

if __name__ == "__main__":
    main()
2. カメラキャリブレーション(01.calibration.py)
import numpy as np
import cv2 as cv
import glob
import pickle

# Chessboard settings
chessboardSize = (9, 6)

# Load frame size from file
with open('./calib_files/frameSize.pkl', 'rb') as f:
    frameSize = pickle.load(f)
    print(f"Loaded frame size: {frameSize}")

# Termination criteria for corner refinement
criteria = (cv.TERM_CRITERIA_EPS + cv.TERM_CRITERIA_MAX_ITER, 30, 0.001)

# Prepare object points (3D points in real world space)
objp = np.zeros((chessboardSize[0] * chessboardSize[1], 3), np.float32)
objp[:, :2] = np.mgrid[0:chessboardSize[0], 0:chessboardSize[1]].T.reshape(-1, 2)

# Size of chessboard squares in mm
size_of_chessboard_squares_mm = 23
objp = objp * size_of_chessboard_squares_mm

# Arrays to store object points and image points
objpoints = []  # 3D points in real world space
imgpoints = []  # 2D points in image plane

# Load chessboard images
images = glob.glob('./images/*.png')

for image in images:
    img = cv.imread(image)
    gray = cv.cvtColor(img, cv.COLOR_BGR2GRAY)

    # Find the chessboard corners
    ret, corners = cv.findChessboardCorners(gray, chessboardSize, None)

    # If corners are found, refine them and store the points
    if ret:
        objpoints.append(objp)
        corners2 = cv.cornerSubPix(gray, corners, (11, 11), (-1, -1), criteria)
        imgpoints.append(corners)

        # Draw and display the corners
        cv.drawChessboardCorners(img, chessboardSize, corners2, ret)
        cv.imshow('img', img)
        cv.waitKey(1000)

cv.destroyAllWindows()

# Camera calibration
ret, cameraMatrix, dist, rvecs, tvecs = cv.calibrateCamera(objpoints, imgpoints, frameSize, None, None)

# Save the calibration results for later use
pickle.dump((cameraMatrix, dist), open("./calib_files/calibration.pkl", "wb"))
pickle.dump(cameraMatrix, open("./calib_files/cameraMatrix.pkl", "wb"))
pickle.dump(dist, open("./calib_files/dist.pkl", "wb"))

# Save object points and image points
pickle.dump(objpoints, open("./calib_files/objpoints.pkl", "wb"))
pickle.dump(imgpoints, open("./calib_files/imgpoints.pkl", "wb"))

# Save rvecs and tvecs for reprojection error calculation
pickle.dump(rvecs, open("./calib_files/rvecs.pkl", "wb"))
pickle.dump(tvecs, open("./calib_files/tvecs.pkl", "wb"))

print("Camera calibration completed and saved.")

3. 歪み補正の適用(02.undistort_image.py)
import numpy as np
import cv2 as cv
import pickle

# Load the saved calibration data
with open('./calib_files/calibration.pkl', 'rb') as f:
    cameraMatrix, dist = pickle.load(f)

# Load frame size from file
with open('./calib_files/frameSize.pkl', 'rb') as f:
    frameSize = pickle.load(f)
    print(f"Loaded frame size: {frameSize}")

# Load object points and image points for reprojection error calculation
with open('./calib_files/objpoints.pkl', 'rb') as f:
    objpoints = pickle.load(f)
with open('./calib_files/imgpoints.pkl', 'rb') as f:
    imgpoints = pickle.load(f)

# Load rvecs and tvecs for reprojection error calculation
with open('./calib_files/rvecs.pkl', 'rb') as f:
    rvecs = pickle.load(f)
with open('./calib_files/tvecs.pkl', 'rb') as f:
    tvecs = pickle.load(f)

# Load test image for undistortion
img = cv.imread('./test_images/test-image.png')
h, w = img.shape[:2]

# Get new optimal camera matrix
newCameraMatrix, roi = cv.getOptimalNewCameraMatrix(cameraMatrix, dist, (w, h), 1, (w, h))

# Undistort the image
dst = cv.undistort(img, cameraMatrix, dist, None, newCameraMatrix)

# Crop the image based on the region of interest (roi)
x, y, w, h = roi
dst = dst[y:y+h, x:x+w]

# Alternative method using remapping
mapx, mapy = cv.initUndistortRectifyMap(cameraMatrix, dist, None, newCameraMatrix, (w, h), 5)
dst_remap = cv.remap(img, mapx, mapy, cv.INTER_LINEAR)

# Crop the remapped image
dst_remap = dst_remap[y:y+h, x:x+w]

# Show the original image
cv.imshow('Original Image', img)

# Show the undistorted image
cv.imshow('Undistorted Image', dst)

# Show the remapped image
cv.imshow('Remapped Image', dst_remap)

# Wait indefinitely until a key is pressed
cv.waitKey(0)

# Close all the windows
cv.destroyAllWindows()

4. Webcamでの応用(03.undistort_webcam.py)
import numpy as np
import cv2 as cv
import pickle

# Load the saved calibration data
with open('./calib_files/calibration.pkl', 'rb') as f:
    cameraMatrix, dist = pickle.load(f)

# Open the webcam
cap = cv.VideoCapture(0)

if not cap.isOpened():
    print("Error: Could not open the webcam.")
    exit()

# Process webcam frames
while True:
    # Capture the frame from the webcam
    ret, frame = cap.read()

    if not ret:
        print("Failed to capture frame. Exiting...")
        break

    # Get the frame size
    h, w = frame.shape[:2]

    # Undistort the image
    undistorted_frame = cv.undistort(frame, cameraMatrix, dist, None)

    # Display the original frame
    cv.imshow('Original Frame', frame)

    # Display the undistorted frame
    cv.imshow('Undistorted Frame', undistorted_frame)

    # Break the loop on 'q' key press
    if cv.waitKey(1) & 0xFF == ord('q'):
        break

# Release the webcam and close all windows
cap.release()
cv.destroyAllWindows()

まとめ
カメラキャリブレーションは、画像の歪みを補正し、正確な3Dデータを取得するために非常に重要なプロセスです。OpenCVを利用すれば、キャリブレーションプロセスを効率的に行うことができます。本記事では、キャリブレーションの数学的背景と、実際のPythonコードを用いたカメラキャリブレーションの実行方法について説明しました。
参考資料