前回の続きです。
次回の記事です。
https://qiita.com/kotai2003/items/8b15a25194a8352ad641
MyCobot 280のPython API完全ガイド
はじめに
MyCobot 280は、コンパクトで多機能な6軸ロボットアームです。このガイドでは、Python APIを使用してMyCobot 280を制御するための全てのメソッドを詳しく説明します。各メソッドの説明とコード例を含め、学習順序を考慮して進めていきます。
基本的な制御メソッド
1. ロボットアームの電源管理
1.1 power_on()
ロボットアームの電源をオンにします。
mc.power_on()
1.2 power_off()
ロボットアームの電源をオフにします。
mc.power_off()
1.3 is_power_on()
ロボットアームが電源オンになっているか確認します。
if mc.is_power_on():
    print("Power is on.")
else:
    print("Power is off.")
2. 角度の取得と設定
2.1 get_angles()
各ジョイントの現在の角度を取得します。
angles = mc.get_angles()
print("Current Angles:", angles)
2.2 send_angle(joint_id, degree, speed)
特定のジョイントを指定した角度に移動させます。
mc.send_angle(1, 90, 50) # ジョイント1を90度に移動
2.3 send_angles(degrees, speed)
全てのジョイントを同時に指定した角度に移動させます。
angles = [0, 45, 90, -45, 0, 0]
mc.send_angles(angles, 50)
3. 座標の取得と設定
MyCobot 280の座標系について
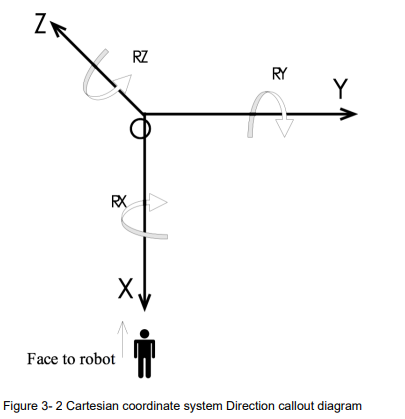

MyCobot 280の座標系は、ロボットアームのベースを基準とした直交座標系(デカルト座標系)です。以下のように定義されています:
- X軸: ロボットアームの前方方向
- Y軸: ロボットアームの右方向
- Z軸: ロボットアームの上方向
座標系の原点は、ロボットアームのベースの中心にあります。これにより、エンドエフェクタ(ロボットアームの先端)の位置と姿勢を3次元空間で表現することができます。
エンドエフェクタの座標系について
エンドエフェクタの座標系は、エンドエフェクタ自体に固定された直交座標系です。これにより、エンドエフェクタの位置だけでなく、姿勢(回転)も指定できます。エンドエフェクタの座標は、次のように表現されます:
- X, Y, Z: エンドエフェクタの位置(ベース座標系に対する相対位置)
-
Rx, Ry, Rz: エンドエフェクタの姿勢(ベース座標系に対する回転角度)
-
3.1 get_coords()
ロボットアームのエンドエフェクタの現在の座標を取得します。
coords = mc.get_coords()
print("Current Coordinates:", coords)
コード例
from pymycobot.mycobot import MyCobot
from pymycobot import PI_PORT, PI_BAUD

# MyCobotオブジェクトの初期化
mc = MyCobot(PI_PORT, PI_BAUD)

# エンドエフェクタの現在の座標を取得
coords = mc.get_coords()
print("Current Coordinates:", coords)
3.2 send_coords(coords, speed, mode)
エンドエフェクタを指定した座標に移動させます。
coords = [100, 100, 100, 0, 0, 0]
mc.send_coords(coords, 50, 1)  # リニアモードで移動
コード例
# 座標を指定してエンドエフェクタを移動
target_coords = [200, 0, 200, 0, 0, 0]  # X=200, Y=0, Z=200の位置
mc.send_coords(target_coords, 70, 1)  # リニアモードで移動
3.3 send_coord(id, coord, speed)
特定の軸の座標を変更します。
mc.send_coord(Coord.X.value, 150, 50) # X軸を150に設定
コード例
# X軸の座標を変更
mc.send_coord(Coord.X.value, 150, 50)  # X軸を150に設定
安全制御メソッド
4. 動作の制御
4.1 pause()
ロボットアームの動作を一時停止します。
mc.pause()
4.2 resume()
一時停止したロボットアームの動作を再開します。
mc.resume()
4.3 stop()
ロボットアームの動作を停止します。
mc.stop()
4.4 is_paused()
ロボットアームが一時停止しているか確認します。
if mc.is_paused():
    print("Paused.")
else:
    print("Running.")
5. サーボの制御

5.1 is_all_servo_enable()
全てのサーボが正常に動作しているか確認します。
if mc.is_all_servo_enable():
    print("All servos are enabled.")
else:
    print("Some servos are disabled or in error.")
5.2 release_servo(servo_id)
特定のサーボを解放します。
mc.release_servo(1) # サーボ1を解放
5.3 focus_servo(servo_id)
特定のサーボを固定します。
mc.focus_servo(1) # サーボ1を固定
応用的な制御メソッド
6. ルート計画
6.1 send_coords([x,y,z,rx,ry,rz], speed, model)
指定した座標へ移動し、エンドエフェクタの姿勢を制御します。
mc.send_coords([200, 0, 200, 0, 0, 0], 70, 1) # リニアモードで移動
7. グリッパーの制御
7.1 is_gripper_moving()
グリッパーが動作中か確認します。
if mc.is_gripper_moving():
    print("Gripper is moving.")
else:
    print("Gripper is not moving.")
7.2 set_gripper_value(value, speed)
グリッパーを指定した位置に移動させます。
mc.set_gripper_value(2048, 50) # グリッパーを位置2048に移動
7.3 set_gripper_state(flag, speed)
グリッパーを開閉します。
mc.set_gripper_state(1, 50) # グリッパーを閉じる
実践的な学習順序
ステップ1: 基本的な制御メソッド
まずは、電源管理と基本的な角度設定、取得メソッドから学びましょう。これにより、ロボットアームを動かすための基礎を習得できます。
ステップ2: 座標制御メソッド
次に、エンドエフェクタの座標制御を学びます。これにより、ロボットアームの位置を正確に制御する方法を理解します。
ステップ3: 安全制御メソッド
ロボットアームの動作を安全に管理するためのメソッドを学びます。一時停止や停止、サーボの制御などです。
ステップ4: 応用的な制御メソッド
最後に、ルート計画やグリッパー制御などの応用的なメソッドを学び
ます。これにより、より複雑な動作やタスクを実行できるようになります。
各メソッドの一覧表
| メソッド名 | 説明 | 使用例 |
|---|---|---|
power_on() |
ロボットアームの電源をオンにします。 | mc.power_on() |
power_off() |
ロボットアームの電源をオフにします。 | mc.power_off() |
is_power_on() |
電源オンかどうかを確認します。 | if mc.is_power_on(): print("Power is on.") |
get_angles() |
各ジョイントの現在の角度を取得します。 | angles = mc.get_angles() |
send_angle(joint_id, degree, speed) |
特定のジョイントを指定角度に移動させます。 | mc.send_angle(1, 90, 50) |
send_angles(degrees, speed) |
全てのジョイントを同時に指定角度に移動させます。 | mc.send_angles([0, 45, 90, -45, 0, 0], 50) |
get_coords() |
エンドエフェクタの現在の座標を取得します。 | coords = mc.get_coords() |
send_coords(coords, speed, mode) |
エンドエフェクタを指定座標に移動させます。 | mc.send_coords([200, 0, 200, 0, 0, 0], 70, 1) |
send_coord(id, coord, speed) |
特定の軸の座標を変更します。 | mc.send_coord(Coord.X.value, 150, 50) |
pause() |
ロボットアームの動作を一時停止します。 | mc.pause() |
resume() |
一時停止したロボットアームの動作を再開します。 | mc.resume() |
stop() |
ロボットアームの動作を停止します。 | mc.stop() |
is_paused() |
ロボットアームが一時停止しているか確認します。 | if mc.is_paused(): print("Paused.") |
is_all_servo_enable() |
全てのサーボが正常に動作しているか確認します。 | if mc.is_all_servo_enable(): print("All servos are enabled.") |
release_servo(servo_id) |
特定のサーボを解放します。 | mc.release_servo(1) |
focus_servo(servo_id) |
特定のサーボを固定します。 | mc.focus_servo(1) |
is_gripper_moving() |
グリッパーが動作中か確認します。 | if mc.is_gripper_moving(): print("Gripper is moving.") |
set_gripper_value(value, speed) |
グリッパーを指定位置に移動させます。 | mc.set_gripper_value(2048, 50) |
set_gripper_state(flag, speed) |
グリッパーを開閉します。 | mc.set_gripper_state(1, 50) |
このガイドを参考にして、MyCobot 280の全てのPython APIメソッドをマスターし、様々なタスクを実行できるようになりましょう。