はじめに
OpenCVを利用して、マウスクリックイベントを練習してみました。
やりたいこと
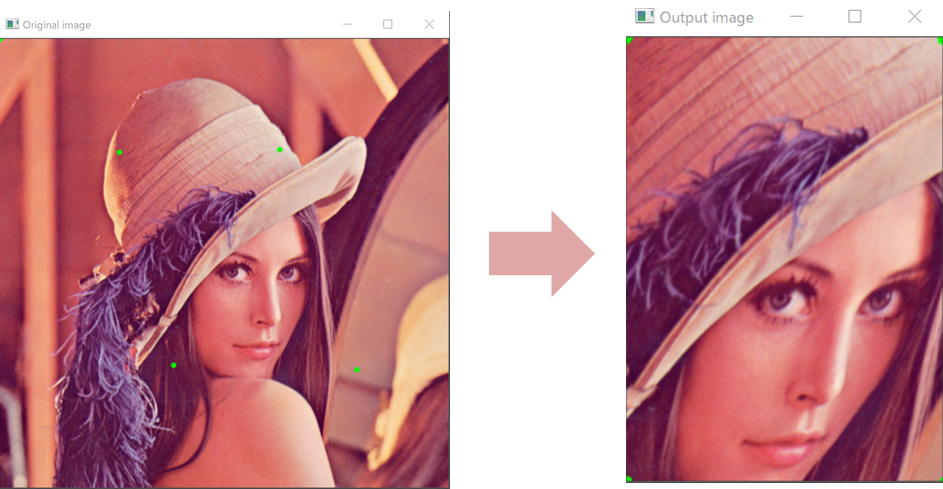
1.画像の上にマウスで4か所をクリックする。(左側の緑ポイント)
2.その4か所の内側の部分を切り取り、別の画像として表示する。(右側)
やり方の説明
OpenCVのマウスクリックイベントを利用します。
マウスカーソルが選択する座標を格納するcircles配列を宣言
マウスクリックを数えるcounter変数を宣言
マウスの左クリックを検知すると、画像の座標をcircles[]に格納する関数を定義
import cv2
import numpy as np

circles = np.zeros((4,2), np.int)
print(circles)
counter = 0

def mousePoints(event, x, y, flags, params):
    global counter
    if event == cv2.EVENT_LBUTTONDOWN:
        print(x,y)
        circles[counter] = x,y
        counter = counter + 1
        print(circles)
画像処理部分。
OpenCVのPerspectivTransformを利用し、マウスで選択された部分をwarp処理する。
マウスが4回クリックされた時のみに、処理を行う。
while True:

    if counter ==4 :
        width , height = 250, 350
        pts1 = np.float32([circles[0],circles[1],circles[2],circles[3]])
        pts2 = np.float32([[0,0],[width,0],[0,height],[width,height]])
        matrix = cv2.getPerspectiveTransform(pts1,pts2)
        imgoutput = cv2.warpPerspective(img, matrix,(width, height))
        cv2.imshow('Output image', imgoutput)

    for x in range(0, 4):
        cv2.circle(img, (circles[x][0], circles[x][1]), 3, (0, 255, 0), cv2.FILLED)
全体コード
import cv2
import numpy as np

circles = np.zeros((4,2), np.int)
print(circles)
counter = 0

def mousePoints(event, x, y, flags, params):
    global counter
    if event == cv2.EVENT_LBUTTONDOWN:
        print(x,y)
        circles[counter] = x,y
        counter = counter + 1
        print(circles)


img = cv2.imread('lena.png')

while True:

    if counter ==4 :
        width , height = 250, 350
        pts1 = np.float32([circles[0],circles[1],circles[2],circles[3]])
        pts2 = np.float32([[0,0],[width,0],[0,height],[width,height]])
        matrix = cv2.getPerspectiveTransform(pts1,pts2)
        imgoutput = cv2.warpPerspective(img, matrix,(width, height))
        cv2.imshow('Output image', imgoutput)

    for x in range(0, 4):
        cv2.circle(img, (circles[x][0], circles[x][1]), 3, (0, 255, 0), cv2.FILLED)

    cv2.imshow('Original image', img)
    cv2.setMouseCallback('Original image', mousePoints)

    cv2.waitKey(1)
参考資料
Bounding Boxを利用する方法の内容も掲載しました。
[OpenCV] マウスクリックで画像からROIを切り取る [2]
