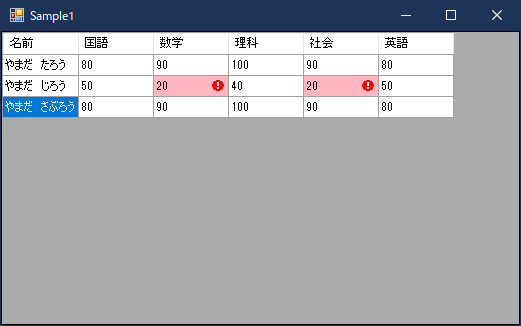
C#のWindows フォーム アプリケーションにはDataGridViewという便利なコントロールがあります。
下のように、行と列からなる表を表現するコントロールです。
実行環境
本記事で紹介する実行画面は次の環境のものです。
- OS
- Windows 10 Home バージョン 20H2
- Visual Studio バージョン
- Visual Studio 2017
- .NET Framework バージョン
- .NET Framework 2.0
基本
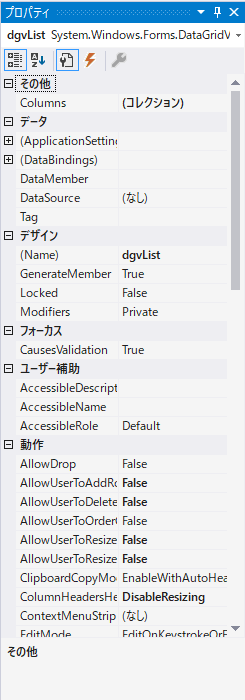
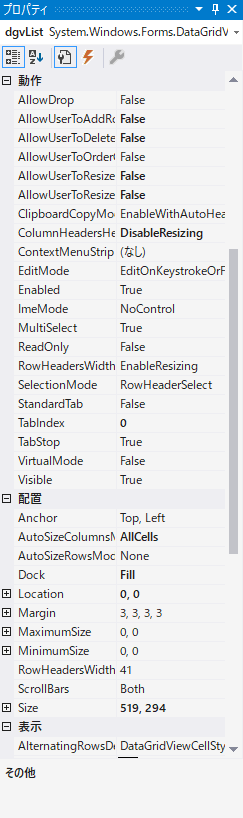
プロパティのおすすめ設定
DataGridViewのプロパティのおすすめ設定は次のとおりです。

セルの指定方法
DataGridViewのセルの指定方法はいくつかあります。
-
RowsプロパティとそのCellsプロパティを使用する方法
//dgvListはDataGridViewコントロール
this.dgvList.Rows[0].Cells[0].Value
- DataGridViewのインデクサを使用する方法
//dgvListはDataGridViewコントロール
this.dgvList[0, 0].Value
よく使うプロパティ
DataGridView関連でよく使用するプロパティの例を挙げます。
//dgvListはDataGridViewコントロール

//セルの値を取得したり変更したりする
this.dgvList[0, 0].Value
//セルの文字色を取得したり変更したりする
this.dgvList[0, 0].Style.ForeColor
//セルの背景色を取得したり変更したりする
this.dgvList[0, 0].Style.BackColor
//セルのエラーアイコンとメッセージを取得したり変更したりする
this.dgvList[0, 0].ErrorText
//セルのフォントを取得したり変更したりする
this.dgvList[0, 0].Style.Font
//行と紐付いているバインドオブジェクトを取得します。
this.dgvList.Rows[0].DataBoundItem
DataGridViewのバインド
DataGridViewには、「バインド」という機能があります。
この機能は、オブジェクトのデータを簡単にコントロールに反映する便利な機能です。
バインドを行うには、DataGridViewに次のように指定します。
//dgvListはDataGridViewコントロール

//カスタムクラスのバインドリストををバインドする場合、AutoGenerateColumnsプロパティをfalseにしないと勝手に列が追加されてしまう
this.dgvList.AutoGenerateColumns = false;
this.dgvList.DataSource = [バインドするオブジェクト];
バインドの準備
DataGridViewにオブジェクトをバインドするにはDataTableなどいくつか方法がありますが、今回はカスタムクラスを使用した方法をご紹介します。
SortableBindingListクラスを用意する
System.Windows.Forms名前空間にはBindingSourceというクラスがありますが、そのままだとソートを行うことができません。そのため、次のリンクにあるSortableBindingListクラスを作成してください。
https://garafu.blogspot.com/2016/09/cs-sorablebindinglist.html
- カスタムクラスの基底クラスを用意する
カスタムクラスを使用するには、共通で使用できる基底クラスがあると便利です。
コードの例を次に挙げます。
using System;
using System.Collections.Generic;
using System.Text;
using System.ComponentModel;

namespace DataGridViewBindingSample.Datas.DataGridView.Rows
{
    /// <summary>
    ///     DataGridViewのカスタムクラスの基底クラスです。
    /// </summary>
    public class DataGridViewDataClassBase : INotifyPropertyChanged
    {
        /// <summary>
        ///     プロパティ変更イベント
        /// </summary>
        public event PropertyChangedEventHandler PropertyChanged;

        /// <summary>
        ///     プロパティ変更イベントを発生させます。
        /// </summary>
        /// <param name="name"></param>
        public void OnPropertyChanged(string name)
        {
            if (this.PropertyChanged != null)
            {
                this.PropertyChanged(this, new PropertyChangedEventArgs(name));
            }
        }

        /// <summary>
        ///     プロパティ変更イベントを発生させながらプロパティに関連するフィールドに値をセットします。
        /// </summary>
        /// <typeparam name="T">データ型</typeparam>
        /// <param name="field">フィールド変数</param>
        /// <param name="value">セットする値</param>
        /// <param name="propName">プロパティ名(イベントの発生に必要)</param>
        public void SetValue<T>(out T field, T value, string propName)
        {
            field = value;
            this.OnPropertyChanged(propName);
        }

        /// <summary>
        ///     入力操作をした場合プロパティ変更イベントを発生させながらプロパティに関連するフィールドを整数に変換して値をセットします。
        /// </summary>
        /// <typeparam name="T">データ型</typeparam>
        /// <param name="field">フィールド変数</param>
        /// <param name="value">セットする値</param>
        /// <param name="propName">プロパティ名(イベントの発生に必要)</param>
        public void SetValueInputInt(ref int? field, string value, string propName)
        {
            int intValue;

            if (int.TryParse(value, out intValue))
            {
                //整数を入力した場合
                field = intValue;
            }
            else if (value == null || value.Trim().Length == 0)
            {
                //何も入力しない場合
                field = null;
            }
            else
            {
                //文字や記号を含めて入力した場合
                //何もしない
            }

            this.OnPropertyChanged(propName);
        }
    }
}
実は、カスタムクラスといっても、プロパティに値をセットしてもすぐにはDataGridViewに反映されません。
そのため、DataGridViewに通知をする仕組みが必要です。
その仕組みが、INotifyPropertyChangedインターフェイス・PropertyChangedイベント・OnPropertyChangedメソッドです。
PropertyChangedイベントをプロパティ名を指定して実行すれば、DataGridViewに通知され、表示が反映されるという仕組みになっています。
カスタムクラスの実装
先述で紹介したカスタムクラスの基底クラスを継承して実装します。
各プロパティがDataGridViewの列の1つに紐付けされます。
using System;
using System.Collections.Generic;
using System.Text;

namespace DataGridViewBindingSample.Datas.DataGridView.Rows.Sample
{
    /// <summary>
    ///     カスタムクラスサンプル1
    /// </summary>
    public class DgvRowSample1 : DataGridViewDataClassBase
    {
        private string strName;
        private int? intKyoka1Point;
        private int? intKyoka2Point;
        private int? intKyoka3Point;
        private int? intKyoka4Point;
        private int? intKyoka5Point;

        /// <summary>
        ///     名前
        /// </summary>
        public string Name
        {
            get { return this.strName; }
            set { this.SetValue(out this.strName, value, "Name"); }
        }

        /// <summary>
        ///     国語の点数
        /// </summary>
        public int? Kyoka1Point
        {
            get { return this.intKyoka1Point; }
            set { this.SetValue(out this.intKyoka1Point, value, "Kyoka1Point"); }
        }

        /// <summary>
        ///     数学の点数
        /// </summary>
        public int? Kyoka2Point
        {
            get { return this.intKyoka2Point; }
            set { this.SetValue(out this.intKyoka2Point, value, "Kyoka2Point"); }
        }

        /// <summary>
        ///     理科の点数
        /// </summary>
        public int? Kyoka3Point
        {
            get { return this.intKyoka3Point; }
            set { this.SetValue(out this.intKyoka3Point, value, "Kyoka3Point"); }
        }

        /// <summary>
        ///     社会の点数
        /// </summary>
        public int? Kyoka4Point
        {
            get { return this.intKyoka4Point; }
            set { this.SetValue(out this.intKyoka4Point, value, "Kyoka4Point"); }
        }

        /// <summary>
        ///     英語の点数
        /// </summary>
        public int? Kyoka5Point
        {
            get { return this.intKyoka5Point; }
            set { this.SetValue(out this.intKyoka5Point, value, "Kyoka5Point"); }
        }

        /// <summary>
        ///     国語の点数(表示・入力用)
        /// </summary>
        public string Kyoka1PointDisplay
        {
            get { return this.intKyoka1Point.ToString(); }
            set { this.SetValueInputInt(ref this.intKyoka1Point, value, "Kyoka1PointDisplay"); }
        }

        /// <summary>
        ///     数学の点数(表示・入力用)
        /// </summary>
        public string Kyoka2PointDisplay
        {
            get { return this.intKyoka2Point.ToString(); }
            set { this.SetValueInputInt(ref this.intKyoka2Point, value, "Kyoka2PointDisplay"); }
        }

        /// <summary>
        ///     理科の点数(表示・入力用)
        /// </summary>
        public string Kyoka3PointDisplay
        {
            get { return this.intKyoka3Point.ToString(); }
            set { this.SetValueInputInt(ref this.intKyoka3Point, value, "Kyoka3PointDisplay"); }
        }

        /// <summary>
        ///     社会の点数(表示・入力用)
        /// </summary>
        public string Kyoka4PointDisplay
        {
            get { return this.intKyoka4Point.ToString(); }
            set { this.SetValueInputInt(ref this.intKyoka4Point, value, "Kyoka4PointDisplay"); }
        }

        /// <summary>
        ///     英語の点数(表示・入力用)
        /// </summary>
        public string Kyoka5PointDisplay
        {
            get { return this.intKyoka5Point.ToString(); }
            set { this.SetValueInputInt(ref this.intKyoka5Point, value, "Kyoka5PointDisplay"); }
        }
    }
}
列とカスタムクラスのプロパティの紐付け
カスタムクラスをバインドしても、列にどのプロパティを適用するかわからないため、そのままでは表示することができません。
そのため、バインドするプロパティを設定する必要があります。
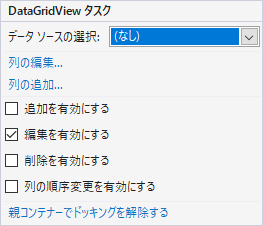
デザイナ画面のDataGridViewの右上の三角をクリックして、「DataGridView タスク」を開き、「列の編集…」を開きます。
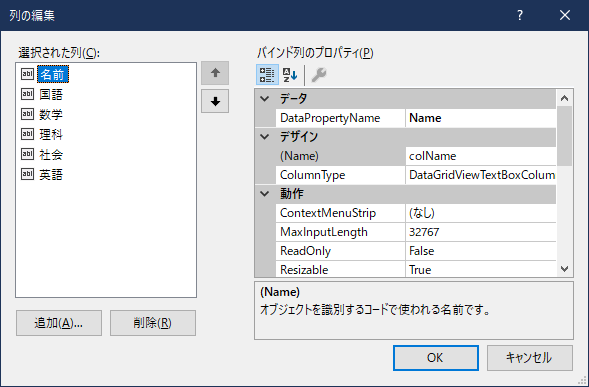
DataPropertyNameプロパティに表示対象のプロパティ名を設定し、OKを押します。
バインドリスト・カスタムクラスの基本操作
先ほど紹介したSortableBindingListはListクラスとほぼ同じように(一部使えないメソッドもありますが)追加・挿入・削除・クリア操作ができます。
コードの例を次に挙げます。
//※sbListはSortableBindingList

//DataGridViewの行を追加する
this.sbList.Add(【カスタムクラス】);
//DataGridViewの1行目に行を挿入する
this.sbList.Insert(1, 【カスタムクラス】);
//DataGridViewの1行目を削除する
this.sbList.RemoveAt(1);
//DataGridViewの行をすべてクリアする
this.sbList.Clear();

//DataGridViewのセルの値は基本的に次のように参照することができます。
this.dgvList[0, 0].Value
//ですが、カスタムクラスを使用すると、次のようにも参照することができます。
//※rowBoundはカスタムクラス
rowBound.Name
応用
入力可能列の制御
整数を入力する場合、単純にカスタムクラスのプロパティの型を整数にしてしまうと、文字列にしたときにエラーが発生してしまいます。
それを防ぐためのコードの例を挙げます。
        /// <summary>
        ///     入力操作をした場合プロパティ変更イベントを発生させながらプロパティに関連するフィールドを整数に変換して値をセットします。
        /// </summary>
        /// <typeparam name="T">データ型</typeparam>
        /// <param name="field">フィールド変数</param>
        /// <param name="value">セットする値</param>
        /// <param name="propName">プロパティ名(イベントの発生に必要)</param>
        public void SetValueInputInt(ref int? field, string value, string propName)
        {
            int intValue;

            if (int.TryParse(value, out intValue))
            {
                //整数を入力した場合
                field = intValue;
            }
            else if (value == null || value.Trim().Length == 0)
            {
                //何も入力しない場合
                field = null;
            }
            else
            {
                //文字や記号を含めて入力した場合
                //何もしない
            }

            this.OnPropertyChanged(propName);
        }
カスタムクラスの基底クラスの例にある上のコードは派生クラスのプロパティのsetで呼び出します。
        /// <summary>
        ///     国語の点数(表示・入力用)
        /// </summary>
        public string Kyoka1PointDisplay
        {
            get { return this.intKyoka1Point.ToString(); }
            set { this.SetValueInputInt(ref this.intKyoka1Point, value, "Kyoka1PointDisplay"); }
        }
実はDataGridViewでデータを入力すると、プロパティのsetが呼び出されます。
その性質を利用して、文字列で入力したものを整数に変換できるか確かめて、変換出来たら整数として格納し、空文字列の場合はnullを格納し(null許容型でフィールド変数を作成)、文字が入力されていたら格納しないようにします。
また、そのままではデータの表示が反映されないため、OnPropertyChangedメソッドを呼び出してPropertyChangedイベントを発生させます。
文字色・背景色の制御
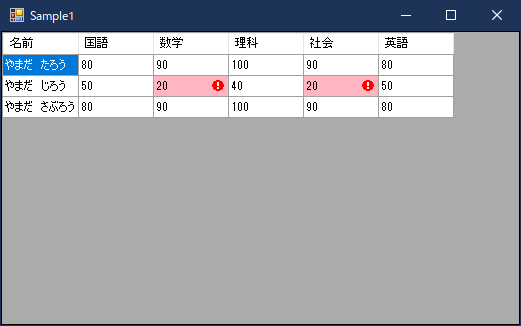
DataGridViewのカスタムクラスでは直接色を紐付けすることはできません。
ただし、工夫次第でカスタムクラスで色をコントロールすることができます。
背景色を変更するコードの例を挙げます。
        /// <summary>
        ///     DataGridViewセルフォーマット時
        /// </summary>
        /// <param name="sender"></param>
        /// <param name="e"></param>
        private void dgvList_CellFormatting(object sender, DataGridViewCellFormattingEventArgs e)
        {
            DataGridView dgv = sender as DataGridView;
            if (dgv == null) return;

            if (e.RowIndex < 0 || e.ColumnIndex < 0 || e.RowIndex >= dgv.Rows.Count || e.ColumnIndex >= dgv.Columns.Count) return;

            DataGridViewCell cell = dgv[e.ColumnIndex, e.RowIndex];
            if (cell == null) return;

            DataGridViewRow row = cell.OwningRow;
            if (row == null) return;

            DataGridViewColumn col = cell.OwningColumn;
            if (col == null) return;

            DgvRowSample1 rowBound = row.DataBoundItem as DgvRowSample1;
            if (rowBound == null) return;

            if (e.ColumnIndex == this.colName.Index)
            {
                //名前
                if (rowBound.Name == null || rowBound.Name.Trim().Length == 0)
                {
                    //未入力
                    cell.Style.BackColor = Color.LightPink;
                }
                else
                {
                    //入力有
                    cell.Style.BackColor = Color.White;
                }
            }
            else if (e.ColumnIndex == this.colKyoka1.Index)
            {
                //国語の点数
                if (rowBound.Kyoka1Point != null && rowBound.Kyoka1Point.Value < 30)
                {
                    //赤点
                    cell.Style.BackColor = Color.LightPink;
                }
                else
                {
                    //合格点
                    cell.Style.BackColor = Color.White;
                }
            }
            else if (e.ColumnIndex == this.colKyoka2.Index)
            {
                //数学の点数
                if (rowBound.Kyoka2Point != null && rowBound.Kyoka2Point.Value < 30)
                {
                    //赤点
                    cell.Style.BackColor = Color.LightPink;
                }
                else
                {
                    //合格点
                    cell.Style.BackColor = Color.White;
                }
            }
            else if (e.ColumnIndex == this.colKyoka3.Index)
            {
                //理科の点数
                if (rowBound.Kyoka3Point != null && rowBound.Kyoka3Point.Value < 30)
                {
                    //赤点
                    cell.Style.BackColor = Color.LightPink;
                }
                else
                {
                    //合格点
                    cell.Style.BackColor = Color.White;
                }
            }
            else if (e.ColumnIndex == this.colKyoka4.Index)
            {
                //社会の点数
                if (rowBound.Kyoka4Point != null && rowBound.Kyoka4Point.Value < 30)
                {
                    //赤点
                    cell.Style.BackColor = Color.LightPink;
                }
                else
                {
                    //合格点
                    cell.Style.BackColor = Color.White;
                }
            }
            else if (e.ColumnIndex == this.colKyoka5.Index)
            {
                //英語の点数
                if (rowBound.Kyoka5Point != null && rowBound.Kyoka5Point.Value < 30)
                {
                    //赤点
                    cell.Style.BackColor = Color.LightPink;
                }
                else
                {
                    //合格点
                    cell.Style.BackColor = Color.White;
                }
            }
        }
DataGridViewにはCellFormattingというイベントがあります。
そのイベントを使用して、上のようにプロパティを設定すると背景色を変更できます。
文字色を変更する場合は、ForeColorプロパティを使用します。
エラーアイコン・メッセージの制御
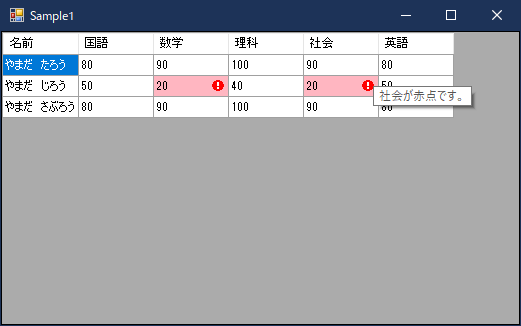
少しトリッキーな方法ですが、Timerクラスを利用する方法があります。
一定間隔でTickイベントを発生させて、エラーチェックをし、エラーの場合はエラーアイコンとメッセージを表示させます。
コードの例を次に挙げます。
        /// <summary>
        ///     表示更新用タイマー
        /// </summary>
        /// <param name="sender"></param>
        /// <param name="e"></param>
        private void tmUpdateDisplay_Tick(object sender, EventArgs e)
        {
            foreach (DataGridViewRow row in this.dgvList.Rows)
            {
                DgvRowSample1 rowBound = row.DataBoundItem as DgvRowSample1;
                if (rowBound == null) continue;

                foreach (DataGridViewColumn col in this.dgvList.Columns)
                {
                    DataGridViewCell cell = this.dgvList[col.Index, row.Index];
                    if (col.Index == this.colName.Index)
                    {
                        //名前
                        if (rowBound.Name == null || rowBound.Name.Trim().Length == 0)
                        {
                            //未入力
                            cell.ErrorText = "名前が未入力です。";
                        }
                        else
                        {
                            //入力有
                            cell.ErrorText = "";
                        }
                    }
                    else if (col.Index == this.colKyoka1.Index)
                    {
                        //国語の点数
                        if (rowBound.Kyoka1Point != null && rowBound.Kyoka1Point.Value < 30)
                        {
                            //赤点
                            cell.ErrorText = "国語が赤点です。";
                        }
                        else
                        {
                            //合格点
                            cell.ErrorText = "";
                        }
                    }
                    else if (col.Index == this.colKyoka2.Index)
                    {
                        if (rowBound.Kyoka2Point != null && rowBound.Kyoka2Point.Value < 30)
                        {
                            //赤点
                            cell.ErrorText = "数学が赤点です。";
                        }
                        else
                        {
                            //合格点
                            cell.ErrorText = "";
                        }
                    }
                    else if (col.Index == this.colKyoka3.Index)
                    {
                        //理科の点数
                        if (rowBound.Kyoka3Point != null && rowBound.Kyoka3Point.Value < 30)
                        {
                            //赤点
                            cell.ErrorText = "理科が赤点です。";
                        }
                        else
                        {
                            //合格点
                            cell.ErrorText = "";
                        }
                    }
                    else if (col.Index == this.colKyoka4.Index)
                    {
                        //社会の点数
                        if (rowBound.Kyoka4Point != null && rowBound.Kyoka4Point.Value < 30)
                        {
                            //赤点
                            cell.ErrorText = "社会が赤点です。";
                        }
                        else
                        {
                            //合格点
                            cell.ErrorText = "";
                        }
                    }
                    else if (col.Index == this.colKyoka5.Index)
                    {
                        //英語の点数
                        if (rowBound.Kyoka5Point != null && rowBound.Kyoka5Point.Value < 30)
                        {
                            //赤点
                            cell.ErrorText = "英語が赤点です。";
                        }
                        else
                        {
                            //合格点
                            cell.ErrorText = "";
                        }
                    }
                }
            }
        }
ただし、重い処理やデータベースにアクセスするような処理はTimerイベントに記述することは望ましくないでしょう。
カスタムクラスの階層化
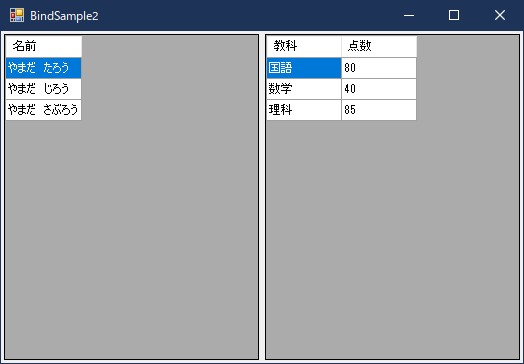
カスタムクラスを使用すればリストを選択すると子リストも変わる処理を簡単に実装することができます。
まず最初に親リストのカスタムクラスを作成します。
using System;
using System.Collections.Generic;
using System.Text;

namespace DataGridViewBindingSample.Datas.DataGridView.Rows.Sample
{
    /// <summary>
    ///     カスタムクラスサンプル2-1
    /// </summary>
    public class DgvRowSample21 : DataGridViewDataClassBase
    {
        private string strName;
        private SortableBindingList<DgvRowSample22> sbChild = new SortableBindingList<DgvRowSample22>();

        /// <summary>
        ///     名前
        /// </summary>
        public string Name
        {
            get { return this.strName; }
            set { this.SetValue(out this.strName, value, "Name"); }
        }

        /// <summary>
        ///     教科の点数リスト(子バインドリスト)
        /// </summary>
        public SortableBindingList<DgvRowSample22> ChildList
        {
            get { return this.sbChild; }
            set { this.sbChild = value; }
        }
    }
}
注目すべき点は、親リストのカスタムクラスにバインドリスト(SortableBindingList)がある点です。
このバインドリストの使い方は後述で述べます。
次に、子リストのカスタムクラスを作成します。
using System;
using System.Collections.Generic;
using System.Text;

namespace DataGridViewBindingSample.Datas.DataGridView.Rows.Sample
{
    /// <summary>
    ///     カスタムクラスサンプル2-2
    /// </summary>
    public class DgvRowSample22 : DataGridViewDataClassBase
    {
        private string strKyoka;
        private int? intPoint;

        /// <summary>
        ///     教科名
        /// </summary>
        public string Kyoka
        {
            get { return this.strKyoka; }
            set { this.SetValue(out this.strKyoka, value, "Kyoka"); }
        }

        /// <summary>
        ///     点数
        /// </summary>
        public int? Point
        {
            get { return this.intPoint; }
            set { this.SetValue(out this.intPoint, value, "Point"); }
        }

        /// <summary>
        ///     点数
        /// </summary>
        public string PointDisplay
        {
            get { return this.intPoint.ToString(); }
            set { this.SetValueInputInt(ref this.intPoint, value, "PointDisplay"); }
        }
    }
}
フォーム上では、最初にDataGridViewに次のようにプロパティに設定します。
            //親リストにデータソースを追加したとき勝手に列が追加されないようにする
            this.dgvList.AutoGenerateColumns = false;
            //子リストにデータソースを追加したとき勝手に列が追加されないようにする
            this.dgvListChild.AutoGenerateColumns = false;
            //親リストのデータソースを設定する
            this.dgvList.DataSource = this.sbList;
DataGridViewにはセルの選択変更時に発生するSelectionChangedというイベントがあります。
親リストのセルを選択変更したときにこのバインドリストを子リストのデータソースに設定します。
        /// <summary>
        ///     DataGridView選択変更時
        /// </summary>
        /// <param name="sender"></param>
        /// <param name="e"></param>
        private void dgvList_SelectionChanged(object sender, EventArgs e)
        {
            this.dgvListChild.DataSource = null;

            DataGridView dgv = sender as DataGridView;
            if (dgv == null) return;

            if (dgv.SelectedCells.Count == 0) return;

            DataGridViewCell cell = dgv.SelectedCells[0];
            if (cell == null) return;

            DataGridViewRow row = cell.OwningRow;
            if (row == null) return;

            DataGridViewColumn col = cell.OwningColumn;
            if (col == null) return;

            DgvRowSample21 rowBound = row.DataBoundItem as DgvRowSample21;
            if (rowBound == null) return;

            //子リストのデータソースをセットする。
            this.dgvListChild.DataSource = rowBound.ChildList;
        }
最後に
DataGridViewのカスタムクラスは「クラス」なので、いろいろな処理を実装することができます。
メソッドを追加して計算処理をしたり、文字列の加工処理をしたり、型の変換処理をすることもできます。
また、入力に不備がないかチェックするメソッドを実装することもできます。
本記事では色を挙げましたが、画像(Imageクラスなど)などいろいろ格納することができます。
バインドにカスタムクラスを使用すれば、実装の可能性が広がります。
いろいろ試行錯誤をして、DataGridViewを使用した実装をしてみてはいかがでしょうか?
最後までお読みいただきありがとうございました。